3
Congratulations on your purchase of the new Bushnell® Image Stabilized Monocular.
This manual will help you optimize your viewing experience by explaining how you can adjust the monocular to your eye,
how to use the image stabilization, and how to care for this instrument. Read the instructions carefully before using your
monocular.
INSTALLING BATTERIES
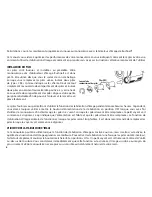
Batteries are provided and pre-installed, so your Bushnell
Image Stabilized Monocular is ready to use right out of the
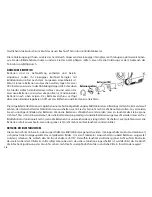
box. When replacing expired batteries, insert two “CR2 type”
batteries as shown in the illustration. Simply unscrew the
battery cover and insert the two batteries with the positive (+)
end of both batteries facing upwards. The battery cover has a
small flip-up handle to make it easy to remove and replace.
The supplied batteries will allow many hours of use of the image stabilization feature. However, you should always remember
to turn the stabilization power switch off when you have finished using the monocular, to prevent unnecessary battery drain.
When the batteries do finally need replacing, the small green light starts to flash, which is the indication that the battery
power is low and the batteries need to be replaced. The image stabilization feature will stop working once there is insufficient
power in the batteries, so it is recommended that the batteries be replaced when the green light no longer remains constant
and starts to flash.
USING THE IMAGE STABILIZATION
This monocular can be used with or without the image stabilization feature switched on, but switching it on will improve
the viewing quality of the magnified image. To switch the stabilization on (once batteries have been inserted), simply slide
the on/off switch to the “on” position. A small green light will illuminate on the rear of the unit above the eyepiece. It should
immediately become obvious that this feature is switched on because the image viewed through the monocular’s 8 power
magnification will no longer be so sensitive to the natural trembling of your hand.


