background image

CONNECTING YOUR 

TV

ANTENNA CONNECTION

Connect your aerial to the back of the TV into the 
ANT  IN socket.

IMPROVE YOUR SIGNAL

To improve picture quality in a poor signal area, use a 
signal amplifier (not supplied).

CONNECT YOUR PC TO THE TV

You can use your TV as a monitor for your personal 
computer by connecting it with a VGA cable (not 
supplied).

Read your computer user guide and check it has a 
VGA connector.

Turn the power off on your TV and PC.

Connect a D type 15-pin VGA interface cable to 
the VGA video interface connector on the PC. 
Connect the other end of the cable to the PC 
interface connector on the TV. Tighten the screws 
on the VGA connectors and connect the audio 
cable (not supplied) to the audio input socket on 
the back of the TV.

Turn on the power of the TV firstly and then the 
PC.

Press the button on the TV or TV remote control to 
set the video input mode to VGA.

Once the image shows, if there is noise present, 
change the VGA mode to another resolution, 
change the refresh rate to another rate or adjust 
the brightness and contrast on the menu until the 
picture is clear.

CONNECT A DVD PLAYER TO YOUR 
TV

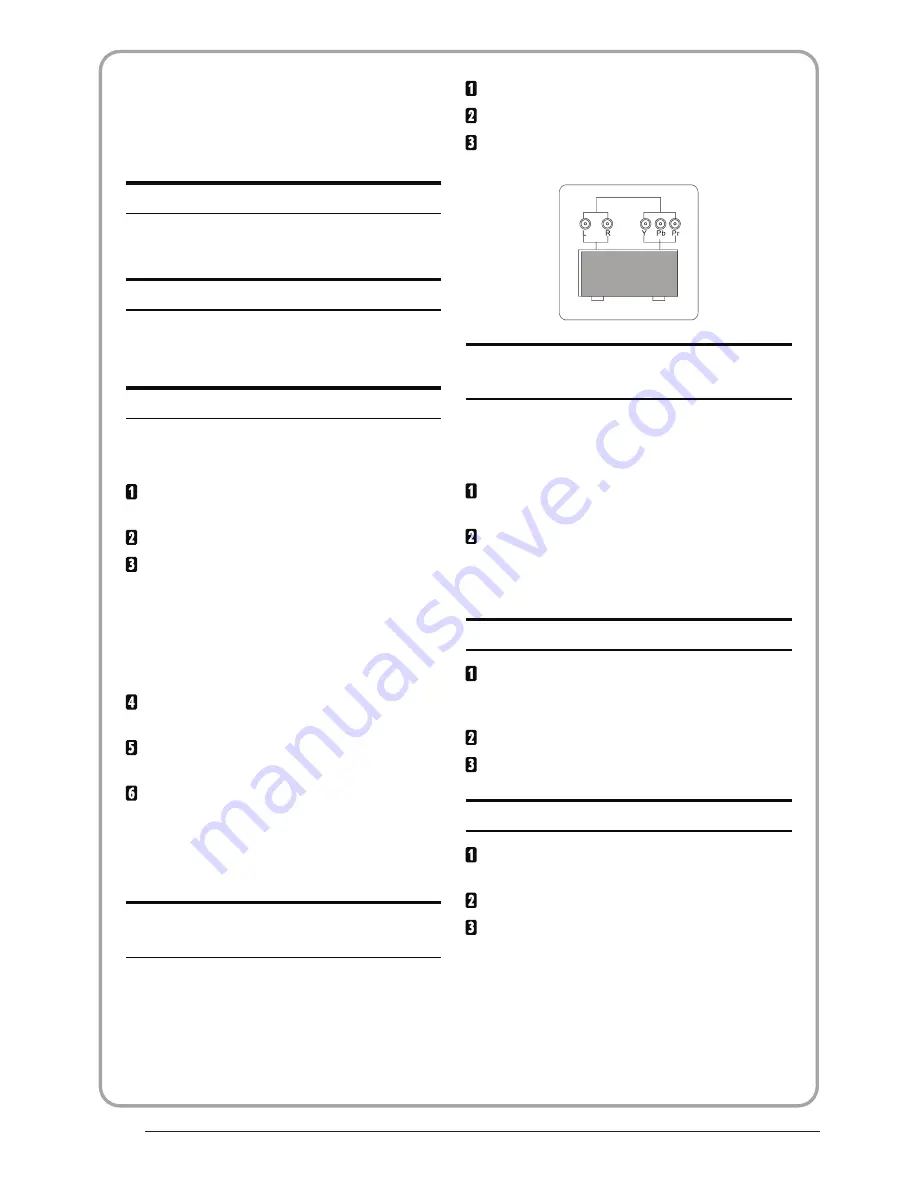
Connect the DVD video outputs (Y, P

b

, P

r

) to the 

COMPONENT (Y, P

b

, P

r

) IN socket on your TV.

Turn on the DVD player and insert a DVD.

Press the button to select .

Refer to the DVD player user guide for operating 

instructions.

DVD

CONNECT A DVD PLAYER OR VCR TO 
YOUR TV

There are two ways in which you can connect a DVD 
player or VCR to your TV. Make sure that both the TV and 
DVD player or VCR are switched off before you connect 
them.

Connect the AV DVD/VCR outputs to the AV IN 
socket on your TV.

Press the

SOURCE

button on the TV to set the video 

input mode to AV.

SCART INPUT

Connect the scart lead from the external device 
(DVD player, Set-top box or games console) to the 
TV scart socket.

Press the

SOURCE

button to select SCART mode.

Press the

 PLAY

 button on the external device.

HDMI  input

Connect the cable from the HDMI device to the TV 
HDMI socket.

Press the

 SOURCE

 button to select HDMI mode.

Refer to the HDMI device user guide for how to 
operate.

Connect the AV audio L & R to the audio input (8)  

P.09

BUSH|Full HD 1080p LCD TV | User Manual | Helpline:0845 604 0105

BUSH|Full HD 1080p LCD TV | User Manual | Helpline:0845 604 0105

Summary of Contents for LT24M3

Page 1: ...Customer helpline 0845 604 0105 24 Full HD 1080p Digital LCD TV INSTRUCTION MANUAL LT24M3 ...

Page 2: ...nnecting your T Remote Control 05 Trouble shooting Trouble shooting 06 Product guarantee Product guarantee 04 Operation Installation Guide 01 Safety and warnings Welcome Important information Safety notice Electrical connections Warnings and cautions Specification V P 06 P 08 P 08 P 09 P 11 P 17 P 19 P 013 P 02 P 02 P 03 P 04 P 05 P 18 Common interface P 10 ...

Page 3: ...L IN THE TRIANGLE THIS SYMBOL INDICATES HIGH VOLTAGE IS PRESENT INSIDE IT IS DANGEROUS TO MAKE ANY KIND OF CONTACT WITH ANYINSIDE PART OF THIS PRODUCT THERE IS A EXCLAMATION MARK IN THE TRIANGLE THIS SYMBOL ALERTS YOU THAT IMPORTANT LITERATURE CONCERNING OPERATION AND MAINTENANCE HAS BEEN INCLUDED WITH THIS PRODUCT CAUTION TO REDUCE THE RISK OF ELECTRIC SHOCK AND FIRE DO NOT PUT THE TV SET NEAR SO...

Page 4: ...nit near a damp wall To prevent electric shock ensure that any external antenna connected to the set is clear of contact with any power lines Do not plug unplug the unit while your hands are wet This may cause an electric shock Please ensure a solid connection with the AC wall socket in order to avoid shock and potential fire To prevent electric shock or fire please prevent rain from entering the ...

Page 5: ...ured markings identifying the terminals in your plug proceed as follows The wire which is coloured blue must be connected to the terminal which is marked with N or coloured blue The wire which is coloured brown must be connected to the terminal which is marked L or coloured brown The green and yellow wire must be connecting to the terminal marked with the letter E or the earth symbol Always ensure...

Page 6: ...eceiver Caution Never stand on lean on or suddenly push the television or its stand You should pay special attention to children Serious injury may result if it should fall Caution Do not place your television on an unstable cart stand shelf or table Serious injury to an individual and damage to the television may result if it should fall Caution When the television receiver is not used for an ext...

Page 7: ... you clean up dust or water drops on the LCD PANEL or CABINET the power cord should be pulled out from the receptacle then wipe the TV with a dry soft cloth During thunder and lighting unplug the power cord and antenna cord to prevent damage to your TV All repairs to this TV should only be performed by qualified TV service personnel Panel TV System PAL B G I D K SECAM B G D K L L Video Signal Syst...

Page 8: ...00 1024 768 1280 1024 1440 900 60 60 60 60 60 31 47 37 88 48 36 63 98 55 93 RESOLUTION V Freq Hz H Freq KHz PC BUSH Full HD 1080p LCD TV User Manual Helpline 0845 604 0105 BUSH Full HD 1080p LCD TV User Manual Helpline 0845 604 0105 P 07 ...

Page 9: ...N INTERFACE CI REAR AV Connections input 6 SCART input 7 CVBS input 8 L R AUDIO Intput 9 SPDIF Output 10 ANT Input 1 SOURCE Displaytheinputsourcemenu MENU Displaymain MENU 3 4 CH CH InTV mode press CH or CH to change the channel up and down In MENU press CH or CH to select items In standby mode it can Turn on theTV STANDBY 2 VOL VOL Adjust sound level In MENU adjust the item that you Selected 5 2 ...

Page 10: ...st the brightness and contrast on the menu until the picture is clear CONNECT A DVD PLAYER TO YOUR TV Connect the DVD video outputs Y Pb Pr to the COMPONENT Y Pb Pr IN socket on your TV Turn on the DVD player and insert a DVD Press the button to select Refer to the DVD player user guide for operating instructions DVD CONNECT A DVD PLAYER OR VCR TO YOUR TV There are two ways in which you can connec...

Page 11: ...the pay TV programmes and additional services Contact your Common Interface service provider to get more information about the modules and subscription Please noted that CA modules and smart cards are neither supplied nor optional accessories from us COMMON INTERFACE BUSH Full HD 1080p LCD TV User Manual Helpline 0845 604 0105 P 10 ...

Page 12: ...d mode 20 CH CH To access the next or previous channels 21 ASPECT To change picture aspect ratio 22 TV RADIO In DVB mode it is u Display remove 23 TEXT To enter or exit TELETEXT 24 INFO T 25 SUBTITLE T For direct access to channels et timer to turn off the TV o display information about the program being viewed and what s on next in DTV mode o access your favourite channels list in TV or DTV mode ...

Page 13: ...he page To display or hide the concealed information games solutions The user can set four favorite pages to be directly linked to the four color keys While list mode is activated it is not possibility to use TOP or FLOF navigation with the colorkeys The favorite page numbers should be stored and restored to from nonvolatile memory for each channel by the system software This is used to call or ex...

Page 14: ...e disappear after auto tuning After auto tuning the channel will skip to the first DTV channel 2 DTV Manual tuning You can select a DTV channel then find the program in this channel Pls press to select the channel then press OK to search the programs 3 ATV Manual tuning You can change the sound system to search the analog TV channels and fine tune the channels then storage the channels you selecte...

Page 15: ...le in NTSC system only 2 There are four colors temperature modes can be selected medium warm cool user 3 Screen is available in PC mode only which can adjust Horizontal position vertical position size and phase 3 SOUND MENU The third item of the MENU is the SOUND MENU You can adjust the sound effect here such as treble bass balance etc Press button to select the item requires adjusting Press to ad...

Page 16: ...owing menu will be displayed 1 Use to choose the programs Press INFO key you can display the highlight program s information INFO 2 Press the teletext green key It can list all the reminder schedule press to choose the list press red key to delete the schedule list Press EPG to return to EPG menu Schedule DELETE The sixth item of the menu is the LOCK MENU You can lock system set password block pro...

Page 17: ...200751 jpg 200752 jpg 200753 jpg SIZE 10956K Bytes PHOTO MUSIC MOVIE TEXT EXIT OK SELECT You can use the USB information like play the Mp3 JPEG Use select PHOTO MUSIC then press ENTER to select Use select the item Press ENTER to add to the play list then press to play or pause Press EXIT to exit the selection Press to skip to the next chapter or track Press to skip to previous chapter or track EXI...

Page 18: ... is not inserted Power switch is not opened Contrast and brightness volume setup Press standby key on the remote control for inspecting No colour Normal audio Colour control Picture breaking up Normal audio or weak retune channel No colour Noise TVsystem Normal audio antenna position direction or connection Trouble shooting Trouble phenomenon Symptom Ghost 05 P 17 BUSH Full HD 1080p LCD TV User Ma...

Page 19: ...essory User manual Remote control Battery x2 The part specifications of this TV set provided here are for reference only Difierences may occur as product technology is updated Design and specifications are subject to change without notice PAL B G I D K SECAM B G D K L L HDMI 480i p 576i p Scart input output description 720p 1080i 1080p Quick start guide 15 C 45 C Storage humidity 5 90 ATV DTV TV S...
Page 20: ...omestic purpose The guarantee will be rendered invalided if the product is re sold or has been damaged by inexpert repair Specifications are subject to change without notice The manufacturer disclaims any liability for the incidental or consequential damages The guarantee is in addition to and does not diminish your statutory or legal rights In the event of a problem with the product within the gu...

Reviews: