background image

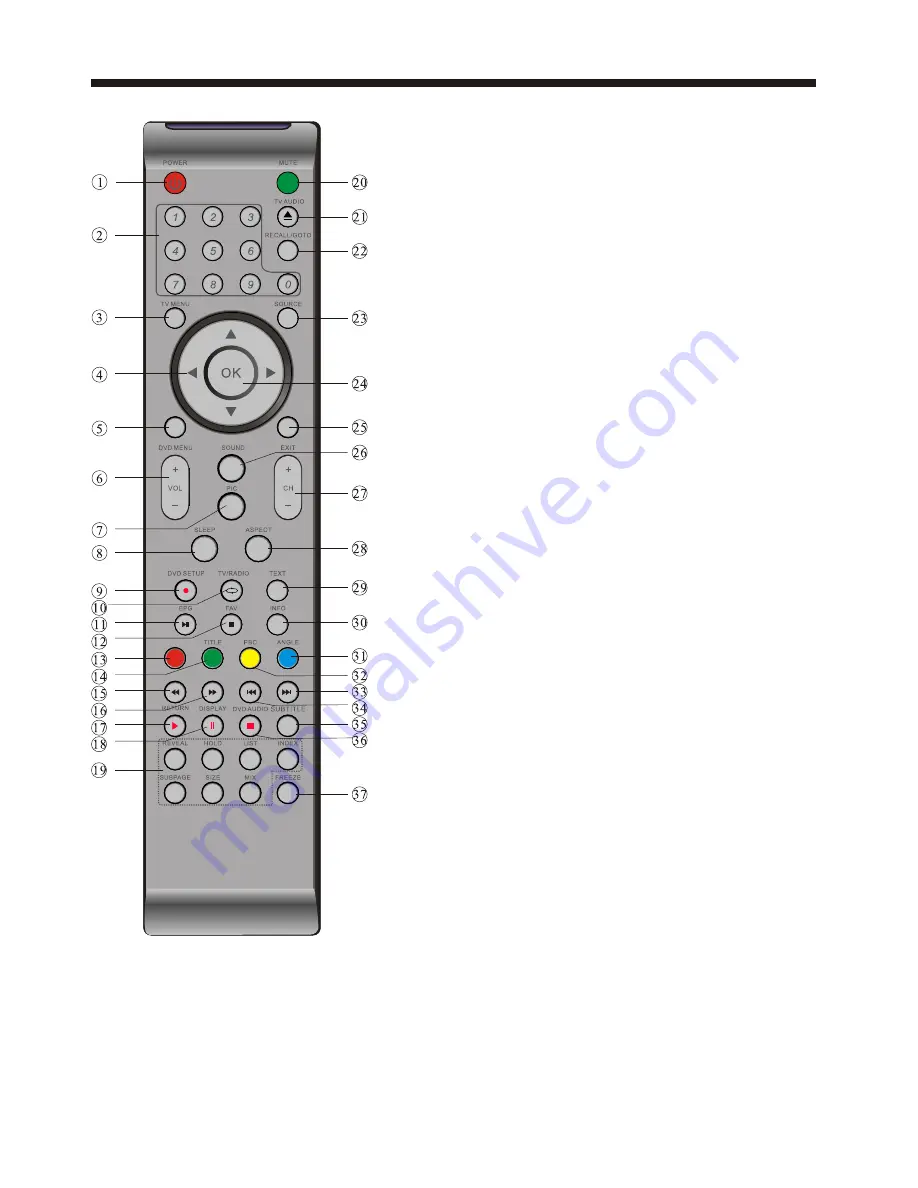
Remote Control - DVD section

-20-

 DVD OPERATION

2:

Numeric keys

:Press to set the time, select title, chapter or track 

you wish to play. Press the ENTER/OK Button to confirm. When a 
VCD is playing (with PBC off), press the Numeric keys to select a 
track directly.
5:

DVD MENU

:During DVD playback, press MENU to display the

disc menu.
9:

DVD SETUP

:Press to enter the system setting menu. Press again 

to exit the menu.
11:

Play/Pause

:Press to begin play of the DVD of media you wish to 

view. Press again to pause play. 
12:

STOP

:Press to stop play of the DVD you are watching at anytime.  

13: 

A-B

:Press to repeat a segment of the disc you are watching 

between A and B. (DVD mode)
14:
15:

REV

:Press to rewind play in DVD, CD MP3 or VCD mode. Press 

repeatedly to scroll through rewind speeds. Press the Play/Pause 
Button to resume play. 
16:

FWD

:Press to fast-forward play in DVD, CD MP3 or VCD mode. 

Press repeatedly to scroll through fast-forward speeds. Press the 
Play/Pause Button to resume play
17:

RETURN

:Press to return to the Main Menu. 

18:

DISPLAY

:Press to show the information of the current playing 

disc.
21:

EJECT

:Press the Eject Button in conjunction with the Open/Close 

Button the back of the unit to Eject your DVD.
22:

GOTO

:For DVD discs, press to choose the desired title and 

chapter and search the desired title, time and chapter time. For 
Super VCD,VCD,CD discs, press this button to search the desired 
disc time and track time and choose the desired track.
Note: During VCD playback, the PBC mode must be set to OFF.
24:

OK

:Press to confirm. 

31:

ANGLE

:Press to view scenes shot from different angles. (Disc 

support is required)
32:

PBC

:During VCD/SVCD playback, press PBC to control PBC 

ON/OFF.
33:

NEXT

:During DVD,CD,MP3, or VCD playback, press 

NEXT 

to 

play the next chapter, title or track.
34:

PREV

:During DVD, CD,MP3, or VCD playback, press 

PREV

to play the previous chapter, title or track.
35:

SUBTITLE

:Press to choose different captions (Requires support 

from disc).

FREEZE

:Press to freeze the picture you are watching. 

TITLE

:Press to display the DVD Main Menu. 

37:

A-B


Summary of Contents for IDLED2202DVD

Page 1: ...INSTRUCTION MANUAL IDLED2202DVD IDLED2402DVD The Gold Technical Support Line 1902 215 259 Personal Product Support Charges will apply at 2 95 per minute LED LCD TV DVD Combo ...

Page 2: ...y features and to ensure you get the very best from your purchase Safety is important Your safety and the safety of others is important Therefore please ensure you read the Safety Instructions before you operate this unit Warranty In the unlikely event that your product fails to work normally please call the below Bush warranty number to discuss the problem with one of our qualified service engine...

Page 3: ...Y INSTRUCTIONS 3 4 BASE STAND INSTALLATION 6 INSTALLATION 7 10 REMOTE CONTROL 11 12 OPERATION 13 18 DVD OPERATION 19 23 DVD TROUBLESHOOTING 24 TROUBLESHOOTING 25 TECHNICAL SPECIFICATIONS 26 27 WARRANTY 28 5 WALL MOUNTING INSTALLATION ...

Page 4: ...rd or plug is damaged if liquid has been spilled or objects have fallen into the TV if the TV has been exposed to rain or moisture if does not operate as per this manual or if it has been dropped 9 The TV should not be exposed to dripping or splashing and no objects filled with liquids Such as vases should be placed on the apparatus 10 If the television is to be built into a cabinet or similar enc...

Page 5: ... ventilation openings Slots and openings on the unit are provided for ventilation The openings should never be blocked Do not place the product on any unstable surfaces as this may cause the unit to fall and may cause possible damage or injury Never place heavy or sharp objects on the panel or frame Only use the AC adapter included with product Using any other adaptor will void your warranty This ...

Page 6: ...g is recommended for comfortable viewing Allow enough space between the TV and the wall to permit ventilation Avoid excessively warm locations to prevent possible damage to the cabinet or premature component failure Remote Control x 1 User s Manual x1 Battery AAA x 2 ACCESSORIES Base Stand Assembly Instruction 1 Place the TV with the display side down on a flat surface Use a cloth to protect Locat...

Page 7: ...ont of the screen to protect it from any damage 2 Remove the screws from the lower part of the television where the base joins to the TV and take away the stand put the stand somewhere safe for future use 3 Use the four screws provided to fix the TV onto a wall mounting bracket not included via the four VESA standard holes on the back of the television 6 INSTALLATION 100mm 100mm ...

Page 8: ...y disc or press again to pause 2 MENU Press the MENU Button to display the Main Menu 3 CH CH Press the CH CH Buttons to change the channel In the SOURCE Menu press the CH CH Buttons scroll through the Input Source List In the MAIN MENU press the CH CH Buttons to scroll through the Menu options 4 VOL VOL Press the Vol Vol Buttons to adjust the Volume level Press the Vol Vol Buttons to confirm your ...

Page 9: ...r Sockets provided AV Input R L Audio Input DC Power Source Input YPbPr Input and HDMI2 Input When HDMI 2 is connected with DVI video source the R L of AV will be used for audio source input Note 1 The AV Input and YPbPr Input share one audio channel 2 Side Sockets Outlined below is the Side Sockets provided HDMI1 Input USB Input PC Audio Input AV Output VGA Input and RF Input Note When HDMI 1 is ...

Page 10: ...C 9 INSTALLATION 1 2 3 4 5 6 7 720 400 640 480 800 600 800 600 800 600 1024 768 1024 768 70 60 56 60 72 60 70 31 47 31 47 35 156 37 88 48 08 48 36 56 48 RESOLUTION V Freq Hz H Freq KHz AV L R Y Pb Pr HDMI2 DC 12V 3A ...

Page 11: ... W R W R G B R Blue Pb Green Y B G VIDEO EQUIPMENT with YPbPr W R G B R W R W R YPbPr Connection can support these video formats 480i 576i 480p 576p 720p 1080i and 1080P HDMI TO AUDIO OUTPUTS VIDEO EQUIPMIENT TO VIDEO OUTPUTS HDMI W R W R TO AUDIO INPUTS VIDEO EQUIPMIENT TO VIDEO INPUTS USB PC AUDIO VGA RF HDMI1 AV L R AV OUTPUT AV L R Y Pb Pr HDMI2 DC 12V 3A ...

Page 12: ...Shift or USB Mode or pause recording in Record Mode 19 TELETEXT KEYS Refer to page 12 20 MUTE Press to disable or enable the sound output 21 TV AUDIO To select the available audio language of TV programs 22 RECALL GOTO Press to return to the previously viewed channel 23 SOURCE Press to display the Input Source List 24 OK Press to confirm Menu selections 25 EXIT To exit the main menu press the Exit...

Page 13: ...me sub page acquisitionThe indication appears top left To freeze the page To display or hide the concealed information The user can set four favourite pages to be directly linked to the four color keys While list mode is activated it is not possibility to use TOP or FLOF navigation with the colour keys The favouritepage numbers should be stored and restored to from nonvolatile memory for each chan...

Page 14: ...on CHANNEL Auto Tuning DTV Manual Tuning Software Update USB Dansk Deutsch Hrvatski Italiano Please select an OSD Language OK Magyar Nederlands Norsk Polski English Cesky E k Espanol Fran ais Portugues Pycck Austria Belgium Country OK Australia Croatia Finland Greece Luxembourg Czech France Hungary Netherlands Bulgaria Denmark Germany Italy Tune Type DTV ATV MENU Austria Belgium Australia Croatia ...

Page 15: ...the character to rename and then press OK to confirm Press the MENU Button or EXITButton to exit this option Note ATV programs can only be 5 characters Use the Arrow Buttons to select the channel you wish to move Then pressthe Yellow Button to select Move function Once active use the Arrow Buttons to move and then press OK to confirm Use the Buttons to highlight the channel program you wish to set...

Page 16: ...rpness 50 Tint 50 Color Temperature Medium Red 40 Green 31 Blue 50 MENU NOTE 1 Youcan change the screen position inPC Mode only You canadjust to horizontal vertical size andphase 3 SOUND MENU To enter the Sound Menu press MENU button and then press or buttons to select the SOUND Menu Once in the Sound Mode press or buttons to select the settings you wish to adjust Press MENU button to return to th...

Page 17: ...recording or or use Time Shift function If FAIL is shown after checking you then need to format your USB or Hard Disc and to be able to record or use Time Shift Format When you format your USB or Hard Disc partition any saved data will be lost Please ensure that you start with a blank partition on your Hard Disc to ensure you don t lose any data PVR File System Type There are two types of format s...

Page 18: ...to set FACTORYRESET NOTE If you wish to reset your TV please select the Restore Factory Default option this will clear all settings Set Password Lock System LOCK Block Program Parental Guidance Off 7 APPLICATIONSMENU To enter the Applications Menu press MENU button and then press or buttons to select the Applications Menu Thisis where you will be able to view and play your USB files APPLICATIONS D...

Page 19: ... modes Press the EPG Button to access the EPG Menu You will receive detailed program information of the channel you are currently watching as well as the 7 Day Program guide Sample1 ts Resolution 720x576 Subtitle 1 1 Size 30574 KBytes Close AudioTrack 1 2 28 Apr 04 39 800 SZTVM01 No Information 801 SZTVM02 802 SZTVM03 803 SZTVM04 804 Date No Information No Information No Information No Information...

Page 20: ...ulti angle R RESTRICTED Parental Lock This item incorporates copy protection technology that is protected by U S patents and other intellectual property rights of Rovi Corporation Reverse engineering and disassembly are prohibited The product complies with the KODAK Picture CD format and will display KODAK Picture CDs The KODAK Picture CD Compatible logo is a trademark of Eastman Kodak Company and...

Page 21: ...speeds Press the Play Pause Button to resume play 17 RETURN Press to return to the Main Menu 18 DISPLAY Press to show the information of the current playing disc 21 EJECT Press the Eject Button in conjunction with the Open Close Button the back of the unit to Eject your DVD 22 GOTO For DVD discs press to choose the desired title and chapter and search the desired title time and chapter time For Su...

Page 22: ...n display language Audio This option allows you to change the Audio Language of the DVD you wish to play Select Video in the setup menu to display the Video submenu Subtitle This option provides the preset subtitle language Select different MPEG4 subtitle encoding option DVD Menu This option provides the film s menu language options VIDEO SETUP MPEG4 Subtitle optional Note Not all players support ...

Page 23: ...your own password Setting the Password Once you have entered the default password you will be asked to input a four digit code of your choice Press the ENTER Ok Button to confirm Note If you forget your password you can use the universal password 6666 to unlock MISC Setup Use the Cursor Button in the Setup Menu to select the MISC Menu and to display the sub menu Use Default Settings This allows yo...

Page 24: ...files to be played at random Edit Mode This option allows you to edit the directory and files and tracks displayed Use the Cursor Buttons to select tracks or files you wish to edit and press the Enter OK Button Toexit the Edit Mode or cancel press the exit button Program View This option allows you to display the track or file directly Browser View This option allows you to display track directory...

Page 25: ...nsure the disc format is compatible with the player Please check whether you have tried to play a software CD If so please restart the player REMOTE NOT WORKING Make sure the Main unit s POWER button is on Ensure the remote batteries are working Point the remote control directly at the player s IR sensor Remove any obstacles between the remote and the IR sensor UNIT NOT WORKING Turn off the power ...

Page 26: ...nected and on Check Cable connections Adjust Contrast Brightness and Volume Settings No colour Normal audio Check TV ColourSettings Picture Breaking Up Normal Audio or Weak Conduct a Channel Rescan No Colour Irregular Check AV Video settings Normal audio Check Antenna Position and that it is connected correctly Potential Issues Ghost 25 TROUBLESHOOTING No Display Mosaic Irregular Check Antenna con...

Page 27: ...ponse time View angle 16 2M 1000 1 10 ms TV DVB T decode DVB T de modulation Audio MPEG2 Audio Layer I II Video MPEG2 Transport MP HL Demodulator COFDM OFDM Mod 2K 8K FFT SFN and MFN Packed Carries 2K 8K Guard Interval 1 4 1 8 1 16 1 32 Terminals Others TV system YPbPr input 250 CD M2 2 X 3W VGA Input PC audio input 160 H 160 V Power supply DC 12V 3A Power adaptor supplied THD 7 26 Model IDLED2202...

Page 28: ...sponse time View angle 16 2M 1000 1 8 ms TV DVB T decode DVB T de modulation Audio MPEG2 Audio Layer I II Video MPEG2 Transport MP HL Demodulator COFDM OFDM Mod 2K 8K FFT SFN and MFN Packed Carries 2K 8K Guard Interval 1 4 1 8 1 16 1 32 Terminals Others TV system YPbPr input 250 CD M2 2 X 3W VGA Input PC audio input 160 H 160 V Power supply DC 12V 3A Power adaptor supplied THD 7 27 Model IDLED2402...

Page 29: ... Bush Warranty on 1800 509 394 Australia or 0800 450 259 New Zealand and have your receipt of purchase on hand This warranty is subject to the following provisions It is only valid within boundaries of the country of purchase The product must be correctly assembled and operated in accordance with the instructions contained in the manual This product must be used solely for domestic purposes The wa...

Page 30: ...PO BOX 6287 Silverwater NSW 1811 www bushaustralia com ...

Reviews: