background image

INSTALLATION

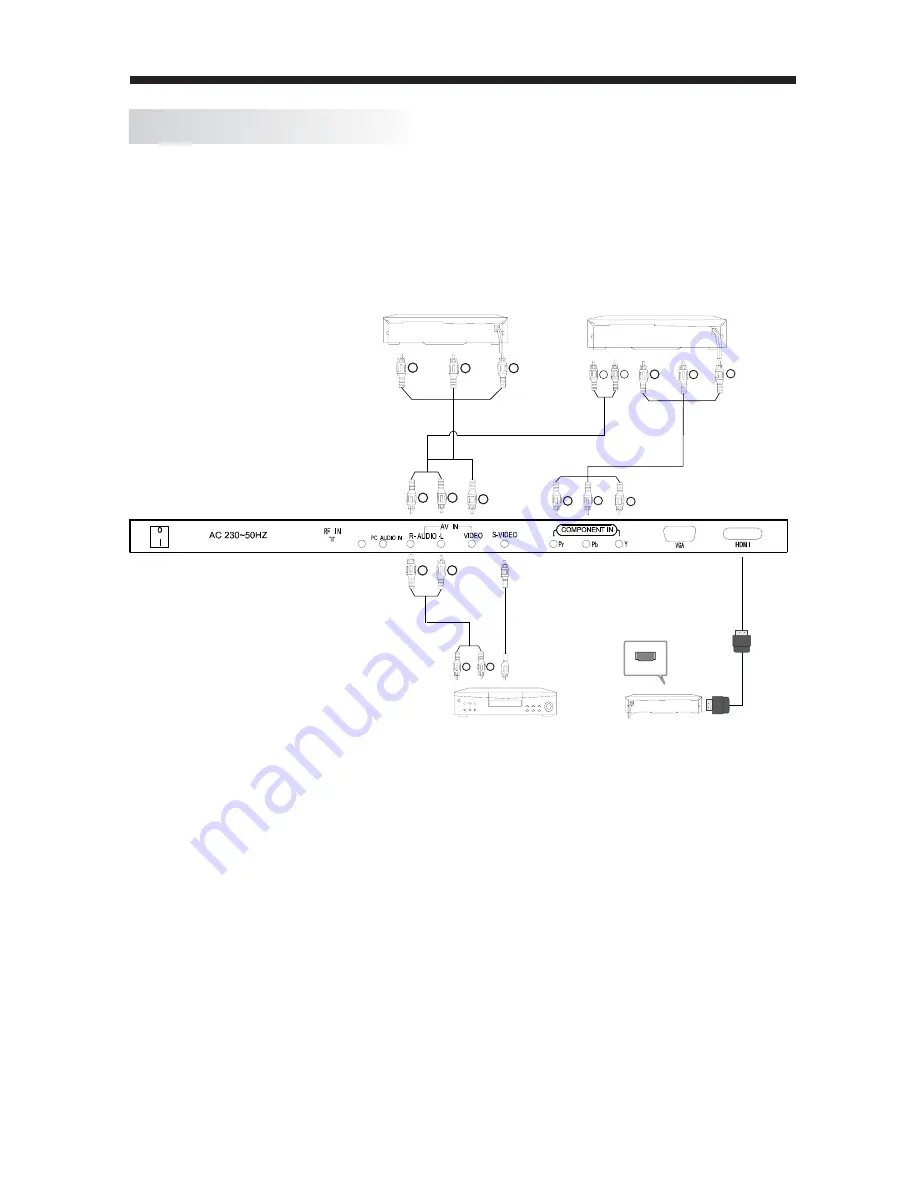
CONNECTING TO AV EQUIPMENTS

connection to

VCR, DVD or other video equipment,

input.

You can use the input terminals on TV set rear as follows.

It can be connected to the following appliances: VCR, multi disc player, DVD, camcorder,
video game or stereo system as well as a number of other electronic items.
YPbPr can support these video fomats:480i,576i,480p,576p,720p,1080i,1080p.

This TV provides three groups of AV,

-9-

two groups of YPbPr for convenient

HDMI for HD signal

HDMI

G

B

VIDEO EQUIPMENT with YPbPr

VIDEO EQUIPMENT with YPbPr

W

R

Y

W

R

Y

R

G

B

R

W

R

VIDEO EQUIPMENT with S-VIDEO

HEADPHONE JACK

and a

W

R

W

R

Summary of Contents for IDLCD1910HD

Page 1: ...INSTRUCTION MANUAL The Gold Technical Support Line 1902 215 259 Personal Product Support Charges will apply at 2 95 per minute 22 IDLCD2211HDV ...

Page 2: ...to ensure you get the very best from your purchase Your safety and the safety of others is important Therefore please ensure you read the Safety Instructions before you operate this unit In the unlikely event that your product fails to work normally please call the below Bush warranty number to discuss the problem with one of our qualified service engineers Safety is important Warranty Australia B...

Page 3: ...ON 7 CONNECTING TO PC 8 PC PRESET 9 CONNECTING TO AV EQUIPMENTS 10 BATTERY INSTALLATION 3 ACCESSORIES 4 4 5 4 REMOTE CONTROL 10 KEYS FUNCTION 11 5 OPERATION 12 BASIC OPERATION 12 TELETEXT 13 MENU OPERATION 14 18 6 DVD OPERATION 19 23 7 TROUBLESHOOTINGS 24 25 8 TECHNICAL SPECIFICATION 26 9 WARRANTY 27 KEY BOARD ...

Page 4: ...to rain or moisture does not operate normally or has been dropped 9 The apparatus should not be exposed to dripping or splashing and no objects filled with liquids such as vases should be placed on the apparatus 10 If the television is to be built into a compartment or similar enclosed the minimum distances must be maintained Heat build up can reduce the service life of your television and can als...

Page 5: ... 2 ACCESSORIES 1 Remote control sensor 2 Indicator LED GREEN POWER ON RED STANDBY 3 Key board see next page 4 30 30 4 2 1 SD USB SLEEP FAV FAV LIST MENU ENTER INFO Press unit OFF button Power Press the standby on the rear panel to turn the unit on button the standby again to turn the ...

Page 6: ...DEO INPUT 7 YPbPr INPUT 8 VGA INPUT 9 HDMI INPUT standby 1 2 MENU 3 CH CH In TV mode to change the channel up and down In MENU mode to select the menu items 4 the items VOL VOL 5 INPUT Press to display the Input Source Menu Press to display the Main Menu Press to adjust the sound level In Menu mode to select press VOL VOL buttons desired menu press the CH CH buttons Standby button turns the TV on ...

Page 7: ... 6 ANTENNA CONNECTION INSTALLATION Note Aerial connections IEC female Input impendance unbalanced 75 HEADPHONE JACK ...

Page 8: ...er are set to Power off 1 Connect VGA and audio cable 2 Connect the power cord 3 Power on the TV switch the input source to VGA mode 4 Power on the PC This sequence is very important INSTALLATION 8 PC Audio Power cord VGA cable HEADPHONE JACK HEADPHONE JACK ...

Page 9: ...mmended resolution is 1024 768 60Hz 1 2 3 4 5 6 7 8 9 720 400 640 480 800 600 800 600 800 600 800 600 1024 768 1024 768 1024 768 70 60 56 60 75 72 60 70 75 31 47 31 47 35 156 37 88 46 88 48 08 48 36 56 48 60 02 RESOLUTION V Freq Hz H Freq KHz ...

Page 10: ... disc player DVD camcorder video game or stereo system as well as a number of other electronic items YPbPr can support these video fomats 480i 576i 480p 576p 720p 1080i 1080p This TV provides three groups of AV 9 two groups of YPbPr for convenient HDMI for HD signal HDMI G B VIDEO EQUIPMENT with YPbPr VIDEO EQUIPMENT with YPbPr W R Y W R Y R G B R W R VIDEO EQUIPMENT with S VIDEO HEADPHONE JACK an...

Page 11: ...arks inside the unit 3 Mount the battery cover Replace with new batteries when the TV set begins to show the following symptoms Operation is unsteady or erratic Sometimes the TV set does not function with Remote Control Unit 1 Alkaline Battery Recommended 2 Remove batteries when they are exhausted or if the remote control is not to be used for an extended period of time 10 ...

Page 12: ...t button to view the channel list Press the Menu button to enter the DVD menu DVD SETUP Press the Setup button to display the DVD menu ZOOM Press the ZOOM button to select different screen sizes and to change the size of the Teletext EPG Press the EPG Electronic Program Guide button to turn on or off the guide in DTV mode RECALL previous program Press the Recall button to return to the Press the G...

Page 13: ... after 5 minutes while there is no signal input 12 2 Turn on the main power switch to button on the remote control to select the TV or DTV input mode Installation Guide menu will be displayed to guide you through the Channel Scan Use the remote control to finish Channel Scan Press the VOL or VOL button to adjust the volume level Press the VOL button CHANGING THE CHANNEL buttons to enter a channel ...

Page 14: ... You can display concealed teletext information e g Answer to puzzles or riddles You can press the button to hold a page and press it again to release the page Press the button to enter the main index page directly 1 Press the button to enlarge the top half of the page 2 Press the button again to enlarge the bottom half of the page button 2 Press the 3 Press the button to return to the normal TV m...

Page 15: ... Source Sel To display the current input source TV DTV To decrease and increase the frequency the current channel number changes to yellow Channel TV will begin from the Main Menu to display the Main Menu Ǐ ǐ button or the buttons to highlight the item to be adjusted 1 Press the MENU button to select the Channel Menu Press the buttons to cycle through the Main Menu Press the RED button to save you...

Page 16: ... the picture buttons to adjust the tint of the picture NTSC buttons buttons to adjust the vertical position buttons to adjust the size of picture to adjust thephaseof picture buttons buttons to buttons to buttons to increase and decrease the level of the pitch buttons to adjust the audio output between left and 1 Press the MENU button to select the Picture Menu Press the 2 Press the 3 Press the bu...

Page 17: ... can display either the DTV Signal Stream Time or set the System Time Press the Press the Press the Press the Press the buttons to select the Sleep Time you want MENU 1 Press the 2 Press the 3 Press the buttons to cycle through the Main Menu button to select the Option Menu Press the 4 When you are satisfied with your adjustment press the EXIT button to exit the Main Menu Press the Press the for m...

Page 18: ...nel you are watching indicating the time of the program playing the EPG it is possible to check the program information for the next eight days If the information is available from the Press the INFO button to see the detailed RADIO Press the RADIO button to switch between Press the GREEN button to see the Press the YELLOW button to see the to select the date information buttons and you can press ...

Page 19: ...he default channel by pressing the buttons The default channel will be displayed when the TV turns on Ǐ ǐ Ǐ ǐ the buttons Set max volume by pressing the ǐbuttons When the max volume is lower than the default volume the max ǐbuttons When it is ON and switch off at the AC power supply the hotel mode is enabled The TV will automatically enter into hotel mode when turns on next time Set Password twice...

Page 20: ...r P 2 OPEN CLOSE the disc movie company PLAYING DVD Basic Operation professional Ǐ ǐ Ǐ ǐ Ǐ ǐǏ ǐ Do not move this machine while playing it will damage the disc 1 INSERT DISC will play 19 Information about Disc Tray the film may start automatically or you may be presented with a menu screen This is dependent on the way the DVD disc has been created by the Press the Press the button to open the disc ...

Page 21: ...orward or fast reverse The DVD player uses the following speeds 20 buttons to skip forward or skip reverse chapters on the DVD Press the To resume normal play press the button Press the Press the button again and the DVD will resume play Press the SUBTITLE button to turn on the subtitles and switch among the Multi Subtitle languages FORWARD X 2 FORWARD X 4 FORWARD X FORWARD X 20 If you press the S...

Page 22: ...urce menu then select DVD Press the SD USB button to select three modes CARD MODE USB MODE or DISC MODE File folder File list Press the OK button to enter or you can press the Ǐ ǐ buttons to select Music mode buttons to select files then press the OK button to start playback 3 Press the button to stop playback then press the Make sure you insert your USB or SD MS MMC card correctly If you don t yo...

Page 23: ... 9 TITLE Press the REPEAT button to repeat the selected title or chapter Press the ou can also use the NUMERIC buttons to select titles and chapters buttons and OK button to select the title chapter you desire Press the TITLE button to stop DVD play and return to the disc Title Menu ...

Page 24: ...ǐǏ ǐ Ǐ ǐǏ ǐ Ǐ ǐǏ ǐ 23 10 SYSTEM SETUP buttons to select been opened for 11 LANGUAGE SETUP ON or OFF The SCREEN SAVER To select the SCREEN SAVER item press the button to confirm You can now enter a new password the DVD default password 0000 Press the press the ENTER button to confirm keys to select the right OSD language Ǐ ǐǏ ǐ Press the keys to select the right AUDIO language and press the ENTER b...

Page 25: ...hat the disc is not dirty or warped 24 the rear of the unit to be read if the printed side is facing towards the front of the unit Check that the system connections are correct and are connected firmly Check that the main power supply is on You may need to replace the batteries A parental rating level may be preventing playback of the DVD Check your Rating Settings Check if the mute function is on...

Page 26: ...tion Check for electrical interference Check the system connections Check the contrast brightness direction direction products away from the TV are correct and connected firmly and connection and connection Check the Antenna connection Check if the Mute function is on Check the volume level Check the audio connections Check the main power is on and colour settings Check the antenna connection Chec...

Page 27: ...io MPEG2 Audio Layer I II Video MPEG2 Transport MP HL Demodulator COFDM OFDM Mod 2K 8K FFT SFN and MFN Packed Carries 2K 8K Guard Interval 1 4 1 8 1 16 1 32 Terminals ower Voltage utput Power THD 7 100V 240V 50 60Hz Others TV system 2 NOTE The specification shown above may be changed without prior notice for quality improvement Analog TV PAL 1000 1 5 ms 170 H 160 V RF IN Input earphone Input VGA a...

Page 28: ...se The product must be correctly assembled and operated in accordance with the instructions contained in the manual This product must be used solely for domestic purposes The warranty does not cover accidental damage The warranty will be rendered invalid if the product is resold or has been damaged by inexpert repair The manufacturer disclaims any liability for incidental or consequential damaged ...

Page 29: ...PO BOX 6287 Silverwater NSW 1811 www bushaustralia com au ...

Reviews: