background image

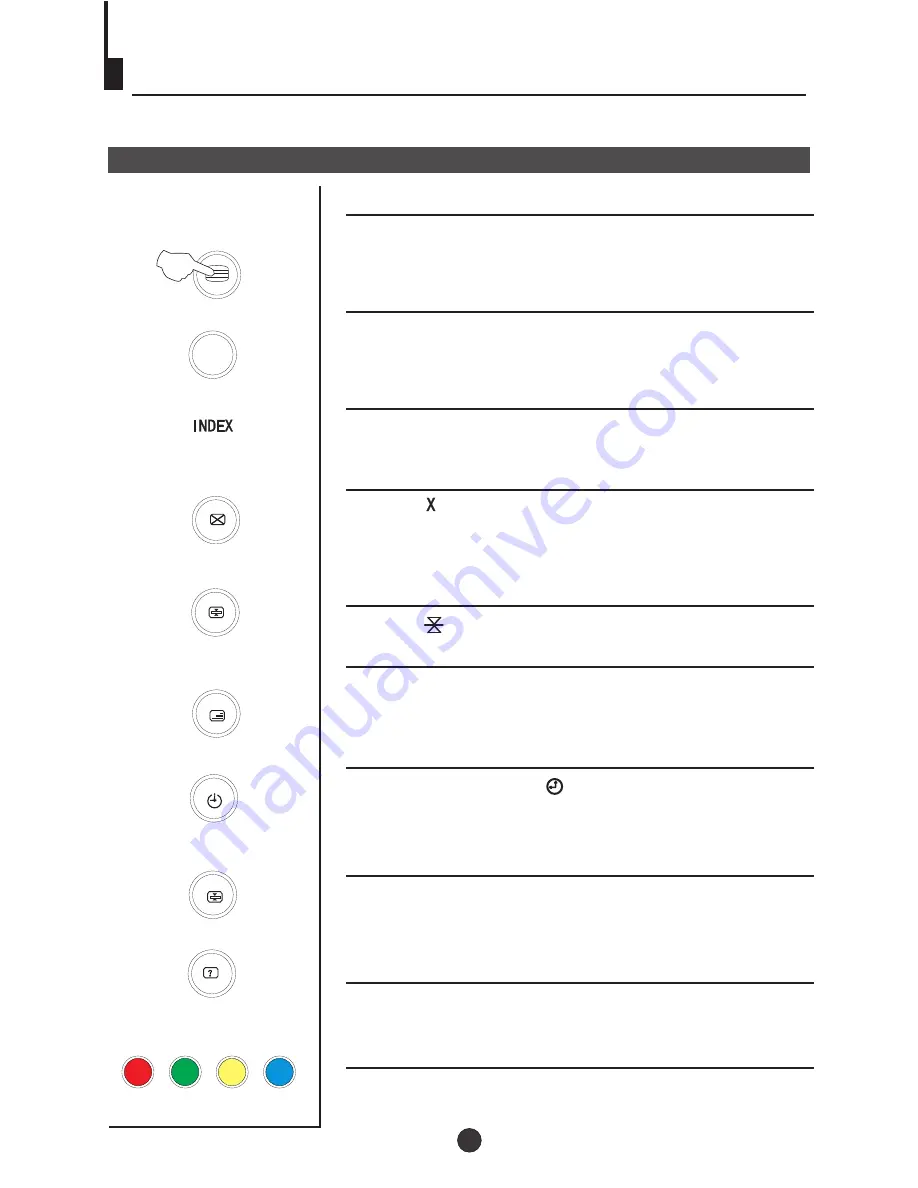
TELETEXT

TELETEXT  

SOME BROADCAST MAY PROVIDE TELETEXT SERVICE. USE THE 
TELETEXT FUNCTION TO ENTER THE TELETEXT MODE. 

TELETEXT FUNCTION

PRESS THE TELETEXT ON/OFF BUTTON TO 
ENTER THE TELETEXT MODE. PRESS TELETEXT 
ON/OFF BUTTON TO EXIT TELETEXT MODE.

INDEX

PRESS THE INDEX BUTTON TO GO TO THE INDEX 
PAGE OF TELETEXT.

CANCEL

PRESS '    ' BUTTON ALLOW YOU TO SEE THE TV 
PICTURE WHILE REMAINING IN TELETEXT MODE.
THE TV MODE TEMPORARY. PRESS THE BUTTON 
AGAIN  TO RETURN TO THE TELETEXT.

HOLD

PRESS '     ' BUTTON TO HOLD THE CURRENT PAGE. 

PRESS THE MIX BUTTON TO SUPERIMPOSE THE 
TELETEXT ON TV PICTURE. PRESS AGAIN TO 
EXIT. 

MIX

TIME / SUBCODE

IN TV MODE, PRESS  '     ' BUTTON TO DISPLAY THE 
TIME. IN TELETEXT MODE, PRESS THIS BUTTON TO 
ENTER SUBCODE.

ENLARGE

PRESS THE ENLARGE BUTTON TO ENLARGE THE 
TELETEXT PAGE. PRESS AGAIN TO RETURN TO 
THE NORMAL TELETEXT SIZE.

REVEALS

PRESS THE REVEALS TO DISPLAY THE HIDDEN 
MESSAGES ON CERTAIN PAGE.

DIRECT PAGE

PRESS THE APPROPRIATE COLOUR TO DIRECT 
ACCESS THE COLOUR PAGE.

TXT MODE /SWAP

PRESS THE TXT MODE /SWAP BUTTON TO CHANGE 
THE VIDEOTEXT BETWEENTOP MODE AND LOF 
MODE.

TXT MODE/SWAP

19

Summary of Contents for DVD154TVX

Page 1: ...User Guide DVD154TVX 15 visible screen size 37 CMS Colour TV DVD Combi with remote control ...

Page 2: ...ontrol 8 Switching on off the TV set 9 TV Set up 10 Blue Back 10 Game 10 Calendar 11 Searching for channels 12 Manual search 12 Program skip 13 Program Exchange 14 Manual fine tune 15 Auto search 16 Watching TV 17 Watching TV program 17 Program swap 18 Teletext 19 DVD System Setup 20 Basic Playback 21 Special Function Playback 25 Advanced Playback 26 Convenient picture control functions 27 Playabl...

Page 3: ...2 DVD154TVX ...

Page 4: ...may be of sufficient magnitude to constitute a risk of electric shock to persons The exclamation point within an equilateral triangle is intended to alert the user to the presence of important operating and maintenance servicing instructions in the literature accompanying the appliance AUTOMATIC DEGAUSSING All colour television receivers are sensitive to magnetic influences usually caused by eithe...

Page 5: ... Service Personnel DANGER LASER SAFETY This unit employs an optical laser beam system in the CD mechanism designed with built in safeguards Do not attempt to disassemble refer to qualified service personnel Exposure to this invisible laser light light beam may be harmful to the human eye THIS ISA CLASS 1 LASER PRODUCT USE OF CONTROLS OR ADJUSTMENTS OR PROCEDURES OTHER THAN THOSE SPECIFIED HEREIN M...

Page 6: ......

Page 7: ...u Button 16 DVD Display Button 17 DVD Program Button 18 DVD stop Button 19 DVD Clear Button 20 DVD Enter Play Button 21 DVD Pause Step Button 22 DVD Fast reverse Button 23 DVD Fast forward Button 24 DVD Menu Button 25 DVD Next Button 26 DVD Previous Button 27 DVD Repeat Button 28 DVD Setup Button 29 DVD Repeat A B Button 30 DVD Navigation Button 31 DVD Slow Button 32 DVD Angle Button 33 DVD Search...

Page 8: ...l of the TV set DVD EXT TV SCART COAXIAL OUTPUT DVD SCART Terminal TV SCART Terminal Digital audio coaxial output terminal Antenna terminal Video Audio Earphone Power Indicator Signal Receiver Power Switch Open close the DVD Menu Channel Position up down Volume up down Stop the DVD TV AV DVD Play Pause the DVD R AUDIO L VIDEO 7 ...

Page 9: ...ation Remove the batteries cover When the remote control will not be used for a long period of time or when the batteries are worn out remove the batteries to prevent the leakage Do not throw the batteries into fire Dispose of used batteries in the specified manner Do not drop dampen or disassemble the remote control Insert two size AA batteries matching the polarities of the battery to the marks ...

Page 10: ...ed press the P P button on the panel or on the remote control the power indicator will become green After several seconds the TV will start normal operation 3 If you want to change to standby status please press the button on the remote control The power indicator will become red Auto switch off function If a channel with no boardcast is selected the sound will automatically be mute If a station s...

Page 11: ...n to move left V button to move right 4 Press TV AV button to quit the game 3 times Blue Back When there is no broadcasting signal the screen will be blue colour when this function is on 1 Press TV MENU until SETUP menu appears 2 Press P buttons to select BLUE BACK 3 Press V buttons to toggle through on and off 3 times SETUP BLUE BACK ON GAME CALENDAR P P V V MENU P P V V MENU P P V V MENU TV AV 4...

Page 12: ...Press TV MENU 3 times until SETUP menu appears 3 Press the P buttons to select theYEAR MONTH DAY press the V buttons to set or adjust the YEAR MONTH DAY S M T W T F S 1 2 3 4 5 6 7 8 9 10 11 12 13 15 16 17 18 19 21 22 23 24 25 26 27 28 29 30 14 20 Y 2004 M 6 D 20 CALENDAR P P V V MENU 1 2 3 11 ...

Page 13: ...lected locations TUNE TUNE SEARCH BAND UHF FINE TUNE COLOUR AUTO SOUND I SKIP OFF PROGRAM 2 AUTO SEARCH AUTO SEARCH BAND UHF FINE TUNE COLOUR AUTO SOUND I SKIP OFF PROGRAM 2 SEARCH 2 Press P or P buttons to select PROGRAM use the number keys on the remote control to input the programmenumber you want to tune If you need a programme number greater than 9 press the button on the remote control Then ...

Page 14: ... 2 Repeat the above procedure 2 3 3 Press the V buttons to turn the SKIP function OFF After presetting you can skip needless channels so that you could choose the desired channels TUNE AUTO SEARCH SEARCH BAND UHF FINE TUNE COLOUR AUTO SOUND I PROGRAM 2 SKIP OFF TUNE AUTO SEARCH SEARCH BAND UHF FINE TUNE COLOUR AUTO SOUND I PROGRAM 2 SKIP ON 1 Press the P buttons to select the desired program to be...

Page 15: ...Program numbers duplicated and some blank To re order the channels 1 Press the TV MENU 5 times until the PROG EXCHANGE menu appears 3 Press P buttons to select PROG II then press the V buttons to set desired program PROG EXCHANGE PROG I 2 PROG II 0 EXCHANGE PROG EXCHANGE PROG I 2 PROG II 0 EXCHANGE PROG EXCHANGE PROG I 2 EXCHANGE PROG II 0 Searching for Channels continued P P V V MENU P P V V MENU...

Page 16: ...nd sound results Under poor reception conditions it is sometimes possible to improve the quality of picture and sound using the fine tune 1Press the P buttons or PROGRAM NUMBER 0 9 button to choose desired channels TUNE AUTO SEARCH SEARCH BAND UHF COLOUR AUTO SOUND I SKIP OFF PROGRAM 1 FINE TUNE VHF L FINE TUNE Searching for Channels continued P P V V MENU P P V V MENU P P V V MENU 1 2 2 4 15 ...

Page 17: ...BAND UHF FINE TUNE COLOUR AUTO SOUND I SKIP OFF PROGRAM 2 AUTO SEARCH VHF L AUTO SEARCH SEARCH BAND UHF FINE TUNE COLOUR AUTO SOUND I SKIP OFF PROGRAM 2 Searching for Channels continued Please note The AUTO SEARCH option does NOT sort the programmes into a pre selected order such as BBC1 and ITV in position 3 If you would like to choose which numbers the programmes are on we recommend you should u...

Page 18: ...the 3 digit channel number Press the P button to increase channel number Press the P button to decrease channel number For proper operation before selecting channel they should be set into the memory See pages 9 Searching Channels 2 Using P buttons Sound mute 1 Press the MUTE button on the remote control to turn off the sound 2 Press MUTE again to turn the sound back on Sleep Timer Press the SLEEP...

Page 19: ... 8 and the channel number you are using is 18 as shown in the figure 3 If you want to return to channel 18 press the button again Through this function you can easily change between the channel you are using and the channel you used last time 2 If you want to return to the last watched program channel 8 you can simply press the TXT MODE SWAP button TXT MODE SWAP 18 ...

Page 20: ... TO RETURN TO THE TELETEXT HOLD PRESS BUTTON TO HOLD THE CURRENT PAGE PRESS THE MIX BUTTON TO SUPERIMPOSE THE TELETEXT ON TV PICTURE PRESS AGAIN TO EXIT MIX TIME SUBCODE IN TV MODE PRESS BUTTON TO DISPLAY THE TIME IN TELETEXT MODE PRESS THIS BUTTON TO ENTER SUBCODE ENLARGE PRESS THE ENLARGE BUTTON TO ENLARGE THE TELETEXT PAGE PRESS AGAIN TO RETURN TO THE NORMAL TELETEXT SIZE REVEALS PRESS THE REVE...

Page 21: ...x is a more common choice In PS mode widescreen material will fill the screen but at the expense of chopping off extreme left and right edges of the original film picture For this feature to work the disc must be specially coded Such discs are uncommon 4 3 LB LB Letter Box You may select this if you have a normal aspect ratio 4 3 TV Widescreen material will be shown in pure unaltered form allowing...

Page 22: ...ecoder through the coaxial connector on the back panel of the product 3 SPDlF PCM This surround sound format is output to a Dolby Digital DTS decoder through the coaxial connector on the back panel of the product TV Display LB General Setup Page Angle Mark On OSD Lang ENG Spdif Output Captions On Screen Saver Off On Off TV Display LB This item allows you to set Angle Mark ON or OFF ANGLE MARK User...

Page 23: ...tches There are up to 8 censorship classes for DVDs Note 1 To change this setting you must enter your password Initial password is 1234 2 When set to OFF all discs may be viewed Preference Page TV Type Auto Parental Password Default 1 Kid Saf 2 G 3 Pg 4 Pg 13 5 Pgr 6 R 7 Nc17 8 Adult TV Type Auto Parental Password Default PAL AUTO NTSC Preference Page PASSWORD CHANGE You can change your password b...

Page 24: ...assword and parental lock status for this DVD player back to the manufacturers original settings Press ENTER to perform the reset Note Some functions may not be available depending on the type of disc TV Type Auto Parental Password Default Preference Page Reset SETUP ENTER PLAY 23 ...

Page 25: ...he location where stopped such as DVDs and audio CDs 2 Press ENTER PLAY to resume playback from the location where playback is stopped 3 Press STOP twice to stop completely Stop playback Previous and Next During playback press PREV key to go back to the beginning of this chapter then each press of this key will skip a chapter till the start of the disc note Disc function may vary depending on disc...

Page 26: ... select a file then press PLAY ENTER The slide show will commence Press PREVIOUS or NEXT to move between pictures Press pause to stop on the current picture Press PLAY ENTER to resume normal playing JPEG DISC PLAYBACK SCREEN SAVER FUNCTION This unit employs a screen saver mode to help protect the tube during static video pictures This can be turned off on the GENERAL SETUP PAGE see Pg 21 25 ...

Page 27: ...low forward Each time the SLOW button is pressed the slow motion speed changes Press ENTER PLAY to resume normal playback Note This function is invalid for CD DVD MENU Press this key to display root menu select item according to your preference This function will work with a DVD having a multi layer menu ANGLE When enjoying sports concert or theatre press this key to watch same actions in differen...

Page 28: ...e will change instantly PP MILD DYNAMIC STANDARD How to customize your own picture status PP 1 Press the TV MENU until the PICTURE menu appears 2 Press the P buttons to select the item you want to adjust then press the V buttons to obtain the desired effect CONTRAST BRIGHTNESS COLOUR SHARPNESS Hue Low Dark Pale Soft lean to purple High Bright Deep Sharp lean to green I T E M Press V button Press V...

Page 29: ...t play discs other than those listed above You cannot play non standardized discs even if they may be labelled as above The performance of CD R or CD RW discs depends on the way they are burned In some instances they may perform poorly or even not play all 28 ...

Page 30: ...12cm 8cm Disc diameter 30cm 20cm 12cm 12cm Horizontal resolution More than 500 line No more than 430 line No more than 350 line No more than 250 line Multiple kinds Picture proportion One kind One kind One kind Subtitle 32 kinds 16 kinds at most 4 kinds at most 4 kinds at most 4 kinds 2 kinds 2 kinds Language 8 kinds Sound quality 48KHz 96KHz 6 20 24bit 44 1KHz 16bit 44 1KHz 16bit 44 1KHz 16bit 44...

Page 31: ...r audio amplification equipment to the scart digital coaxial sockets at the rear of the set to enjoy higher quality sound and picture Stereo To video audio input DVD VCD and other reproducing equipment To outside input DVD EXT Coaxial cable To COAXIAL type digital audio input Amplifier To TV EXT To TV EXT To DVD EXT To another TV SCART terminal COAXIAL OUTPUT TV SCART 30 ...

Page 32: ...no picture No or low signal Check aerial connection Aerial may be damaged Screen lit No noise Set in AV mode Switch set to TV Mode No colour Colour turned down Adjust colour settings Picture Ok No sound Sound muted Switch sound mute Off One sound channel missing Balance incorrectly set Adjust sound Balance DVD not playing No disc on screen Disc in wrong way round Disc or Laser dirty Place disc wit...

Page 33: ...0 THD 15 colour picture tube Remote control X1 Owner s manual X1 Battery AA X2 420 Width x385 Depth x382 Height mm The specifications offered you here are only for reference and with the improvement of the products there may be some different between the description and the practicality NOTE Design and specifications are subject to change without notice Dimensions quoted in this manual are approxi...

Page 34: ...01 0090508220 ...

Reviews: