Installing your gas cooker
Bringing it all together
Installing your gas cooker
20
If you require any technical guidance or find that your product is not operating as intended, a simple solution can often be found in the
Troubleshooting
section of these instructions,
screw must be tightened.
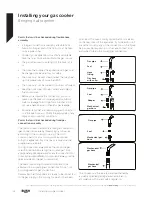
Bypass screw
Screw(inside the hole)
Valve with flame failure
device
Valve without flame failure
device
Determining the minimum flame position
To determine the minimum position, ignite the burners
and leave them on in the minimum position. Remove
the knobs to gain access to the screws. With the help
of a small screwdriver, fasten or loosen the bypass
screw by around 90 degrees. When the flame has a
length of at least 4mm, the gas is well distributed. Make
sure that the flame does not die out when passing
from the maximum position to the minimum position.
Create an artificial wind with your hand towards the
flame to see if the flames are stable. For the oven
burner, operate the oven burner at the minimum
position for 5 minutes, then open and close the oven
door 2-3 times to check the flame stability of the
burner.
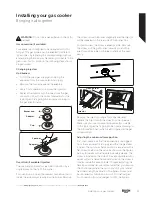
Bypass screw
Bypass screw
Thermostatic oven valve
Non-thermostatic
oven valve
Changing the gas inlet
For some countries, the gas inlet type can be different
for NG/LPG gases. In this case, remove the current
connection components and nuts (if any) and connect
the new gas supply accordingly. In all conditions,
all components used in gas connections should be
approved by local and/or international authorities. In all
gas connections, refer to the “Assembly of gas supply
and leakage check” clause explained above.
Electrical connection and safety (if
available)
•
WARNIN
G:
The electrical connection of this
appliance should be carried out by an
authorised service person or qualified electrician,
according to the instructions in this guide and in
compliance with the current local regulations.
WARNING: THE APPLIANCE MUST BE EARTHED.
•
Before connecting the appliance to the power
supply, the voltage rating of the appliance (stamped
on the appliance identification plate) must be
checked for correspondence to the available mains
supply voltage, and the mains electric wiring should
be capable of handling the appliance’s power rating
(also indicated on the identification plate).
•
During installation, please ensure that isolated
cables are used. An incorrect connection could
damage your appliance. If the mains cable is
damaged and needs to be replaced this should be
done by a qualified person.
•
Do not use adaptors, multiple sockets and/or
extension leads.
•
The supply cord should be kept away from hot
parts of the appliance and must not be bent or
compressed. Otherwise the cord may be damaged,
causing a short circuit.
•
If the appliance is not connected to the mains with
a plug, a multi-pole isolator switch (with at least 3
mm contact spacing) must be used in order to meet
the safety regulations.
•
The appliance is designed for a power supply of
220-240 V~. If your supply is different, contact the
Summary of Contents for BGC60SB
Page 1: ...Instruction manual Gas Cooker BGC60SW BGC60SB Max 8 9 9 7 5 2 3 4 1 ...
Page 4: ......
Page 5: ...1 Safety information ...
Page 10: ......
Page 11: ...Getting to know your gas cooker 2 ...
Page 14: ......
Page 15: ...Installing your gas cooker 3 ...
Page 24: ......
Page 25: ...Functions 4 ...
Page 30: ......
Page 31: ...Using your gas cooker 5 ...
Page 36: ......
Page 37: ...Care and maintenance 6 ...
Page 40: ......
Page 41: ...Product support 7 ...
Page 46: ...Contact www argos support co uk Helpline 0345 257 7271 ...


