


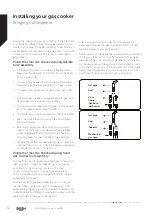


Installing your gas cooker
Bringing it all together
Installing your gas cooker
21
or online at
www.bush-support.com
If you still require further assistance, call one of our experts on
0345 257 7271.
for NG/LPG gases. In this case, remove the current
connection components and nuts (if any) and connect
the new gas supply accordingly. In all conditions,
all components used in gas connections should be
approved by local and/or international authorities. In all
gas connections, refer to the “Assembly of gas supply
and leakage check” clause explained above.
Electrical connection and safety
WARNING:
The electrical connection of this
appliance should be carried out by an authorised
service person or qualified electrician, according to the
instructions in this guide and in compliance with the
current local regulations.
WARNING: THE APPLIANCE MUST BE EARTHED.
• Before connecting the appliance to the power
supply, the voltage rating of the appliance (stamped
on the appliance identification plate) must be
checked for correspondence to the available mains
supply voltage, and the mains electric wiring should
be capable of handling the appliance’s power rating
(also indicated on the identification plate).
• During installation, please ensure that isolated
cables are used. An incorrect connection could
damage your appliance. If the mains cable is
damaged and needs to be replaced this should be
done by a qualified person.
• Do not use adaptors, multiple sockets and/or
extension leads.
• The supply cord should be kept away from hot
parts of the appliance and must not be bent or
compressed. Otherwise the cord may be damaged,
causing a short circuit.
• If the appliance is not connected to the mains with
a plug, a multi-pole isolator switch (with at least 3
mm contact spacing) must be used in order to meet
the safety regulations.
• The appliance is designed for a power supply of
220-240 V~. If your supply is different, contact the
authorized service personnel or qualified electrician.
• The power cable (H05VV-F) must be long enough
to be connected to the appliance.
• The fused switch must be easily accessible once the
appliance has been installed.
• Ensure all connections are adequately tightened.
• Fix the supply cable in the cable clamp and then
close the cover.
• The terminal box connection is placed on the
terminal box.
Brown
Green
Blue
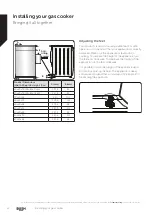
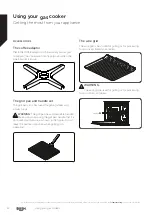
Anti-tilting kit
Anti-tilting
Bracket (x1) (will
be attached to
the wall)
Dowel (x1)
Screw (x1)
1
2
3
The document bag contains an anti-tilting kit. Loosely
attach the anti-tilting bracket (1) to the wall using the
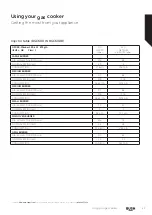
screw (2) and dowel (3), following the measurements
shown in the figure and table below. Adjust the height
of the anti-tilting bracket so that it lines up with the
slot on the cooker and tighten the screw. Push the
appliance towards the wall making sure that the anti-
tilting bracket is inserted into the slot on the rear of the
appliance.
Summary of Contents for BGC50DB
Page 1: ...Instruction manual Gas Cooker BGC50DW BGC50DB BGC60DW BGC60DB ...
Page 4: ......
Page 5: ...1 Safety information ...
Page 10: ......
Page 11: ...Getting to know your gas cooker 2 ...
Page 14: ......
Page 15: ...Installing your gas cooker 3 ...
Page 24: ......
Page 25: ...Functions 4 ...
Page 30: ......
Page 31: ...Using your gas cooker 5 ...
Page 38: ......
Page 39: ...Care and maintenance 6 ...
Page 42: ......
Page 43: ...Product support 7 ...
Page 48: ...52267384 Contact www bush support com Helpline 0345 257 7271 ...


