Burmester 032 Owner'S Manual Download Page 9

OPERATING CONTROLS


With the exception of the AC mains switch all operating controls are located on the front panel. To operate the unit it 

must be connected to the AC supply. 

AC mains switch


The 

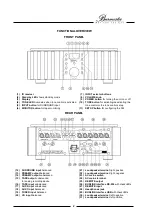
AC mains switch (19) 

which turns AC power to the unit on and off is located on the 

rear panel above the AC mains terminal. By switching to the ON position the transformer is 

powered up and the unit is in stand-by mode. The stand-by mode is shown by the lightning 

of the 

Stand-by LED (2)

POWER button


The 

POWER button (9)

 turns the unit on and off provided the AC mains switch is in the ON 

position. 

When the amp is ready for operation the 

alphanumeric display (3)

 will light up. 

In stand-by mode only the 

stand-by LED (2)

 lights up. 

After switching on the 032, the safety monitoring system takes a few seconds to check all 

functions.  The  speaker  terminals  and  preamp  outputs  are  enabled  only,  if  no  errors  are 

detected. 

CAUTION:

 Always use the 

POWER button (9)

 first to switch the unit off, before setting the 

AC mains switch (23) to OFF. 

VOLUME knob


The 

VOLUME knob (8)

  controls  the  volume  level  in  61  steps  from  00  (off)  to  60  (full 

volume). If the VOLUME knob is turned slowly, the volume changes step by step. If rotated 

quickly,  the  volume  changes  in  larger  increments.  The  display  indicates  the  selected 

volume level.  

The VOLUME knob also controls the functions in the SETUP menu. 

INPUT select


Inputs  are  selected  by  pressing  the  respective  one  of  the 

input select buttons (7)

.  The 

display (3)

 indicates the selection. 

SURROUND input


Pressing  the  button 

SURR

(ound)

  (5)

  activates  the  input 

SURROUND IN (12)

.  The  signal 

from  the  SURROUND  input  is  routed  directly  to  the  power  amp  stages,  bypassing  tone 

control and volume control. 

MONITOR function


Pressing the button labeled 

MONITOR (15)

 blocks the direct signal path during recording 

and switches to replaying the just recorded signal. When the monitor function is activated, 

the display will add a 

–M

 to the selected source name. 

The inputs TAPE and SURROUND have no monitor function.


Summary of Contents for 032

Page 1: ...OWNER S MANUAL 032 INTEGRATED AMPLIFIER 9 1 0 1 Q Q 1 0 CLASSIC LINE ...

Page 2: ......

Page 3: ...in its entirety before initial operation This will enable you to make full use of all capabilities of this outstanding audiophile instrument Should you have any further questions please contact your dealer or us directly You decide if we meet the demands of producing high end components We offer an additional service which also demonstrates high end quality Talk to us about your special requests e...

Page 4: ...KING AND SETTING UP 1 FUNCTIONAL OVERWIEW OF FRONT AND REAR PANEL 2 CONNECTIONS 3 4 OPERATING CONTROLS 5 6 REMOTE CONTROL 6 THE SETUP MENU 7 ERROR PROTECTION 8 BURLINK 9 GENERAL INSTRUCTIONS 10 TECHNICAL SPECIFICATIONS 11 ...

Page 5: ...ontent of box The box should contain the following 1 Integrated amplifier 032 1 AC power cord 1 remote control 067 1 owner s manual Packaging We recommend keeping the original packing in case the unit needs to be shipped in the future Setting up Carefully remove the unit from its packaging and set it up in an appropriate location To protect the 032 from overheating make sure that the location offe...

Page 6: ...nfiguring the 032 REAR PANEL 12 SURROUND input balanced 21 Loudspeaker terminal right positive 13 PREAMP output balanced 22 Loudspeaker terminal right negative 14 PREAMP output unbalanced 23 AC mains switch 15 TAPE output unbalanced 24 AC mains terminal for analog recording device 25 REMOTE output 16 TAPE input unbalanced 26 BURLINK interface RS 232 with check LEDs 17 AUX2 input unbalanced 27 REMO...

Page 7: ...gnal is sent directly to the power amp stages of the 032 bypassing tone control and volume control Volume and other signal settings are controlled by the connected surround sound processor or decoder CAUTION Connect only components with their own volume control to the SURROUND input The pinning of the SURROUND input is PIN1 GND PIN2 NEG PIN3 POS NOTICE If necessary the balanced SURROUND input can ...

Page 8: ... of the balanced output is PIN1 GND PIN2 NEG PIN3 POS Volume and tone control have no influence to the TAPE OUT signal REMOTE Connecting DC OUT 25 to the corresponding DC IN jack of another BURMESTER unit offers to switch on or off this other unit simultaneous by the 032 In this case 032 has the master function Connecting DC IN 27 to the corresponding DC OUT jack of another BURMESTER unit offers t...

Page 9: ...detected CAUTION Always use the POWER button 9 first to switch the unit off before setting the AC mains switch 23 to OFF VOLUME knob The VOLUME knob 8 controls the volume level in 61 steps from 00 off to 60 full volume If the VOLUME knob is turned slowly the volume changes step by step If rotated quickly the volume changes in larger increments The display indicates the selected volume level The VO...

Page 10: ...tion the signal path by passes the tone control completely Tone control To switch the tone control into the signal path press the button TONE 10 briefly The TONE LED 4 illuminates when the tone control is activated To switch the tone control off press the button TONE 10 briefly again and the TONE LED 4 will go out REMOTE CONTROL Equipped as standard is the 067 remote control By definition the butt...

Page 11: ...ALUE Input level CD Input level adjustment for input CD L CD 9 bis 0 bis 9 Input level TUNER Input level adjustment for input TUNER L TU 9 bis 0 bis 9 Input level TAPE Input level adjustment for input TAPE L TP 9 bis 0 bis 9 Input level AUX1 Input level adjustment for input AUX1 L A1 9 bis 0 bis 9 Input level AUX2 Input level adjustment for input AUX2 L A2 9 bis 0 bis 9 Volume Selecting initial vo...

Page 12: ...ack on If the 032 does not cool down to below the maximum allowable temperature within three minutes the unit switches automatically into stand by mode The display continues to indicate TEMP and the stand by LED also illuminates Please leave the 032 turned off for a while allowing it to cool down Overload DC offset If high currents overload the power transistors or DC current is detected at the ou...

Page 13: ...put SURR r activates the SURROUND input VOLUP r increases the volume for one step VOLDN r decreases the volume for one step MONITOR r switches the monitor loop on or off MONITORON r switches the monitor loop on MONITOROFF r switches the monitor loop off TONE r switches the tone control on or off TONEON r switches the tone control on TONEOFF r switches the tone control off BASSUP r increases the ba...

Page 14: ...tection Merely switching the 032 off does not suffice since voltage spikes are able to arc over separated contacts Interconnects We supply custom made balanced as well as unbalanced interconnect cables and speaker cables of any length to ensure highest quality signal paths for our components The impedance of our cables is ideally matched to all BURMESTER components For the cleanest power supply we...

Page 15: ...to 240V 50 60Hz 2 x slow 250mA E 2 x slow 3 15A E for 100V to 127V 50 60Hz 2 x slow 500mA E 2 x slow 6 3A E Power consumption ON STBY Mains switch ON max 609 W approx 3 W PLEASE NOTE The dimensions do not include the length of binding posts and the space needed for plugs of interconnect cables The technical data and design of this product are subject to change without notice ...

Page 16: ...Burmester HomeAudio GmbH Wilhelm Kabus Straße47 ro829 Berlin Germany www burmester de Version2 3 2108 ...

Reviews: