DIAGRAMME CÂBLAGE IOBRELG1500, IOBRELG1800, IOBRELG2200
IOBRELG3000
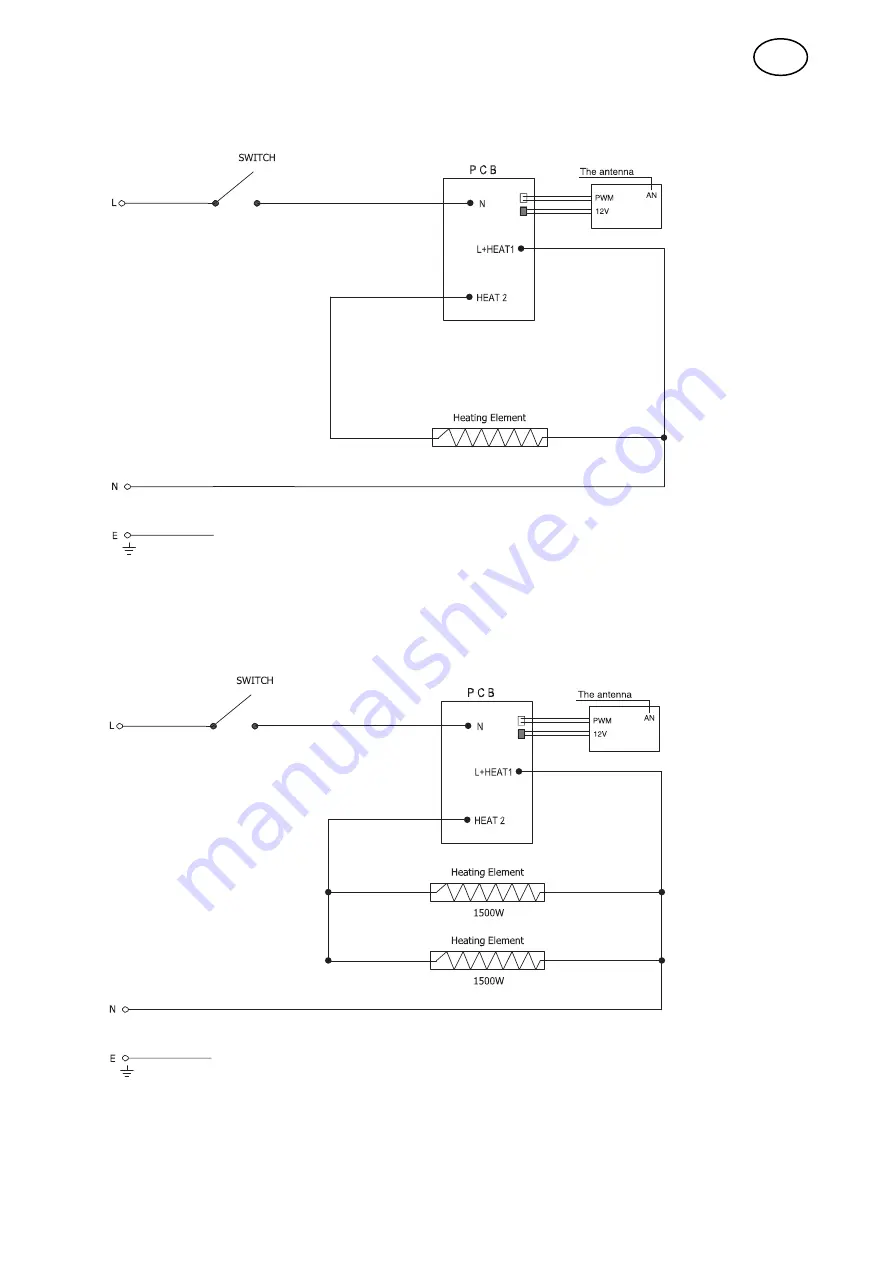
41
FR
230
-
240VAC 50-60Hz
1500W1800W2200W
Page 1: ...DE MONTAJE Y USO Irrtum und technische nderungen vorbehalten Subject to errors and technical changes Sous reserve d erreurs et de modifications techniques Excepto erro ou alteracao tecnica Salvo erro...
Page 2: ...Schutzkontaktsteckdose an Das Ger t muss vorsichtig behandelt werden und darf keinen Vibrationen oder Schl gen ausgesetzt werden WARNUNG FEUERGEFAHR BESTEHT WENN DAS HEIZGER T VON VORH NGEN ODER ANDER...
Page 3: ...eckenmaterials sollte mindestens 80 C betragen WARNUNG Dieses Heizger t ist nicht mit einem Ger t zur Regelung der Raumtemperatur ausgestattet Dieses Heizger t ist f r den Einsatz im Freien oder in gr...
Page 4: ...rung 90 x 17 x 15 5 90 x 17 x 15 5 90 x 17 x 15 5 128 6 x 17 x 15 5 BETRIEB HINWEIS W hrend der Heiz oder K hlperiode k nnen leichte Knisterger usche zu h ren sein Dies sind normale Betriebsger usche...
Page 5: ...und die Leistung des Produkts beeintr chtigen 1 Beschreibung Somfy Funkhandsender a LED Anzeige Batteriestatus b LED Anzeigen Kanalauswahl c Auswahl Funkkan le d Variationszifferblatt e Auto Man Modus...
Page 6: ...ngen Um eine neue Fernbedienung hinzuzuf gen lesen Sie bitte Abschnitt 2 5 und 2 6 3 1 Schalten Sie das Ger t 2 Sekunden lang aus 3 2 Schalten Sie die Stromversorgung f r 10 Sekunden ein l nger als 5...
Page 7: ...hlen Sie den Kanal f r die Heizung mit Ihrer bevorzugten Leistungsstufe LOW MED oder HIGH und dr cken Sie dann die Taste MY f r ca 5 Sekunden Die Lampe wird in einem Zyklus AN AUS sein Die bevorzugte...
Page 8: ...n einzustellen die Taste MY um den Timer auf 6 Stunden einzustellen und die Taste UP um den Timer auf 12 Stunden einzustellen 6 5 Die Lampe ist in 1 Zyklus EIN AUS 6 6 Dr cken Sie die MY Taste f r 2 S...
Page 9: ...age IOBRELG1500 IOBRELG1800 IOBRELG3000 Die ideale Montageposition befindet sich direkt ber dem zu beheizenden Bereich mit einer L ngsausrichtung und ist vertikal nach unten gerichtet ACHTUNG Der Stra...
Page 10: ...bst nde in mm bei Montage des Heizger ts an einer VERTIKALEN WAND 10 DE 1000 Min to surfaces ie table tops ect 1800 Min from floor 1500W 1800W 2100 Min from floor 3000W 3000 Max from floor recommended...
Page 11: ...4 F r den korrekten Installationsvorgang wie in der obigen Abbildung dargestellt w hlen Sie die Position des Heizger ts an der Decke aus indem Sie einen Bolzen oder Strukturbalken anbringen um eine s...
Page 12: ...tigungselementen gesichert werden Das Gewicht des Heizger ts betr gt bis zu 5 3Kg 1 5 1 8 2 2KW and 6 8Kg 3 0KW Der Installationsort muss das 5 fache Gewicht des Heizelements halten k nnen In dem Hohl...
Page 13: ...lten Sie das Heizger t aus lassen Sie es abk hlen und reinigen Sie es anschlie end Klirrende Ger usche beim Einschalten und nach dem Ausschalten des Heizstrahlers Dies sind Ausdehnungs und Kontraktion...
Page 14: ...s erforderlich sind jedoch m glicherweise f r die Umwelt gef hrlich sind Das Produkt darf nicht mit dem normalen Hausm ll entsorgt werden sondern muss zur Entsorgung an einer daf r bestimmten Sammelst...
Page 15: ...t the appliance is switched on as severe burns may result The appliance can take up to 1 hour to cool down after switching it off Do not place any items of clothing hand towels or similar over the hea...
Page 16: ...as with high ceilings The heater must not be within reach from the floor as severe burns may occur due to high surface temperatures Do not use this heater in small rooms or where the room or area is o...
Page 17: ...17 x 15 5 cm 90 x 17 x 15 5 cm 128 6 x 17 x 15 5 1 OPERATION WARNING Slight crackles may be heard during the heating or cooling period This is normal operational noise NOTE After switching on the app...
Page 18: ...al to the product s performance Description of remote control panel a Weak battery LED b Channel selection indicator LEDs c Select Channel select switch d Variation dial e Auto man mode selector f Wal...
Page 19: ...nds more than 5 seconds and less than 15 seconds 3 3 Switch the power off 2 seconds 3 4 Switch the power on The lamp will be ON and OFF one cycle The symbol means one cycle of lamp ON OFF 3 5 Press th...
Page 20: ...5 seconds to remove my favorite power setting 5 3 Briefly press MY button when the heater is in standby or other power level the heater will start to work or set to the favorite power level 6 TIMER 6...
Page 21: ...the manual carefully The heater must be installed in accordance with the manufacturer s installation instructions This heater comes with a pair of stainless steel adjustable angle mounting brackets T...
Page 22: ...ances when mounting the heater parallel with a ceiling Unit in mm Minimum clearances when mounting the heater at an angle to the ceiling Unit in mm 22 EN 1000 Min to surfaces ie table tops ect 1800 Mi...
Page 23: ...ut 2 Take out the packing paper sheet from the end of heater 3 Take out one pair of mounting Brackets These adjustable brackets allow direct ceiling or wall mount and come with preset angle options of...
Page 24: ...ang the heater on the brackets and firmly secure in place with the mounting bracket locking plates by tightening bolts labelled A Model No B MINIMUM DISTANCE mm 1500W 500 50 1800W 500 50 2200W 500 50...
Page 25: ...eck the electric cable contacts and terminal connectors for good tightening If the body becomes dirty wipe off dust with a towel and the radiating boards should be wiped in cold condition with a damp...
Page 26: ...nstallation Unit is not installed in correct position possibly too high or heater is too small for recommended area There is a burning smell and or strange sounds other than normal expansion and contr...
Page 27: ...WIRING SCHEMATIC DIAGRAM IOBRELG1500 IOBRELG1800 IOBRELG2200 IOBRELG3000 27 EN 230 240VAC 50 60Hz 230 240VAC 50 60Hz 1500W 1800W 2200W...
Page 28: ...temp rature des panneaux radiants pendant le fonctionnement peut atteindre 380 C Pour viter les br lures ne touchez pas la surface de l appareil avec les mains ou d autres parties du corps Il est gale...
Page 29: ...et appareil de chauffage n est pas quip d un dispositif permettant de contr ler la temp rature de la pi ce Cet appareil de chauffage doit tre utilis dans des environnements ouverts ou en plein air ou...
Page 30: ...0 IOBRELG3000 Voltage Puissance W 1500 1800 2200 3000 Installation Mur plafond Mur plafond Mur Mur plafond Hauteur de montage minimale M 1 8 1 8 2 1 2 1 Classe de protection lectrique I I I I Gamme de...
Page 31: ...le chauffage et la t l commande doit tre inf rieure 3 m tres et la t l commande doit tre directement dirig e vers le r cepteur situ sur le panneau avant pendant le fonctionnement Instruction d op rat...
Page 32: ...onnement 2 LED 2 allum e qui permet de r guler le chauffage 2 4 Replacez le couvercle du compartiment piles 2 5 Appuyez simultan ment sur les boutons HAUT et BAS jusqu ce que la lampe s allume et s te...
Page 33: ...veau de puissance le plus lev Appuyez sur la touche BAS pour teindre le chauffage 4 3 Faites d filer la molette vers le haut ou vers le bas et faites varier le chauffage entre LOW BAS MED MOYEN HIGH H...
Page 34: ...dant 2 secondes La lampe est allum e teinte dans le premier cycle 6 4 Appuyez sur la touche DOWN pour r gler la minuterie sur 3 heures sur la touche MY pour r gler la minuterie sur 6 heures et sur la...
Page 35: ...OBRELG3000 La position de montage id ale est directement au dessus de la zone chauffer avec une orientation longitudinale et orient e verticalement vers le bas Avertissement Le chauffage ne doit jamai...
Page 36: ...ELG3000 Distance minimale lors du montage de l appareil de chauffage sur UN MUR VERTICAL 36 FR 1000 Min to surfaces ie table tops ect 1800 Min from floor 1500W 1800W 2100 Min from floor 3000W 3000 Max...
Page 37: ...supports r glables permettent un montage direct au plafond ou au mur et sont livr s avec des options d angle pr d finies parall le 15 30 45 et hauteur 165mm 4 Le processus d installation correct comme...
Page 38: ...chaleur derri re le chauffage Si le chauffage doit tre mont sur une inclination par exemple un plafond vo t assurez vous que la prise de courant se trouve son point le plus bas 38 FR L appareil de ch...
Page 39: ...appareil dans l eau Danger de mort Emballage Les mat riaux d emballage sont choisis en tenant compte de l environnement et sont donc recyclables Manipulation du produit en fin de vie active Le symbole...
Page 40: ...extr mes telles que les grands vents les temp ratures excessivement froides peuvent r duire les performances de chauffage d une installation ext rieure L unit n est pas install e dans la position corr...
Page 41: ...DIAGRAMME C BLAGE IOBRELG1500 IOBRELG1800 IOBRELG2200 IOBRELG3000 41 FR 230 240VAC 50 60Hz 230 240VAC 50 60Hz 1500W 1800W 2200W...
Page 42: ...ispositivo si scalda molto durante il funzionamento Pertanto impostare il dispositivo in modo da escludere contatti accidentali Burns Non asciugare vestiti asciugamani o simili sull apparecchio Surris...
Page 43: ...otato di un unit di controllo della temperatura ambiente Questo riscaldatore progettato per l uso all aperto o in ambienti di grandi dimensioni con soffitti alti Il riscaldatore non deve essere access...
Page 44: ...x 17 x 15 5 90 x 17 x 15 5 128 6 x 17 x 15 5 ATTENZIONE possibile udire leggeri crepitii durante il periodo di riscaldamento o raffreddamento Essi rappresentano normali rumori di funzionamento NOTA D...
Page 45: ...re sulle prestazioni del prodotto 1 Descrizione telecomando Somfy a LED display stato della batteria b Indicatori LED selezione canali c Selezione canali radio d Quadrante Variation e Selettore modali...
Page 46: ...Attenzione Questo ripristino rimuove tutti i telecomandi Per aggiungere un nuovo telecomando leggere le sezioni 2 5 e 2 6 3 1 Spegnere l alimentazione per 2 secondi 3 2 Accendere l alimentazione per 1...
Page 47: ...oni preferito 5 1 Selezionare il canale per il riscaldamento con il livello di potenza preferito BASSO MED o ALTO quindi premere il tasto MY per circa 5 secondi La lampada sar accesa spenta in un cicl...
Page 48: ...timer su 3 ore il pulsante MY per impostare il timer su 6 ore e il pulsante SU per impostare il timer su 12 ore 6 5 La lampada accesa spenta in 1 ciclo 6 6 Premere il tasto MY per 2 secondi 6 7 La la...
Page 49: ...a riscaldare con un orientamento longitudinale e rivolto verso il basso verticalmente AVVERTIMENTO Il radiatore non deve mai essere installato rivolto verso l alto o verso l interno la superficie di r...
Page 50: ...anze minime da rispettare per il montaggio del radiatore a muro verticale Unit in mm 50 IT IOBRELG1500 IOBRELG1800 IOBRELG2200 IOBRELG3000 1000 Min to surfaces ie table tops ect 1800 Min from floor 15...
Page 51: ...to del radiatore sul soffitto disponendo il perno o i travetti strutturali in modo da garantire un fissaggio sicuro del radiatore pur rispettando le distanze minime dal pavimento e altre avvertenze 5...
Page 52: ...52 IT NOTA A seconda del materiale e del design degli elementi strutturali del so tto l apparecchio deve essere ssato utilizzando gli elementi di raccordo corretti Il peso totale del radiatore e del...
Page 53: ...tanto necessario contattare il proprio rivenditore specializzato o il servizio clienti Importante Qualsiasi manomissione dell apparecchio invalider la garanzia Le riparazioni eseguite in modo impropri...
Page 54: ...rivenditore Contattare il servizio o il rivenditore autorizzato Quando viene attivato l interruttore automatico di sicurezza messa a terra salta o si brucia un fusibile Spegnere il radiatore e contatt...
Page 55: ...DIAGRAMMA SCHEMATICO DI CABLAGGIO IOBRELG1500 IOBRELG1800 IOBRELG2200 IOBRELG3000 55 IT 230 240VAC 50 60Hz 1500W 1800W 2200W 230 240VAC 50 60Hz...
Page 56: ...ico Se recomienda un fusible especial para el foco Conecte el aparato nicamente a una toma de corriente debidamente instalada con contacto de puesta a tierra Este aparato se debe manipular con cuidado...
Page 57: ...rial del techo debe ser de al menos 80 C ADVERTENCIA Este calentador no est equipado con una unidad de control de temperatura ambiente Este calentador est dise ado para usarse al aire libre o en habit...
Page 58: ...17 x 15 5 90 x 17 x 15 5 128 6 x 17 x 15 5 ADVERTENCIA Se pueden escuchar leves crujidos durante el per odo de calentamiento o enfriamiento Es un ruido de funcionamiento normal NOTA Al encender el ar...
Page 59: ...imiento del producto Descripci n telemando Somfy a Pantalla LED de estado de la bater a b Selecci n de canal de indicadores LED c Selecci n canales de radio d Variaci n de l nea e Selector de modo aut...
Page 60: ...auci n Este reinicio elimina todos los controles remotos Para agregar un nuevo control remoto lea las secciones 2 5 y 2 6 3 1 Apague la alimentaci n durante 2 segundos 3 2 Encienda la alimentaci n dur...
Page 61: ...5 1 Seleccione el canal para calentar con su nivel de potencia preferido BAJO MEDIO o ALTO y luego presione el bot n My durante aproximadamente 5 segundos La l mpara se encender apagar en un ciclo El...
Page 62: ...temporizador en 3 horas el bot n My para configurar el temporizador en 6 horas y el bot n UP para configurar el temporizador en 12 horas 6 5 La l mpara se enciende apaga en 1 ciclo 6 6 Presione el bot...
Page 63: ...ajo o haci afuera A continuaci n encontrar las distancias m nimas para montar el calentador en paralelo al techo Unidad en mm 63 ES INSTALLACI N Este calentador viene con un par de soportes de montaje...
Page 64: ...montaje en pared Unidad en mm Distancias 64 ES IOBRELG1500 IOBRELG1800 IOBRELG2200 IOBRELG3000 1000 Min to surfaces ie table tops ect 1800 Min from floor 1500W 1800W 2100 Min from floor 3000W 3000 Ma...
Page 65: ...l techo teniendo en cuenta la posici n del montante o las vigas estructurales para garantizar que el calentador se sujete de manera segura adem s de respetar las distancias m nimas al suelo y otras re...
Page 66: ...o con un trapo h medo y h medo en fr o Mientras est en funcionamiento es necesario corroborar peri dicamente una vez al a o que los contactos del cable el ctrico y los conectores de los terminales est...
Page 67: ...mente fr as puede disminuir la capacidad de calefacci n de una instalaci n al aire libre La unidad no est instalada en la posici n correcta posiblemente est demasiado alta o el calentador sea demasiad...
Page 68: ...c clelo de manera responsable para fomentar la reutilizaci n sostenible de los recursos materiales Para devolver su dispositivo usado utilice los sistemas de devoluci n y recolecci n o contacte con el...