background image


15 

Attaching the Loader to Your Tractor 

(Continued) 


6. 

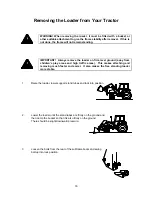
When the hook is lined up, dump or roll back the bucket to lower or raise the subframe 
upright to align with the mounting boot. 


7. 

Continue to drive the tractor forward until the subframe uprights are seated in the boot. 


8. 

Secure the subframe uprights with the bolts and washers.  Torque to 500 ft-lbs. 


IMPORTANT:  When mounting for the first 
time, the front hook bolts will have to be 
tightened after positioning the hook 
directly over the mounting boss (most 
rearward position). 


9. 

Raise the loader and lock the support stand tubes into the up position. 


NOTE:  When mounting for the first time, 
raise the loader slowly and check to make 
sure that the hoses do not bind or become 
pinched in all positions. Work the loader and 
bucket up and down to work out all the air in 
the hydraulics.  Check and refill the tractor’s 
hydraulic system. 

Summary of Contents for Allied 595

Page 1: ......

Page 2: ...en material published is for the sole purpose of identifying goods and shall conform to such descriptions Any sample or model is for illustrative purposes only and does not create an Express Warranty...

Page 3: ...tion Diagram 9 General Instructions and Information 10 Operation and Maintenance 11 Operating Suggestions for Loading 12 Operating Suggestions for Backfilling 13 Attaching the Loader to Your Tractor 1...

Page 4: ......

Page 5: ...alled 4 All bolts are tightened to the torque specifications shown in the torque chart 5 All safety decals are readable 6 The loader has been tested and operates properly 7 The operator s manual has b...

Page 6: ...4 Loader Identification Diagram HSL Model Shown For further details refer to Loader Mainframe and Subframe diagrams...

Page 7: ...ng to tractor remote couplers Hose Kit C Loader operated by an external valve that is plumbed into the tractor hydraulic system Consists of 4 hoses leading from loader tubing to external mounted valve...

Page 8: ...aving tractor seat Do not walk under raised bucket Never operate loader while operator is not seated in the driver s seat on the tractor Keep tractor on solid ground Loose fill rocks and holes can be...

Page 9: ...ARD To prevent serious injury of death Do not handle round bales or other shiftable objects unless loader is equipped with an attachment designed for this purpose Do not handle loose loads that are no...

Page 10: ...r weight for stability 7 Move wheels to widest recommended settings to increase stability 8 Do not handle large round bales or other shiftable objects unless loader is equipped with a grapple fork 9 D...

Page 11: ......

Page 12: ...ing hydraulics follow the circuit carefully See hydraulic hook up section and make sure the hoses do not contact any hot manifolds or sharp edges on tractor After assembly raise the loader slowly and...

Page 13: ...or is the easier it will roll We recommend that weight be added to rear tires with liquid or by the installation of rear wheel weights Where additional weight is required a counterweight box can be fa...

Page 14: ...to turn tractor while loading bucket can cause damage to both the loader and tractor Come in level NOTE Bottom surface of bucket is parallel to line on motion Work both levers back to direct pressure...

Page 15: ...ucket in dumped position for bulldozing This will only impose severe shock loading on the bucket cylinders and make it more difficult to maintain a level grade Backgrade work surface with a loaded buc...

Page 16: ...of the air is removed Loosen the bolts on the hooks so that they can be moved Also check that the nuts in the rear of the subframes are in line with the holes 3 On some tractors the lift cylinders ma...

Page 17: ...to 500 ft lbs IMPORTANT When mounting for the first time the front hook bolts will have to be tightened after positioning the hook directly over the mounting boss most rearward position 9 Raise the lo...

Page 18: ...y from children s play areas and high traffic areas This makes attaching and removing much faster and easier It also makes the free standing loader more stable 1 Raise the loader lower support stand t...

Page 19: ...ll back the bucket all the way This raises the rear uprights of the loader NOTE On some mountings the lift cylinders must be extended more while the tractor is backing up so that the subframes clear t...

Page 20: ...d O rings in valve Install an O ring repair kit Insufficient lift capacity Improper hydraulic pump operation Repair or replace pump Load is greater than boom lift capacity Check loader specifications...

Page 21: ...forced to supply oil at a higher pressure no damage to the loader components will occur It is however recommended to avoid the above situations and keep the bucket somewhat level while raising or lowe...

Page 22: ......

Page 23: ...iner Weldment 2 2 2 2 11 110887 Loader Lift Lock Weldment 2 2 2 2 12 812717 Grommet 0 375 ID X 1 00 OD X 13 2 2 2 2 13 812026 Bolt Hex 0 313nc X 1 00 gr5 pl 2 2 2 2 14 812944 Bolt Car 0 625nc X 3 00 g...

Page 24: ......

Page 25: ...50 Long 4 4 14 117371 Pin Qtach 4 4 15 113766 Bushing 1 25 ID x 1 50 OD x 1 375 Long 8 8 16 24242 Tube Cover 1 1 17 24407 3 0 Dia x 20 63 Bucket Cylinder 2 2 18 24408 3 0 Dia x 20 50 Lift Cylinder 2...

Page 26: ......

Page 27: ...1967 Locknut 0 625 DIA 4 4 25 113691 Bushing 1 25 I D X 1 63 O D x 0 75 lg 8 8 26 81570 Flat Washer 0 375 DIA 4 4 27 113570 Bushing 1 25 I D X 1 63 O D x 1 88 lg 4 4 28 113766 Bushing 1 25 I D x 1 50...

Page 28: ...26 595 S595 Hydraulic Plumbing Diagram...

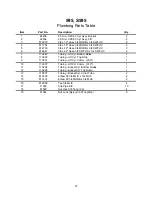
Page 29: ...2 Tubing Lift Cyl Bottom Raise 1 8 113223 Tubing Lift Cyl Top Drop 1 9 113031 Tubing Lift Cyl Comm 23 0 1 10 112937 Tubing Lift Cyl Comm 31 0 1 11 113224 Tubing Bucket Cyl Bottom Rollbk 1 12 113225 Tu...

Page 30: ......

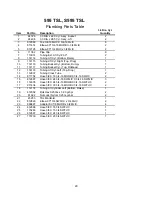
Page 31: ...l Left Top Drop 1 13 112837 Tubing Cross Tube 2 14 811754 Hose 3 8 X 18 3 4 16 MORB X 3 4 16 SWJIC 2 15 812697 Hose 3 8 X 24 3 4 16 SWFJIC X 3 4 16 SWFJIC 3 16 114605 Hose 3 8 X 24 3 4 16 MORB X 3 4 1...

Page 32: ...Shaft Diameter 1 50 1 50 1 75 1 50 1 75 Item Description Part Number Part Number Part Number Part Number Part Number 1 Head Plate 24540 24656 24606 24540 24606 2 Shaft Weldment 113120 113120 113928 1...

Page 33: ......

Page 34: ...IA Atlantic 712 243 5520 IA Lakeview 712 657 8585 ID Meridian 208 887 6006 IL Hooppole 815 948 2591 IL LeRoy 309 962 8414 IN Clarksville 812 284 3376 IN Crawfordsville 317 362 4495 KS Wichita 765 265...

Reviews: