background image

10

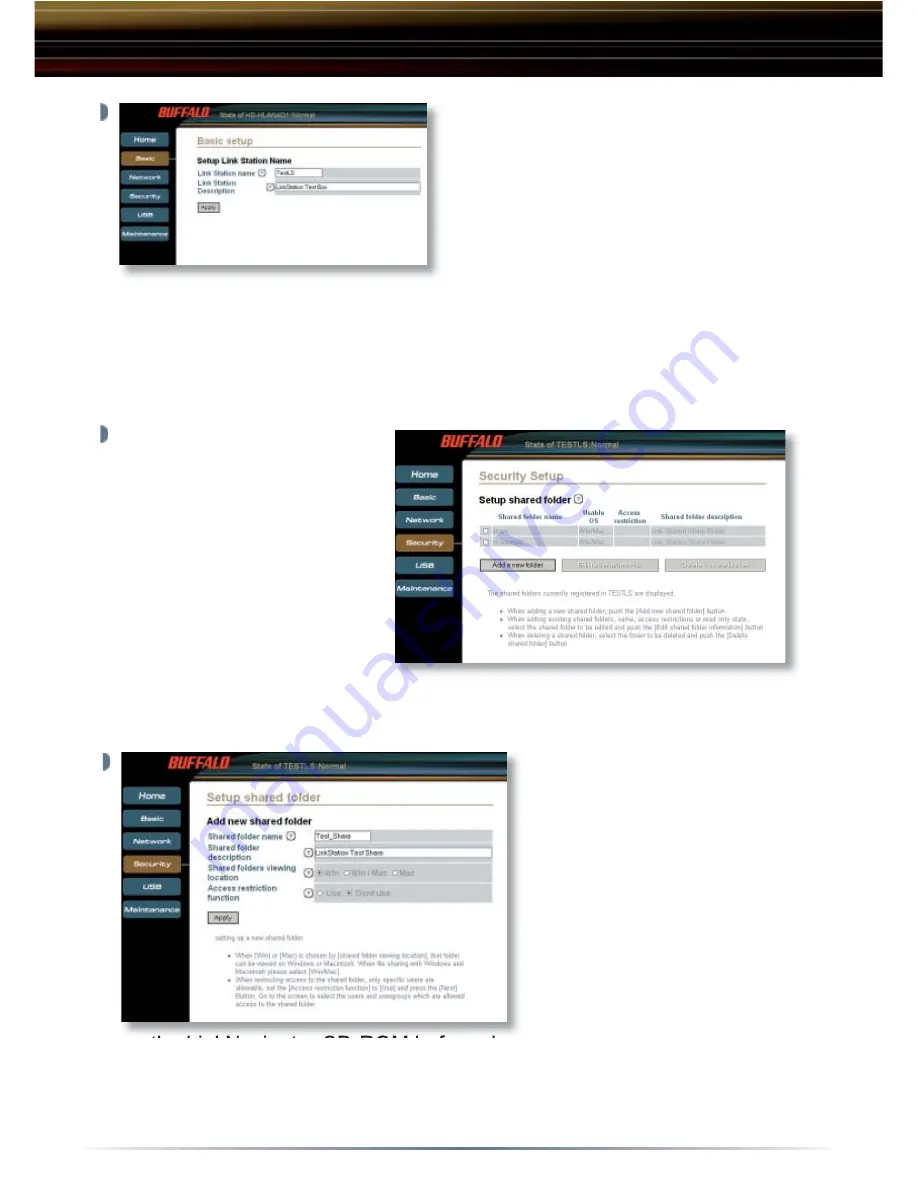
The LinkStation name is 
used to name and identify the 
LinkStation.  A friendly, easy name 
is recommended.  Enter a suitable 
name in the  

LinkStation Name


fi eld.  Feel free to use your fi rst or 
last name, a description of the data 

to be installed on LinkStation, or simply name it LinkStation. Enter a 
short description of LinkStation in the

 ‘

LinkStation Description

 fi eld.  

Once completed, press the 

Apply

 button.  

NOTE: 

 After changing the 

LinkStation name, 

you may be required to re-locate the network share 

by following the instructions on Page 4 or Page 6.

By default there are two 
shares on LinkStation.  If 
you would like to create 
additional shares for 
specifi c users or specifi c 
types of data, then click 
on the 

Security

 tab. 

Then click on the 

Shared 

Folder Setup

’ 

link.  From 

this confi guration page 
you can add new shares or edit existing shares.  Press the 

Add a New 

Folder

 button to begin creating a new shared folder.     

To begin setting up a new 
share, enter an appropriate 
share/folder name in the 

Shared Folder Name


fi eld.  Enter a description 
of the share in the 

Shared 

Folder Description

’ 

fi eld.  

It is recommended to leave 
the remaining settings in 
their default state.  Please 
refer to the User Manual 

on the LinkNavigator CD-ROM before changing any of these additional 
settings.  Press the 

Apply

 button when fi nished.  Please repeat this 

step to create additional shares.

General LinkStation Confi guration

Summary of Contents for LinkStation HD-H series

Page 1: ...gator Installation CD 1 Quick Setup Guide this user s guide 1 Warranty card 1 If any items are missing or damaged please contact the reseller or retailer from which the product was purchased The front...

Page 2: ...tlet Then connect the included Ethernet Cable into the Ethernet port on the back of LinkStation Press the power button on the front of LinkStation to turn LinkStation on Connect the other end of the i...

Page 3: ...he Cable Selection switch Verify that the LINK ACT light on the front of LinkStation is lit see Step 4 s picture If it is lit turn to Page 4 to contintue setting up LinkStation If the LINK ACT light i...

Page 4: ...e named HD xxx One of two windows will appear An SMB mount window or an Apple leshare window If the SMB Mount Window opens By default there are two share folders on the LinkStation Share and Share Mac...

Page 5: ...c and click OK The LinkStation will now appear on your desktop and in your nder You are now ready to copy les to the LinkStation Simply drag and drop les onto the Share Mac icon If the Apple Fileshare...

Page 6: ...ow Select the LinkStation and click OK The login window will open Select Guest and click Connect From the Apple Menu Iitems Select the Chooser By default there are two share folders on the LinkStation...

Page 7: ...CUPS GIMP drivers for todays most common printers If you printer does not appear try a generic Postscript Printer or contact the printer manufacturer Selecting the correct Printer Model ensures all p...

Page 8: ...ftware is available for both OSX and OS9 Some of these solutions are free and some with more functionality may have a small cost We recommend you search the WWW or consult your local reseller for othe...

Page 9: ...may add addition les and folders by clicking the button on the bottom left and select which les and folders you would like to backup Once done click the Backup Now button Your les will now be backed...

Page 10: ...If you would like to create additional shares for speci c users or speci c types of data then click on the Security tab Then click on the Shared Folder Setup link From this con guration page you can...

Page 11: ...rence that may cause undesired operation Technical Speci cations LAN Standards IEEE 802 3u 100BASE TX IEEE 802 3 10BASE T Transmission Types 100Mbps 10 Mbps 100BASE TX 4B 5B MLT 3 10BASE T Manchester...

Reviews: