background image

Chapter 4  Client Manager

WI-U2-800D / WI-U2-400D User Manual

51

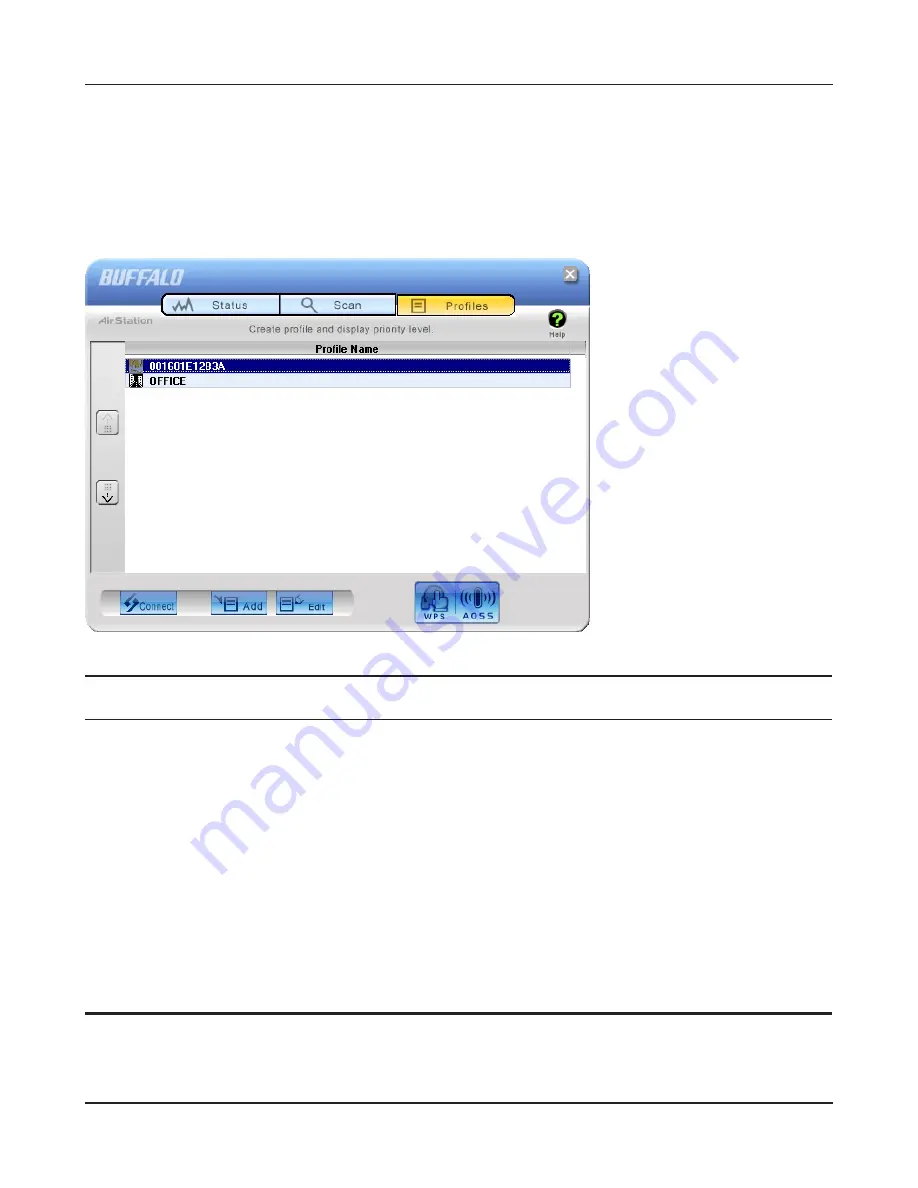
Profiles

Connect to an access point or edit a profile.

Parameter

Meaning

Connect

Selecting a profile and clicking this button will connect to an access 
point using a stored profile.

Add

Click this to add a new profile.  It will display the Profiles Information 
screen (next page).

Edit

Click this to edit or delete information in a profile.

WPS  AOSS

Click this button to have AOSS/WPS (PBC) automatically set security.
After connection, a profile based on these settings will be created.

802.1x Profiles

This button is displayed when Client Manager is operating in 
Business Mode.  Click to configure 802.1x authentication.

Summary of Contents for AirStation WI-U2-400D

Page 1: ...User Manual AirStation WI U2 866D WI U2 400D www buffalotech com...

Page 2: ...rk 13 Automatic Secure Setup AOSS WPS 13 Windows 8 7 or Vista Client Manager V 14 Windows XP Client Manager 3 15 Automatic Secure Setup WPS PIN 16 Windows 8 7 or Vista Client Manager V 16 Windows XP C...

Page 3: ...s Access Points 35 Wireless Network Information 36 WPS PBC AOSS selection 37 Wireless Status 38 Wireless LAN Diagnostic 40 Profile List 41 Wireless Properties 42 Network Properties 43 Browser Properti...

Page 4: ...o the Network Wirelessly 60 You Forgot the AP s SSID Encryption Key or Password 60 Other Tips 61 Appendix 63 Specifications 63 WI U2 866D 63 WI U2 400D 66 Uninstalling the Software 68 Uninstalling the...

Page 5: ...cal CPUs Computers with Dual core CPU s are supported AirStation does not support Windows Vista 32 bit Standby mode Compatible OS Windows 8 32 bit or 64 bit Windows 7 32 bit or 64 bit Vista 32 bit XP...

Page 6: ...Chapter 1 Product Overview WI U2 800D WI U2 400D User Manual 5...

Page 7: ...ers Do not connect the AirStation to your computer yet 1 2 Boot your computer and insert the AirNavigator CD The setup wizard will launch automatically Note If the setup wizard doesn t launch double c...

Page 8: ...0D WI U2 400D User Manual 7 4 Disable any firewalls and click Next 5 Click Install 6 Click Next Note Check Install Wireless Client Manager to install Client Manager after the drivers Refer to page 10...

Page 9: ...lation 7 Read the license agreement select Agree then click Next 8 Check Always trust software from BUFFALO INC and click Install 9 When the screen to the left is displayed attach the AirStation to yo...

Page 10: ...alled the screen at left will be displayed Click Finish Note If you checked the box to Install Wireless Client Manager page 7 then the installation screen for Client Manager will be displayed after th...

Page 11: ...the procedure below to install Client Manager 1 Boot your computer and insert the AirNavigator CD The setup wizard will launch automatically Note If the setup wizard is not displayed double click My...

Page 12: ...U2 400D User Manual 11 4 Check the box for Install Wireless Client Manager and click Install Note Use Client Manager V with Windows 7 Vista or Client Manager 3 with Windows XP 5 Click Next 6 Read the...

Page 13: ...WI U2 800D WI U2 400D User Manual 12 Chapter 2 Installation 7 8 9 Click Next Click OK Click Back 10 Click X at the top right corner of the window to close it Client Manager is now installed...

Page 14: ...this system to connect to wireless devices computers or game machines which support AOSS or WPS AOSS AirStation One Touch Secure System is technology developed by Buffalo Technology WPS was created by...

Page 15: ...AirStation Utility Client Manager V Windows 8 7 or Vista Client Manager V If you are using Windows 8 7 or Vista use the included Client Manager V software to connect wire lessly with AOSS or WPS Clic...

Page 16: ...k or Public location depending on the environment in which the AirStation will be used 2 Windows XP Client Manager 3 If you are using Windows XP use the included Client Manager 3 software to connect w...

Page 17: ...use WPS PIN first install Client Manager software on your computer See chapter 2 for instructions on installing Buffalo Client Manager software Windows 8 7 or Vista Client Manager V The procedure for...

Page 18: ...Chapter 3 Connect to a Wireless Network WI U2 800D WI U2 400D User Manual 17 4 Click Advanced Setup 5 Click WPS PIN...

Page 19: ...I U2 400D User Manual 18 Chapter 3 Connect to a Wireless Network 6 Carefully copy the PIN to a piece of paper then click Next 7 Select the access point to connect to then click Next This screen will b...

Page 20: ...nterface The screen to enter the PIN code will be displayed 9 Navigate to the WPS PIN configuration screen then enter the PIN that you write down in step 6 Note If the access point you are trying to c...

Page 21: ...If you are using Windows XP use your Client Manager 3 software to connect wirelessly with WPS PIN 1 Right click on the icon in the system tray and select Easy Connection WPS PIN Code type 2 Carefully...

Page 22: ...ffalo AirStation click Wireless Config WPS from the home page of the configuration interface The screen to enter the PIN code will be displayed 5 Navigate to the WPS PIN configuration screen then ente...

Page 23: ...on the version of Windows used First install Client Manager from the included CD See chapter 2 for instructions on installing Client Manager Windows 8 7 or Vista Client Manager V With Windows 7 or Vi...

Page 24: ...Chapter 3 Connect to a Wireless Network WI U2 800D WI U2 400D User Manual 23 4 Click Advanced Setup 5 Click Connect Manually...

Page 25: ...Enter your Network Type Security Type Encryption Method and Encryption Key passphrase then click Connect When Connection has been completed is displayed your connection is complete If Set Network Loc...

Page 26: ...Client Manager 3 is a wireless connection utility for Windows XP 2 1 Right click on the icon in the system tray and select Scan Select the access point to connect to and click Next 3 Choose your Encr...

Page 27: ...procedure varies depending on the version of Windows used Windows 8 or 7 WLAN AutoConfig Use WLAN AutoConfig to connect to the AirStation 1 Click on the network icon in the system tray 2 Select the t...

Page 28: ...400D User Manual 27 1 Right click on the wireless network icon in the system tray 2 Click Connect to a network Select your wireless network and click Connect 3 Windows Vista WLAN AutoConfig You can u...

Page 29: ...WI U2 800D WI U2 400D User Manual 28 Chapter 3 Connect to a Wireless Network If the screen below is displayed click I want to enter the network key or passphrase instead Go to step 4...

Page 30: ...WI U2 400D User Manual 29 Enter the encryption key and click Connect 4 Step through the wizard to complete configuration If the Set Network Location screen is displayed select Home Work or Public loc...

Page 31: ...all Client Manager 3 to use Wireless Zero Configuration or just use Client Manager 3 to connect to the AirStation 1 Right click on the wireless network icon in the system tray 2 Click View Available W...

Page 32: ...dows XP The installation program will install the correct version for your operating system Using Client Manager V Opening and Closing Client Manager When you install Client Manager it will be added t...

Page 33: ...ong them Transmission Speed Displays the current connection speed Signal Strength Displays the current signal strength Create Profile Click this to display the Automatic Secure Setup and Advanced Setu...

Page 34: ...ure your wireless settings manually It will display the SSID WPS PIN selection screen next page Option Expert only Click this to specify whether you use AOSS or WPS PBC for connection in Automatic Sec...

Page 35: ...figure connection settings Click here to display the Searching Wireless Access Points screen next page Connect with WPS PIN Click this to connect to a wireless access point by entering its WPS PIN SSI...

Page 36: ...s the signal strength of an access point Enter the Network Name SSID manually Click this to enter an SSID manually and display the Wireless Network Information screen page 36 Search Click here to sear...

Page 37: ...ype of the selected access point Encryption Method Select the encryption method of the selected access point Encryption Key or Passphrase Enter the encryption key for the access point Connect to a net...

Page 38: ...hod Click this to automatically connect to an access point that supports WPS Automatic Secure Setup AOSS method Click this to automatically connect to an access point that supports AOSS WPS PBC AOSS s...

Page 39: ...ses wizard page 40 Profile Name Displays the current profile name Status Displays the current transmission status Network Mode Displays the current network mode Transmission Speed Displays the current...

Page 40: ...s the type of encryption currently used Signal Strength Displays the current signal strength IP Address Displays the IP address assigned to your wireless client Subnet Mask Displays the subnet mask as...

Page 41: ...restrictions Some items may not be displayed depending on your wireless device Signal strength and quality displays may vary depending on wireless devices These graphs should not be used to compare d...

Page 42: ...ireless client which is currently used New Create a new profile Click this to display the Automatic Secure Setup and Advanced Setup screen page 33 Edit Edit the selected profile Click this to display...

Page 43: ...ection Security Type Displays the security type you are using for the current connection Encryption Type Displays the encryption type you are using for the current connection Security key or Pass phra...

Page 44: ...ly by DHCP You may configure it manually from this screen Parameter Meaning Do not change IP Address settings of this Profile Select to keep your current TCP IP network setting without any changes Thi...

Page 45: ...rer settings for wireless connections Parameter Meaning Do not change the browser settings of this Profile Select to keep the current Internet Explorer settings Use the following settings Select this...

Page 46: ...onfigure the printer used while connected to an access point wirelessly Parameter Meaning Do not change the printer settings of this Profile Select to keep your current printer settings Use the follow...

Page 47: ...Station Utility ClientManager3 Right click on the Client Manager icon in the system tray and click Exit to close Client Manager The Client Manager icon will change appearance according to its connecti...

Page 48: ...t connection profile name SSID SSID of the currently connected access point Adapter Name Name of the wireless client currently in use Network Type Current network mode Transmission Speed Current trans...

Page 49: ...Chapter 4 Client Manager Parameter Meaning MAC Address MAC address of this unit Duration Elapsed duration of the current wireless connection Signal Strength Current signal strength Reconnect Click to...

Page 50: ...int Wireless mode Wireless type such as 11a and 11g of the access point Channel Wireless channel of the access point Strength Reception strength of each access point Encryption Displays if security is...

Page 51: ...r Connect Configure connection to an access point Parameter Meaning Encryption Method Type of encryption used by the access point Encryption Key Enter the access point s encryption key pass phrase Reg...

Page 52: ...profile Add Click this to add a new profile It will display the Profiles Information screen next page Edit Click this to edit or delete information in a profile WPS AOSS Click this button to have AOSS...

Page 53: ...wireless or wired Ethernet For use with the AirStation select Wireless Profile Name Enter a name for the profile Network Type Select infrastructure mode to connect to an access point recommended or ad...

Page 54: ...hod used by the wireless access point Transmission Key If WEP is used for the Encryption Method 4 pass phrases may be entered Use of the first at least is recommended Encryption Key Enter the encrypti...

Page 55: ...o not change IP Address settings of this Profile Check to keep using current TCP IP network settings Automatically acquire the IP Address Check to automatically acquire the IP address from a DHCP serv...

Page 56: ...orer settings when connecting wirelessly Uncheck to use any of the settings below Address to use as Home Page To use a different home page in Internet Explorer when connecting wirelessly enter it here...

Page 57: ...t Manager Profile Information Printers Configure the printer that your computer uses when connected wirelessly Parameter Meaning Do not change the printer settings of this Profile Select this option t...

Page 58: ...lays the Status screen page 47 Scan Displays the Scan screen page 49 Profile Displays the Profiles screen page 51 Easy Connection Runs Automatic Secure Setup using one of the following connection meth...

Page 59: ...ofiles screen Page 51 Home Mode is recommended Lock If you click this you will not be able to add new profiles or edit existing profiles To lock or unlock enter the password 8 63 characters Export a p...

Page 60: ...ation unlock the unit Use the following network adapter Select a network adaptor to use in Client Manager Wireless Adapter Auto select is recommended for most users Automatically connect to the profil...

Page 61: ...n access point wirelessly Configure the same SSID encryption method and encryption key for each wireless device These settings must match those of your wireless access point move your wireless devices...

Page 62: ...r the correct security key and encryption type into the Windows connection manager To enter the security key in Windows XP Go to View Available Wireless Networks and select change Advanced Settings Cl...

Page 63: ...ifying that the modem is connected to the wireless router with a cable to the WAN port power on the modem and wait two minutes Turn on the wireless router and then the computer Verify whether an Inter...

Page 64: ...1 stream 20 MHz BW Short GI 173 3 144 4 130 115 6 86 7 57 8 43 3 28 9 14 4 Mbps 2 stream 86 7 72 2 65 57 8 43 3 28 9 21 7 14 4 7 2 Mbps 1 stream 40 MHz BW Long GI 360 324 270 243 216 162 108 81 54 27...

Page 65: ...m 40 MHz BW Long GI 270 243 216 162 108 81 54 27 Mbps 2 stream 135 121 5 108 81 54 40 5 27 13 5 Mbps 1 stream 40 MHz BW Short GI 300 270 240 180 120 90 60 30 Mbps 2 stream 150 135 120 90 60 45 30 15 M...

Page 66: ...136 140 Australia India Hong Kong Philippines Thailand Malaysia Singapore 5180 5240 MHz Channels 36 40 44 48 5260 5320 MHz Channels 52 56 60 64 5745 5825 MHz Channels 149 153 157 161 165 802 11g Frequ...

Page 67: ...162 108 81 54 27 Mbps 2 stream 180 162 135 121 5 108 81 54 40 5 27 13 5 Mbps 1 stream 40 MHz BW Short GI 400 360 300 270 240 180 120 90 60 30 Mbps 2 stream 200 180 150 135 120 90 60 45 30 15 Mbps 1 st...

Page 68: ...802 11a Frequency Range China 5745 5825 MHz Channels 149 153 157 161 165 South Korea 5180 5240 MHz Channels 36 40 44 48 5745 5825 MHz Channels 149 153 157 161 165 Taiwan 5260 5320 MHz Channels 52 56...

Page 69: ...vi exe 2 Click Options 3 Click Uninstall software 4 Follow the insturctions on the screen to delete the Utility software Uninstalling the Drivers To remove the AirStation wireless client drivers follo...

Page 70: ...sage Windows needs your permission to continue appears click Continue 6 Select Internet Protocol Version 4 TCP IPv4 then click Properties 7 To have DHCP set your IP address settings automatically chec...

Page 71: ...dows needs your permission to continue click Continue 6 Select Internet Protocol Version 4 TCP IPv4 then click Properties 7 To have DHCP set your IP address settings automatically check Obtain an IP a...

Page 72: ...rotocol TCP IP then click Properties 5 To have DHCP set your IP address settings automatically check Obtain an IP address auto matically and Obtain DNS server address automatically To set your IP addr...

Page 73: ...nto an outlet on a circuit different from that to which the receiver is connected Consult the dealer or an experienced radio TV technician for help FCC Caution Any changes or modifications not express...

Page 74: ...ed operation Cet appareil num rique de la classe B est conforme la norme NMB 003 du Canada Ce dispositif est conforme la norme CNR 210 d Industrie Canada applicable aux appareils radio exempts de lice...

Page 75: ...sent metteur radio peutfonctionner avec une antenne d un type et d un gain maximal ou inf rieur approuv pourl metteur par Industrie Canada Dans le but de r duire les risques de brouillage radio lectr...

Page 76: ...ervices Part 1 Common technical requirements EN 301 489 17 V2 1 1 2009 05 Electromagnetic compatibility and Radio spectrum Matters ERM ElectroMagnetic Compatibility EMC standard for radio equipment an...

Page 77: ...ja nimetatud direktiivist tulenevatele teistele asjakohastele s tetele English Hereby Buffalo Technology Inc declares that this AirStation WI U2 800D WI U2 400D is in compliance with the essential req...

Page 78: ...Inc nyilatkozom hogy a AirStation WI U2 800D WI U2 400D megfelel a vonatkoz alapvet k vetelm nyeknek s az 1999 5 EC ir nyelv egy b el r sainak Polski Polish Niniejszym Buffalo Technology Inc deklaruj...

Page 79: ...r I verensst mmelse med de v sentliga egenskapskrav och vriga relevanta best mmelser som framg r av direktiv 1999 5 EG NCC B B Brasil Este equipamento opera em car ter secund rio isto n o tem direito...

Page 80: ...to avoid the dissemination of those substances in our environment and to diminish the pressure on the natural resources we encourage you to use the appropriate take back systems The take back systems...

Reviews: