background image

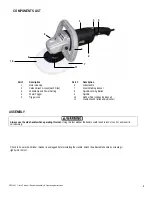
COMPONENTS LIST  


3

5

6

1

4

8

2

11

10 

7


Part # 

Description  


Part # 

Description 


Motor Housing 

6  

  Side Handle 


Carbon Brush Access (Each Side) 

7  

  Wool Polishing Bonnet 


Variable Speed Power Setting 

8  

  Spindle-Locking Button 

 4 

Power 

Trigger 


Spindle 


Trigger Lock 

10 

  Rubber Pad (Hidden By Bonnet) 


11 

  Clamp Washer (Hidden By Bonnet) 


ASSEMBLY 


Always use the side handle when operating this tool. Using this tool without the handle could result in lose of control, and result in 

serious injury. 


Check to be sure the Polisher / Sander is unplugged before installing the Handle. Attach the adjustable handle by screwing it 

tightly into the tool.  


PS07401  7-Inch Polisher / Sander Assembly & Operating Instructions                                                                                                                                                         


9


Summary of Contents for PS07401

Page 1: ...to change this product at any time without prior notice IF THERE IS ANY QUESTION ABOUT A CONDITION BEING SAFE OR UNSAFE DO NOT OPERATE THIS PRODUCT HAVE QUESTIONS OR PROBLEMS DO NOT RETURN THIS PRODUCT TO THE RETAILER CONTACT CUSTOMER SERVICE If you experience a problem or need parts for this product visit our website http www buffalotools com or call our customer help line at 1 888 287 6981 Monda...

Page 2: ...am Pad And 1 Wool Polishing Bonnet Trigger Lock SPECIFICATIONS Rated Current 10 AMP Rated Voltage 120V 60 Hz No Load Speed 0 3 300 RPM Wheel Diameter 7 Inch 177 8mm FOR CONSUMER USE ONLY NOT FOR PROFESSIONAL USE PS07401 7 Inch Polisher Sander Assembly Operating Instructions 2 ...

Page 3: ...NSTRUCTIONS 5 WORK AREA 5 ELECTRICAL SAFETY 5 TOOL USE CARE 5 SERVICE 7 SPECIFIC SAFETY RULES AND OR SYMBOLS SYMBOLS 8 FUNCTIONAL DESCRIPTION PACKAGE CONTENTS 8 COMPONENTS LIST 9 ASSEMBLY ASSEMBLY 9 INSTALLING THE RUBBER PAD 10 INSTALLING THE POLISHING BONNET 10 OPERATION POLISHER OPERATION 11 SANDER OPERATION 11 MAINTENANCE MAINTENANCE 12 ACCESSORIES ACCESSORIES 12 ...

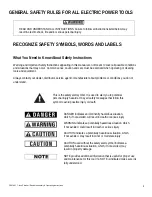
Page 4: ...he safety alert symbol It is used to alert you to potential personal injury hazards Obey all safety messages that follow this symbol to avoid possible injury or death DANGER indicates an imminently hazardous situation which if not avoided will result in death or serious injury WARNING indicates a potentially hazardous situation which if not avoided could result in death or serious injury CAUTION i...

Page 5: ...se cords are rated for outdoor use and reduce the risk of electric shock Make sure the extension cord being used is in good condition If there are any cuts or nicks no matter how deep in the insulation DO NOT use that cord Also make sure the extension cord is heavy enough to carry the current needed DO NOT use small around the house lamp extension cords These cords can easily overheat and or catch...

Page 6: ...r in poorly lit and cluttered areas Do not operate power tools in the presence of flammable liquids gas or dust Sparks created from the power tool could ignite flammable materials Keep children and other distractions at a distance while operating power tools This power tool is equipped with a polarized plug meaning one blade is wider than the other and is designed to fit into a standard polarized ...

Page 7: ...s with proper care will increase the life of the power tool and reduce the risk of injury Check to be sure all moving parts are free from binding and are properly aligned Use only accessories that are recommended by the manufacturer for your tool model Hold the tool by the insulated grip when using in an area where contact with a live wire is a possibility Only qualified repair personnel must perf...

Page 8: ...d area to reduce your exposure to harmful chemicals and dust particles Before installing the sanding wheel or polishing bonnet make sure you have checked the following Use Sander paper and accessories that are rated for 3 000 RPM or greater SPECIFIC SAFETY RULES AND OR SYMBOLS SYMBOLS The following symbols may be used on your tool Be familiar with and learn the symbols to operate the tool safely S...

Page 9: ... Trigger Lock 10 Rubber Pad Hidden By Bonnet 11 Clamp Washer Hidden By Bonnet ASSEMBLY Always use the side handle when operating this tool Using this tool without the handle could result in lose of control and result in serious injury Check to be sure the Polisher Sander is unplugged before installing the Handle Attach the adjustable handle by screwing it tightly into the tool PS07401 7 Inch Polis...

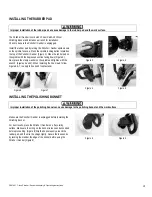
Page 10: ... wrench Figures 4 and 5 When installing the Foam pad follow Figure 6 7 to apply to hook and loop fastener Figure 2 Figure 3 Figure 4 Figure 5 Figure 6 Figure 7 INSTALLING THE POLISHING BONNET Improper installation of the polishing bonnet can cause damage to the polishing bonnet and the work surface Make sure the Polisher Sander is unplugged before installing the Polishing Bonnet For best results p...

Page 11: ...n complete release the Power Trigger and unplug the power cord from the power source This tool is equipped with a Variable Speed Control To adjust the Variable Speed Power Setting to increase or decrease the speed of the Polisher first press the Power Trigger Then turn the Variable Speed Power Setting wheel Setting 1 is slow speed setting 6 is high speed Always select the appropriate polishing bon...

Page 12: ...nd triggers by blowing with compressed air Use only mild soap and a slightly damp cloth to clean the Polisher Sander This motor uses carbon brushes which may require replacing Carbon brushes wear out over time and could create motor trouble Keep carbon brushes free and clear of debris and replace worn parts when necessary ACCESSORIES All accessories used with this tool must be rated for 0 3 000 RP...

Reviews: