The Packet Radio
“
2 N 1
”
Handbook
by
Buck Rogers
K4ABT
Section 1
;
Packet Radio “The Basics
”
Section 2
;
The X1J4 System Node Operator’s (SNO) Handbook
Section 1
;
Packet Radio “The Basics
”
A Packet Primer for the new Packeteer
__ Page 0
IT IS FREE ! There is no “catch”, it is FREE!
You
supply the disk, mailer, and return postage.
TO:
BuxTerm
115 Luenburg Drive
Evington, Virginia 24550
You can also download BUXTERM from one of my web
sites at;
www.PacketRadio.com
Next we switch on the VHF transceiver and turn the
volume up a quarter turn or just above the "9:00 o'clock
position." Make sure the squelch is not set too tight.
The squelch should be set to a position where the
transceiver is quite. The squelch is set in a similar
manner that you would use for voice operation.
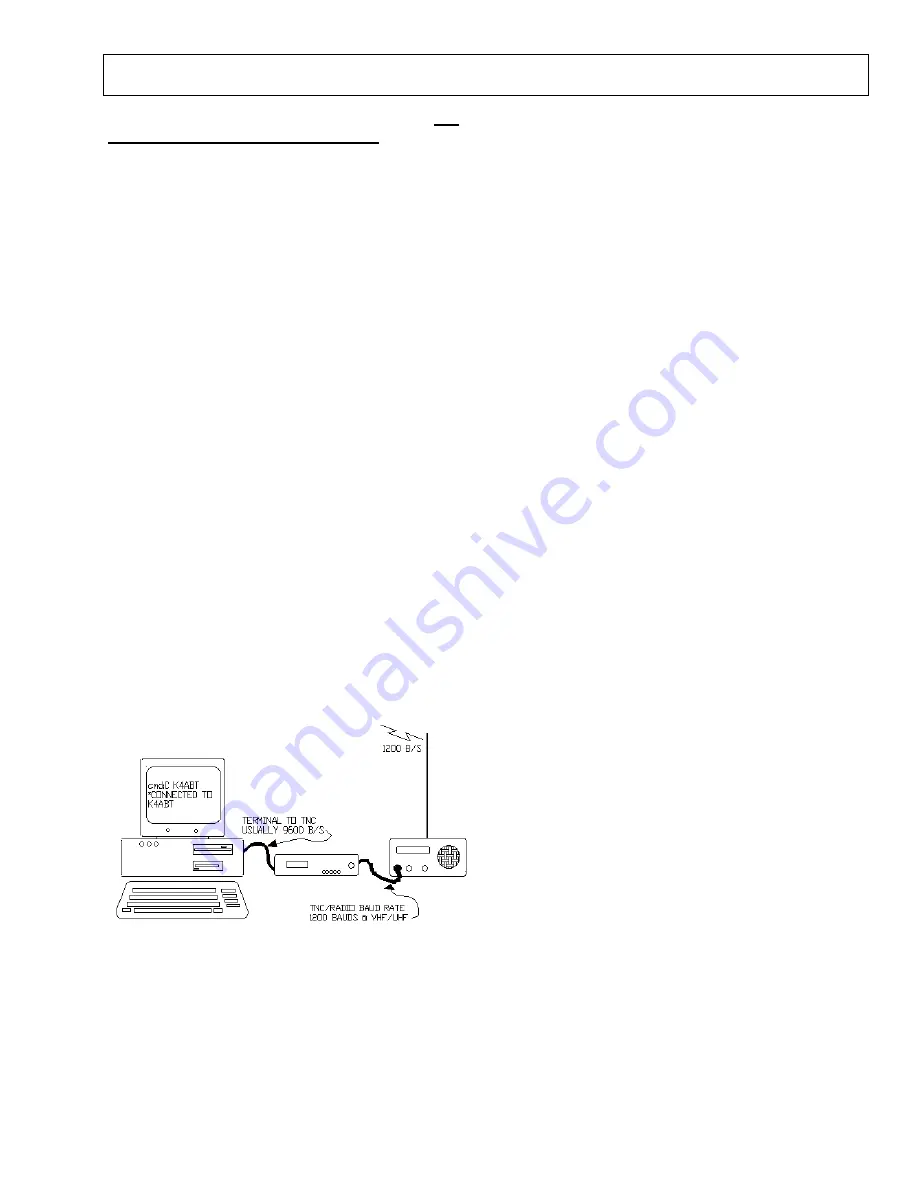
There are two communication speeds that are used in
Packet Radio. It is necessary that each new Packeteer be
aware of the meaning of each speed, and the relationship
to his/her Packet station. The first speed is the terminal
to TNC baudrate. The second speed is the “ON-AIR” or
radio (VHF) baudrate.
Since we are about to begin operating in the VHF region
we will begin with an on-air baudrate of 1200 baud’s.
ABAUD
refers to the terminal to TNC, and
HBAUD
refers to the RADIO or ON-AIR baudrate. Most
computer and TNCs will operate at an Abaud of 9600
baud’s.
The following figure will give you an idea of two
communication functions that we are discussing.
1
2
3
1.
Computer or Dumb Terminal
2.
Packet Radio Terminal Node Controller
(TNC)
3.
VHF or UHF Transceiver
NOW LET'S BEGIN HAVING FUN:
If you’ve followed the setup procedures outlined in the
manual that comes with your TNC, then you are ready to
take the plunge into the wonderful world of operating
Packet.
Verify that all control, signal and ground wires (PTT,
RECEIVE, AFSK, and SIGNAL GROUND) are
connected to the correct connector pins.
TURN ON THE TNC!
When you first turn on the TNC you may see garbled text
on the screen. This is usually because the terminal to
TNC baudrate is not set to the same parameters. Some
TNCs will do a "search" mode to find the setting that you
have your terminal program set to/for. If at first you see
garbage on the screen then clear text begins to appear,
you should follow the instructions that appear on the
screen. If you are unable to establish communications
with the TNC, then review the TNC manual for further
instructions. The baud rate of the TNC has to match the
baud rate used by your computer terminal program and is
easily adjusted. When the terminal to TNC parameters
are correct, a message will appear on the screen showing
the TNC manufacturer's name, firmware version, and
date of EPROM program.
Perform a "control C" (press Ctrl and the letter C at the
same time); this places the TNC into command (cmd:)
mode.
This is where all commands are issued from you to the
TNC. Any command that is typed while in the "cmd:
mode is received by the TNC as a direct order.
Once in the command mode, you can press the [Enter]
key and each time you press the [Enter] key a "cmd:"
prompt should appear on the screen. This is an
indication that you have control (command) of the TNC.
The next step will be to set our callsign into the TNC.
To put our call sign into the TNC, at the cmd: prompt,
we type and [Enter] the following:
MY
(my call) or (your call)
I send my call sign to my TNC in the following manner.
Type and [Enter] to the keyboard/TNC: (the [Enter]
simply means I pressed the Enter key).
MY K4ABT
[Enter]
You may now test the TNC to see if your call sign is
indeed set into the TNC. To do so, type:
MY [Enter]
and the TNC should respond with:
MYCALL K4ABT


