background image


6

3.2 ID Setting 

This wireless RF keyboard kit contains 255 sets ID. This extra ID-recognition function 
helps to protect against interference from other RF keyboards in the same environment. 

This wireless RF keyboard kit comes preset with default ID. Under this circumstance, you 
can use this default ID setting and begin using the keyboard kit immediately after the 
installation. However, we still 

recommend

 following the steps below to set ID again to 

ensure the usage is fluent. 


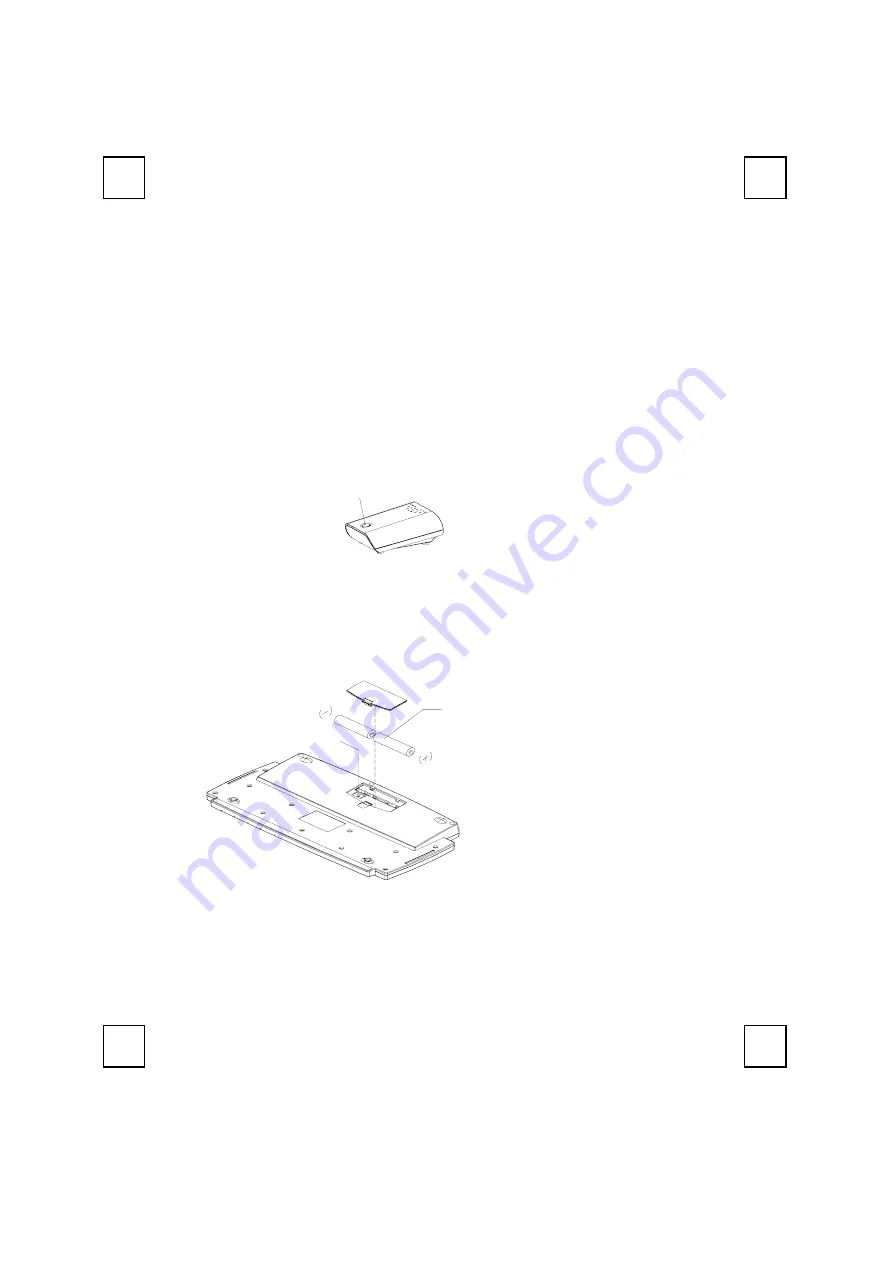
The word CONNECT labels ID button on each unit. 


The LED under ID button of receiver shows connecting condition.


Step 1: 

Press ID button on the top of the receiver once. 

ID Button(LED)


Step 2: 

The LED light under ID button on receiver starts flashing. 

Step 3: 

Press ID button on the back of keyboard once. 

ID  B u tto n

1 .5 V   *   2


Step 4: 

Steps Complete. The LED light under ID button on receiver flashes quickly 
several times and then stops when the connection between receiver and 
keyboard is complete. 

Attention:

 The whole procedure should be completed 

within 1 minute

ID Button on Receiver   
(With a LED under the ID button)


Front View of 9116URF Keyboard 

Summary of Contents for 9116URF

Page 1: ...9116URF Wireless Keyboard with Joystick Manual Version 1 0 ...

Page 2: ...uipment is intended for use in the following countries EU 15 countries Austria Belgium Denmark Finland France Germany Ireland Italy Luxembourg Netherlands Spain Sweden United Kingdom Portugal Greece And other non EU countries Switzerland Norway and Iceland 低功率電波輻射性電機管理辦法 第十四條 經型式認證合格之低功率射頻電機 非經許可 公司 商號或使用者均不得擅自變更頻率 加大功率或變更原設計 之特性及功能 第十七條 低功率射頻電機之使用不得影響飛航安全及干擾合法通信 經發現有干擾現象時 應立即停用 並改善至無干擾時 方得繼續使用 前項...

Page 3: ... Hardware Installation 5 3 1 Connecting and Battery Information 5 3 2 ID Setting 6 4 Software Installation 8 4 1 Driver installation 8 4 2 Battery Low Indication 8 4 3 LED Indication 8 5 Using the Keyboard and Joystick Mouse 9 5 1 Keyboard Functions 9 5 2 Using Keyboard Embedded Numeric Keypad 10 5 3 Using the Joystick 12 6 Troubleshooting 14 ...

Page 4: ...ppears Install keyboard driver first to ensure the battery power is monitored Don t mix different types of batteries or new and old batteries together Always replace old batteries with new and same type batteries Remove batteries after long periods of non use Battery leakage or corrosion may damage the device quality and cause danger 2 Receiver cable positioning 2 1 Don t warp receiver cable aroun...

Page 5: ...ystick mouse which provides both mouse joystick functions Under mouse mode it provides Quick Jump function that can easily access to Internet Menu Multimedia Menu and Office Menu Please Note Please install the driver first to enjoy this amazing function And when under joystick mode in your exciting computer games you immediately can enjoy the convenience and easy of operating that joystick Please ...

Page 6: ...ns on Keyboard Requires installation of keyboard driver Available immediately after hardware installation except Eject function Keyboard Extra ACPI Keys Requires driver to enable the system ACPI Power Management function Available immediately after hardware installation Mouse Function Available immediately after hardware installation Available immediately after hardware installation Keyboard Batte...

Page 7: ...es on the back are installed correctly Follow the polarity signs in the battery compartment ID B utton 1 5V 2 Remarks 1 The keyboard uses 2pcs standard UM 3 AA 1 5V alkaline batteries 2 Battery life is approximately 1 5 months depending on the intensity of usage Front View of USB Connector Back View of USB Connector Bottom view of 9116URF keyboard Plug the USB connector into PC USB port ...

Page 8: ... the usage is fluent The word CONNECT labels ID button on each unit The LED under ID button of receiver shows connecting condition Step 1 Press ID button on the top of the receiver once ID Button LED Step 2 The LED light under ID button on receiver starts flashing Step 3 Press ID button on the back of keyboard once ID B utton 1 5V 2 Step 4 Steps Complete The LED light under ID button on receiver f...

Page 9: ...pressed step 2 also or you will need to begin again 2 If the keyboard does not work after ID setting procedure or the signal transmission between the receiver and keyboard is interrupted please re proceed ID setting procedure 3 Receiver LED status When receiver USB connector is plugged in the LED will flash for several times The LED will remain steadily on when the ID setting procedure is complete...

Page 10: ...dows system tray when all setup procedures are finished the PC needs not restart 4 2 Battery Low Indication We have 4 different levels for battery power indication Battery low icon will show on Windows system tray when keyboard batteries are low Level 3 Level 4 Power status will show up on Windows system tray when moving the cursor onto KeyMaestro driver icon Level 1 Battery power is about 90 powe...

Page 11: ... last page you viewed Forward View the next page you viewed before Stop If a page you are trying to view is taking too long to open click this button to stop Web Home To start your Microsoft Internet Explorer 5 0 or above and bring up the homepage you set Note You can select Tools Internet Options Programs to change the default settings of Internet Browser Search To gain access to a number of sear...

Page 12: ... The embedded numeric keypad consists of 16 keys and different functions in three ways Note Please install KeyMaestro Input Device Driver to show LED NumLock indication As a part of the main keyboard As a numeric keypad As a cursor movement keypad ...

Page 13: ...during operation Num Lock 1 Lights NumLock LED indicator on Windows system tray 2 Enable the embedded numeric keypad 2 When NumLock status is ON the 16 embedded numeric keypad work as a numeric keypad You can Press To Shift Temporarily enable the cursor movement function of embedded numeric keypad Press and hold the key s during operation Num Lock 1 Turns off NumLock LED indicator on Windows syste...

Page 14: ...itch to Joystick Function When switching to Joystick Mode an icon will appear on Windows system tray 5 4 1 Joystick Buttons Default Setting Button 1 Mouse Left Button Button 2 Mouse Right Button Joystick 1 Cursor movement 2 Press joystick Button 3 Mouse Left Button Mouse Left Button Mouse Right Button Stick ...

Page 15: ...eral Properties Test to check the axes direction and buttons are functioned well 3 When using Joystick function under each computer game all the keys default function is defined by game software not by KeyMaestro Input Device Driver Which means depending on each different game you may need to modify the games configuration to take full functionality of the joystick 4 For more detail functionality ...

Page 16: ...t to default settings If you are not familiar with BIOS setup refer to your PC manual for more information 7 If you have problems using the sleep button make sure that the power management in your PC has been enabled both in BIOS and in Windows For more information on your PC BIOS settings refer to your PC manual For more information on how to enable the power management features in Windows refer ...

Page 17: ...k the following Press Fn F12 again to see if the function is switched to joystick Go to Start Settings Control Panel Game Controllers Advanced to check if the joystick is assigned to ID 1 This is the default setting for almost every computer game Refer to the manual of the game software to see if there are other extra settings are needed If above troubleshooting suggestions still do not solve your...

Page 18: ...封底 3100506170 Version 1 0 Jan 2004 Printed in China ...

Reviews: