Quick Set-up and User Guide
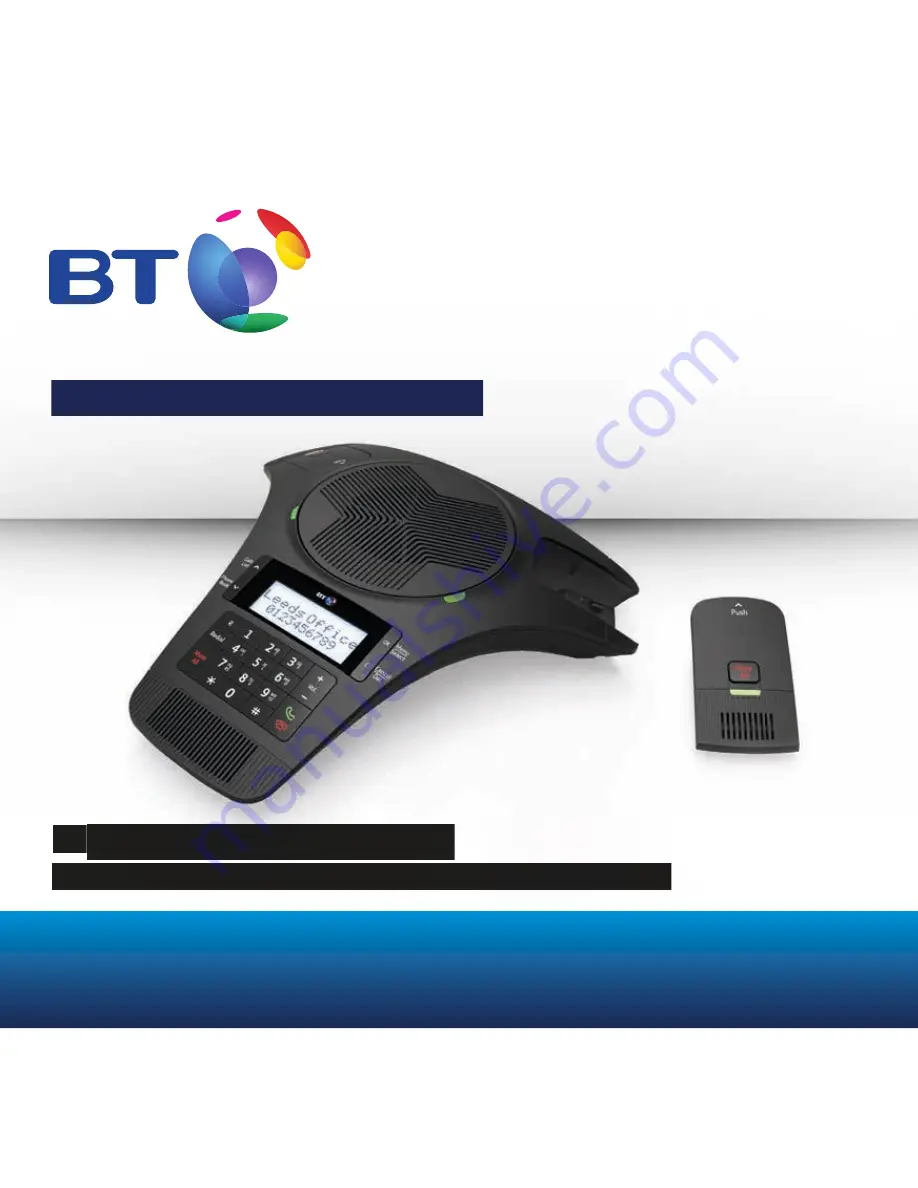
BT Conferencing Unit X300
Professional conferencing unit with wireless microphones
Page 1: ...up and User Guide BT Conferencing Unit X300 Professional conferencing unit with wireless microphones Quick Set up and User Guide BT Conferencing Unit X300 Professional conferencing unit with wireless microphones ...
Page 2: ...ling the battery pull tab and charge the wireless microphone batteries for eight hours before using them see page 5 To make sure you get the best range and reception from your conferencing unit avoid interference by placing the base unit away from large metal objects such as metal cabinets microwave ovens or electronic products such as computers and TVs If you re using this product on a PSTN line ...
Page 3: ...er adaptor cables and rechargeable batteries supplied in this box or this product might not work Any replacement rechargeable batteries must be of the same type BT accepts no responsibility for damage caused to your conferencing unit if you use any other type of batteries 6 metre connector cable 2 x 3 7V 240mAh Li ion Polymer batteries already in wireless mic units Connection box item code 075566 ...
Page 4: ...uct works by sending radio signals between the wireless mics and base unit The strength of the signal depends on where you position the base unit Quick set up guide 4 1 Plug in cables 1 Plug the 6 metre connector cable into the base unit and the other end into the connection box s socket labelled To Base 2 Plug one end of the phone line cord into the connection box s socket labelled To Line and th...
Page 5: ... is required When a mic unit is sitting in the powered up base its light is red when charging and amber when fully charged Quick set up guide 5 2 Set up wireless mic units 1 Activate the battery in each wireless mic by pulling the plastic tab away from the back of the unit Remove this tab and charge battery for 8 hours before use Rechargeable battery already fitted If the mic unit doesn t turn on ...
Page 6: ...d Set Date Time then press 3 Press or to scroll and find the date then press or use the keypad to enter a two digit number 01 31 4 Press or to scroll and find the month then press or use the keypad to enter a two digit number 01 12 Talk standby time Under ideal conditions the wireless mic batteries should give up to 5 hours talk time or 70 hours standby on a single 8 hour charge Battery low warnin...
Page 7: ...ll and find AM or PM 9 Press to save PBX Mode Make sure the PBX mode is set correctly This will depend on whether you are using the unit on a PBX or PSTN line The unit is set by default to PBX mode On If you re using the unit on a PBX no action is required If you re using the unit on a PSTN line then you need to change the setting to PBX mode Off See page 33 for further details And that s it Your ...
Page 8: ...l list 18 See the redial list 18 Dial a redial list entry 18 Save a redial list entry to your phonebook 18 Delete a redial list entry 19 Delete all redial list entries 19 How to get a number from the calls list or phonebook whilst on a call 20 How to get a number from the redial list while on a call 20 Page all microphones 20 Phonebook Add a phonebook entry 21 Character map 22 Search your phoneboo...
Page 9: ... entries 27 Caller display screen messages 27 Settings How to change your settings 28 Menu 28 Volume 28 Ringer tone 29 Date and time 30 How to rename your base unit 31 Key tone 32 Dial mode 32 PBX mode 33 Turn PBX off 33 Set an access code 34 Reset 35 De register and re register the wireless mics 36 Help 37 General information Safety information 40 How to recycle your equipment 41 Guarantee 41 Tec...
Page 10: ... move the cursor to the right Phone Book or When idle press to see phonebook see page 21 In menu phonebook calls or redial list press to scroll down When entering names or numbers press to move the cursor to the left R Press R to answer an incoming call during a call when you receive a call waiting alert see page 17 Redial Press to see a list of the calls you ve dialled see page 18 Mute All Press ...
Page 11: ... for full light status indications OK Press OK for the menu to select an item or save an entry or setting C Press C to go back or delete a character Press and hold to delete all characters Vol Press to increase ringer or speaker volume Vol Press to decrease ringer or speaker volume Talk end call Press to make answer or end a call 0 Press and hold to insert either a dialing pause P when entering nu...
Page 12: ...ne in the base but you can also place the two wireless mics around the table which would be of benefit if you are sitting around a large conference table Mute All Press to mute or unmute all microphones during a call when mics are on the base they are muted LED The light changes colour between green amber and red See page 14 for full light status indicators ...
Page 13: ...e with your conferencing unit or their equivalent A wireless mic unit will last about five hours in use e g talking or about 70 hours on standby e g not in use When should I charge the batteries You need to charge the batteries when you install a new battery or the wireless mic units red light flashes Regularly place the mics back on the base unit to charge ready for your next call How long does i...
Page 14: ...ncoming call Steady green during a call Flashes amber and green alternately if battery low during a call Steady red when Mute is on during a call Flashes amber and red alternately if battery low when the call is muted Flashes red when the wireless mic unit has a low battery Light is off when the wireless mic unit is in idle mode or without a battery Flashes amber slowly when the wireless mic unit ...
Page 15: ...tries Ringer Volume Ringer Tone Set Date Time Format Date Format Rename Base Key Tone Dial Mode PBX Mode Access Code Reset Edit Contact Add Contact Delete Delete All Speed Dial Capacity Store To PB Delete Delete All Calls 6 levels Off Tone 1 10 Set Time 12 Hour 24 Hour DD MM YY MM DD YY 3 levels Off Tone Pulse On Off Access Code Reset To Default Edit Number Enter Number Delete Contact Delete All C...
Page 16: ...first If you make a mistake press the button to delete the last digit 2 Press button to dial Answer a call Press End a call Press and remember to put any wireless mic units on the base unit Redial last call Press and then Adjust volume During a call press to increase or decrease the volume You ll hear two beeps when the highest or lowest volume is reached Using your conferencing unit ...
Page 17: ...ones in the system Silence the ringer If you don t want to be disturbed you can stop the phone from ringing when a call comes in Press several times until you see Ringer Off Or just press the button on the base unit Call waiting If you ve got a call waiting service and it is switched on you hear a beep while you re on a call so you know that another call is trying to get through Press to hold the ...
Page 18: ...er s name and number to your phonebook 1 Press when the base unit isn t in use 2 Press or to scroll the redial list or press repeatedly to scroll down the list Dial a redial list entry 1 Press when the base unit isn t in use 2 Press or to scroll to find the number you re looking for 3 To dial press Save a redial list entry to your phonebook 1 Find the number in your redial list see See the redial ...
Page 19: ...ase unit will show Enter Name Use your keypad to edit the name press or to move the cursor to the left or right press to add a space press to delete a character press and hold to delete all characters 5 Press to save Delete a redial list entry 1 Find the number in your redial list see See the redial list on page 18 and press 2 Press or to scroll to Delete and then press Delete all redial list entr...
Page 20: ...want Page all microphones You can page the mics to help you locate them 1 Press when the base isn t in use 2 Press or to scroll and find Page All Mics then press 3 All registered mics in range will beep for 60 seconds 4 To stop the paging beep press the button on the base or to mute individual mics press on the selected mic or place it back in the cradle Press to exit the phonebook calls list or r...
Page 21: ...ress again and you ll get the next e g B etc The first letter of every word you enter will be a capital letter 1 Press when the base unit isn t in use then 2 Press or to scroll and find Add Contact then press 3 When the screen shows Enter Number use your keypad to enter the number then press 4 When the screen shows Enter Name use your keypad to enter the name press or to move the cursor to the lef...
Page 22: ... 3 D E F d e f 3 4 G H I g h i 4 5 J K L j k l 5 6 M N O m n o 6 7 P Q R S p q r s 7 8 T U V t u v 8 9 W X Y Z w x y z 9 0 Space 0 Search your phonebook You can search alphabetically 1 Press when the base unit isn t in use 2 Press or to scroll through your phonebook or use your keypad to enter the first digit of the name you re looking for If there isn t anything matching your search you ll see th...
Page 23: ...ss 2 Press or to scroll and find Edit Contact then press The base unit will show Edit Number 3 Use your keypad to edit the number press or to move the cursor to the left or right press to delete a number press and hold to delete all numbers 4 Press The base unit will show Edit Name Use your keypad to edit the name press or to move the cursor to the left or right press to add a space press to delet...
Page 24: ...tions 1 5 Save a speed dial entry 1 Find a name in your phonebook see Search your phonebook on page 22 and press 2 Press or to scroll and find Speed Dial then press 3 Press or to scroll and find the speed dial location 1 5 you want 4 Press to show your selected phonebook entry 5 Press to save Dial a speed dial number When the base unit isn t in use press and hold to to dial the number stored on th...
Page 25: ...a speed dial entry 1 Find a name in your phonebook see Search your phonebook on page 22 and press 2 Press or to scroll and find Speed Dial then press 3 Press or to scroll and find the speed dial location 1 5 you want to change and press twice 4 Press or to scroll and select Delete and then press ...
Page 26: ...ls list About caller display Your conferencing unit supports caller display type 1 service Caller display information might not be available for every incoming call Callers might block their names and or phone numbers Calls list If you use a caller display service information about each caller will show after the first or second ring If you answer a call before the caller s information appears it ...
Page 27: ...u can review the calls list to find out who called to return the call or to copy the caller s name and number into your phonebook 1 Press when the base unit isn t in use 2 Press or to browse your entries 3 To dial an entry press when the entry is displayed Delete a calls list entry all entries 1 Press when the base unit isn t in use then 3 Press or to scroll and find Delete or Delete All Calls and...
Page 28: ...hange are ringer volume and tone date and time base unit name key tone dial mode and PBX code You can also reset the default settings Menu How to enter the menu 1 Press when the base unit isn t in use 2 Press or to scroll to find what you re looking for 3 Press to select the item 4 Press to go back Volume How to adjust the ringer volume Here s how to increase or decrease ringer volume 1 Press or w...
Page 29: ... Here s how to turn ringer off 1 Press when the base unit isn t in use 2 Press or to scroll and find Ringers then press 3 Press again 4 Press to scroll and find Ringer Off 5 Press to save Your base unit will now not ring for all incoming calls Ringer tone How to change your ringer tone You ve got a selection of ringer tones to choose from Here s how to change your ringer tone 1 Press when the base...
Page 30: ...er a two digit number 01 31 4 Press or to scroll and find the month then press or use the keypad to enter a two digit number 01 12 5 Press or to scroll and find the year then press or use the keypad to enter a two digit number 00 99 and press 6 Press or to scroll and find the hour then press or use the keypad to enter a two digit number 01 24 7 Press or to scroll and find the minute then press or ...
Page 31: ...o rename your base unit Your unit s new name can be up to 11 characters long 1 Press when the base unit isn t in use 2 Press or to scroll and find Settings then press 3 Press or to scroll and find Rename Base then press 4 The base unit will show the default name BASE Enter your new name using the keypad Press or to move the cursor to the left or right Press to delete a character Press and hold to ...
Page 32: ... find Settings then press 3 Press or to scroll and find Key Tone then press 4 Press or to scroll and try each tone Off or 1 to 3 5 Press to save Dial mode How to change your dial mode The dial mode is preset to tone dialing If you have a pulse service you need to change the dial mode to pulse dialing before making a call 1 Press when the base unit isn t in use 2 Press or to scroll and find Setting...
Page 33: ... by default to PBX Mode On If you re using the unit on a PBX1 then this mode is correct If you re using the unit on a PSTN2 line you will need to change the setting to PBX Mode Off Turn PBX off 1 Press when the base isn t in use 2 Press to scroll and find Settings then press 3 Press to scroll and find PBX Mode then press 4 Press or to select Off and press If in any doubt of the correct PBX setting...
Page 34: ...ess code which is automatically dialled before each number but only when you are in the Calls list 1 Press when the base isn t in use 2 Press or to scroll and find Settings then press 3 Press or to scroll and find Access Code then press 4 Enter the number you want maximum 1 digit and press When you make a call from the Phonebook Speed dial Redial list or when pre dialling this access code feature ...
Page 35: ...o reset to default settings Your phonebook and speed dial entries won t be deleted if you reset your settings 1 Press when the base unit isn t in use 2 Press or to scroll and find Settings then press 3 Press until the base unit shows Reset and then press 4 The base unit shows Reset To Default Press ...
Page 36: ...dditional wireless mic you will need to de register and then re register all the mics before you can use them 1 When the conferencing unit is in idle mode put all replacement working mics on the base unit 2 Enter the code 331734 and press on the base unit 3 The display will show Please Place All Wireless Mics On Cradle Then Press OK 4 Wait for the base to go through the de registration and registr...
Page 37: ... another phone or you ve recently changed your phone service to a digital service from a cable company or a VoIP service call us Wireless mic unit doesn t work or there s no charging light Make sure there is a battery installed in the mic See the light indicator status table on page 14 Make sure your base unit s cables are plugged in correctly Make sure the base unit isn t near other DECT phones o...
Page 38: ...or electronic devices that could be causing interference Try resetting the base unit Unplug its power wait for 15 seconds then plug it back in Give it a minute to reset I have interference on the phone and wireless mic unit Sometimes other electrical equipment can interfere with your base and wireless mic units if they re placed too close We recommend you put your units at least one metre away fro...
Page 39: ... or go to bt com producthelp General sales enquiries BT Residential lines call 150 BT Business lines call 152 For non BT line customers call 0800 800 150 residential or 0800 800 152 business Billing enquiries Please see the phone number shown on your BT bill Calls made from within the UK mainland network are free Mobile and international call costs may vary ...
Page 40: ...cesses For more information please contact your local authority or the retailer where the product was purchased for advice on how to dispose of these batteries in an environmentally friendly way Safety information Only use the power supply suitable for the conferencing unit Using an unauthorised power supply will invalidate your guarantee and may damage the unit The item code for the base mains po...
Page 41: ...could be damaged by an electrical storm We recommend that you unplug the power and telephone line cord during an electrical storm How to recycle your equipment The symbol shown here and on the product means that the product is classed as electrical or electronic equipment so DO NOT put it in your normal rubbish bin It s all part of the Waste Electrical and Electronic Equipment WEEE Directive to re...
Page 42: ...f the 12 month guarantee period If your product needs repair after the guarantee period has ended the repair must meet the approval requirements for connection to the phone network We recommend that you contact BT s recommended repair agent Discount Communications on 0800 980 8999 or a local qualified repairer Returning your phone If the helpdesk team can t fix things for you they will issue a Fau...
Page 43: ...within the UK for connection to the public telephone network and compatible switchboards This equipment complies with the essential requirements for the Radio Equipment and Telecommunications Terminal Equipment Directive 1999 5 EC Declaration of Conformance Hereby BT declares that this BT Conferencing Unit X300 is in compliance with the essential requirements and other relevant provisions of Direc...
Page 44: ...J Registered in England No 1800000 Printed in China Written and designed by The Art Design Partnership ADP and Muse Publishing Available in other formats including braille large print or audio CD If you would like a copy please call 0800 218 2182 Calls made from within the UK mainland network are free Mobile and international call costs may vary BT Conferencing Unit X300 02 15 Issue 3 For a Better...