background image

Need some help with your Home SmartPhone S? Go online at bt.com/producthelp for FAQ’s and full user guide or call us free on 0808 100 9889*

2

Slide your finger up and down to see   
more networks.

Using WPS
If your router supports WPS, (WPS available) 
will show next to its name. Touch the WPS 
icon   and then press the WPS button on the 

router within 2 minutes. This will start your 
secure connection.

…OR…

Using your wireless 
network key

Select your usual  
Wi-Fi network name.

Touch the Password  
box to enter the Wi-Fi  
password or key for 
that network.

You can select Show 
password. If you make  
a mistake, touch the 

 icon to delete.

Touch Done or 

Touch Connect

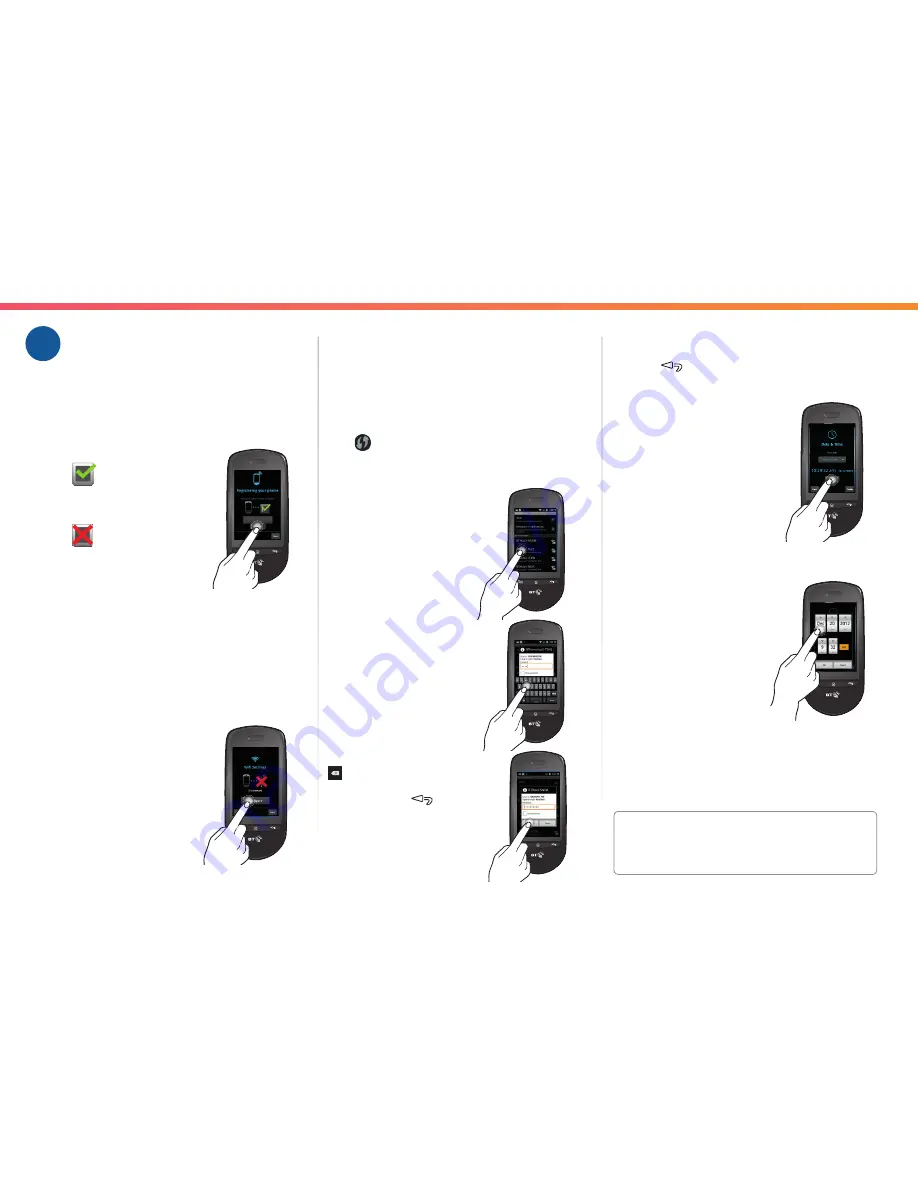
When you set up your Home SmartPhone S  
for the first time you’ll be taken through  
the following steps.

Registration

1

  If 

 is shown then your 

handset is successfully 
registered to the base. 


If 

 is shown then your 

handset has become  
de-registered and you  
should follow the on  
screen steps to re-register,  
making sure you press and hold  
the button on the back of the base. 
(See page 1 for button location)

2

  Press Next.

Select Wi-Fi network

3

  Touch Configure on the  

Wi-Fi settings window.

4

  There are 2 ways of 

selecting your network: 
use WPS if your router 
supports it, otherwise 
use your wireless 
network key.

Set up your phone

3

5

  When you’re connected 

press 

.

6

  Press Next.

Set date and time

7

  To change the date  

and time press Set.

8

  Adjust the date or time  

using + or -. Press OK  
to confirm.

9

  Press Finish to return to the Home screen.


If you need to change these settings in the 
future, they can be accessed through the 
Settings menu.

Summary of Contents for Home SmartPhone

Page 1: ...BT Home SmartPhone S User Guide Touch screen home phone with web browsing...

Page 2: ...n the side of your SmartPhone to turn it on The handset vibrates and the screen turns on Plug in and charge Turn on 1 2 16 hours Full Charge 1 3 4 2 You can also plug the USB charger into the bottom l...

Page 3: ...S for the first time you ll be taken through the following steps Registration 1 If is shown then your handset is successfully registered to the base If is shown then your handset has become de registe...

Page 4: ...right to show additional screens Answer phone Touch to open messages window Back Press to close the keyboard or return to previous screen or app Menu Press to open app options and settings Home Press...

Page 5: ...eft to end the call Use your phone 5 How to use the touch screen Touch once to open a menu start an app or confirm something Slide left right up or down to scroll lists or screens Pinch two fingers to...

Page 6: ...irst time and touch OK 1 Restrict Incoming calls such as nuisance calls Touch the first option Incoming calls You can block numbers in two separate ways Touch Do Not Disturb to restrict all incoming c...

Page 7: ...Touch the Answer Phone icon 3 The screen shows who s called Press to play the first new message Press to play the next message Press to play the previous message Press to pause playback Touch then th...

Page 8: ...rials Products over 28 days old from the date of purchase may be replaced with a refurbished or repaired product The conditions of this guarantee the guarantee shall apply only to defects that happen...

Reviews: