


7
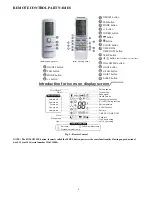
SLEEP MODE:
The unit automatically adjusts room temperature during your sleep
time. This slight change in temperature will not affect your comfort
level due to the natural effects that sleeping has on the body, however
it saves on energy consumption and lowers your electric bill.
The unit has three Sleep Modes to select from. Press the SLEEP
button to select Sleep 1, Sleep 2, Sleep 3, or Cancel. The SLEEP
icon appears.
SLEEP 1
In Cool, Dehumidify modes: sleep status after run for one hour, the
main unit setting temperature increases 1.8
_
F (1
_
C), setting
temperature increased 3.6
_
F (2
_
C) , the unit will run at this setting
temperature. In Heat mode: sleep status after run for one hour, the
setting temperature decreases 1.8
_
F (1
_
C), 2 hours, setting
temperature decreases 3.6
_
F (2
_
C), then the unit will run at this
setting temperature. Sleep mode continues until cancelled.
SLEEP 2
In Expert Mode the unit adjusts the room set temperature at a rate
based on the starting set temperature value. Sleep Mode continues
until cancelled.
DIY MODE SLEEP 3
1. Under Sleep 3 mode, hold ”Turbo” button until the remote
control enters into user individuation sleep setting status, at
this time, the time of remote control displays “1 hour”, the
setting temperature “88” displays the corresponding
temperature of the last setting sleep curve and blink (The
first entering displays according to the initial curve setting
value of original factory setting).
2. Adjust the ”+” and ”
−
” button, to change the corresponding
setting temperature. After adjusted, press “Turbo” for
confirmation.
3. At this time, 1 hour will be automatically increased at the
timer position on the remote control, (that are “2 hours” or
“3 hours” or “8 hours”), the place of setting temperature
“88” displays the corresponding temperature of last setting
sleep curve and blink.
4. Repeat the previous steps (2) & (3) operation, until 8 hours
temperature setting finished, sleep curve setting finished, at
this time, the remote control resumes the original timer
display; displays the corresponding temperature of last
setting sleep curve and blinks (The first setting entered dis-
plays according to the initial curve setting value of original
factory setting); “2 hours” or “3 hours” or “8 hours”), the
place of setting temperature “88” displays the
corresponding temperature of the last setting sleep curve
and blinks; the temperature display resumes to the original
setting temperature.
Sleep3
−
the sleep curve setting under
SLEEP mode by DIY could be inquired:
The user could use the existing sleep curve setting method
to inquire the presetting sleep curve, enter into user
individuation sleep setting status, but do not change the
temperature, press “Turbo” button directly for confirmation.
NOTE: In the above presetting or enquiry procedure, if
continuously within 10s, there is no button pressed, the sleep
curve setting will automatically quit and resume to display the
original displaying. In the presetting or inquiry procedure,
press the “ON/OFF” button, “Mode” button, “Timer”button
or “Sleep” button, the sleep curve setting or inquiry status will
quit similarly. The Sleep mode continues until cancelled.
NOTE: During this procedure, if no button is pressed within 10
seconds, the remote controller automatically exits the sleep
curve setting and resumes the original display. If the ON/OFF,
MODE, TIMER, SLEEP, COOLING or HEATING button is
pressed during the setting or inquiry procedure, the remote
controller exits the sleep curve setting.
NOTE: Sleep function can not be set in AUTO mode.
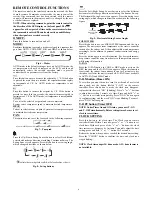
TEMP:
Press this button, you can see the indoor set temperature, indoor
ambient temperature or outdoor ambient temperature on the indoor
unit’s display. The setting on the remote controller is selected
circularly as shown in the following figure.
no display
Fig. 10
−
Temp Modes
When selecting with remote controller or no display, the
temperature indicator on indoor unit displays set temperature;
When selecting
with the remote controller, temperature
indicator on indoor unit displays indoor ambient temperature;
When selecting with the remote controller, temperature
indicator on indoor unit displays outdoor ambient temperature. 3s
later it will return to the setting temperature or it depends on the
other received signal within 3s.
IMPORTANT
: When displaying the outdoor ambient, the
displaying range is 32
−
99
_
F and 0
−
60
_
C. When it goes beyond
the range, it keeps the threshold data (the smallest —0 or 32
_
F and
the largest 99
_
F or 60
_
C).
Warm tips:
When operating buttons on the cover please make sure
the cover is closed completely.
button
/
NOTE: The Healthy and scavenging feature is not available
on this model.
LIGHT:
This function allows the user to turn the display ON or OFF on
the front panel.
Press the light icon to turn the indoor unit front panel ON or
OFF. The remote control displays the Light Icon .
Combination of “+” and “
−
” Buttons:
Press “+” and “
−
” buttons simultaneously to lock or unlock the
keypad. If the remote control is locked, is displayed. In this
case, pressing any button, blinks three times to acknowledge
the keypad is locked. Repeat the process to unlock the remote
controller.
Combination of “TEMP” and “CLOCK ” Buttons:
Press “TEMP” and “CLOCK” simultaneously in HEAT mode to
start 8
_
C (46
_
F )Heating Function Nixie tube on the remote
controller displays “$” and a selected temperature of “8
_
C”. (46
_
F
if Fahrenheit is adopted). Repeat the operation to quit the function.


