


Residential Air Conditioners and Heat Pumps Using R-22 and Puron® Refrigerant: Application Guideline and Service Manual
Manufacturer reserves the right to change, at any time, specifications and designs without notice and without obligations.
26
Brazing
This section on brazing is not intended to teach a technician how to
braze. There are books and classes which teach and refine brazing
techniques. The basic points below are listed only as a reminder.
Definition: The joining and sealing of metals using a nonferrous metal
having a melting point over 800°F/426.6°C.
Flux: A cleaning solution applied to tubing or wire before it is brazed.
Flux improves the strength of the brazed connection.
When brazing is required in the refrigeration system, certain basics
should be remembered. The following are a few of the basic rules.
1. Clean joints make the best joints. To clean:
– Remove all oxidation from surfaces to a shiny finish before
brazing.
– Remove all flux residue with brush and water while material is still
hot.
2. Silver brazing alloy is used on copper-to-brass, copper-to-steel, or
copper-to-copper. Flux is required when using silver brazing alloy.
Do not use low temperature solder.
3. Fluxes should be used carefully. Avoid excessive application and do
not allow fluxes to enter into the system.
4. Brazing temperature of copper is proper when it is heated to a
minimum temperature of 800°F and it is a dull red color in
appearance.
Aluminum Brazing
This field repair procedure is intended for aluminum coil product group
that have acquired mechanical damage. This procedure is limited to
repairing self-tapping screw holes and punctures, not to exceed 0.182”
along its largest axis if non circular, and 0.182” diameter if circular.
Brazing kit p/n 337748-751 is available from RC.
Coil replacement is needed if at least one of the following is present:
• Corrosion cracks and burst cracks
• A singular tube with more than 2 holes
• Holes that exceed .182” largest axis if non circular and .182” dia. If
circular.
The key to brazing aluminum is watching the flame change in color. Any
fuel gas/oxygen flame in the neutral state will produce a flame that is a
shade of blue. As the aluminum heats up to temperature, you will see the
flame change in color to red/orange.
The change in color indicates the base metal is at temperature ready for
braze material. Continuing to apply heat will not change the color and
will melt the base metal.
The braze alloys should not have direct contact with the flame. In cored
wire filler metals, you will notice that the filler metal will melt away
exposing the flux. The flux change in state is from white liquid, to dry
white, to clear liquid. The change in state of flux coincides with the
flame change in color. The addition of flux will minimize the flame
change in color. The alloy is ready to apply when the flux is in the clear
state.
Most aluminum alloys melt at 1200°F, and the braze materials melt
between 905°F and 1080°F. The zinc alloys (ZA-1) melt at a lower
temperature while alloys which have more aluminum content melt at a
higher temperature.
Materials:
1. 78/22 braze alloy Channel Flux ZA-1, Harris AlGroove900 cored
wire
2. Flux CX-60 Omni / Lucas product
3. Stainless steel wire brushes small handle / rotary brush
4. Turbo-Torch equipment
Aluminum Brazing Instructions:
1. Clean area to be brazed
a. Joint must be free of oil, grease, rust, corrosion, and refrigerant.
2. Wire brush to remove oxides from area
3. Flux area if required with the CX-60 flux. Cored wire alloys will
not need fluxing.
a. Additional flux with cored filler will aid in dirty conditions
4. Depending on thickness of material, select an appropriate torch tip
size.
a. Turbo torch standard nozzles work well for aluminum repair
NOTE
: It is important to size the torch tip to the thickness of
material. Example: too large a torch tip will melt the aluminum
base metal before you are able to repair it.
5. Heat area until flux turns clear or you see flame change in color.
6. Continue to heat the joint and test by wiping the braze rod across
the joint.
7. Once the alloy melts on the parent metal add alloy to repair the
area. Maintain joint temperature until repair is complete. Do not
over heat. (withdraw torch as required)
8. It is best to repair the area the first time. Reheating can cause failure
to repair the area.
9. If reheating is necessary, let joint cool, wire brush, reapply flux.
Reheat joint so flux melts and reapply braze material.
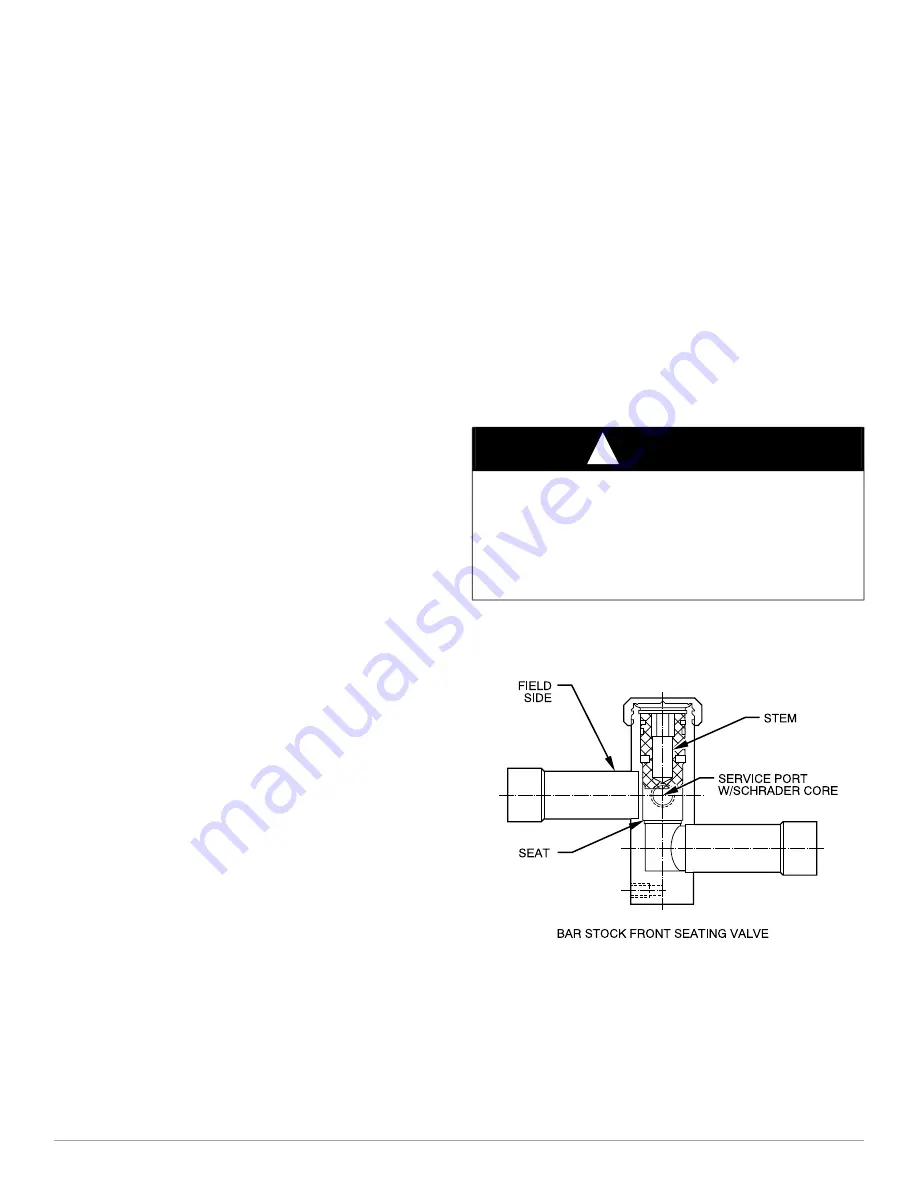
Service Valves and Pumpdown
Service valves provide a means for holding original factory charge in
outdoor unit prior to hookup to indoor coil. They also contain gauge
ports for measuring system pressures and provide shutoff convenience
for certain types of repairs. (See
.)
A91447
Fig. 19 – Suction Service Valve (Front Seating)
Used in
Legacy
ACs and HPs
Front-seating service valves are used in outdoor residential equipment.
This valve has a service port that contains a Schrader fitting. The service
port is always pressurized after the valve is moved off the front-seat
position.
The service valves used in the outdoor units come from the factory
front-seated. This means that the refrigerant charge is isolated from the
WARNING
!
PERSONAL INJURY AND UNIT DAMAGE HAZARD
Failure to follow this warning could result in personal injury or
equipment damage.
Never attempt to make repairs to existing service valves. Unit operates
under high pressure. Damaged seats and o-rings should not be replaced.
Replacement of entire service valve is required. Service valve must be
replaced by properly trained service technician.


