99
Electrical and Ignition
Charging System Tests
6
read no continuity. If meter reads continuity,
replace stator.
Stator Voltage Output Test
Use a voltmeter to check the stator output voltage.
Set meter to read 110 VAC output.
Disconnect CPS.
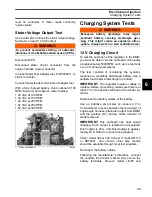
Disconnect stator (6-pin) connector from the
engine harness (6-pin)
connector.
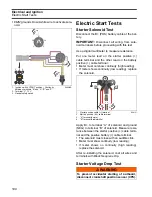
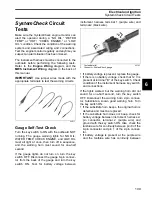
Connect Stator Test Adaptor tool, P/N 5006211, to
stator connector.
Connect meter leads to terminals of adaptor tool.
With a fully charged battery, crank outboard (100
RPM minimum) and observe meter reading:
•
20 VAC at 100 RPM
•
30 VAC at 150 RPM
•
42 VAC at 200 RPM
•
52 VAC at 250 RPM
•
62 VAC at 300 RPM
Charging System Tests
12 V Charging Circuit
To test the operation of the regulator in the
EMM
,
you must be able to run the outboard continuously
at approximately 5000 RPM, such as in a test tank
or on a marine dynamometer.
The test consists of monitoring the system’s
response to a partially discharged battery. Use a
variable load tester to discharge the battery.
IMPORTANT:
The regulator requires voltage to
operate. Before proceeding, make sure there is at
least 7 V on the positive terminal of the starter so-
lenoid.
Disconnect the battery cables at the battery.
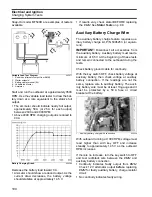
Use an inductive amp meter or connect a 0 to
50 A ammeter in series between the red wire(s) of
engine wire harness (alternator output from
EMM
)
and the positive (B+) battery cable terminal of
starter solenoid.
IMPORTANT:
This outboard has dual output
charging. Each output is isolated and regulated.
Each output is 25 A. Combined output is approxi-
mately 50 A. Refer to engine wiring diagram.
Fluke
†
model 334 or 336,
Snap-On
†
model MT110
or EETA501, and various other amp meters
should be available through local tool suppliers.
Reconnect the battery cables.
Following the manufacturer’s directions, connect
the variable load tester (carbon pile) across the
battery terminals.
Stevens
model LB-85 and
WARNING
To prevent accidental starting of outboard,
disconnect crankshaft position sensor (CPS).
1.
Stator Test Adaptor
004326
1
WARNING
Excessive battery discharge rates might
overheat battery causing electrolyte gas-
sing. This might create an explosive atmo-
sphere. Always work in a well ventilated area.
Summary of Contents for EVINRUDE E-TEC BE225HGXABA
Page 163: ...Oiling System Oil Supply Diagrams 163 8 008208R Port Side View Starboard Side View ...
Page 165: ...Oiling System Oil Supply Diagrams 165 8 008432R Port Side View Starboard Side View ...
Page 167: ...Oiling System Oil Recirculation Diagrams 167 8 008207R Starboard View Port View ...
Page 251: ...Powerhead Powerhead Views 251 11 Powerhead Views Port Hose Routings 3 3 L models 007153 ...
Page 252: ...252 Powerhead Powerhead Views Starboard Hose Routings 3 3 L models 007154 ...
Page 253: ...Powerhead Powerhead Views 253 11 Port Hose Routings 3 4 L models 008503 ...
Page 254: ...254 Powerhead Powerhead Views Starboard Hose Routings 3 4 L models 008502 ...
Page 255: ...Powerhead Powerhead Views 255 11 Port 3 3 L models 008448 ...
Page 256: ...256 Powerhead Powerhead Views Starboard 3 3 L models 008449 ...
Page 257: ...Powerhead Powerhead Views 257 11 Port 3 4 L models 008441 ...
Page 258: ...258 Powerhead Powerhead Views Starboard 3 4 L models 008442 ...
Page 259: ...Powerhead Powerhead Views 259 11 Front 3 3 L models 008450 ...
Page 260: ...260 Powerhead Powerhead Views Front 3 4 L models 008439 ...
Page 261: ...Powerhead Powerhead Views 261 11 Rear 3 3 L models 007142 ...
Page 262: ...262 Powerhead Powerhead Views Rear 3 4 L models 008440 ...
Page 263: ...Powerhead Powerhead Views 263 11 Top 008438 ...
Page 264: ...264 Powerhead Powerhead Views Starboard ICON models 008504 ...
Page 269: ...Midsection Service Charts 269 12 Muffler 004117R ...
Page 320: ...S 322 ...

