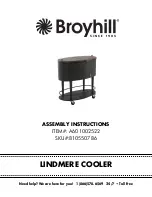
STEP 2
Assembled View:
1x
4x
7/10
Attached Support Ring (
E
) to Leg
(
D
) with Bolts (H1), tighten with
Wrench (HW).
Page 1: ...ASSEMBLY INSTRUCTIONS ITEM A601002522 SKU 810550786 LINDMERE COOLER Need help We are here for you 1 866 578 6569 24 7 Toll Free...
Page 2: ...gain Pay attention to the parts orientation Keep all children and pets away from assembly area Children and pets should be supervised when they are in the area of the construction If scratched please...
Page 3: ...EXPLODED DRAWING 3 10...
Page 4: ...ug Pre assembled 1 E P00500055601 Support Ring 1 D P00540053401 Leg 4 F P00430009001 Bottom Board 1 I P003300027 Caster 2 J P003300028 Caster With Brake 2 4 10 HARDWARE LIST Label Part Number Descript...
Page 5: ...HELPFUL HINTS Tools needed and not included Separating parts before starting How many people needed for the installation work Provided in hardware pack Provided 5 10...
Page 6: ...STEP 1 Assembled View 1x 16x 4x 6 10 Attached Leg D to Body C with Bolts H1 tighten with Wrench HW...
Page 7: ...STEP 2 Assembled View 1x 4x 7 10 Attached Support Ring E to Leg D with Bolts H1 tighten with Wrench HW...
Page 8: ...STEP 3 Assembled View 1x 2x 2x Attached Caster I Bottom Board F and Caster with brake J to Leg D tighten with Wrench HW1 8 10...
Page 9: ...STEP 4 Assembled View 2x 2x 1x Attached Knob A to Lid B with Bolts H2 9 10...
Page 10: ...STEP 5 Assembled View 10 10 Put the assembled lid A B to basin C...