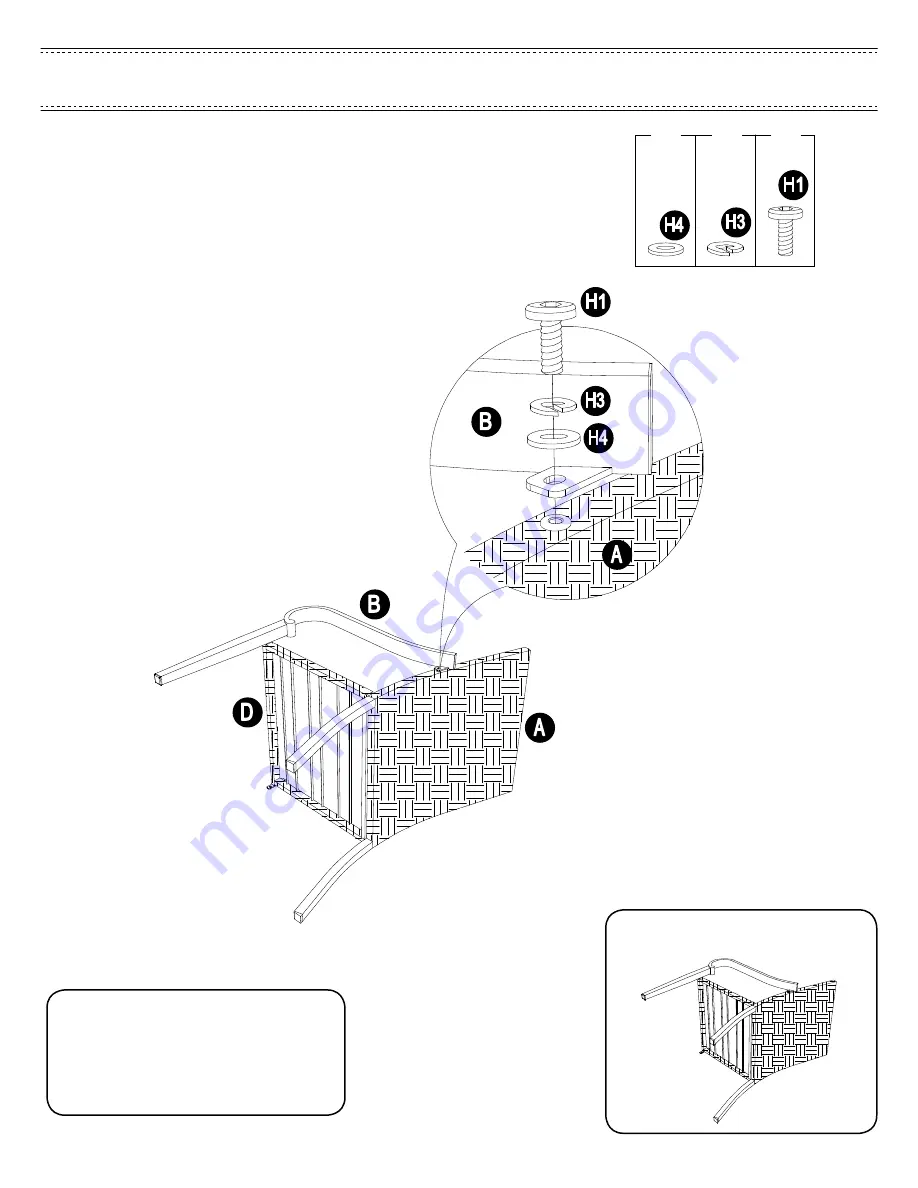
Assembled View:
Attached the Armrest (Left)(B) to Back(A)
with Bolt(H1), Spring Washer(H3) and Flat
washer(H4), tighten the Bolt(H1) to 80%
depth with Wrench(HW).
8/11
1x
STEP 3
Page 1: ...ASSEMBLY INSTRUCTIONS ITEM A222015203 SKU 810545192 Need help We are here for you 1 866 578 6569 24 7 Toll Free AUTUMN COVE 7PC DINING SET CHAIR 6PK...
Page 2: ...hildren and pets should be supervised when they are in the area of the Chair construction Keep assembly area at least 6 feet from any obstruction such as a fence garage house overhanging branches laun...
Page 3: ...3 11 EXPLODED DRAWING...
Page 4: ...H1 H010030030 Bolt M6 15 6 1 H2 H010030035 Bolt M6 40 2 1 H3 H050020017 Spring Washer M6 8 1 H4 H050010025 Flat washer M6 8 1 HW H090030002 Allen Key M6 1 0 P00180017201 P00160023101 P00140030401 P001...
Page 5: ...Tools needed and not included Separating parts before starting Provided in hardware pack How many people needed for the installation work 5 11 Provided HELPFUL HINTS...
Page 6: ...Assembled View Attached Back A to Seat D with Bolt H2 Spring Washer H3 and Flat washer H4 tighten the Bolt H2 to 80 depth with Wrench HW 6 11 1x 1x 2x 2x 2x STEP 1...
Page 7: ...Assembled View 7 11 1x 2x 2x 2x Attached the Armrest Left B to Seat D with Bolt H1 Spring Washer H3 and Flat washer H4 tighten the Bolt H1 to 80 depth with Wrench HW STEP 2...
Page 8: ...Assembled View Attached the Armrest Left B to Back A with Bolt H1 Spring Washer H3 and Flat washer H4 tighten the Bolt H1 to 80 depth with Wrench HW 8 11 1x 1x 1x STEP 3...
Page 9: ...Assembled View Attached the Armrest Right C to Seat D with Bolt H1 Spring Washer H3 and Flat washer H4 tighten the Bolt H1 to 80 depth with Wrench HW 9 11 2x 2 1x x 2x STEP 4...
Page 10: ...Assembled View Attached the Armrest Right C to Back A with Bolt H1 Spring Washer H3 and Flat washer H4 tighten all the Bolt to 100 depth with Wrench HW at last 10 11 1x 1x 1x STEP 5...
Page 11: ...Assembled View Put the Seat Cushion E on the Seat D 11 11 1x STEP 6...