ENGLISH
ENGLISH
ENGLISH
ENGLISH
ENGLISH
ENGLISH
8
● ● ● ● ● ● ● ● ● ● ● ● ● ● ● ● ● ● ● ● ● ● ● ● ● ● ● ● ● ● ● ● ● ● ● ● ● ● ● ● ● ●
Operating procedure
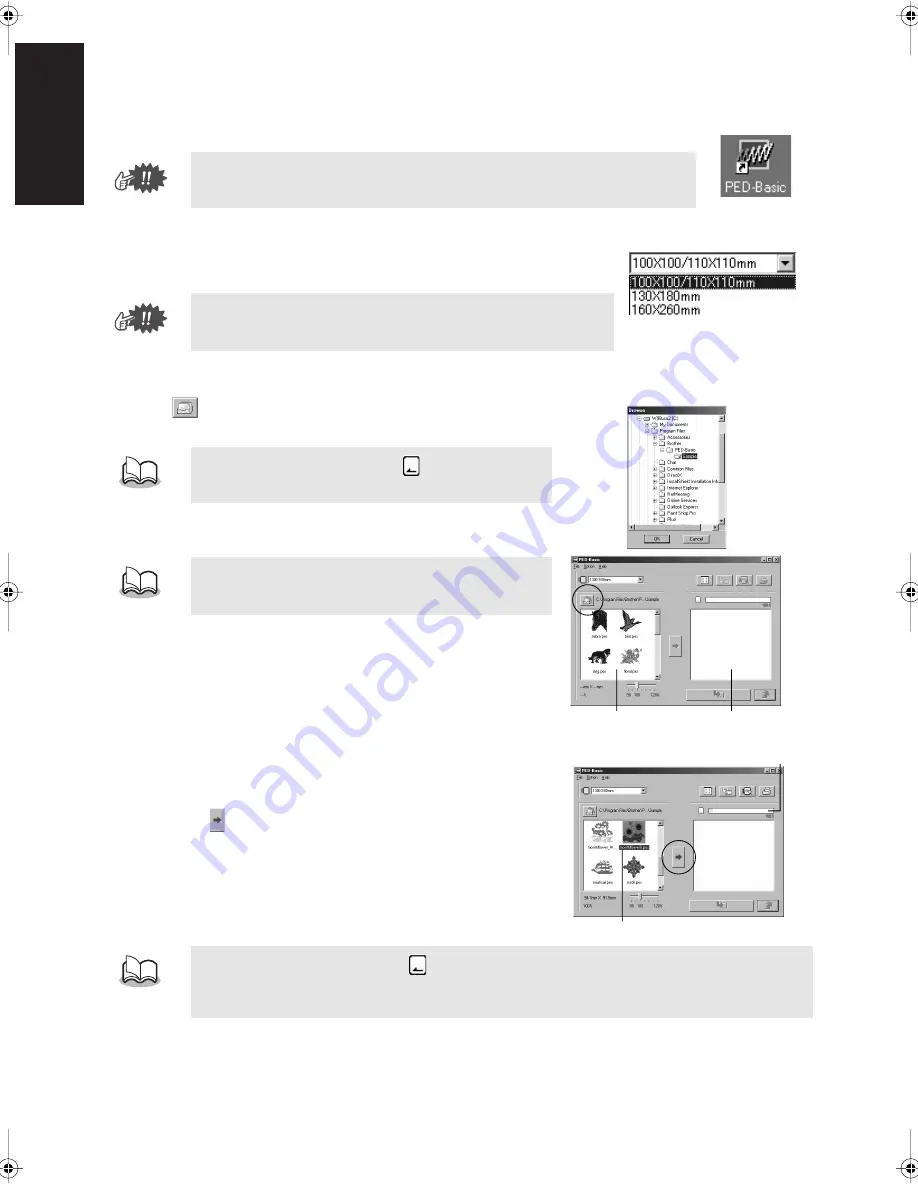
1
Start up the application.
From the desktop, double-click the icon shown at the right.
2
Select the embroidery hoop size.
With the Hoop size selector, select the size of the embroidery hoop that
can be used with your embroidery machine.
3
Select the folder.
1) Click
. The Folder dialog box appears. Select the folder
where the pattern file (.pes) is saved, and then click [OK].
2) Images and file names for the pattern files saved in the
selected folder appear in the “Available patterns list”.
4
Select the patterns.
1) From the “Available patterns list”, click the pattern that you
want to write to the card. The highlighted pattern is selected.
2) Then, click
to add the selected pattern to the “Selected pat-
terns list”.
3) Continue this operation for all patterns that you wish to write
to an original card. Viewing the “Card capacity indicator” dur-
ing this process will allow you to plan which designs you
would like to save an original card.
Make sure that the USB card writer box is connected to the computer’s USB port
and that an original card is inserted.
Do not select a hoop size larger than the embroidery hoop that can
be used with your embroidery machine. The created card will not
work correctly with the embroidery machine.
If an original card was selected
, the patterns saved
on the inserted card can be seen.
If there are any patterns on the card that you do not wish
to erase, be sure to add them to the “Selected patterns
list”. (See page 8, “Select the patterns.”)
•
If an original card was selected
, the patterns saved on the inserted card can be seen.
•
If there are any patterns on the card that you do not wish to erase, be sure to add them to the
“Selected patterns list”.
“Available patterns list” “Selected patterns list”
Highlighted
“Card capacity indicator”
PE-DESIGN.book Page 8 Monday, October 25, 2004 10:56 AM


