background image

55

A

A

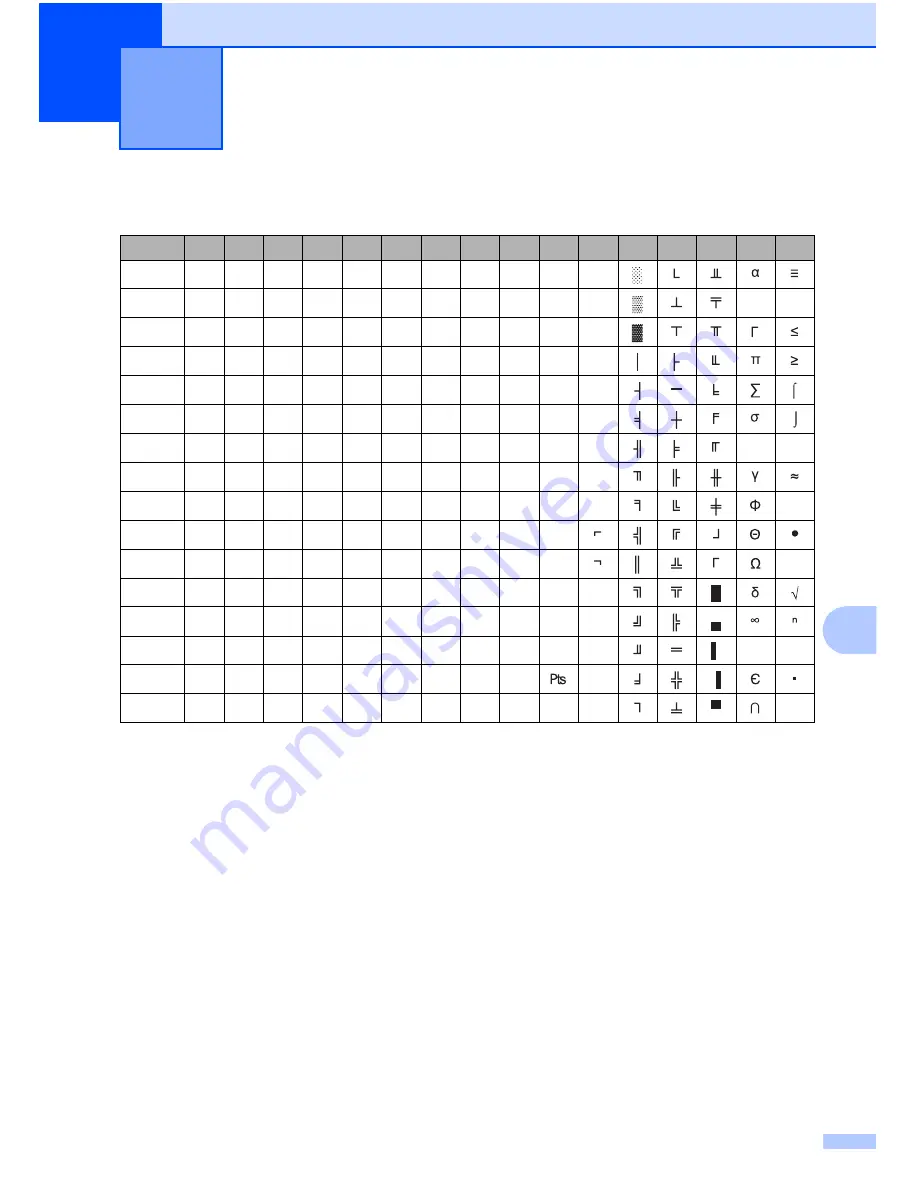
Character Sets

A

Extended Graphics Character Table

MSB>

0

1

2

3

4

5

6

7

8

9

A

B

C

D

E

F

LSB 0

0

@

P

`

p

Ç

É

á

1

!

1

A

Q

a

q

ü

æ

í

ß

2

2

B

R

b

r

é

Æ

ó

3

#

3

C

S

c

s

â

ô

ú

4

$

4

D

T

d

t

ä

ö

ñ

5

%

5

E

U

e

u

à

ò

Ñ

6

&

6

F

V

f

v

å

û

a

µ

÷

7

7

G

W

g

w

ç

ù

o

8

(

8

H

X

h

x

ê

ÿ

¿

º

9

)

9

I

Y

i

y

ë

Ö

A

*

:

J

Z

j

z

è

Ü

B

+

;

K

[

k

{

ï

¢

½

C

,

<

L

\

l

¦

î

£

¼

D

-

=

M

]

m

}

ì

¥

¡

ø

²

E

.

>

N

^

n

~

Ä

«

F

/

?

O

_

o

Å

ƒ

»

Summary of Contents for PJ662 PocketJet 6 Print Engine with Bluetooth

Page 1: ...ER S GUIDE PJ 622 PJ 623 PJ 662 PJ 663 Mobile Printer Before using this printer be sure to read this Users Guide We suggest that you keep this manual in a handy place for future reference Version A US ENG ...

Page 2: ...is Document The following symbols are used throughout this document About This Document This document PDF is included on the CD ROM Note If using Adobe Reader to view this document on a computer the cursor changes to when the cursor is placed on a link Click the link to open the corresponding page For information about using Adobe Reader see the help file included with Adobe Reader This symbol ind...

Page 3: ... Overview 9 Installing and Uninstalling the Driver 10 Install the Printer Driver 10 Uninstall the Printer Driver 11 Connecting the Computer and Printer 12 USB Connection 12 Bluetooth Connection PJ 662 663 Only 13 Switching Between IrDA and Bluetooth PJ 662 663 Only 15 2 Using the Printer 17 Operation Panel 17 Power Button and Feed Button Functions 17 Indicators 18 Printing Solutions 19 Printing 19...

Page 4: ...e Using PJ 600 Series Utility 27 Starting PJ 600 Series Utility 27 How to Use PJ 600 Series Utility 28 Parameters 29 4 Other Function 39 JPEG Printing 39 5 Maintaining the Printer 40 Cleaning the Platen Roller 40 Cleaning the Printer s Exterior 41 6 Reference 42 Indicators 42 Indicator Warnings 44 Printing a Printer Report 46 7 Troubleshooting 47 Overview 47 Paper Problems 48 Printed Image Problem...

Page 5: ...nnecting to an AC Power Outlet Optional 1 Connect the printer to a nearby AC power outlet to power the printer or charge the rechargeable battery using AC power a Connect the AC adapter to the printer b Connect the AC power cord to the AC adapter c Connect the AC power cord to a nearby AC power outlet 100 240 VAC 50 60 Hz 1 AC adapter 2 AC power cord Note The AC adapter and AC power cord are optio...

Page 6: ...ower and then turn on the printer 1 DC cable Note The DC cable is an optional accessory The voltage supplied by a vehicle fluctuates The printing speed may differ depending on the supplied voltage Using the Rechargeable Ni MH Battery Optional 1 Installing the Rechargeable Ni MH Battery 1 a Open the battery cover by pressing the cover latch 1 Battery cover 2 Cover latch b Swing the cover open and r...

Page 7: ...tery connector cord The voltage supplied by the rechargeable Ni MH battery fluctuates The printing speed may also fluctuate depending on the voltage Removing the Rechargeable Ni MH Battery 1 a Open the battery cover by pressing the cover latch b Swing the cover open and remove it c Gently pull the battery removal ribbon until the rechargeable Ni MH battery starts to tilt out of its compartment 1 B...

Page 8: ... battery immediately after purchase Do not use it before it is charged The rechargeable Ni MH battery loses its charge gradually over time even if it is not used Therefore we recommend charging the rechargeable Ni MH battery before using it While the printer is connected to an AC or DC power outlet a small amount of current is used to charge the rechargeable Ni MH battery This is called trickle ch...

Page 9: ...battery charge it periodically Inactivity Inactivity is the condition when the rechargeable Ni MH battery has been unused for too long and it cannot retain as much power as before The battery can be restored to its earlier capacity by refreshing it one or two times If more than one year has passed since the battery was last use it will not return to its earlier capacity Trickle charge Trickle char...

Page 10: ...an be charged while it is inserted in the printer and also while it is removed from the printer Perform the following procedure to charge the rechargeable Li ion battery Note Charge the rechargeable Li ion battery immediately after purchase using the following procedure Up to 180 minutes is needed to fully charge a rechargeable Li ion battery About 300 pages can be printed when using a new fully c...

Page 11: ...nt Density on page 34 Unlike the rechargeable Ni MH battery battery refreshing and trickle charging are not necessary when using the rechargeable Li ion battery The rechargeable Li ion battery charging can take place in 32 F 104 F 0 C 40 C environments Charge the rechargeable Li ion battery in an environment in this temperature range If the surrounding temperature is out of this range the recharge...

Page 12: ...rgeable Li ion battery with a high charge charged 90 or more in a location exposed to high temperatures will considerably accelerate battery deterioration Using the printer while the rechargeable Li ion battery is installed and charging may accelerate the battery s deterioration If using the printer when the rechargeable Li ion battery is installed disconnect the AC adapter or DC cable Try to full...

Page 13: ...ribed in the following table Ni MH battery Li ion battery Battery mounting Internal External Print while charging Yes Yes Trickle charge battery Yes No Battery charger location Inside Printer Inside Battery Approximate charge time 120 min 180 min Approximate number of pages charge 70 pages 300 pages Refresh battery feature Yes No Charge without the printer No Yes ...

Page 14: ...Utility For PJ 623 663 Printer driver PJ 600 Series Utility and P touch Editor c Select the model d Follow the on screen instructions to install the software e Click Finish to close the installation screen For Mac OS Users 1 a Insert the CD ROM into your computer s CD ROM drive b Open the Mac OS X folder and then double click Brother PJ XXX Driver pkg to start the driver installer c Follow the on ...

Page 15: ... enter the password and click OK The Print Server Properties window displayed e Click the Drivers tab and choose Brother PJ XXX Then click Remove f Choose Remove driver and driver package and click OK Follow the on screen instructions g Close the Print Server Properties window The printer driver has been uninstalled Windows 7 a Turn off the printer b Start button Devices and Printers c Choose Brot...

Page 16: ...nt Fax 10 5 x 10 6 window The printer driver has been uninstalled Connecting the Computer and Printer 1 The printer can be connected to your computer via USB cable and Bluetooth PJ 662 663 only Note When connecting via Bluetooth the connection settings are saved even after the printer is turned off USB Connection 1 a Make sure that the printer is turned off before connecting the USB cable b Connec...

Page 17: ...rs d Windows XP Windows Vista Right click the printer icon and then click Properties Windows 7 Right click the printer icon and then click Printer Properties e Click the Ports tab f Select the the port name confirmed in step b COM plus a number g Click OK to close the properties dialog box h Close the printers window to finish Note Refer to your Bluetooth device management software s documentation...

Page 18: ...ound on your device is displayed click Continue h Mac OS X 10 5 x Select the desired printer and select the Remember this device checkbox Note The printer s passkey PIN code is the last four digits of the printer s serial number by default i Mac OS X 10 6 Select the appropriate printer from the list and then click Continue j Mac OS X 10 6 Click Passcode Options k Mac OS X 10 6 Select Use a specifi...

Page 19: ...luetooth adapter The default PIN is the last four characters of the printer s serial number Use PJ 600 Series Utility to change the PIN if necessary For more information see Bluetooth Settings PJ 662 663 only on page 37 Switching Between IrDA and Bluetooth PJ 662 663 Only 1 When switching the connection method between IrDA and Bluetooth connection change the printer settings that correspond to the...

Page 20: ...Chapter 1 16 To connect to a portable terminal using a IrDA or Bluetooth connection refer to the documentation included with the portable terminal ...

Page 21: ...cally after the selected period of inactivity Charge the rechargeable Ni MH battery While the printer is turned off press and hold the Power button for two or more seconds until the POWER indicator begins to blink in green and orange The POWER indicator continues to blink until charging is complete For details on charging the rechargeable Ni MH battery see Charging the Rechargeable Ni MH Battery o...

Page 22: ... 2 inch 12 7 mm of paper has been ejected about one page length of paper is ejected at high speed The amount of paper ejected is determined by the Form Feed Mode setting see Form Feed Mode on page 21 or 34 In order to assure that printing is complete before permitting a form feed manual form feeds cannot be performed for five seconds after the printer has received any data Set the printer to servi...

Page 23: ... be printed b Make sure that the printer is properly powered Use a charged battery or connect the printer to an AC or DC power outlet c Turn the printer on by pressing the Power button The POWER indicator lights 1 Power button 2 POWER indicator d Connect the printer to a computer using either USB IrDA Windows only or Bluetooth PJ 662 663 only e Load the paper Use both hands to hold the paper strai...

Page 24: ...utton to print and eject the page If you load paper before you start the print job you will have time to adjust the paper If the paper is skewed after the printer pulls it into the starting position open the release cover completely remove the paper and then close the cover and load the paper again see Clearing a Paper Jam on page 25 To print a JPEG image without using the printer driver see JPEG ...

Page 25: ...Feed Mode 2 Available settings No Feed Fixed Page End of Page End of Page Retract Default setting Fixed Page This option determines how paper is ejected it determines how the printer responds to form feed command No Feed Paper is not fed at the end of a job Because additional paper is not ejected when at the end of the document this setting is useful when using non perforated roll paper Fixed Page...

Page 26: ...t when the commands are switched while using the printer Setting Paper Size 2 To use a pre defined paper size letter legal A4 etc select the desired paper size in the page setup dialog If the desired paper size has not been defined use the following procedure to add and configure the desired paper size For Windows Users 2 Windows XP a If the desired paper size has not been defined open Control Pan...

Page 27: ... or Perforated Roll Retract Cut Sheet Paper 2 When using cut sheet paper configure the printer driver as described below a Select the appropriate paper size Letter A4 or Legal b Windows only set Paper Type to Cut Sheet c Set Form Feed Mode to Fixed Page Non Perforated Roll Paper 2 When using non perforated roll paper configure the printer driver as described below depending on the desired length o...

Page 28: ...rforated Roll Retract is selected paper is fed between pages and the printable area is the same as when using cut sheet paper Tips on Using Paper 2 Use Genuine Brother Thermal Paper 2 Thermal paper eliminates the use of toner ribbons or ink Brother guarantees optimum compatibility with your printer when you use genuine Brother thermal paper which has been specifically designed and tested for optim...

Page 29: ...eated as many times as necessary If this does not eject the jammed paper continue to the next step b Gently open the release cover completely c Gently pull the paper out of the printer in either direction d Close the release cover e Insert a new sheet of paper and print again Cutting Roll Paper 2 Roll paper can be cut using the printer s tear bar Pull one edge of the ejected paper up and toward th...

Page 30: ...is printer s driver installed Installing PJ 600 Series Utility 3 For Windows Users 3 a Insert the CD ROM into your computer s CD ROM drive b Click PC Windows software and then click PJ 600 Series Utility Note You can install PJ 600 Series Utility and other software at the same time by clicking PC Windows software Standard Installation see Installing and Uninstalling the Driver on page 10 For Mac O...

Page 31: ...r PJ 600 Series Utility app in the trash Macintosh HD Library Printers Brother PocketJet Utilities Brother PJ 600 Series Utility app Using PJ 600 Series Utility 3 Before Using PJ 600 Series Utility 3 Connect the printer to an AC or DC power outlet or make sure that the battery is fully charged Make sure that the printer driver has been installed and is functional Connect the printer to a computer ...

Page 32: ...nus or enter the desired values c Click Send Settings to save the settings in the printer Note Some parameters can be adjusted using both the printer driver s dialog box and PJ 600 Series Utility For the following parameters the setting specified in the printer driver s dialog box has priority Paper Size Density Print Density Form Feed Mode Dash Line Print Settings that are specified using the pri...

Page 33: ...printer settings the settings of the printer selected in this list will be changed 2 Update List Windows only Refreshes the printer list If a printer is connected to the computer or is turned on while PJ 600 Series Utility is running click this button to refresh the list and select the desired printer 3 Import Loads a configuration file created with PJ 600 Series Utility that was saved previously ...

Page 34: ... Lines Inch 0 12 1 00 15 87 Default setting Lines 6 The setting specified for this parameter takes effect only when Paper Size is set to Custom Form length is determined by specifying the number of lines per page or the length in inches of each page Lines Form length i e the height of the page is determined by the number of text lines per page specified here and the height of each line specified f...

Page 35: ...characters inch the actual width of the left margin is 1 inch 25 4 mm Note that if Default Pitch is set to Proportional 10 characters inch is used for this calculation The maximum width of the left margin is 4 5 inches 114 3 mm 6 Right Margin Available settings Use Paper Size Columns number of columns can be specified Default setting Use Paper Size Use Paper Size The default margins determined by ...

Page 36: ...tings None 10 Minutes 20 Minutes 30 Minutes 40 Minutes 50 Minutes 60 Minutes Default setting 10 Minutes This parameter determines how much time passes before the printer turns off automatically to conserve power when it is being powered by the rechargeable Ni MH battery If no data is received for the specified amount of time the printer turns off If the printer is connected to an AC or DC power ou...

Page 37: ...een pages useful when printing on roll paper When Enable is selected set Form Feed Mode to Fixed Page Note that dash lines are printed on the paper they are not punched in the paper Note If this parameter is changed in the printer driver s dialog box that setting has priority ...

Page 38: ...t the vertical length of the selected page size i e letter legal A4 or user defined size Select this setting when using cut sheet paper End of Page Paper is fed until the printer detects that no paper remains in the input slot or until 14 355 6 mm of paper has been fed Select this setting when using perforated paper End of Page Retract Paper is fed until the paper sensor detects a pre printed end ...

Page 39: ...5 Paper Sensor Threshold Available settings Setting a number 0 255 Default setting 128 This parameter determines the threshold of the paper detection sensor 6 Wireless I O PJ 662 663 only Available settings Bluetooth IrDA Default setting Bluetooth This parameter determines whether a Bluetooth connection or an IrDA connection can be used 7 Wireless Switching Mode PJ 662 663 only Available settings ...

Page 40: ...s appropriate for the language selected See the table on page 56 for details 3 Default Font Available settings Serif Sans Serif Default setting Serif This parameter determines which built in font is used A serif font similar to Courier and a Sans Serif font similar to Letter Gothic are built in 4 Reduce Character Size Available settings Disable Enable Default setting Disable This parameter determi...

Page 41: ...d If Enable is selected in the PIN code pull down menu the PIN code specified here must also be stored on the computer in order to communicate with the printer when using Bluetooth You can change the PIN code if necessary If the Encryption checkbox is selected data sent using PJ 600 Series Utility between the computer and printer will be encrypted when using Bluetooth Device Name Allows you to spe...

Page 42: ...Auto Paper Sensor Threshold Adjustment and follow the on screen instructions to adjust the paper detection sensor automatically Factory Reset Click Factory Reset to reset PJ 600 Series Utility to its default settings and send them to the printer 6 Exit Click Exit to exit PJ 600 Series Utility 7 Send Settings Click Send Settings to save the settings displayed with a checkmark in PJ 600 Series Utili...

Page 43: ...hering process may make your printed image fuzzy To improve the image quality try to turn off any preprocessing of the JPEG image Only JPEG images can be printed Limited to files with the jpg extension The maximum file size is 5 MB The maximum resolutions are as follows 300 dpi Height Width 3300 2400 dots 200 dpi Height Width 2200 1600 dots If these limits are exceeded the data received by the pri...

Page 44: ...right and face the front of the printer as shown The roller will pull the cleaning sheet into the starting position c Remove the backing paper on the upper half of the cleaning sheet as shown Note Do not remove the backing paper from the lower half of the cleaning sheet d Press the Feed button for more than two seconds The printer will feed and eject the cleaning sheet Note Do not attempt to clean...

Page 45: ... 5 Clean the exterior of the printer by wiping it with a dry cloth Note Do not wet the cloth or allow water to enter the printer Do not use benzene alcohol paint thinner or cleaners that are abrasive alkaline or acidic Such cleaners may damage the printer s case ...

Page 46: ...blinking in any color or pattern Indicator is off POWER DATA STATUS Bluetooth 1 Description AC adapter DC cable Rechargeable Li ion battery in use Rechargeable Ni MH battery in use Rechargeable battery in use battery charge is full Once every 4 seconds Rechargeable battery in use battery charge is half full Twice every 4 seconds Rechargeable battery in use battery charge is low Once every second R...

Page 47: ...printer report System error call for service No rechargeable Ni MH battery found when charging Time out when charging the rechargeable Ni MH battery Head or motor is cooling down Data reception error Buffer full or format error Printer is in boot mode Ready for Bluetooth communication POWER DATA STATUS Bluetooth 1 Description ...

Page 48: ... charge the battery Make sure that the rechargeable Ni MH battery is installed properly and that there are no broken wires at the battery or connector For more information see Installing the Rechargeable Ni MH Battery on page 2 If the rechargeable Ni MH battery is connected properly the battery may have overheated while charging Allow the rechargeable Ni MH battery to cool before charging it again...

Page 49: ...dequate ventilation and is not located in an enclosed space Motor Do not use the printer continuously If the printer is used continuously the motor will become too hot In this case the printer will stop and resume printing after the motor has cooled down Note This condition may occur more often when the printer is used at high altitude more than 10 000 feet due to a lower air density available to ...

Page 50: ... Make sure that the printer is turned on and that no paper is loaded b Press and hold the Feed button for two or more seconds until the DATA indicator turns red c Insert a piece of genuine Brother thermal paper into the printer s paper input slot The report will print automatically and then the printer will return to an idle state Note This operation can also be performed using PJ 600 Series Utili...

Page 51: ...printer to an AC or DC power outlet see Connecting the Printer to External Power on page 1 Install and select the proper printer driver see Installing and Uninstalling the Driver on page 10 Connect the printer to the computer see Connecting the Computer and Printer on page 12 If you still have problems read the troubleshooting tips in this chapter for help Troubleshooting 7 ...

Page 52: ...mal paper and that the paper is loaded properly see Printing on page 19 Check if whether the platen roller is dirty If it is dirty clean it see Cleaning the Platen Roller on page 40 Print quality is poor and the printed image is too light or too dark Adjust the density setting using the printer driver see Making Prints Lighter or Darker on page 20 Make sure that you are using genuine Brother therm...

Page 53: ...ntal position Adjust the settings as needed The printed page does not contain the proper characters Make sure that you have defined the proper character set font in the computer program Change the character set if necessary Try changing the font used in the document The printed page contains random dots Check the printer driver to make sure that it is set correctly Make sure that the USB cable is ...

Page 54: ... is the wrong size Check settings in the computer program and the print driver for the proper page size Make sure that the page size specified in the computer program matches the paper that is loaded Make sure that the Form Feed Mode setting of the printer driver is not set to No Feed Try pressing the Feed button to manually form feed The printer ejects a partially printed page and the DATA indica...

Page 55: ...216 x 279 mm Legal 8 5 x 14 216 x 356 mm Power optional Battery Rechargeable Ni MH battery 14 4 V Rechargeable Li ion battery 11 1 V Adapter AC adapter 15 V Car adapter Cigarette car adapter or Wired type 12 V DC Battery Yield printing duty 5 with density 5 and using fully charged new battery Rechargeable Ni MH battery Approximately 70 sheets Rechargeable Li ion battery Approximately 300 sheets In...

Page 56: ...nting USB interface and AC adapter power Temperature 77 F 25 C Operating environment Windows XP Windows Vista Windows 7 USB Mac OS X 10 4 11 10 6 USB ENVIRONMENTAL Operation temperature 41 95 F 5 35 C Operation humidity 30 80 No condensation Storage temperature 5 122 F 15 50 C Storage humidity 30 85 No condensation Model Name PJ 622 PJ 623 ...

Page 57: ...ry 14 4 V Rechargeable Li ion battery 11 1 V Adapter AC adapter 15 V Car adapter Cigarette car adapter or Wired type 12 V DC Battery Yield printing duty 5 with density 5 and using fully charged new battery Rechargeable Ni MH battery Approximately 70 sheets Rechargeable Li ion battery Approximately 300 sheets Interface USB USB Ver 2 0 Full Speed mini B Peripheral IrDA Ver 1 2 IrCOMM and IrOBEX Blue...

Page 58: ... pattern on A4 size paper and continuous printing USB interface and AC adapter power Temperature 77 F 25 C ENVIRONMENTAL Operation temperature 41 95 F 5 35 C Operation humidity 30 80 No condensation Storage temperature 5 122 F 15 50 C Storage humidity 30 85 No condensation Model Name PJ 662 PJ 663 ...

Page 59: ... 3 4 5 6 7 8 9 A B C D E F LSB 0 0 P p Ç É á 1 1 A Q a q ü æ í ß 2 2 B R b r é Æ ó 3 3 C S c s â ô ú 4 4 D T d t ä ö ñ 5 5 E U e u à ò Ñ 6 6 F V f v å û a µ 7 7 G W g w ç ù o 8 8 H X h x ê ÿ º 9 9 I Y i y ë Ö A J Z j z è Ü B K k ï C L l î D M m ì ø E N n Ä F O _ o Å ƒ ...

Page 60: ... USA France à Ç é ù è Ø Germany Ä Ö Ü ä ö ü ß United Kingdom Denmark I Æ Ø Å æ ø å Sweden É Ä Ö Å Ü é ä ö å ü Italy é ù à ò è ì Spain I Pts Ñ Ø ñ Japan Norway É Æ Ø Å Ü é æ ø å ü Denmark II É Æ Ø Å Ü é æ ø å ü Spain II á Ñ é í ñ ó ú Latin America á Ñ é ü í ñ ó ú Korea Legal ...

Page 61: ......

Reviews: