background image

28

12-1

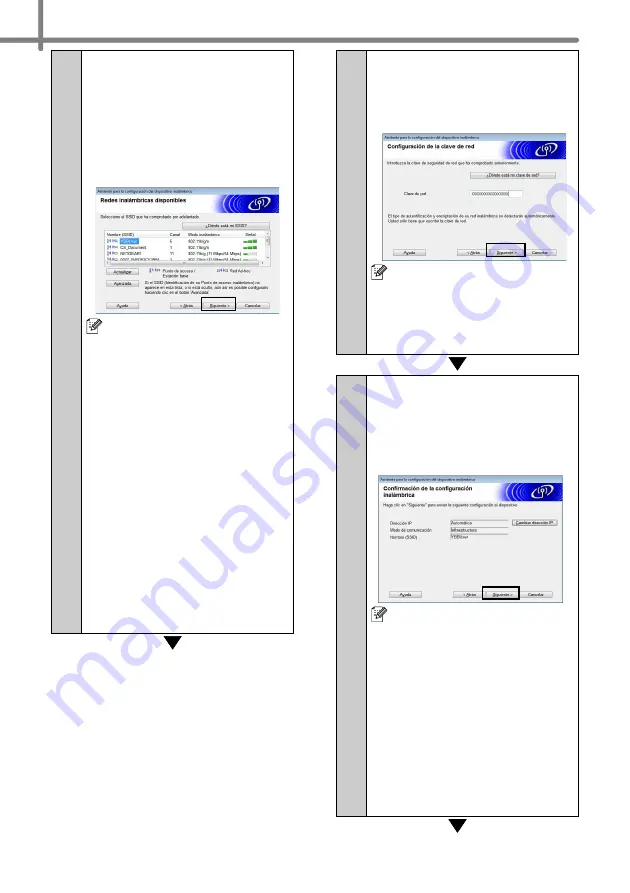
El asistente buscará las 

redes inalámbricas 

disponibles para su 

impresora. Seleccione el 

SSID que apuntó en 

MEMO


Î

 página 23 y haga clic en 

[

Siguiente

].

Si la lista está vacía, 

compruebe que el punto de 

acceso está encendido y 
transmitiendo el SSID, y 

luego verifique que la 

impresora y el punto de 
acceso tienen el mismo 

rango de comunicaciones 

inalámbricas.
A continuación haga clic en 

[

Actualizar

].

Si su punto de acceso está 
configurado para no 

transmitir el SSID, puede 

introducir el SSID 
manualmente pulsando el 

botón [

Avanzada

]. Siga las 

instrucciones de la pantalla 
para introducir el 

Name 

(SSID)

, y haga clic en 

[

Siguiente

].

13-1

Introduzca la 

clave de la 

red

 que apuntó en 

MEMO


Î

 página 23 y haga clic en 

[

Siguiente

].

Si su red no está configurada 

para autenticación y cifrado, 

aparece la pantalla 

ATENCIÓN!

. Para continuar 

con la configuración, haga clic 

en [

Aceptar

] y vaya a 

14-1

.

14-1

Confirme los parámetros de 

la red inalámbrica y haga 

clic en [

Siguiente

]. La 

configuración se enviará a 

la impresora.

• Si hace clic en [

Cancelar

] la 

configuración permanecerá 

sin cambios.

• Si quiere asignar 

manualmente una dirección 

IP para la impresora, haga 

clic en [

Cambiar dirección 

IP

] e introduzca una 

dirección IP compatible con 

su red.

• Si aparece la pantalla de 

error de configuración de la 

red inalámbrica, haga clic en 
[

Reintentar

].

Summary of Contents for P-touch QL-710W

Page 1: ...tand this guide before using the machine We recommend that you keep this guide nearby for future reference Asegúrese de leer y comprender esta guía antes de utilizar la máquina Le recomendamos que la conserve a mano para futuras consultas www brother com US ENG QL 710W 720NW ...

Page 2: ...vice pursuant to Part 15 of the FCC Rules These limits are designed to provide reasonable protection against harmful interference in a residential installation This equipment generates uses and can radiate radio frequency energy and if not installed and used in accordance with the instructions may cause harmful interference to radio communications However there is no guarantee that interference wi...

Page 3: ...document represents all editions of Windows Vista Windows 7 in this document represents all editions of Windows 7 Windows Server 2003 in this document represents Windows Server 2003 Windows Server 2003 R2 In addition Windows Server 2003 in this document does not represent Windows Server 2003 x64 Edition Windows Server 2008 in this document represents all editions of Windows Server 2008 and Windows...

Page 4: ...hichever comes first What is NOT covered This warranty does not cover 1 Physical damage to this Product 2 Damage caused by improper installation improper or abnormal use misuse neglect or accident including but not limited to transporting this Product without the proper preparation and or packaging 3 Damage caused by another device or software used with this Product including but not limited to da...

Page 5: ...he Authorized Service Center will provide you with a replacement Machine after receiving one from Brother If you are dealing directly with Brother Brother will send to you a replacement Machine with the understanding that you will after receipt of the replacement Machine supply the required proof of purchase information together with the Machine that Brother agreed to replace You are then expected...

Page 6: ...G IMPLIED WARRANTIES OF MERCHANTABILITY AND FITNESS FOR A PARTICULAR PURPOSE ARE HEREBY DISCLAIMED This Limited Warranty is the only warranty that Brother is giving for this Product It is the final expression and the exclusive and only statement of Brother s obligations to you It replaces all other agreements and understandings that you may have with Brother or its representatives This warranty gi...

Page 7: ... of purchase bill of sale in case your Product requires service Model __________________________________________ Serial __________________________________________ Date of purchase __________________________________ Store where purchased _____________________________ Location of store __________________________________ Important We recommend that you keep all original packing materials in the event...

Page 8: ......

Page 9: ...ace users Windows 11 For USB interface users Macintosh 13 For wired network interface users Windows QL 720NW only 15 For wired network interface users Macintosh QL 720NW only 18 For wireless network interface users 20 For Windows users 23 For Macintosh users 29 6 Installing and using other software 32 BRAdmin Light Windows 32 BRAdmin Light Macintosh 33 P touch Editor Lite LAN Windows 34 7 Start P ...

Page 10: ... other countries Wi Fi and Wi Fi Alliance are registered trademarks of the Wi Fi Alliance Wi Fi Protected Setup WPA and WPA2 are marks of the Wi Fi Alliance Android is a trademark of Google Inc The names of other software or products used in this document are trademarks or registered trademarks of the respective companies that developed them Each owner whose software title is mentioned in this doc...

Page 11: ...e Machine Do not use the printer in special environments such as near medical equipment Electromagnetic waves may cause the medical equipment to malfunction Users with heart pacemakers should move away from the machine if they sense any abnormalities Dispose of plastic bags correctly and keep away from babies and children Do not wear or play with plastic bags Unplug the power cord immediately and ...

Page 12: ...ine with water or a foreign object in the machine the machine may be damaged or personal injury could result Follow these guidelines to avoid fire electric shock or other damage Power Cord Use only the authorized power source 120V AC for the machine Use only the power cord included with the machine Do not handle the power cord or plug if your hands are wet Do not overload the electrical outlet wit...

Page 13: ...put machine parts or labels in their mouths If any object has been swallowed seek medical attention Do not place the machine in areas exposed to direct sunlight near heaters or other hot appliances or in any area exposed to extremely high or low temperatures high humidity or excessive dust Doing so could cause the machine to malfunction Do not hold or lift the machine by the DK Roll cover The cove...

Page 14: ...use CD DVD labels in a slot loading CD DVD player for example a CD player in a car where the CD is slid into a slot in the CD player Do not peel off the CD DVD label once it is applied to the CD DVD a thin surface layer may come off resulting in damage to the disk Do not apply CD DVD labels to CD DVD disks designed for use with ink jet printers Labels peel off these disks easily and using disks wi...

Page 15: ...W 720NW USB cable Quick Setup Guide CD ROM DK Label Tape Guide AC Power cord The plug may differ by countries DK Roll Starter roll The Brother QL 710W 720NW includes two starter rolls One starter roll of DK Die cut Standard Address Labels 100 labels One starter roll of DK Continuous Durable Tape 2 4 x 26 2 feet 1 Unpacking the QL 710W 720NW ...

Page 16: ... outlet The wire in the power cord may become damaged Do not connect the QL 710W 720NW to the computer until directed to do so when installing the printer driver Front Rear When the Wi Fi lamp is lit wired network connections are disabled 2 Parts Description Main Printing Unit DK Roll compartment cover Feed button Cut button Wi Fi button ON OFF button Status lamp Wi Fi lamp Power cord USB port Pow...

Page 17: ...n the spool guides on the left and right Insert the spool with the DK Roll into the spool guide located on the right hand side of the Brother QL 710W 720NW 3 Thread the end of the DK Roll into the slot until it align to the area shown on the right Align the end of the roll with the upright edge of the label output slot 4 Close the DK Roll compartment cover When you press the ON OFF button to turn ...

Page 18: ...displayed may differ between the QL 710W and QL 720NW The screens of the QL 720NW are used in the explanations in this manual Installation procedure is subject to change without notice If your computer does not have a CD ROM drive you can download the latest drivers manuals and utilities for your model from the Brother Solutions Center at http solutions brother com Some software applications inclu...

Page 19: ...ms Standard Installation Installs P touch Editor 5 0 P touch Address Book P touch Update Software Printer Setting Tool User s Guide and Printer Driver User s Guides Displays the User s Guide Software User s Guide and Network User s Guide Custom Installation Individually installs P touch Editor 5 0 P touch Address Book P touch Update Software Printer Setting Tool Printer Driver User s Guide and P t...

Page 20: ...e installation continues The QL 710W does not support wired network connections Ethernet 6 When instructed connect the printer to finish the printer driver installation 7 When the screen for the online user registration is displayed click OK or Cancel If you choose OK you will go to the online user registration page before finishing the installation recommended If you choose Cancel installation co...

Page 21: ...ntosh 1 IInsert the installer CD ROM into your CD ROM drive 2 Double click the Start Here OSX icon to install Available items Start Here OSX Installs P touch Editor 5 0 P touch Update Software and the Printer Driver Utilities Includes BRAdmin Light and the Wireless Device Setup Wizard Documentation Includes the User s Guide Software User s Guide and Network User s Guide Brother Support Displays th...

Page 22: ...Print Scan Mac OS X 10 7 Then click 6 Click Choose Brother QL XXX from the list and click Add to add the printer to the Print Fax Mac OS X 10 5 8 10 6 Print Scan Mac OS X 10 7 7 When the screen returns to the Print Fax Print Scan screen check that Brother QL XXX is added and close the Print Fax Print Scan screen Now you can use the machine ...

Page 23: ...le click Start exe 2 Click Standard Installation Installation items Standard Installation Installs P touch Editor 5 0 P touch Address Book P touch Update Software Printer Setting Tool User s Guide and Printer Driver User s Guide Displays the User s Guide Software User s Guide and Network User s Guide Custom Installation Individually installs P touch Editor 5 0 P touch Address Book P touch Update S...

Page 24: ...nded or Network Shared Printer and then click Next The following step describes the operation when Peer to Peer is selected For details on Network Shared Printer connections please see Brother Solutions Center http solutions brother com 7 When this screen appears choose Change the Firewall port settings to enable network connection and continue with the installation Recommended and click Next If y...

Page 25: ... when the Windows Security screen appears click the check box and click Install to complete the installation 9 When the screen for the online user registration is displayed click OK or Cancel If you choose OK you will go to the online user registration page before finishing the installation recommended If you choose Cancel installation continues 10 Click Finish The software installation is now com...

Page 26: ...OM into your CD ROM drive 2 Double click the Start Here OSX icon to install Available items Start Here OSX Installs P touch Editor 5 0 P touch Update Software and the Printer Driver Utilities Includes BRAdmin Light and the Wireless Device Setup Wizard Documentation Includes the User s Guide Software User s Guide and Network User s Guide Brother Support Displays the link to On Line Registration and...

Page 27: ...the screen Select LPD as the protocol Enter the IP address of the printer into the Address box Choose Brother QL XXX from the list and click Add to add the printer When specifying the Queue Name use the value BRNxxxxxxxxxxxx at wherexxxxxxxxxxxx is the Ethernet address 6 When the screen returns to the Print Fax Print Scan screen check that Brother QL XXX is added and close the Print Fax Print Scan...

Page 28: ...int router 1 Access point router 2 Your printer 3 Wireless capable computer connected to the access point router 4 Wired computer connected to the access point router 5 Smartphone Choosing Your Wireless Install Method The following instructions will offer two methods for installing your printer in a wireless network environment Choose the method you prefer for your environment To set up your print...

Page 29: ...r or internet provider Method2 One push configuration using WPS and configuration using the Installer CD ROM If your WLAN access point router supports automatic wireless one push setup WPS you can also choose this method You need to temporarily use a USB cable during configuration If you are using Windows XP or using a network cable to connect your computer with your wireless access point router y...

Page 30: ...age 25 page 27 For Macintosh users go to page 29 Step 1 Step 2 Step 3 Step 9 page XX Step 10 Step 11 Step 12 Step 13 Method 1 Configuration using the Installer CD ROM and temporarily using USB cable Method 2 One push using WPS and configuration using the Installer CD ROM Step 4 1 page Step 5 1 Step 6 1 Step 7 1 Step 8 1 Step 4 2 page Step 5 2 Step 6 2 Step 7 2 page 29 page 30 page 31 Make sure tha...

Page 31: ...er s Guide and Printer Driver User s Guide Displays the User s Guide Software User s Guide and Network User s Guide Custom Installation Individually installs P touch Editor 5 0 P touch Address Book P touch Update Software Printer Setting Tool Printer Driver User s Guide and P touch Editor Lite LAN Network Utility Installs BRAdmin Light utility Brother Support Displays the link to Brother Solutions...

Page 32: ...k Next The QL 710W does not support wired network connections Ethernet 6 Choose Brother Peer to Peer Network Printer recommended or Network Shared Printer and then click Next The following step describes the operation when Peer to Peer is selected For details on Network Shared Printer connections please see Brother Solutions Center http solutions brother com 7 When this screen appears choose Chang...

Page 33: ...cable and then click Next Go to 9 2 If the Important Notice screen appears read the notice Check the box after you confirm the SSID and Network Key and then click Next Go to 9 1 Go to 9 2 For Method 1 users 9 1 Temporarily connect the USB cable directly to the computer and the printer 10 1 Do one of the following If the Installation confirmation screen appears check the box and click Next then go ...

Page 34: ...ter the Network Key you noted in MEMO Î page 21 and then click Next If your network is not configured for authentication and encryption the ATTENTION screen will appear To continue configuration click OK and go to 14 1 14 1 Confirm the wireless network settings and then click Next The settings will be sent to your printer The settings will remain unchanged if you click Cancel If you want to manual...

Page 35: ...reless settings fail the Wireless Device Setup Wizard screen appears Follow the on screen instructions to complete the wireless configuration If you are using WEP but your printer is not found make sure you entered the WEP key correctly 17 The installation of the Brother drivers will automatically start The installation screens appear one after another DO NOT cancel any of the screens during the i...

Page 36: ...ware window may appear when using the printer or its software Please allow or permit the installer to continue 19 Click Finish The software installation is now complete Turn the power of the printer OFF and then ON again When you are asked to restart the computer click Restart ...

Page 37: ...he box after you confirm the SSID and Network Key and then click Next Finish Go to 4 1 Go to 4 2 For Method 1 users 4 1 Temporarily connect the USB cable directly to the computer and the printer and then click Next 5 1 The wizard will search for wireless networks available from your printer Choose the SSID that you noted in MEMO Î page 21 and then click Next If the list is blank check that the acc...

Page 38: ... enter an IP address that is compatible with your network If the wireless setup failure screen appears click Retry 8 1 Disconnect the USB cable connecting the computer and the printer and then click Finish Wireless setup is now complete Go on to 9 to install the printer driver and the software For Method 2 users 4 2 Confirm that your WLAN access point router has the WPS symbol 5 2 Place your print...

Page 39: ...er Support Displays the link to On Line Registration and Brother Solutions Center 10 Follow the on screen instructions 1 2 3 4 11 Click Apple menu System Preferences and click Print Fax 10 5 8 10 6 Print Scan 10 7 Then click 12 Choose Brother QL XXX from the list and click Add to add the printer Now go to 13 12 Choose IP at the top of the screen Select LPD as the protocol Enter the IP address of t...

Page 40: ... Light and follow the onscreen instructions If the Windows Firewall is enabled on your PC the message Do you wish to add this application to the list of exceptions appears Check your PC environment and choose Yes or No 1 Click Start All Programs Brother BRAdmin Light BRAdmin Light BRAdmin Light will search for new devices automatically If you have a DHCP BOOTP RARP server in your network you don t...

Page 41: ...se STATIC for the Boot Method Enter the IP Address Subnet Mask and Gateway and then click OK 4 The address information will be saved to the printer BRAdmin Light Macintosh 1 Click Library Printers Brother P touch Utilities BRAdmin Light jar BRAdmin Light will search for new devices automatically If you have a DHCP BOOTP RARP server in your network you don t have to do the following operation as th...

Page 42: ...en the printer is connected to the network therefore the printer can be used immediately However since the IP address may change dynamically we recommend specifying a static IP address when P touch Editor Lite LAN is being used For details contact your network administrator Specify the settings after consulting with your network administrator P touch Editor Lite LAN Windows 1 Start the computer an...

Page 43: ... Click Brother P touch and P touch Editor 5 0 Help Start from New Open dialog When you start the P touch Editor 5 0 and the New Open dialog box appears click Help How To If you click Check for update in red square shown right you can check if the latest P touch Editor is available or not on the web site Start from P touch Editor Click Help menu and choose P touch Editor Help Start from Snap mode R...

Page 44: ...r printer name Start from New Open dialog When you start the P touch Editor 5 0 and the New Open dialog box appears click Help How To Start from P touch Editor Click Help menu and choose P touch Editor Help Start from Snap mode Click the mouse with the control key held and select P touch Editor Help For Macintosh ...

Page 45: ...Guía de configuración rápida Asegúrese de leer y comprender esta guía antes de utilizar la máquina Le recomendamos que la conserve a mano para futuras consultas www brother com SPA QL 710W 720NW ...

Page 46: ...ar Brother QL 710W 720NW y consérvela a mano para futuras consultas Ofrecemos servicio de asistencia para usuarios que registran sus productos en nuestro sitio web Le recomendamos que aproveche esta oportunidad para registrarse visitándonos en Registro de usuario online http registermybrother com Página de asistencia online http solutions brother com NOTA También es posible obtener acceso a los si...

Page 47: ...apagándolo y encendiéndolo se recomienda al usuario intentar corregir la interferencia empleando cualquiera de las siguientes medidas Reorientar o reubicar la antena de recepción Aumentar la separación entre el equipo y el receptor Conectar el equipo a una toma de red en un circuito diferente al que esté conectado el receptor Solicitar ayuda al distribuidor o a un técnico de radio TV cualificado E...

Page 48: ...e documento representa Windows XP Professional y Windows XP Home Edition Asimismo Windows XP en este documento no representa Windows XP x64 Edition Windows Vista en este documento representa todas las ediciones de Windows Vista Windows 7 en este documento representa todas las ediciones de Windows 7 Windows Server 2003 en este documento representa Windows Server 2003 Windows Server 2003 R2 Asimismo...

Page 49: ... Estados Unidos y no incluye los gastos de transporte fuera de los Estados Unidos Duración del periodo de garantía Máquinas dos años a partir de la fecha de compra original Consumibles y accesorios incluidos 90 días a partir de la fecha de compra original o la duración prevista del consumible lo que suceda antes Aspectos NO CUBIERTOS Esta garantía no cubre 1 Daños físicos a este Producto 2 Daños p...

Page 50: ... se pondrán a su disposición para que los recoja personalmente en un Centro de Servicio Autorizado situado en un lugar conveniente Si la máquina o los artículos consumibles y accesorios no están cubiertos por esta garantía ninguna de sus dos fases se cobrarán al usuario los gastos de transporte en los que se incurra para devolverle el equipo y los artículos consumibles y accesorios así como por cu...

Page 51: ... los daños consecuentes o accidentales por tanto es posible que la limitación anterior no se aplique en su caso ESTA GARANTÍA INVALIDA CUALQUIER OTRA GARANTÍA ESCRITA U ORAL YA SEA EXPRESADA MEDIANTE UNA AFIRMACIÓN PROMESA DESCRIPCIÓN DIBUJO MODELO O PRUEBA TODAS Y CADA UNA DE LAS GARANTÍAS DISTINTAS DE ESTA SEAN EXPLÍCITAS O IMPLÍCITAS INCLUIDAS LAS GARANTÍAS DE COMERCIABILIDAD Y ADECUACIÓN A UN ...

Page 52: ...necesitar servicio técnico del producto Nº de modelo _____________________________________ Nº de serie _______________________________________ Fecha de compra __________________________________ Establecimiento de compra __________________________ Ubicación del establecimiento ________________________ Importante Le recomendamos que conserve todos los materiales de embalaje original en caso de que n...

Page 53: ...3 Para usuarios de interfaz USB Macintosh 15 Para usuarios de interfaz de red de cable Windows Solamente QL 720NW 17 Para usuarios de interfaz de red cableada Macintosh Solamente QL 720NW 20 Para usuarios de interfaz de red inalámbrica 22 Para usuarios de Windows 25 Para usuarios de Macintosh 31 6 Instalación y uso de otras aplicaciones de software 36 BRAdmin Light Windows 36 BRAdmin Light Macinto...

Page 54: ... Fi Alliance Wi Fi Protected Setup WPA y WPA2 son marcas de Wi Fi Alliance Android es una marca comercial de Google Inc Los nombres de otros programas o productos utilizados en este documento son marcas comerciales o marcas comerciales registradas de sus respectivos titulares Todos los propietarios de los títulos de software que se mencionan en este documento tienen un contrato de licencia de soft...

Page 55: ...es especiales como por ejemplo cerca de equipos electrónicos médicos Las ondas electromagnéticas pueden causar el mal funcionamiento de los equipos Los usuarios con marcapasos deben separarse de la impresora si notan cualquier síntoma de anormalidad Deseche las bolsas de plástico correctamente y manténgalas fuera del alcance de bebés y niños No juegue con las bolsas de plástico Desenchufe inmediat...

Page 56: ...te las tormentas eléctricas intensas porque puede recibir una descarga eléctrica Asegúrese de apagar la máquina y retirar el cable de alimentación de la toma eléctrica cuando limpie la máquina Si no lo hace puede provocar una descarga eléctrica o un incendio Para evitar incendios o posibles descargas eléctricas no desmonte la máquina ni permita que se moje No utilice disolvente para pintura bencin...

Page 57: ...cortocircuito que podría provocar un incendio No utilice el cable de alimentación si está dañado Asegúrese de que el cable de alimentación está conectado correctamente a la toma eléctrica No tire del cable de alimentación cuando lo desenchufe de la toma eléctrica Si lo hace puede provocar una descarga eléctrica o un incendio No dañe el cable de alimentación de las siguientes maneras porque podría ...

Page 58: ...extremadamente altas o bajas a humedad elevada o al polvo Si lo hace puede provocar fallos en la máquina No sujete ni levante la máquina por la cubierta del rollo DK La cubierta se puede salir y la máquina se puede caer y dañar No sujete la máquina con una sola mano La máquina se le puede resbalar Verifique que la orientación y el procedimiento sean correctos cuando conecta los cables y los produc...

Page 59: ...nos mojadas con agua o sudor la etiqueta puede cambiar de color o decolorarse No coloque etiquetas a personas animales o plantas Además nunca aplique etiquetas en lugares públicos o privados sin autorización Dado que el extremo del rollo DK está diseñado para que no se adhiera al carrete de la etiqueta puede que la última etiqueta no se corte correctamente Si esto sucede retire las etiquetas resta...

Page 60: ...oambientales la etiqueta puede quedarse pegada o fija o el color de la etiqueta puede cambiar o puede pasarse a otros objetos Antes de colocar la etiqueta compruebe las condiciones medioambientales y el material Compruebe la etiqueta pegando una pequeña muestra en una zona discreta de la superficie en la que desee pegarla CD ROM y software No raye ni exponga el CD ROM a temperaturas altas o bajas ...

Page 61: ...le USB Guía de configuración rápida CD ROM Guía de etiqueta y cinta DK Cable eléctrico de CA El enchufe puede ser distinto dependiendo del país Rollo DK rollo inicial La Brother QL 710W 720NW incluye dos rollos iniciales Un rollo inicial de etiquetas de dirección estándar predeterminada DK 100 etiquetas Un rollo inicial de cinta continua duradera DK 2 4 x 26 2 pies 1 Desembalaje de la QL 710W 720N...

Page 62: ...W 720NW al ordenador hasta que se le indique en el procedimiento de instalación del controlador de impresora Vista frontal Vista posterior Cuando el testigo Wi Fi está encendido las conexiones de la red de cable están desactivadas 2 Descripción de piezas Unidad principal de impresión Cubierta del compartimento del rollo DK Botón Feed Botón Cut Botón Wi Fi Botón ON OFF Testigo Status Testigo Wi Fi ...

Page 63: ...s guías derecha e izquierda Introduzca el carrete con el rollo DK en la guía del carrete que hay en la parte derecha de la Brother QL 710W 720NW 3 Introduzca el extremo del rollo DK en la ranura hasta que se alinee con el área que se muestra a la derecha Alinee el extremo del rollo con el borde superior de la ranura de salida de etiquetas 4 Cierre la cubierta del compartimento del rollo DK Cuando ...

Page 64: ...ser distintas entre la QL 710W y la QL 720NW En las explicaciones de este manual se usan las pantallas de la QL 720NW El procedimiento de instalación está sujeto a modificaciones sin previo aviso Si el ordenador no tiene una unidad de CD ROM puede descargar los controladores los manuales y las utilidades más recientes para su modelo desde Brother Solutions Center en http solutions brother com Algu...

Page 65: ...ón Instalación estándar Instala P touch Editor 5 0 P touch Address Book P touch Update Software Printer Setting Tool la Guía del usuario y el controlador de impresora Guías del usuario Muestra la Guía del usuario la Guía del usuario de software y la Guía del usuario en red Instalación personalizada Instala individualmente P touch Editor 5 0 P touch Address Book P touch Update Software Printer Sett...

Page 66: ...instalación continúa La QL 710W no admite conexiones de red de cable Ethernet 6 Cuando se le indique conecte la impresora para finalizar la instalación del controlador de impresora 7 Cuando aparezca la pantalla para registrarse en línea haga clic en Aceptar o en Cancelar Si selecciona Aceptar antes de finalizar la instalación pasará por la página de registro de usuarios en línea recomendado Si sel...

Page 67: ...D ROM con el programa de instalación en la unidad de CD ROM 2 Haga doble clic en el icono Start Here OSX para iniciar la instalación Elementos disponibles Start Here OSX Instala P touch Editor 5 0 P touch Update Software y el controlador de impresora Utilidades Incluye BRAdmin Light y el Asistente para la configuración del dispositivo inalámbrico Documentación Incluye la Guía del usuario la Guía d...

Page 68: ...ón haga clic en 6 Haga clic en Seleccione Brother QL XXX en la lista y haga clic en Añadir para añadir la impresora a Impresión y Fax Mac OS X 10 5 8 10 6 Impresión y Escaneado Mac OS X 10 7 7 Cuando vuelva a aparecer la pantalla Impresión y Fax Impresión y Escaneado compruebe que se ha añadido Brother QL XXX y cierre la pantalla Impresión y Fax Impresión y Escaneado Ahora puede utilizar la máquin...

Page 69: ...n Start exe 2 Haga clic en Instalación estándar Elementos de la instalación Instalación estándar Instala P touch Editor 5 0 P touch Address Book P touch Update Software Printer Setting Tool la Guía del usuario y el controlador de impresora Guía del usuario Muestra la Guía del usuario la Guía del usuario de software y la Guía del usuario en red Instalación personalizada InstalaindividualmenteP touc...

Page 70: ...n a la red a través de cable Ethernet y haga clic en Siguiente Siga las instrucciones de la pantalla para comprobar el estado del testigo y el cable y haga clic en Siguiente 6 Seleccione Impresora de red punto a punto de Brother recomendado o Impresora compartida de red y haga clic en Siguiente El paso siguiente describe el funcionamiento cuando está seleccionado punto a punto Para obtener más inf...

Page 71: ...er se iniciará automáticamente Las pantallas de instalación aparecen una tras otra NO cancele ninguna pantalla durante la instalación Todas las pantallas tardarán unos segundos en aparecer En Windows Vista y Windows 7 cuando aparezca la pantalla Seguridad de Windows active la casilla de verificación y haga clic en Instalar para completar la instalación 9 Cuando aparezca la pantalla para registrars...

Page 72: ...e el CD ROM con el programa de instalación en la unidad de CD ROM 2 Haga doble clic en el icono Start Here OSX para iniciar la instalación Elementos disponibles Start Here OSX Instala P touch Editor 5 0 P touch Update Software y el controlador de impresora Utilidades Incluye BRAdmin Light y el Asistente para la configuración del dispositivo inalámbrico Documentación Incluye la Guía del usuario la ...

Page 73: ... Ahora vaya a 6 5 Seleccione la IP en la parte superior de la pantalla Seleccione LPD como protocolo Introduzca la dirección IP de la impresora en el cuadro Dirección Seleccione Brother QL XXX de la lista y haga clic en Añadir para añadir la impresora Al especificar el Nombre de la cola utilice el valor BRNxxxxxxxxxxxx donde xxxxxxxxxxxx es la dirección Ethernet 6 Cuando vuelva a aparecer la panta...

Page 74: ...ructura conectada a un ordenador a través de un punto de acceso enrutador 1 Punto de acceso enrutador 2 Su impresora 3 Ordenador con capacidad inalámbrica conectado al punto de acceso enrutador 4 Ordenador conectado por cable al punto de acceso enrutador 5 Teléfono inteligente Selección del método de instalación inalámbrica Las siguientes instrucciones le ofrecen dos métodos para instalar su impre...

Page 75: ... administrador del sistema o a su proveedor de Internet Método 2 Configuración de un toque usando WPS y configuración usando el CD ROM de instalación Si su punto de acceso enrutador de WLAN admite la configuración inalámbrica WPS automática un toque también puede seleccionar este método Durante la configuración necesitará temporalmente un cable USB Si está usando Windows XP o un cable de red para ...

Page 76: ...so 2 Paso 3 Paso 9 page XX Paso 10 Paso 11 Paso 12 Paso 13 Método 1 Configuración usando el CD ROM de instalación y temporalmente un cable USB Método 2 Configuración de un toque usando WPS y configuración usando el CD ROM de instalación Paso 4 1 page Paso 5 1 Paso 6 1 Paso 7 1 Paso 8 1 Paso 4 2 page Paso 5 2 Paso 6 2 Paso 7 2 página 32 página 33 página 34 Asegúrese de que ha iniciado la sesión con...

Page 77: ... y el controlador de impresora Guía del usuario Muestra la Guía del usuario la Guía del usuario de software y la Guía del usuario en red Instalación personalizada Instala individualmente P touch Editor 5 0 P touch Address Book P touch Update Software Printer Setting Tool el controlador de impresora la Guía del usuario y P touch Editor Lite LAN Utilidades de red Instala la utilidad BRAdmin Light So...

Page 78: ...admite conexiones de red de cable Ethernet 6 Seleccione Impresora de red punto a punto de Brother recomendado o Impresora compartida de red y haga clic en Siguiente El paso siguiente describe el funcionamiento cuando está seleccionado punto a punto Para obtener más información sobre las conexiones de Impresora compartida de red visite el sitio web de Brother Solutions Center http solutions brother...

Page 79: ...te Vaya a 9 2 Si aparece la pantalla Nota Importante lea la advertencia Marque la casilla para confirmar que dispone de la información del SSID y de la clave de la red y haga clic en Siguiente Vaya a 9 1 Vaya a 9 2 Para los usuarios del Método 1 9 1 Conecte la impresora al ordenador con el cable USB 10 1 Escoja uno de los dos pasos siguientes Si aparece la pantalla de confirmación de la instalació...

Page 80: ...es de la pantalla para introducir el Name SSID y haga clic en Siguiente 13 1 Introduzca la clave de la red que apuntó en MEMO Î página 23 y haga clic en Siguiente Si su red no está configurada para autenticación y cifrado aparece la pantalla ATENCIÓN Para continuar con la configuración haga clic en Aceptar y vaya a 14 1 14 1 Confirme los parámetros de la red inalámbrica y haga clic en Siguiente La...

Page 81: ...r 11 2 Encienda la impresora y pulse y mantenga el botón Wi Fi hasta que el testigo Wi Fi comience a parpadear en verde 12 2 Pulse el botón WPS de su punto de acceso enrutador de la WLAN Cuando haya terminado la configuración el testigo Wi Fi de la impresora se enciende en verde La configuración inalámbrica está terminada Vaya a 16 16 Seleccione el equipo de la lista y haga clic en Siguiente Si se...

Page 82: ...arecer En Windows Vista y Windows 7 cuando aparezca la pantalla Seguridad de Windows active la casilla de verificación y haga clic en Instalar para completar la instalación 18 Cuando aparezca la pantalla para registrarse en línea haga clic en Aceptar o en Cancelar Si selecciona Aceptar antes de finalizar la instalación pasará por la página de registro de usuarios en línea recomendado Si selecciona...

Page 83: ...te un cable USB seleccione Sí tengo un cable USB que puedo usar en la instalación y haga clic en Siguiente Vaya a 4 1 Cuando utilice el Método 2 Configuración de un toque usando WPS y configuración usando el CD ROM de instalación seleccione No no tengo un cable USB y haga clic en Siguiente Vaya a 4 2 Si aparece la pantalla Nota Importante lea la advertencia Marque la casilla para confirmar que dis...

Page 84: ...clic en Siguiente Si la lista está vacía compruebe que el punto de acceso está encendido y transmitiendo el SSID y luego verifique que la impresora y el punto de acceso tienen el mismo rango de comunicaciones inalámbricas A continuación haga clic en Actualizar Si su punto de acceso está configurado para no transmitir el SSID puede introducir el SSID manualmente pulsando el botón Avanzada Siga las ...

Page 85: ...cción IP compatible con su red Si aparece la pantalla de error de configuración de la red inalámbrica haga clic en Reintentar 8 1 Desconecte el cable USB que conecta la impresora al ordenador y haga clic en Finalizar La configuración inalámbrica está terminada Vaya a 9 para instalar el controlador de impresora y el software Para los usuarios del Método 2 4 2 Confirme que el punto de acceso enrutad...

Page 86: ...ción Incluye la Guía del usuario la Guía del usuario de software y la Guía del usuario en red Soporte técnico de Brother Muestra el vínculo a Registro en línea y a Brother Solutions Center 1 2 3 4 10 Siga las instrucciones que aparecen en pantalla 11 Haga clic en el menú Apple Preferencias del Sistema y después en Impresión y Fax 10 5 8 10 6 Impresión y Escaneado 10 7 A continuación haga clic en 1...

Page 87: ...cer la pantalla Impresión y Fax Impresión y Escaneado compruebe que se ha añadido Brother QL XXX y cierre la pantalla Impresión y Fax Impresión y Escaneado Ahora puede utilizar la máquina Apague la impresora y vuelva a encenderla ...

Page 88: ...y siga las instrucciones que aparecen en pantalla Si tiene el Firewall de Windows activado en su PC aparecerá el mensaje Desea añadir esta aplicación a la lista de excepciones Compruebe el entorno de su PC y seleccione Sí o No 1 Haga clic en Inicio Todos los programas Brother BRAdmin Light BRAdmin Light BRAdmin Light buscará nuevos dispositivos automáticamente Si dispone de un servidor DHCP BOOTP ...

Page 89: ...C para Método de arranque Introduzca la Dirección IP Máscara Subred y Puerta de acceso y haga clic en Aceptar 4 La información de dirección se guardará en la impresora BRAdmin Light Macintosh 1 Haga clic en Library Printers Brother P touch Utilities BRAdmin Light jar BRAdmin Light buscará nuevos dispositivos automáticamente Si dispone de un servidor DHCP BOOTP RARP en su red no tiene que realizar ...

Page 90: ...que se pueda usar inmediatamente Sin embargo como la dirección IP puede cambiar dinámicamente le recomendamos que especifique una IP estática cuando use P touch Editor Lite LAN Para más información contacte con el administrador de la red Especifique los parámetros después de consultar al administrador de la red 4 La información de dirección se guardará en la impresora P touch Editor Lite LAN Windo...

Page 91: ...a Todos los programas Haga clic en Brother P touch y P touch Editor 5 0 Ayuda Inicio desde el cuadro de diálogo Nuevo Abrir Cuando inicie P touch Editor 5 0 y aparezca el cuadro de diálogo Nuevo Abrir haga clic en Ayuda Procedimientos para Si hace clic en Comprobar actualizaciones indicado a la derecha por un cuadro rojo podrá comprobar si hay una actualización disponible para P touch Editor en el...

Page 92: ...den no coincidir con el nombre de su impresora Inicio desde el cuadro de diálogo Nuevo Abrir Cuando inicie P touch Editor 5 0 y aparezca el cuadro de diálogo Nuevo Abrir haga clic en Ayuda Procedimientos para Iniciar desde P touch Editor Haga clic en el menú Ayuda y seleccione Ayuda de P touch Editor Inicio desde el modo Snap Haga clic con el botón secundario del ratón y seleccione Ayuda de P touc...

Page 93: ...Printed in China Impreso en China LB9843001 ...

Reviews: