background image

24

Cómo formatear la etiqueta

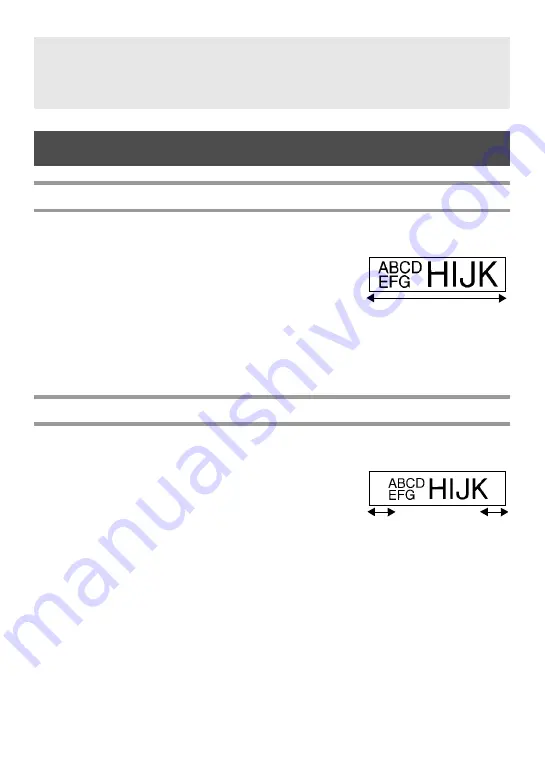
Definición de la longitud de la etiqueta

La longitud de la etiqueta se puede definir como sigue:

1

Pulse 

g

 y luego 

A

.

2

Pulse 

l

 o 

r

 hasta que se visualice 

LENGTH

.

3

Pulse 

u

 o 

d

 hasta que se visualice la longitud 

de etiqueta deseada (o utilice las teclas numéricas 
para escribirla).

4

Pulse 

n

.

Definición de un tamaño de margen

Se puede definir el tamaño de los márgenes izquierdo y derecho del texto.

1

Pulse 

g

 y luego 

A

.

2

Pulse 

l

 o 

r

 hasta que se visualice 

MARGIN

.

3

Pulse 

u

 o 

d

 hasta que se visualice el ajuste de 

márgenes deseado (o utilice las teclas numéricas 
para escribirlo).

4

Pulse 

n

.

Una vez que se llene la categoría de símbolos 

PERSONAL

, los nuevos símbolos 

que se seleccionen se sobrescribirán sobre los antiguos a menos que la función de 
guardar símbolos esté ajustada a 

OFF

 (desactivada). (Consulte 

Definición de la 

actualización continua de la categoría de símbolos PERSONAL

 en la página 40.)

0,30" a 39,00" (6 a 999 mm)

0,10" a 4,00" (2 a 99 mm)

Summary of Contents for P-touch 1600

Page 1: ...de before you start using your P touch Keep this User s Guide in a handy place for future reference Antes de usar su equipo por primera vez lea cuidadosamente esta guía de usuario Guarde esta guía de usuario para futuras referencias USER S GUIDE GUÍA DE USUARIO ...

Page 2: ...en tested and found to comply with the limits for a Class B digital device pursuant to Part 15 of the FCC Rules These limits are designed to provide reasonable protection against harmful interfer ence in a residential installation This equipment generates uses and can radiate radio frequency energy and if not installed and used in accordance with the instructions may cause harmful interference to ...

Page 3: ...utter 8 Optional AC Adapter 9 Connecting the AC adapter 9 Turning the P touch On Off 9 2 Label Type Modes 10 Selecting a Label Type Mode 10 Normal and Vertical Modes 10 Rotate Mode and Rotate Repeat Mode 11 Flag Mode 12 Port Panel Modes 13 3 Basic Functions 15 Performing Basic Operations 15 Choosing functions parameters settings and groups 15 Choosing the default setting 15 Confirming a choice 15 ...

Page 4: ...ne Adjustments 38 Selecting how tape is fed and cut 38 Adjusting the display contrast 38 Setting the Auto Reduction function 39 Calibrating the label length 39 Specifying if the PERSONAL symbol category is continually updated 40 Changing the units of measure 40 Changing the language 40 Displaying version information 40 5 Using P touch With a Computer for PT 1650 only 41 Installing the Software Pri...

Page 5: ...er image to the text 52 Using template data 52 Using downloaded database data 54 Backing up restoring P touch data 57 6 Appendix 58 Troubleshooting 58 Error Message List 59 Machine Specifications 63 Hardware 63 Software 63 Accessories For USA Only 64 Index 67 Contact Information For USA Only 70 ...

Page 6: ... Accessory Items that expired in accordance with a rated life and 5 Problems arising from other than defects in materials or workmanship This limited warranty is VOID if this Product has been altered or modified in any way including but not limited to attempted warranty repair without authorization from Brother and or alteration removal of the serial number What to do if you think your Product is ...

Page 7: ... do not return your original Product to Brother within five 5 business days ii the problems of your original Product are not covered by the limited warranty iii the proper packaging instructions are not followed and has caused damage to the product or iv the warranty period on your original Product has expired or has not been sufficiently validated with a copy of the proof of purchase bill of sale...

Page 8: ...e record your model and serial number and your date and location of Purchase below for your records Keep this information with your proof of purchase bill of sale in case your Product requires service Model Serial Date of purchase Store where purchased Location of store Important We recommend that you keep all original packing materials in the event you ship this product Save Time Register On Line...

Page 9: ...al Description Top view bottom view Tape cutter button USB port for PT 1650 only Keyboard AC adapter connector Display Back cover Cassette release lever Print head Tape exit slot Tape cassette compartment Battery compartment Top view Bottom view ...

Page 10: ...lock number page 17 A Label Type setting page 10 B Width setting page 27 C Size setting pages 26 27 D Length setting page 24 E Caps mode page 16 F Insert mode page 17 G Shift mode page 16 H Code mode page 16 I Power key page 9 J Backspace key pages 15 18 K Arrow keys page 15 L Return key pages 15 17 M Global format key pages 26 N Auto Format keys page 30 O Feed key page 31 P Print key page 31 Q La...

Page 11: ... Block number page 17 A Label Type setting page 10 B Width setting page 27 C Size setting pages 26 27 D Length setting page 24 E Caps mode page 16 F Insert mode page 17 G Shift mode page 16 H Code mode page 16 I Power key page 9 J Backspace key pages 15 18 K Arrow keys page 15 L Return key pages 15 17 M Global format key pages 26 N PF keys page 30 O Feed key page 31 P Print key page 31 Q Label Typ...

Page 12: ... s edge Use only the AC adapter designed exclusively for this machine Use of any other adapter will void the warranty Do not try to disassemble the AC adapter When the machine is not to be used for a long period of time disconnect the AC adapter and remove the batteries to prevent them from leaking and damaging the machine Use six AA alkaline or rechargeable Ni Cd or Ni MH batteries Never try to d...

Page 13: ...rgeable Ni Cd or Ni MH batteries can be used instead of six alkaline batteries The rechargeable batteries cannot be recharged by leaving them in the P touch with the AC adapter connected Instead recharge the batteries by using a battery charger designed specifically for the type of batteries used For more details on the rechargeable batteries refer to the instructions provided with them Do not use...

Page 14: ... the display and stored in the memory will be lost Since the enclosed batteries begin discharging fromthe time that the unit is shipped from the factory their life span may not meet specifications depending on when the unit is put into use Notes on tape cassettes Before installing the tape cassette make sure that the end of the tape feeds under the tape guides If the tape cassette to be installed ...

Page 15: ...labels such as around sharp bends and cylindrical objects we recommend using Flexible ID Tape Labels made with Flexible ID Tape are not designed for use as electrical insulation When wrapping labels around cylindrical objects the diameter of the object should be at least 1 8 3 mm otherwise the label should be wrapped as a flag and the FLAG Label Type mode should be used In addition the overlapping...

Page 16: ...tape cutter Notes on cleaning the print head rollers If a blank horizontal streak appears through the label text clean the machine s print head The print head can be cleaned more easily if the optional print head cleaning cassette TZ CL4 is used Before cleaning the print head and rollers press o to turn off the P touch and then remove the batteries and disconnect the optional AC adapter Be extreme...

Page 17: ...ouch for an extended period of time When the power is disconnected all text shown in the display and stored in the memory will be lost Turning the P touch On Off Press o to turn on or turn off the P touch If batteries are installed or the P touch has remained plugged in using the AC adapter the previous session s text is displayed when the P touch is turned on again This feature allows you to stop...

Page 18: ...s If ROTATE ROT REP PORT PANEL or FLAG was selected continue with the following steps 4 Press l or r until the desired parameter is displayed 5 Press u or d until the desired setting is displayed or use the number keys to type in the desired setting 6 Press n to apply the selected settings 7 Type the text for each label in a separate text block 8 Print the labels To print a single copy of each lab...

Page 19: ...he label so that it can easily be read from any angle After selecting the ROTATE or ROT REP Label Type mode specify the length of each label and a frame style if desired BLK LEN block length 0 80 to 8 00 20 to 200 mm Default 1 20 30 mm FRAME OFF Default OFF Asingle block of text can contain a maximum of 7 text lines and with the ROT REP Label Type mode only the text lines that fit within the label...

Page 20: ...tyle if desired and whether or not to rotate the text FLAG flag diameter 0 00 to 4 00 0 to 100 mm Default 0 25 7 mm FLAG LEN flag length 0 40 to 8 00 10 to 200 mm Default 1 20 30 mm FRAME OFF Default OFF ROTATE OFF ON Default OFF A single block of text can contain a maximum of 7 text lines For labels to be attached to cables and wires we recommend using Flexible ID Tape To wrap Flexible ID Tape ar...

Page 21: ... label useful for a row of equally spaced switches fuses or connectors on a patch panel In addition the text blocks can be printed in the order that they were typed in or in the opposite order After selecting the PORT or PANEL Label Type mode specify the length of each text block or label and select a frame style if desired For the PANEL Label Type mode select whether the text blocks are printed i...

Page 22: ...RINT print order FRONT REVERSE Default FRONT For these types of labels we recommend using Extra Strength Adhesive Tape The PRINT parameter is only available with the PANEL Label Type mode By using the Numbering function with the PANEL Label Type mode a single label containing multiple blocks of ascending characters can easily be created for example to label patch panels as shown above For details ...

Page 23: ...f S T appears press u to select the previous item or d to select the next item Choosing the default setting To select the default setting of a function or parameter press e Confirming a choice To select an item from a list to apply a selected setting or to answer yes press n Cancelling a choice To quit a function and return to the previous display without changing the text or to answer no press b ...

Page 24: ...ew and edit the text or you can select the various functions and settings To move the cursor left right up or down press l r u or d To move the cursor to the beginning of the current line of text press g then l To move the cursor to the end of the current line of text press g then r To move the cursor to the beginning of the entered text press g then u To move the cursor to the end of the entered ...

Page 25: ...current position instead of inserting it press i to exit Insert mode The number of text lines that can be printed depends on the width of the tape The line number on the display indicates the line number of the text block A single label can only contain a maximum of fifty text blocks The number of the block that the cursor is in is indicated at the bottom of the display All texts blocks have the s...

Page 26: ...unction The following accented characters are available 1 Press g then s The message ACCENT a u A U appears 2 Press the key of the letter in the desired accented character until the desired character is selected 3 Add the accented character s to the text To add a single accented character or the last one in a series skip to step 5 To add a series of accented characters to the text press g then n 4...

Page 27: ... letter key An accented character can also be selected by typing in the corresponding code from the table above For example typing A2 then pressing n adds Ä to the text Since this machine is not specifically designed for special bar code label making some bar code readers may not be able to read the labels Bar code readers may not be able to read bar codes printed with certain ink colors on certai...

Page 28: ... immediately to the right of where you wish to add the special character and then press s Press u or d until the desired special character is displayed and then press n to add the character to the data Refer to the tables below for a list of the special characters that are available To change the data or WIDTH or UNDER parameter settings of a bar code that has already been added to the text positi...

Page 29: ... To add a single symbol or the last one in a series skip to step 6 To add a series of symbols to the text press g then n 5 For each additional symbol repeat steps 2 through 4 Symbol Character Symbol Character Symbol Character Symbol Character 0 SPACE 18 36 BEL 54 EM 1 19 37 BS 55 SUB 2 20 38 HT 56 ESC 3 21 39 LF 57 4 22 40 VT 58 FS 5 23 41 FF 59 6 24 42 CR 60 GS 7 25 43 SO 61 8 26 44 SI 62 RS 9 27...

Page 30: ...n the keypad To use a symbol on a key press g to enter Code mode and then press the key for the symbol INTERNATIONAL CHARACTERS G 00 01 02 03 04 05 06 07 08 09 10 11 12 13 14 15 16 17 00 01 02 03 04 05 00 01 02 03 04 05 06 00 01 02 03 04 05 06 07 00 01 02 03 04 05 06 07 08 09 00 01 02 03 04 05 06 07 08 00 01 02 03 04 05 06 07 08 09 10 11 12 13 14 Category Symbols PUNCTUATION BUSINESS MATHEMATICS B...

Page 31: ... 23 24 25 26 27 28 29 30 31 32 33 40 41 42 34 35 36 37 38 39 00 01 02 03 04 05 06 00 01 02 00 01 02 03 NUMBER PICTOGRAPH PROHIBITION WARNING COMMUNICATIONS OTHERS ELECTRICAL ELECTRONIC Category Symbols H I J K L M N Z PERSONAL CATEGORY 1 2 1 3 1 4 A maximum of 16 most recently selected symbols are automatically saved in the PERSONAL symbol category ...

Page 32: ...ins for the left and right sides of the text can be specified 1 Press g then A 2 Press l or r until MARGIN is displayed 3 Press u or d until the desired margin setting is displayed or use the number keys to margine type in the desired setting 4 Press n Once the PERSONAL symbol category becomes full newly selected symbols will overwrite older ones unless the Symbol Save function is set to OFF Refer...

Page 33: ...g then B 2 Press u or d until the desired frame setting is displayed 3 Press n The selected setting is applied to the entire text The following frame styles are available Frame Setting Sample Frame Setting Sample 1 8 2 9 3 10 4 11 5 12 6 13 7 14 ...

Page 34: ...ected setting is only applied to the text line that the cursor is positioned in With the default character size setting AUTO the largest possible text size is automatically selected depending on the width of the installed tape and the number of lines in the text Since the text sizes that can be printed depends on the width of the tape the following table shows the maximum text size that can be use...

Page 35: ... the cursor to the line of text whose character width you wish to change 2 Press g then E 3 Press l or r until WIDTH is displayed 4 Press u or d until the desired character width setting is displayed 5 Press n The selected setting is only applied to the text line that the cursor is positioned in The following width sizes are available for each text size as shown Width Size NORMAL NARROW MINIMUM WI...

Page 36: ...text Formatting the character style of a line 1 Move the cursor to the line of text whose character style you wish to change 2 Press g then D 3 Press u or d until the desired character style setting is displayed 4 Press n The selected setting is only applied to the text line that the cursor is positioned in The following text styles are available Style Setting Sample Style Setting Sample NORMAL IT...

Page 37: ...ines in the text 1 Press t 2 Press l or r until ALIGN is displayed 3 Press u or d until the desired setting is displayed 4 Press n The selected setting is applied to the entire text The following alignment settings are available LEFT CENTER RIGHT JUSTIFY ...

Page 38: ...the template that you wish to use is assigned 2 Press n The first field for the selected template is displayed Key Template Name Tape Width Label Length Template Fields Sample 1 BIN BOX 3 4 2 75 18 mm 69 mm 1 SYMBOL 2 TEXT1 3 TEXT2 4 BAR CODE 2 ASSET1 1 3 30 24 mm 83 mm 1 TEXT1 2 TEXT2 3 BAR CODE 3 ASSET2 1 3 15 24 mm 79 mm 1 TEXT 2 BAR CODE 4 ASSET3 1 1 60 24 mm 41 mm 1 TEXT 2 BAR CODE 5 ASSET4 1...

Page 39: ...er left corner of the display Feeding tape To feed out 1 23 mm of tape press f The message FEED is displayed Printing a label To print out a label press p The message WORKING then COPIES followed by the number of the label being printed is displayed Accented characters page 18 symbols page 21 and bar codes page 19 can be entered in the template fields To quit using the template display the last fi...

Page 40: ... copies with incremental characters The Numbering function can be used to print several copies of the same text while incrementing the values of certain characters letters numbers or bar code data after each label is printed This type of automatic incrementation is very useful when printing serial number labels production control labels or other labels requiring ascending codes 1 Press g then a If...

Page 41: ...ess the tape cutter button to cut off the label and continue printing Be sure to cut the tape within 5 minutes from the time that the message appears For the different options available for cutting the tape refer to Selecting how tape is fed and cut on page 38 Letters and numbers increase as shown below 0 Î 1 Î 9 Î 0 Î A Î B Î Z Î A Î a Î b Î z Î a Î A0Î A1 Î A9Î B0 Î Spaces shown as underlines _ ...

Page 42: ...umber of each copy is displayed while it is being printed Printing mirrored labels This function prints your label so that the text can be read from the adhesive side of the tape If mirror printed labels are attached to glass or some other transparent material they can be read correctly from the opposite side 1 Press g then a 2 Press l or r until MIRROR is displayed To specify settings for additio...

Page 43: ...ate is being used For example by combining the operations for the Repeat Printing function and the Numbering function to print two copies of a label with 1 selected as the numbering field and three increments the labels shown above will be printed When using the Mirror Printing function the text should be printed on clear tape To specify settings for additional Print Option functions instead of co...

Page 44: ...or more space is necessary the Clear function can be used to delete text files Storing label text 1 Press m 2 Press u or d until STORE is displayed 3 Press n 4 Press u or d until the file number where you wish to store the text is displayed 5 Press n If the maximum number of characters has already been stored the error message MEMORY FULL appears in the display If this occurs an existing text file...

Page 45: ...o be deleted To delete a single file skip to step 6 To select multiple files press e The current file number is highlighted Continue selecting text files by repeating step 4 then pressing e until all files that you wish to delete are selected To delete all files press g then e 6 Press n The message OK TO CLEAR or CLEAR ALL if all files were selected appears 7 Press n The text stored in the selecte...

Page 46: ...g is selected the last label in the previous session remains in the machine is not fed out so that the next label can be printed without wasting tape When the last label is printed press f to feed the chain of labels and then press the tape cutter button to cut it The following settings are available The default setting is 1 1 Press g then Z 2 Press l or r until CUT is displayed 3 Press u or d unt...

Page 47: ...bel length If the length of the printed label does not correspond to the length specified with the Length function the printed label length can be recalibrated with the Length Adjust function by selecting a setting between 1 and 3 The default setting is 0 1 Press g then Z 2 Press l or r until LENGTH ADJUST is displayed 3 Press u or d until the desired setting is displayed and then press n If TEXT ...

Page 48: ...ters mm or inches inch The default setting is inch 1 Press g then Z 2 Press l or r until UNITS is displayed 3 Press u or d until the desired setting is displayed and then press n Changing the language The language of the menus settings and messages can be changed by selecting ENGLISH or FRANÇAIS The default setting is ENGLISH 1 Press g then Z 2 Press l or r until LANGUAGE is displayed 3 Press u or...

Page 49: ...you to expand the P touch s capabilities to create customized labels Databases created with P touch Editor or in the csv format provide you with convenient access to large amounts of data for example customer lists and inventory which can be used to print labels User defined character images in the bmp format can be used to enhance labels with characters that are not available on the P touch Backu...

Page 50: ... AT or compatible Operating system Microsoft Windows 98 98 SE Me 2000 Professional XP Professional or XP Home Edition Processor Pentium 166 MHz or higher XP Professional and XP Home Edition Pentium 300 MHz or higher Memory At least 64 MB XP Professional and XP Home Edition 128 MB or higher Hard disk free space At least 20 MB 100 MB for a full installation Monitor 800 x 600 dpi SVGA High Color or h...

Page 51: ...with the procedure in Installing the USB printer driver on page 44 8 When installation of P touch Editor is finished a dialog box appears allowing you to upgrade P touch Editor 3 2 so that it will be compatible with Access 2000 To upgrade P touch Editor 3 2 for Access 2000 click Yes and then follow the instructions that appear Do not connect the P touch to the computer until you are instructed to ...

Page 52: ... to connect the P touch to the computer 2 Connect the P touch to the computer using the enclosed USB interface cable and then hold down g and press o to turn on the P touch in Transfer mode The first Found New Hardware Wizard dialog box appears Do not connect the P touch to the computer until you are instructed to do so otherwise the printer driver may not be installed correctly If a dialog box ap...

Page 53: ... for the P touch 5 Click Finish A dialog box appears indicating that the installation is finished 6 Select Yes I want to restart my computer now or Yes restart immediately if the printer driver was installed separately click Finish to restart the computer and then remove the CD ROM from the computer If a Driver Setup dialog box appears indicating that the printer driver has been installed click Fi...

Page 54: ...User s Guide is an HTML document a browser is needed to read it To view the User s Guide from the CD ROM 1 Start up Windows Explorer 2 Select the CD ROM drive 3 Double click the Ptouch folder 4 Double click the Manual folder 5 Double click Main htm To view the User s Guide installed on the hard disk 1 Click Start in the taskbar to display the Start menu 2 Point to Programs 3 Point to P touch Edito...

Page 55: ...characters available with P touch Editor are not available with the P touch machine Bar codes specified with settings not compatible with the P touch bar codes settings will not print correctly A template created with P touch Editor should have a fixed length with a maximum of 39 1 m The template and database should be created so that no more than approximately 500 characters per label will be pri...

Page 56: ...the property dock Page Properties Although the screens shown in the following explanations are for Windows 98 98 SE and Me the operations for Windows 2000 and XP are the same unless specifically mentioned Menu bar Property dock Layout area Print area Draw toolbar Status bar Title bar Rulers Cursor Standard toolbar Object dock Database Properties icon Page Properties icon Font Properties icon Layou...

Page 57: ...ead bar codes printed with certain ink colors on certain label tape colors Be sure to test the bar code reader to make sure that it can read printed bar codes in the environment where you plan to use them The bar codes protocols that can be used are limited to those available with the P touch Refer to page 19 for a list of the available bar code protocols Although the screens shown in the followin...

Page 58: ...h Editor 3 2 CD ROM for more details Using a function available with Microsoft Access 97 Excel files can be linked to mdb files With this function data changed in Excel is automatically updated with P touch Editor Transferring Data To From a Computer A template database or a user defined character image character not available on the P touch can be transferred from the computer and assigned to a P...

Page 59: ...e data that you wish to transfer 5 For each template or a user defined character image that you want transferred click Change PF Key Mapping and then select the PF key where you wish to assign the data 6 Click Start to begin transferring the data A dialog box appears indicating that the data is being transferred 7 When the message The transfer was completed successfully appears click OK 8 On the P...

Page 60: ...ain one database at a time However the database can be replaced or updated When data is downloaded to a PF key it replaces the preset template initially available on the P touch To restore the initial templates use Transfer Manager to download the pd3 files from the folder located at etc Transfer in the P touch Editor folder Only one character image or template can be assigned to a PF key If a cha...

Page 61: ...le database record to be printed in the template 3 Press u or d to highlight the desired record and then press n 4 To edit any text in the record press u or d to display the text and then type in the new text 5 Press p To select a range of database records to be printed in the template 3 Press u or d to highlight a record and then press n 4 Press g then a The message CLEAR TEXT PRINT DATABASE appe...

Page 62: ...e is fed and cut on page 38 To search for a specific record while the database data is displayed in step 2 above refer to Searching the database on page 56 To view other fields in the record selected in step 3 press l or r When editing data as described in step 4 of the procedure for printing a single database record the database remains unchanged When printing a range of database records the text...

Page 63: ...either TEXT PRINT or DATA PRINT when g then a is pressed At this time select DATA PRINT If TEXT PRINT is selected the special printing functions for printing multiple copies of labels refer to page 32 printing multiple copies with incremental characters refer to page 32 printing a range of text blocks refer to page 34 or printing the label text as a mirror image refer to page 34 are available To s...

Page 64: ...racters 1 Press g and e until the search screen is displayed 2 Type in the characters that you wish to search for 3 Press n The first record after the currently selected one that contains the entered characters appears To display a record with a specific number 1 Press g and e until the jump screen is displayed 2 Press u or d until the desired record number is displayed or use the number keys to t...

Page 65: ...estore P touch data backed up on the computer click the PC Printer tab 4 From the File List select the data that you wish to back up or restore 5 Click Start A dialog box appears indicating that the data is being transferred 6 When the message The transfer was completed successfully appears click OK Only the selected data will be backed up or restored To select more than one file hold down the key...

Page 66: ... batteries are low replace them with new ones 4 The printed characters are not formed properly If you are using batteries they may have a low charge Try using the AC adapter or replace the batteries with new ones 5 A blank horizontal line appears through the printed label Clean the print head as explained on Cleaning the print head rollers and tape cutter on page 8 6 Striped tape appears You have ...

Page 67: ... 50 BUFFER EMPTY This message appears if no text has been typed in when you try to print or Preview function Type in some text before trying to perform any of these operations BUFFER FULL This message appears if you try to add a character a space a new line a new block a symbol an accented character or a bar code after the maximumnumberofcharacters has already been entered Delete some existing tex...

Page 68: ... more than 1000 copies were selected with the Print Option functions Note the number of copies plus the number of sequential labels cannot exceed 1000 Select less than 1000 copies CUTTER ERROR This message appears if the tape cutter button was pressed in when p was pressed or the tape was being fed Release the tape cutter button If pwas pressed press f to feed out any printed tape If the problem c...

Page 69: ...teis notinstalledwhen printing an Auto Format template created for 1 2 12 mm wide tape Install a 1 2 12 mm wide tape cassette INSERT 12mm TAPE INSERT 3 8 TAPE This message appears if a 3 8 9 mm wide tape cassetteis notinstalledwhen printing an Auto Format template created for 3 8 9 mm wide tape Install a 3 8 9 mm wide tape cassette INSERT 9mm TAPE INSERT 1 4 TAPE This message appears if a 1 4 6 mm...

Page 70: ...r a different record number TEXT TOO HIGH XX BLOCK This message appears if the size of the text is larger than the width of the installed tape Reduce the size of the characters install a tape with a greater width or select the AUTO text size setting TEXT TOO LONG This message appears if the length of the text is longer than the label length that has been set with the Length function Press A and th...

Page 71: ...ght 180 dpi resolution Tape cutter Manual cutter Dimensions With tape cutter button 5 1 4 W 9 7 16 D 3 7 16 H 133 mm W 239 mm D 87 mm H Without tape cutter button 4 1 2 W 9 7 16 D 3 7 16 H 116 mm W 239 mm D 87 mm H Weight 1 36 lb 615 g Character fonts 1 built in font Helsinki Character sizes AUTO plus 7 point sizes 1 2 3 4 6 9 and 12 mm 6 9 12 18 24 36 and 48 points Character styles Normal Bold Ou...

Page 72: ... 17 99 TZ S231 Black on White 1 2 12mm 18 99 TZ S241 Black on White 3 4 18mm 21 99 TZ S251 Black on White 1 24mm 25 99 TZ S611 Black on Yellow 1 4 6mm 15 99 TZ S621 Black on Yellow 3 8 9mm 17 99 TZ S631 Black on Yellow 1 2 12mm 18 99 TZ S641 Black on Yellow 3 4 18mm 21 99 TZ S651 Black on Yellow 1 24mm 25 99 TZ S941 Black on Matte Silver 3 4 18mm 25 99 TZ S951 Black on Matte Silver 1 24mm 27 99 Fl...

Page 73: ...on Blue 20 99 TZ 545 White on Blue 23 99 TZ 641 Black on Yellow 20 99 TZ 741 Black on Green 20 99 TZ B41 Black on Fluorescent Orange 16 4ft tape length 24 99 TZ M41 Black on Clear Matte Finish 20 99 TZ WB41 Black on Bugs Bunny Pattern 23 99 TZ WS41 Black on Sylvester Tweety Pattern 23 99 TZ WT41 Black on Tazmanian Devil Pattern 23 99 1 2 12mm wide laminated tapes TZ 131 Black on Clear 16 99 TZ 135...

Page 74: ...3 Complete the order form on the reverse side and fax it to us at 1 800 947 1445 4 Complete the order form on the reverse side and mail it to us as directed If you haven t already returned your machine warranty card take a few minutes to register at www registermybrother com StockNo Description Price Options XXXXX Carrying Case XXXX There are 4 easy ways to order directly from Brother ...

Page 75: ...38 character size 26 style 28 width 27 choosing 15 default setting 15 cleaning print head 8 rollers 8 tape cutter 8 Clear function 18 Code indicator 2 3 confirming 15 Contrast function 38 copies 32 cursor 16 Cut function 38 cut pause 38 D database record range 53 databases 53 54 Label Type mode 55 searching 56 default setting 15 deleting memory files 37 text 18 display 2 contrast 38 E error messag...

Page 76: ...gnment 29 indicator 2 3 K keyboard 2 L label margins 24 Label Type key 2 3 Label Type mode 10 databases 55 Label Type setting indicator 2 3 language 40 LCD display 2 left text alignment 29 indicator 2 3 length adjustment 39 Length function 24 length indicator 2 3 local formatting character size 26 character style 28 character width 27 locked up 58 low battery indicator 2 3 lowercase letters 16 M M...

Page 77: ...mode 11 Rotate mode 11 S searching 56 selecting 15 16 default setting 15 Setup key 38 Shift indicator 2 3 Shift mode 16 size 26 indicator 2 3 Space key 15 16 storing 36 style 28 Symbol key 21 T tape cassettes 5 cutter 8 templates Auto Format 30 P touch Editor 52 text alignment 29 size 26 size adjustment 39 style 28 width 27 width adjustment 39 Transfer Manager 51 Transfer mode 50 troubleshooting 5...

Page 78: ... may call toll tree 1 888 879 3232 or complete the order form in your user s guide and fax both sides of the form to 1 800 947 1445 For purchasing accessories on the Internet http www brothermall com To order by mail or pay by check please complete the accessory order form and mail it along with payment to Brother International Corporation Attn Consumer Accessory Division P O Box 341332 Bartlett T...

Page 79: ...me and address in the space below 6 Place your order a Call toll free anytime 1 888 879 3232 b Order on line at www brothermall com c Fax completed form to 1 800 947 1445 d Mail completed form along with proper payment to BROTHER INTERNATIONAL CORP Attn Consumer Accessory Div P O Box 341332 Bartlett TN 38184 1332 Supply Accessory Subtotal AZ CA CO CT FL GA IL LA MA MD MI MN MO NC NJ NV NY OH PA TN...

Page 80: ......

Page 81: ...me and address in the space below 6 Place your order a Call toll free anytime 1 888 879 3232 b Order on line at www brothermall com c Fax completed form to 1 800 947 1445 d Mail completed form along with proper payment to BROTHER INTERNATIONAL CORP Attn Consumer Accessory Div P O Box 341332 Bartlett TN 38184 1332 Supply Accessory Subtotal AZ CA CO CT FL GA IL LA MA MD MI MN MO NC NJ NV NY OH PA TN...

Page 82: ......

Page 83: ...GUÍA DE USUARIO ...

Page 84: ...e los límites correspondientes a un dispositivo digital de Clase B conforme a la Parte 15 de las Normas FCC Dichos límites están diseñados para ofrecer una protección razonable contra interferencias perjudiciales en una instalación residencial Este equipo genera usa y puede radiar energía de radiofrecuencia si no se instala y se usa de acuerdo con las instrucciones puede causar interferencias perj...

Page 85: ...ormal y Vertical 10 Modos Girar ROTATE y Girar y repetir ROT REP 11 Modo Bandera FLAG 12 Modos Puerto PORT y Panel PANEL 13 3 Funciones básicas 15 Cómo realizar las operaciones básicas 15 Elección de funciones parámetros ajustes y grupos 15 Elección del ajuste predeterminado 15 Confirmación de una elección 15 Cancelación de una elección 15 Introducción de los datos de la etiqueta 16 Introducción y...

Page 86: ...ón de reducción automática 39 Calibración de la longitud de la etiqueta 39 Definición de la actualización continua de la categoría de símbolos PERSONAL 40 Cambio de las unidades de medida 40 Cambio del idioma 40 Visualización de información sobre la versión 40 5 Uso de la P touch con un PC sólo para PT 1650 41 Instalación de los programas y del controlador de impresión 42 Antes de la instalación 4...

Page 87: ...r una copia de seguridad de los datos de la P touch y restaurarlos 57 6 Apéndice 58 Solución de problemas 58 Lista de mensajes de error 59 Características técnicas de la máquina 63 Hardware 63 Software 63 Accesorios sólo para EE UU 64 Índice alfabético 67 Información de contacto sólo para EE UU 70 ...

Page 88: ...iv ...

Page 89: ...n del cortador de la cinta Puerto USB sólo para PT 1650 Teclado Conector del adaptador de CA Visualizador Cubierta posterior Palanca de liberación del casete Cabezal de impresión Ranura de salida de la cinta Compartimento del casete de cinta Compartimento de las pilas Vista Vista inferior ...

Page 90: ...de etiqueta página 10 B Ajuste de anchura página 27 C Ajuste de tamaño páginas 26 y 27 D Ajuste de longitud página 24 E Modo de mayúsculas continuas página 16 F Modo de inserción página 17 G Modo de mayúscula individual página 16 H Modo de código página 16 I Tecla de alimentación página 9 J Tecla de retroceso páginas 15 y 18 K Teclas de flechas página 15 L Tecla de retorno páginas 15 y 17 M Tecla ...

Page 91: ... de etiqueta página 10 B Ajuste de anchura página 27 C Ajuste de tamaño páginas 26 y 27 D Ajuste de longitud página 24 E Modo de mayúsculas continuas página 16 F Modo de inserción página 17 G Modo de mayúscula individual página 16 H Modo de código página 16 I Tecla de alimentación página 9 J Tecla de retroceso páginas 15 y 18 K Teclas de flechas página 15 L Tecla de retorno páginas 15 y 17 M Tecla...

Page 92: ...cuchilla Emplee sólo el adaptador de CA diseñado exclusivamente para esta máquina El empleo de otro cancelaría la garantía No intente desmontar el adaptador de CA Cuando la máquina no se vaya a utilizar durante períodos prolongados desenchufe el adaptador de CA y saque las pilas para evitar fugas que puedan dañar la máquina Emplee seis pilas alcalinas o recargables Ni Cd o Ni MH de tamaño AA Nunca...

Page 93: ...requiere seis pilas de tamaño AA Pueden usarse pilas recargables Ni Cd o Ni MH en lugar de 6 pilas alcalinas Las pilas recargables no se pueden cargar dejándolas en la P touch con el adaptador de CAconectado Cárguelas con un cargador diseñado específicamente para el tipo de pilas utilizado Para más detalles acerca de las pilas recargables consulte las instrucciones suministradas con ellas A fin de...

Page 94: ...erden el texto que se muestra en la pantalla y el que está almacenado en la memoria Dado que las pilas que se incluyen empiezan a descargarse desde el mismo momento en que la unidad sale de fábrica es posible que su duración no cumpla las especificaciones dependiendo de cuándo se empiece a usar la unidad Observaciones acerca de los casetes de cinta Antes de instalar el casete de cinta cerciórese d...

Page 95: ...s pronunciadas o en torno a objetos cilíndricos se recomienda usar cinta de identificación flexible Las etiquetas creadas con cinta de identificación flexible no están diseñadas para servir como aislante eléctrico Cuando pegue etiquetas en torno a objetos cilíndricos el diámetro del objeto debe ser como mínimo de 1 8 3 mm si es menor pegue la etiqueta en forma de bandera y utilice el modo de tipo ...

Page 96: ...presión y de los rodillos Si aparece una franja horizontal en blanco en el texto de la etiqueta limpie el cabezal de impresión de la máquina Será más fácil limpiar el cabezal de impresión si se emplea el casete de limpieza opcional TZ CL4 Antes de limpiar el cabezal de impresión y los rodillos pulse o para desconectar la P touch y a continuación extraiga las pilas y desenchufe el adaptador de CA o...

Page 97: ...ecte el adaptador de CA Cuando se desconecta la máquina se pierden el texto que se muestra en la pantalla y el que está almacenado en la memoria Conexión desconexión de la P touch Pulse o para encender o apagar la P touch Si la P touch tiene pilas instaladas o ha estado enchufada mediante el adaptador de CA cuando se vuelva a encender se visualizará el texto de la sesión anterior Esta característi...

Page 98: ...apítulo 3 Funciones básicas Si ha seleccionado ROTATE ROT REP PORT PANEL o FLAG siga estos pasos 4 Pulse l o r hasta que se visualice el parámetro deseado 5 Pulse u o d hasta que se visualice el ajuste deseado o utilice las teclas numéricas para escribirlo 6 Pulse n para aplicar los ajustes seleccionados 7 Escriba el texto de cada etiqueta en un bloque de texto diferente 8 Imprima las etiquetas Pa...

Page 99: ...de que se pueda leer fácilmente desde cualquier ángulo Después de seleccionar el modo de tipo de etiqueta ROTATE o ROT REP defina la longitud de cada etiqueta y si lo desea un estilo de marco BLK LEN longitud del bloque 0 80 a 8 00 20 a 200 mm Valor predeterminado 1 20 30 mm FRAME marco OFF Valor predeterminado OFF Un bloque puede contener 7 líneas de texto como máximo y con el modo de tipo de eti...

Page 100: ...iámetro de la bandera 0 00 a 4 00 0 a 100 mm Valor predeterminado 0 25 7 mm FLAG LEN longitud de la bandera 0 40 a 8 00 10 a 200 mm Valor predeterminado 1 20 30 mm FRAME marco OFF Valor predeterminado OFF ROTATE girar OFF ON Valor predeterminado OFF Un bloque puede contener 7 líneas de texto como máximo Para aquellas etiquetas que vayan a pegarse a hilos o cables se recomienda usar cinta de identi...

Page 101: ...esulta útil para una hilera de conmutadores fusibles o conectores de un panel de conexiones con idéntica distancia de separación Además los bloques de texto se pueden imprimir en el orden en que se han escrito o en el orden inverso Después de seleccionar el modo de tipo de etiqueta PORT o PANEL defina la longitud de cada bloque de texto o etiqueta y si lo desea seleccione un estilo de marco Con el...

Page 102: ...impresión FRONT REVERSE Valor predeterminado FRONT Para estos tipos de etiquetas se recomienda usar cinta con fuerza adhesiva extra El parámetro PRINT sólo está disponible con el modo de tipo de etiqueta PANEL Si utiliza la función de numeración con el modo de tipo de etiqueta PANEL podrá crear con facilidad una única etiqueta que contenga varios bloques de caracteres ascendentes por ejemplo para ...

Page 103: ...ra seleccionar el elemento anterior o d para seleccionar el elemento siguiente Elección del ajuste predeterminado Para seleccionar el ajuste predeterminado de una función o parámetro pulse e Confirmación de una elección Para seleccionar un elemento de una lista para aplicar un ajuste seleccionado o para responder sí pulse n Cancelación de una elección Para abandonar una función y volver a la panta...

Page 104: ... revisar y modificar el texto o para seleccionar las diversas funciones y ajustes Para mover el cursor hacia la izquierda hacia la derecha hacia arriba o hacia abajo pulse l r u o d Para mover el cursor al principio de la línea de texto actual pulse g y luego l Para mover el cursor al final de la línea de texto actual pulse g y luego r Para mover el cursor al principio del texto introducido pulse ...

Page 105: ...al del cursor en lugar de insertarlo pulse i para salir del modo de inserción El número de líneas de texto que se pueden imprimir depende de la anchura de la cinta El número de línea que aparece en el visualizador indica el número de línea del bloque de texto Una etiqueta puede contener cincuenta bloques de texto como máximo El número del bloque en el que se encuentra el cursor aparece indicado en...

Page 106: ...tos Están disponibles los siguientes caracteres acentuados 1 Pulse g y luego s Aparecerá el mensaje ACCENT a u A U 2 Presione la tecla correspondiente a la letra del carácter acentuado deseado hasta seleccionar el carácter deseado 3 Añada los caracteres acentuados al texto Para añadir un solo carácter acentuado o el último de una serie vaya al paso 5 Para añadir al texto una serie de caracteres ac...

Page 107: ...o el código correspondiente que puede ver en la tabla anterior Por ejemplo para añadir Ä al texto escriba A2 y luego pulse n Como esta máquina no ha sido específicamente diseñada para hacer etiquetas de códigos de barras es posible que algunos lectores de códigos de barras no puedan leer las etiquetas Es posible que los lectores de códigos de barras no puedan leer códigos de barras impresos con ci...

Page 108: ...R EAN128 o CODE128 coloque el cursor debajo del carácter situado inmediatamente a la derecha del punto en el que desea añadir el carácter especial y seguidamente pulse s Pulse u o d hasta que se visualice el carácter especial deseado y seguidamente pulse n para añadir el carácter a los datos En las tablas siguientes puede ver una lista de los caracteres especiales disponibles Para cambiar los dato...

Page 109: ...o símbolos al texto Para añadir un solo símbolo o el último de una serie vaya al paso 6 Para añadir al texto una serie de símbolos pulse g y luego n 5 Para cada símbolo adicional repita los pasos 2 a 4 Símbolo Carácter Símbolo Carácter Símbolo Carácter Símbolo Carácter 0 SPACE 18 36 BEL 54 EM 1 19 37 BS 55 SUB 2 20 38 HT 56 ESC 3 21 39 LF 57 4 22 40 VT 58 FS 5 23 41 FF 59 6 24 42 CR 60 GS 7 25 43 ...

Page 110: ...l teclado Para usar un símbolo impreso sobre una tecla pulse g para entrar en el modo de código y seguidamente pulse la tecla correspondiente CARACTERES INTERNACIONALES G 00 01 02 03 04 05 06 07 08 09 10 11 12 13 14 15 16 17 00 01 02 03 04 05 00 01 02 03 04 05 06 00 01 02 03 04 05 06 07 00 01 02 03 04 05 06 07 08 09 00 01 02 03 04 05 06 07 08 00 01 02 03 04 05 06 07 08 09 10 11 12 13 14 Categoría ...

Page 111: ... 30 31 32 33 40 41 42 34 35 36 37 38 39 00 01 02 03 04 05 06 00 01 02 00 01 02 03 NUMÉRICOS PICTOGRÁFICOS PROHIBICIÓN ADVERTENCIA COMUNICACIONES OTROS ELECTRICIDAD ELECTRÓNICA Categoría Símbolos H I J K L M N Z CATEGORÍA PERSONAL 1 2 1 3 1 4 En la categoría de símbolos PERSONAL se guardan automáticamente los símbolos seleccionados más recientemente hasta un máximo de 16 ...

Page 112: ...os márgenes izquierdo y derecho del texto 1 Pulse g y luego A 2 Pulse l o r hasta que se visualice MARGIN 3 Pulse u o d hasta que se visualice el ajuste de márgenes deseado o utilice las teclas numéricas para escribirlo 4 Pulse n Una vez que se llene la categoría de símbolos PERSONAL los nuevos símbolos que se seleccionen se sobrescribirán sobre los antiguos a menos que la función de guardar símbo...

Page 113: ...go B 2 Pulse u o d hasta que se visualice el ajuste de marco deseado 3 Pulse n El ajuste seleccionado se aplicará a todo el texto Están disponibles los siguientes estilos de marco Ajuste de marco Muestra Ajuste de marco Muestra 1 8 2 9 3 10 4 11 5 12 6 13 7 14 ...

Page 114: ...o E 3 Pulse u o d hasta que se visualice el ajuste de tamaño de caracteres deseado 4 Pulse n El ajuste seleccionado solamente se aplicará a la línea de texto en la que está situado el cursor Puesto que los tamaños de texto que se pueden imprimir dependen de la anchura de la cinta la tabla siguiente indica el tamaño máximo de texto que se puede utilizar con cada anchura de cinta Con el ajuste AUTO ...

Page 115: ...sor a la línea de texto cuya anchura de caracteres desea cambiar 2 Pulse g y luego E 3 Pulse l o r hasta que se visualice WIDTH 4 Pulse u o d hasta que se visualice el ajuste de anchura de caracteres deseado 5 Pulse n El ajuste seleccionado solamente se aplicará a la línea de texto en la que está situado el cursor Están disponibles las siguientes anchuras para cada tamaño de texto indicado Anchura...

Page 116: ...lo de los caracteres de una línea 1 Mueva el cursor a la línea de texto cuyo estilo de caracteres desea cambiar 2 Pulse g y luego D 3 Pulse u o d hasta que se visualice el ajuste de estilo de caracteres deseado 4 Pulse n El ajuste seleccionado solamente se aplicará a la línea de texto en la que está situado el cursor Están disponibles los siguientes estilos de texto Ajuste de estilo Muestra Ajuste...

Page 117: ...lse t 2 Pulse l o r hasta que se visualice ALIGN 3 Pulse u o d hasta que se visualice el ajuste deseado 4 Pulse n El ajuste seleccionado se aplicará a todo el texto Están disponibles los siguientes ajustes de alineación LEFT izquierda CENTER centrada RIGHT derecha JUSTIFY justificada ...

Page 118: ...a numérica asignada a la plantilla que desee usar 2 Pulse n Se visualizará el primer campo de la plantilla seleccionada Tecla Nombrede la plantilla Anchura cinta Longitudetiqueta Campos de la plantilla Muestra 1 BIN BOX 3 4 2 75 18 mm 69 mm 1 SYMBOL 2 TEXT1 3 TEXT2 4 BAR CODE 2 ASSET1 1 3 30 24 mm 83 mm 1 TEXT1 2 TEXT2 3 BAR CODE 3 ASSET2 1 3 15 24 mm 79 mm 1 TEXT 2 BAR CODE 4 ASSET3 1 1 60 24 mm ...

Page 119: ...el ángulo inferior izquierdo del visualizador Avance de la cinta Para hacer avanzar 1 23 mm de cinta pulse f Aparecerá el mensaje FEED Impresión de una etiqueta Para imprimir una etiqueta pulse p Aparecerá el mensaje WORKING y luego COPIES seguido del número de la etiqueta que se esté imprimiendo En los campos de la plantilla se pueden introducir caracteres acentuados página 18 símbolos página 21 ...

Page 120: ...umeración puede utilizarse para imprimir varias copias del mismo texto incrementando los valores de ciertos caracteres letras números o datos de código de barras después de la impresión de cada etiqueta Este tipo de incremento automático es muy útil para imprimir etiquetas de números de serie etiquetas de control de producción u otras etiquetas que requieran códigos ascendentes 1 Pulse g y luego a...

Page 121: ...ra cortar la etiqueta y proseguir con la impresión Corte la cinta antes de que transcurran 5 minutos desde la aparición del mensaje Si desea ver las distintas opciones disponibles para cortar la cinta consulte Selección de la forma de avance y corte de la cinta en la página 38 Las letras y los números se incrementarán como se muestra a continuación 0 Î 1 Î 9 Î 0 Î A Î B Î Z Î A Î a Î b Î z Î a Î A...

Page 122: ...se esté imprimiendo Impresión especular de etiquetas Con esta función podrá imprimir la etiqueta de modo que el texto pueda leerse desde el lado del adhesivo de la cinta Si se adhieren etiquetas con impresión especular a un cristal u otro material transparente podrán leerse correctamente desde el lado opuesto 1 Pulse g y luego a 2 Pulse l o r hasta que se visualice MIRROR Para definir ajustes para...

Page 123: ...la Por ejemplo si se combinan las operaciones de la función de copias múltiples y la función de numeración para imprimir dos copias de una etiqueta después de seleccionar 1 como campo de numeración y tres incrementos se imprimirán las etiquetas que se muestran arriba Cuando emplee la función de impresión en modo espejo el texto se imprimirá en cinta transparente Para definir ajustes para otras fun...

Page 124: ...te un archivo o cuando necesite más espacio podrá utilizar la función de borrado para eliminarlo Almacenamiento de texto de etiquetas 1 Pulse m 2 Pulse u o d hasta que se visualice STORE 3 Pulse n 4 Pulse u o d hasta que se visualice el número de archivo en el que desee almacenar el texto 5 Pulse n Si ya se ha almacenado el número máximo de caracteres aparecerá el mensaje MEMORYFULL en el visualiz...

Page 125: ...vo o archivos que desee borrar Para borrar un solo archivo vaya al paso 6 Para seleccionar varios archivos presione e El número del archivo actual aparecerá resaltado Para seguir seleccionando archivos de texto repita el paso 4 y luego pulse e hasta que haya seleccionado todos los archivos que desee borrar Para borrar todos los archivos presione g y luego e 6 Pulse n Aparecerá el mensaje OK TO CLE...

Page 126: ...la sesión anterior se quedará en la máquina no avanzará a fin de que la etiqueta siguiente pueda imprimirse sin desperdiciar cinta Cuando se imprima la última etiqueta pulse f para que avance la cadena de etiquetas y seguidamente pulse el botón del cortador de la cinta para cortarla Están disponibles los siguientes ajustes El ajuste predeterminado es 1 1 Pulse g y luego Z 2 Pulse l o r hasta que s...

Page 127: ...ud de la etiqueta Si la longitud de la etiqueta impresa no se corresponde con la longitud especificada con la función de longitud la longitud de la etiqueta impresa se puede recalibrar con la función de ajuste de longitud seleccionando un valor entre 1 y 3 El valor predeterminado es 0 1 Pulse g y luego Z 2 Pulse l o r hasta que se visualice LENGTH ADJUST 3 Pulse u o d hasta que se visualice el aju...

Page 128: ... g y luego Z 2 Pulse l o r hasta que se visualice UNITS 3 Pulse u o d hasta que se visualice el ajuste deseado y seguidamente pulse n Cambio del idioma El idioma de los menús ajustes y mensajes se puede cambiar seleccionando ENGLISH o FRANÇAIS El ajuste predeterminado es ENGLISH 1 Pulse g y luego Z 2 Pulse l o r hasta que se visualice LANGUAGE 3 Pulse u o d hasta que se visualice el ajuste deseado...

Page 129: ...r las posibilidades de la P touch para crear etiquetas personalizadas Bases de datos creadas con P touch Editor o en formato csv que ofrecen un cómodo acceso a grandes cantidades de datos por ejemplo listas de clientes e inventario que se pueden emplear para imprimir etiquetas Imágenes de carácter definidas por el usuario en formato bmp que se pueden emplear para mejorar las etiquetas con caracter...

Page 130: ...ible Sistema operativo Microsoft Windows 98 98 SE Me 2000 Professional XP Professional o XP Home Edition Procesador Pentium 166 MHz o superior XP Professional y XP Home Edition Pentium 300 MHz o superior Memoria Al menos 64 MB XP Professional y XP Home Edition 128 MB o más Espacio libre en el disco duro Al menos 20 MB 100 MB para una instalación completa Monitor 800 x 600 ppp SVGA High Color o sup...

Page 131: ...larse Cuando se haya instalado P touch Editor se abrirá un cuadro de diálogo desde el que puede decidir si quiere o no instalar el controlador de impresión 6 Haga clic en Yes Sí Se abrirá el primer cuadro de diálogo de instalación del controlador que informa de que va a instalarse el controlador de impresión de la P touch 7 Continúe con el procedimiento Instalación del controlador de impresión USB...

Page 132: ...e indica que la instalación ha terminado y le sugiere que reinicie el PC seleccione la opción de reiniciar el PC haga clic en Finish Finalizar para reiniciar el PC y extraiga el CD de su unidad Para desinstalar el programa P touch Editor 3 2 en la ventana Panel de control haga doble clic en Agregar o quitar programas Agregar o quitar programas en Windows XP y siga las instrucciones de la pantalla ...

Page 133: ...o que indicará que este asistente ha terminado la instalación del controlador de impresión para la P touch 5 Haga clic en Finish Finalizar Se abrirá un cuadro de diálogo que informa de que la instalación ya ha terminado 6 Seleccione Yes I want to restart my computer now Sí deseo reiniciar mi ordenador en este momento o Yes restart immediately Sí reiniciar inmediatamente si el controlador de impres...

Page 134: ...avegador para leerla Para ver la Guía del usuario desde el CD ROM 1 Inicie el Explorador de Windows 2 Seleccione la unidad de CD ROM 3 Haga doble clic en la carpeta Ptouch 4 Haga doble clic en la carpeta Manual 5 Haga doble clic en Main htm Para ver la Guía del usuario instalada en el disco duro 1 Haga clic en el botón Inicio de la barra de tareas para ver el menú Inicio 2 Seleccione Programas 3 S...

Page 135: ...os caracteres disponibles con P touch Editor no están disponibles con la máquina P touch Los códigos de barras especificados con ajustes que no sean compatibles con los de la P touch no se imprimirán correctamente Una plantilla creada con P touch Editor debe tener una longitud fija de 39 1 m como máximo La plantilla y la base de datos deben crearse de manera que no se impriman más de 500 caractere...

Page 136: ...iente de la zona de propiedades Propiedades de la página Aunque las pantallas que se muestran en las explicaciones siguientes corresponden a Windows 98 98 SE y Me las operaciones para Windows 2000 y XP son iguales salvo indicación expresa en contrario Barra de menús Zona de propiedades Área de maquetación Área de impresión Barra de dibujo Barra de estado Barra de título Reglas Cursor Barra estánda...

Page 137: ...ódigos de barras impresos con ciertos colores de tinta sobre ciertos colores de cinta de etiquetas Pruebe el lector de códigos de barras para asegurarse de que los códigos impresos se podrán leer bien en el entorno en el que piensa utilizarlos Los protocolos de códigos de barras que se pueden usar están limitados a los disponibles con la P touch Consulte en la página 19 una lista de los protocolos...

Page 138: ...touch Editor 3 2 para obtener más información Con una función de Microsoft Access 97 los archivos de Excel se pueden vincular con archivos mdb Con esta función los datos modificados en Excel se actualizan automáticamente con P touch Editor Transferencia de datos a desde un PC Se puede transferir desde el PC una plantilla una base de datos o una imagen de carácter definida por el usuario un carácte...

Page 139: ...lantilla o imagen de carácter definida por el usuario que desee transferir haga clic en Change PF Key Mapping Cambiar la asignación de teclas PF y seleccione la tecla PF a la que desea asignar los datos 6 Haga clic en Start Inicio para empezar a transferir los datos Se abrirá un cuadro de diálogo que indicará que los datos se están transfiriendo 7 Cuando aparezca el mensaje The transfer was comple...

Page 140: ...lo puede contener en cada momento una sola base de datos que se puede cambiar o actualizar Cuando se descargan datos a una tecla PF sustituyen a la plantilla predefinida disponible inicialmente en la P touch Para restaurar las plantillas iniciales use Transfer Manager para descargar los archivos pd3 de la carpeta situada en etc Transfer dentro de la carpeta P touch Editor Sólo se puede asignar una...

Page 141: ...imprimirlo en la plantilla 3 Pulse uo d para resaltar el registro deseado y seguidamente pulse n 4 Para modificar cualquier texto del registro pulse u o d para visualizar el texto y a continuación escriba el nuevo texto 5 Pulse p Para seleccionar una serie de registros de la base de datos e imprimirla en la plantilla 3 Pulse u o d para resaltar un registro y seguidamente pulse n 4 Pulse g y luego ...

Page 142: ...e de la cinta en la página 38 Para buscar un registro específico mientras se visualizan los datos de la base de datos en el anterior paso 2 consulte Búsqueda en la base de datos en la página 56 Para ver otros campos del registro seleccionado en el paso 3 pulse l o r Cuando se modifiquen datos de la forma descrita en el paso 4 del procedimiento de impresión de un solo registro de base de datos la b...

Page 143: ... le pedirá que elija TEXT PRINT o DATA PRINT cuando pulse g y luego a Seleccione DATA PRINT Si selecciona TEXT PRINT estarán disponibles las funciones especiales de impresión que permiten imprimir múltiples copias de las etiquetas consulte la página 32 imprimir varias copias con ciertos caracteres que se incrementan consulte la página 32 imprimir un intervalo de bloques de texto consulte la página...

Page 144: ...tos 1 Pulse g y e hasta que aparezca la pantalla de búsqueda 2 Escriba los caracteres que desee buscar 3 Pulse n Apareceráel primer registro posterior al que esté seleccionado que contenga los caracteres definidos Para visualizar un registro con un número concreto 1 Pulse g y e hasta que aparezca la pantalla de salto 2 Pulse u o d hasta que se visualice el número de registro deseado o utilice las ...

Page 145: ...eguridad guardada en el PC haga clic en la pestaña PC Printer 4 En la File List Lista de archivos seleccione los datos que desee guardar o restaurar 5 Haga clic en Start Inicio Se abrirá un cuadro de diálogo que indicará que los datos se están transfiriendo 6 Cuando aparezca el mensaje The transfer was completed successfully La transferencia ha terminado con éxito haga clic en OK Aceptar Sólo se g...

Page 146: ...elas por otras nuevas 4 Los caracteres impresos no se forman correctamente Si está empleando pilas quizá estén gastadas Pruebe a utilizar el adaptador de CA o cambie las pilas por otras nuevas 5 Aparece una línea horizontal en blanco a lo largo de la etiqueta impresa Limpie el cabezal de impresión como se explica en Limpieza del cabezal de impresión rodillos y cortador de la cinta en la página 8 6...

Page 147: ...ER EMPTY Este mensaje aparecerá si no se ha escrito ningún texto al intentar imprimir o usar la función de vista preliminar Escriba algún texto antes de intentar realizar cualquiera de estas operaciones BUFFER FULL Este mensaje aparecerá si intenta introducir un carácter un espacio una nueva línea un nuevo bloque un símbolo un carácter acentuado o un código de barras cuando ya haya escrito el núme...

Page 148: ... 1000 copias CUTTER ERROR Este mensaje aparecerá si el botón del cortador de la cinta estaba presionado cuando se ha pulsado po la cinta estaba avanzando Suelte el botón cortador de la cinta Si ha pulsado p pulse fpara hacer avanzar la cinta impresa Si no logra corregir el problema póngase en contacto con su representante de servicio IMAGE CHARACTER SIZE ERROR sólo para PT 1650 Este mensaje aparec...

Page 149: ... 3 8 9 mm de anchura instalado al intentar imprimir una plantilla de formato automático creada para cinta de esta 9 mm anchura Instale un casete de cinta de 3 8 9 mm de anchura INSERT 9mm TAPE INSERT 1 4 TAPE Este mensaje aparecerá si no hay un casete de cinta de 1 4 6 mm de anchura instalado al intentar imprimir una plantilla de formato automático creada para cinta de esta 6 mm anchura Instale un...

Page 150: ... del texto es más grande que el ancho de la cinta instalada Reduzca el tamaño de los caracteres instale una cinta más ancha o seleccione el ajuste de tamaño de texto AUTO TEXT TOO LONG Este mensaje aparecerá si la longitud del texto es mayor que la longitud que se ha ajustado para la etiqueta con la función de longitud Pulse A y seguidamente seleccione una longitud de etiqueta mayor TEXT TOO LONG ...

Page 151: ...r de la cinta Manual Dimensiones Con el botóndel cortador de la cinta 51 4 An 9 7 16 Prf 3 7 16 Al 133 mm An 239 mm Prf 87 mm Al Sinel botón del cortador de la cinta 4 1 2 An 9 7 16 Prf 3 7 16 Al 116 mm An 239 mm Prf 87 mm Al Peso 1 36 1b 615 g Tipos de caracteres 1 tipo de caracteres integrado Helsinki Tamaños de caracteres AUTO más 7 tamaños en puntos 1 2 3 4 6 9 y 12 mm 6 9 12 18 24 36 y 48 pun...

Page 152: ...nco 3 8 9 mm 17 99 TZ S231 Negro sobre fondo blanco 1 2 12 mm 18 99 TZ S241 Negro sobre fondo blanco 3 4 18 mm 21 99 TZ S251 Negro sobre fondo blanco 1 24 mm 25 99 TZ S611 Negro sobre fondo amarillo 1 4 6 mm 15 99 TZ S621 Negro sobre fondo amarillo 3 8 9 mm 17 99 TZ S631 Negro sobre fondo amarillo 1 2 12 mm 18 99 TZ S641 Negro sobre fondo amarillo 3 4 18 mm 21 99 TZ S651 Negro sobre fondo amarillo...

Page 153: ...41 Negro sobre fondo rojo 20 99 TZ 541 Negro sobre fondo azul 20 99 TZ 545 Blanco sobre fondo azul 23 99 TZ 641 Negro sobre fondo amarillo 20 99 TZ 741 Negro sobre fondo verde 20 99 TZ B41 Negro sobre fondo naranja fluorescente cinta de 16 4 pies de longitud 24 99 TZ M41 Negro sobre acabado mate transparente 20 99 TZ WB41 Negro sobre motivo de Bugs Bunny 23 99 TZ WS41 Negro sobre motivo de Silvest...

Page 154: ...isite nuestra página Web www brothermall com y pague con una de las principales tarjetas de crédito 3 Rellene el formulario de pedido al dorso y envíenoslo por fax al número 1 800 947 1445 4 Rellene el formulario de pedido al dorso y envíenoslo por correo a la dirección indicada Si aún no nos ha enviado la tarjeta de garantía de su máquina dedique unos minutos a registrarse en www registermybrothe...

Page 155: ...ilo 28 tamaño 26 categoría de símbolos PERSONAL 23 configuración 40 cinta casetes 5 cortador 8 Cinta con fuerza adhesiva extra 7 Cinta de identificación flexible 7 código de barras caracteres especiales 20 conexión al PC 41 conexión USB 41 44 45 confirmación 15 controlador de impresión instalación 44 copias 32 cursor 16 E elección 15 ajuste predeterminado 15 estilo 28 estilo de texto cursiva 28 in...

Page 156: ...de tipo de etiqueta 2 3 alineación del texto a la derecha 2 3 alineación del texto a la izquierda 2 3 alineación del texto centrada 2 3 alineación del texto justificada 2 3 anchura 2 3 código 2 3 estilo de texto cursiva 2 3 estilo de texto negrilla 2 3 estilo de texto perfilado 2 3 inserción 2 3 longitud 2 3 marco 2 3 mayúscula individual 2 3 mayúsculas continuas 2 3 número de bloque 2 3 pilas gas...

Page 157: ...9 tecla de avance 2 3 31 tecla de configuración 38 tecla de espaciado 15 16 tecla de formato 26 27 28 tecla de formato global 2 3 tecla de impresión 2 3 31 tecla de inserción 17 tecla de memoria 36 tecla de retorno 2 3 15 17 tecla de retroceso 2 3 15 18 tecla de símbolo 21 tecla de tipo de etiqueta 2 3 teclado 2 teclas de flechas 2 3 15 16 Teclas de formato automático 2 teclas PF 3 texto ajuste de...

Page 158: ...n Internet http www brothermall com Para hacer su pedido por correo o pagar con talón rellene el formulario de pedido de accesorios y envíelo con el abono a nombre de Brother International Corporation Attn Consumer Accessory Division P O Box 341332 Bartlett TN 38184 1332 Sistema de respuesta por fax El Servicio de atención al cliente de Brother ha instalado un sencillo sistema de respuesta por fax...

Page 159: ...te Sólo en territorio continental de EEUU 14 75 TOTAL A PAGAR No se admiten pedidos contra reembolso Método de abono marque uno Nombre Visa Master Card Discover Dirección Talón Giro postal American Express Localidad Estado Número de cuenta Código postal Fecha de caducidad Nº de teléfono durante el día Firma Nº de fax durante el día Dirección de facturación si es distinta de la dirección de envío i...

Page 160: ......

Page 161: ...te Sólo en territorio continental de EEUU 14 75 TOTAL A PAGAR No se admiten pedidos contra reembolso Método de abono marque uno Nombre Visa Master Card Discover Dirección Talón Giro postal American Express Localidad Estado Número de cuenta Código postal Fecha de caducidad Nº de teléfono durante el día Firma Nº de fax durante el día Dirección de facturación si es distinta de la dirección de envío i...

Page 162: ......

Page 163: ...Printed in China LN3015001 ...

Reviews: