Brother MFC-T910DW Reference Manual Download Page 10

Load Paper

1

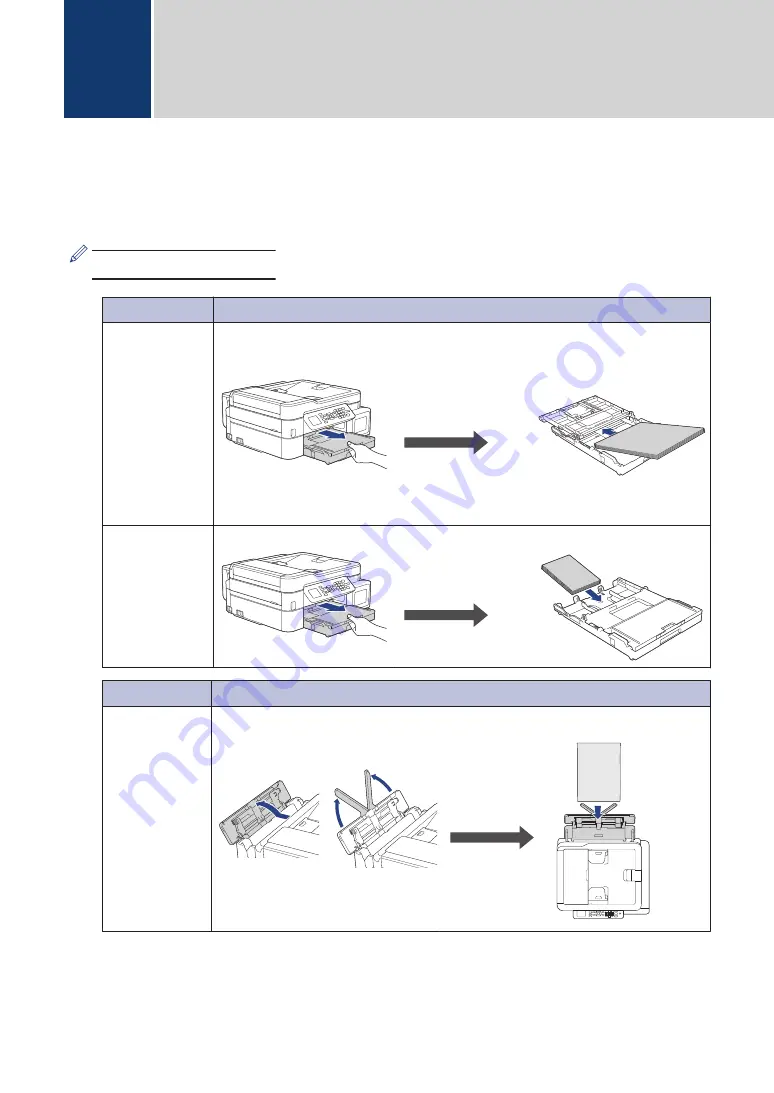
Load the paper in the paper tray as follows.

Fan the stack of paper well.

Tray #1

How to Load Paper

A4/Letter

Executive

B5/B6 (JIS)

16K (195 x 270
mm)

A5/A6

Photo 2L

Index card

Envelopes

Adjust the paper
guides.

Printing surface: Face down

Photo

Adjust the paper
guides.

Printing surface: Face down

MP Tray

How to Load Paper

A4/Letter

Executive

B5/B6 (JIS)

16K (195 x 270
mm)

A5/A6

Photo

Photo L/2L

Index card

Envelopes

Adjust the paper
guides.

Printing surface: Face up

For more detailed information, see the 

Online User's Guide

Load Paper

.

2

Paper Handling

4

Summary of Contents for MFC-T910DW

Page 1: ... using this product read carefully these instructions for correct operation Keep the User s Guide in a secure place for future reference Online User s Guide For more advanced instructions information and product specifications see the Online User s Guide at support brother com manuals ...

Page 2: ...local regulations properly 3 When the machine need replacing parts for the maintenance and repair please discard used circuit boards used electrical parts and products as disposed electrical materials 4 The power consumption is 0 W after you turn off the machine and unplug it from the AC outlet 5 Some parts in the machine can be used on the same series model machines which are produced in the same...

Page 3: ...machine maintenance See troubleshooting tips Printed or on Brother Installation Disc In the Box Online User s Guide This guide includes the additional contents of the Reference Guide In addition to information about the PC Print PhotoCapture Center Scan Copy Fax Internet services Mobile Functions and Brother ControlCenter operations useful information is included about using the machine on a netwo...

Page 4: ...ns and Videos Online Go to your model s FAQs Troubleshooting page on the Brother Solutions Center at support brother com Provides several ways to search Displays related questions for more information Receives regular updates based on customer feedback ii ...

Page 5: ...from Your Computer 8 Scan Using the Scan Button on the Machine 8 6 PhotoCapture Center 10 Print Photos Directly from a USB Flash Drive 10 Preview and Print Photos from a USB Flash Drive 10 Print Settings Overview 10 7 Fax 11 Before Faxing 11 Telephone Line Interference VoIP 11 Send a Fax 11 Choose the Correct Receive Mode 12 A Routine Maintenance 14 Check the Print Quality 14 Check the Print Align...

Page 6: ...Error and Maintenance Messages 17 Wireless LAN Report Error Codes 21 C Appendix 22 Enter Text on Your Brother Machine 22 Supply Specifications 23 iv ...

Page 7: ... machine to Copy mode PHOTO Press to switch the machine to Photo Web mode 3 Settings buttons Clear Back Press to go back to the previous menu level Settings Press to access the main menu OK Press to select a setting d or c Press to adjust the ring volume while the machine is idle Press to store Speed Dial and Group numbers in the machine s memory Press to look up and dial numbers that are stored i...

Page 8: ... keyboard to enter text or characters 6 Stop Exit Press to stop an operation Press to exit from a menu 7 Start buttons Black Start Press to start sending faxes in monochrome Press to start making copies in monochrome Press to start scanning documents in colour or monochrome depending on the scan setting Color Start Press to start making copies in full colour Press to start scanning documents in co...

Page 9: ...et Mode is turned on the print speed becomes slower 2 Wireless Status Each icon in the following table shows the wireless network status Wireless network is connected A three level indicator in the Home screen displays the current wireless signal strength The wireless access point cannot be detected The wireless setting is disabled 3 Date and Time Displays the date and time set on the machine 4 Fa...

Page 10: ...x card Envelopes Adjust the paper guides Printing surface Face down Photo Adjust the paper guides Printing surface Face down MP Tray How to Load Paper A4 Letter Executive B5 B6 JIS 16K 195 x 270 mm A5 A6 Photo Photo L 2L Index card Envelopes Adjust the paper guides Printing surface Face up For more detailed information see the Online User s Guide Load Paper 2 Paper Handling 4 ...

Page 11: ... needed 2 1 Load Documents Place the document in the ADF or on the scanner glass as shown in the illustration Automatic Document Feeder ADF Scanner Glass Place your document face down in the ADF Place the document face down in the upper left corner of the scanner glass 2 Paper Handling 5 ...

Page 12: ...ration Print a Document Mac 1 From an application such as Apple TextEdit click the File menu and then select Print 2 Select Brother MFC XXXX where XXXX is the name of your model 3 Click Print 4 Complete your print operation Various Printing To use the various printing features click the printing properties or preferences button to change the printer setting Print on Both Sides of the Paper Automat...

Page 13: ...a or b to scroll through the copy settings When the setting you want is highlighted press OK When you load paper other than A4 size Plain Paper you must change the Paper Size and Paper Type settings 6 When finished press Black Start or Color Start To stop copying press Stop Exit Other Copy Options You can use various copy features by changing copy settings Enlarge or Reduce Copied Images 2 sided C...

Page 14: ...achine is connected over the network press a or b to select the computer where you want to send data and then press OK If the LCD prompts you to enter a PIN use the control panel to enter the four digit PIN for the computer and then press OK 6 Do one of the following To change the settings go to the next step To use the default settings press Black Start or Color Start Scan Type depends on the def...

Page 15: ...Contrast Select the contrast level Remove Background Change the amount of background colour that is removed 10 Press Black Start or Color Start Scan Type depends on the settings you have selected Pressing Black Start or Color Start does not allow you to change the settings 5 Scan 9 ...

Page 16: ...es using the dial pad 6 Repeat the last two steps until you have selected all the photos you want to print Press Clear Back to go back to the previous level 7 Press OK 8 To change the print settings press a or b to select the setting you want to change and then press OK Press a or b to select the option you want and then press OK 9 Press Color Start Print Settings Overview The Print Settings you c...

Page 17: ...the compatibility setting to Basic for VoIP Normal sets the modem speed at 14 400 bps 3 Press Stop Exit VoIP Voice over IP is a type of phone system that uses an Internet connection rather than a traditional phone line Brother does not recommend the use of a VoIP line VoIP limitations in general can cause some functions of the fax machine not to work correctly Send a Fax This feature is available ...

Page 18: ...ting you want to change and then press OK 5 When finished press Black Start 6 Do one of the following If you are using the ADF the machine starts scanning and sending the document If you are using the scanner glass and pressed Black Start the machine starts scanning the first page Go to the next step 7 When the LCD displays Next page do one of the following Press c to scan another page Place the n...

Page 19: ...lect Fax Press OK b Select Setup Receive Press OK c Select Receive Mode Press OK 3 Press a or b to select the Fax Auto Fax Tel External TAD or Fax Manual option and then press OK 4 Press Stop Exit 7 Fax 13 ...

Page 20: ...elow press c to select Yes OK Poor 6 The LCD asks you to check the print quality of each colour Press d or c to select the pattern 1 4 that most closely matches the printing result and then press OK 7 Do one of the following If print head cleaning is needed press c to start the cleaning procedure If print head cleaning is not needed the Ink or Maintenance screen reappears on the LCD 8 After the cl...

Page 21: ...st the print alignment 1 Press Settings 2 Press a or b to select the following a Select General Setup Press OK b Select Maintenance Press OK c Select Impr PrintQuality Press OK d Select Alignment Press OK 3 Press c 4 Press c again The machine starts printing the Alignment Check Sheet A 5 For pattern A press d or c to select the number of the test print that has the fewest visible vertical stripes ...

Page 22: ...the computer or the wireless connection is set up on both the machine and your computer For network models The access point for wireless router or hub is turned on and its link button is blinking To find the error and the solution check the LCD or the machine s status in Status Monitor on your computer Using the LCD Using the Status Monitor 1 Follow the messages on the LCD 2 See the instructions i...

Page 23: ...option on the machine or in the printer driver Cover is Open The ink tank cover is not locked in the closed position Firmly close the ink tank cover until it locks into place Data Remaining Press Stop Exit The machine will cancel the job and clear it from the memory Try to print again Disconnected Try to send or receive again If calls are stopped repeatedly and you are using a VoIP Voice over IP s...

Page 24: ...For more detailed information see the Online User s Guide Printer Jam or Paper Jam Make sure the paper guides are set to the correct paper size Clean the paper pick up rollers For more detailed information see the Online User s Guide Clean the Paper Pick up Rollers Low Temperature After warming the room allow the machine to warm up to room temperature Try again when the machine has warmed up Media...

Page 25: ...tch 1 Check that the paper size you selected on the machine s display matches the size of the paper in the tray For more detailed information see the Online User s Guide Change the Paper Size and Paper Type 2 Make sure you loaded the paper in a Portrait position by setting the paper guides at the indicators for your paper size For more detailed information see the Online User s Guide Load Paper 3 ...

Page 26: ...hine or your computer before disconnecting the machine so you will not lose any important messages Then disconnect the machine from the power for several minutes and reconnect it For more detailed information see the Online User s Guide Transfer Your Faxes or Fax Journal Report Unable to Scan XX Transfer your faxes to another fax machine or your computer before disconnecting the machine so you wil...

Page 27: ...ng the correct network key TS 04 Unsupported authentication encryption method has been detected on your wireless access point router Your wireless access point router is using an authentication encryption method that is not supported by the device Check that you are selecting the correct SSID network name TS 05 The specified SSID and network key are incorrect Check that you are selecting the corre...

Page 28: ...e Times Six Times Seven Times Eight Times Nine Times 2 A B C a b c 2 A B 3 D E F d e f 3 D E 4 G H I g h i 4 G H 5 J K L j k l 5 J K 6 M N O m n o 6 M N 7 P Q R S p q r s 7 8 T U V t u v 8 T U 9 W X Y Z w x y z 9 To move the cursor to the left or right press a b d or c to select or and then press OK Inserting spaces To enter a space press a b d or c to select and then press OK Making corrections I...

Page 29: ...is complete the ink bottles provided with your machine will have a lower yield than standard ink bottles With all following ink bottles you can print the specified number of pages Replacement Supplies Black Ink Bottle BTD60BK Yellow Ink Bottle BT5009Y Cyan Ink Bottle BT5009C Magenta Ink Bottle BT5009M Black Approximately 6500 pages 1 Yellow Cyan and Magenta Approximately 5000 pages 1 1 Quoted appr...

Page 30: ...e World Wide Web www brother com This machine is approved for use in the country of purchase only Local Brother companies or their dealers will support only machines purchased in their own countries CHN ENG Version 0 ...

Reviews: