


Configure and Operate LDAP Search
> Perform an
LDAP Search Using Your Machine's Control Panel
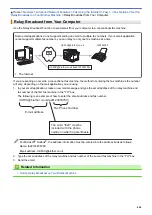
Perform an LDAP Search Using Your Machine's Control Panel
After you configure LDAP settings, you can use the LDAP search feature to find fax numbers or email addresses
to use for:
•
Sending a Fax
•
Sending an Internet Fax (I-Fax)
•
Scanning to Email Server
•
The LDAP feature supports LDAPv3.
•
The LDAP feature does not support SSL/TLS.
•
You may need to use Kerberos Authentication or Simple Authentication to connect to your LDAP server,
depending on the security policy set by your network administrator.
•
You must configure the SNTP protocol (network time server), or you must set the date, time and time
zone correctly on the control panel for Kerberos authentication.
>> MFC-J2330DW/MFC-J5330DW/MFC-J5335DW
>> MFC-J2730DW/MFC-J5730DW/MFC-J5930DW
MFC-J2330DW/MFC-J5330DW/MFC-J5335DW
1. Press
to search.
2. Enter the initial characters for your search using the LCD.
•
You can enter up to 15 characters.
•
For more information about how to enter text, see the
Appendix
.
3. Press
[OK]
.
The LDAP search result will be shown on the LCD; the
icon appears before the local address book
search results.
•
If there is no match on the server or the local address book, the LCD will show
[Results cannot be
found.]
for about 60 seconds.
4. Press
a
or
b
to display the name you want.
5. Press the name.
To view the details of the name, press
[Detail]
.
6. If the result includes more than one fax number or email address, the machine will prompt you to select just
one. Press
[Apply]
. Do one of the following:
•
If you are sending a fax and an I-Fax, press
[Fax Start]
.
•
If you are scanning to the E-mail Server, load your document, press
[Next]
, and then press
[Start]
.
MFC-J2730DW/MFC-J5730DW/MFC-J5930DW
1. Press
to search.
2. Enter the initial characters for your search using the LCD.
•
You can enter up to 15 characters.
•
For more information about how to enter text, see the
Appendix
.
3. Press
[OK]
.
452
Summary of Contents for MFC-J2330DW
Page 12: ... Features Tables 3 7 93 4 mm Touch Panel models 5 ...
Page 25: ... Use the A3 Copy Shortcuts Error and Maintenance Messages 18 ...
Page 27: ...Related Information Touchscreen LCD Overview 20 ...
Page 30: ... Touchscreen LCD Overview Check the Ink Volume 23 ...
Page 32: ...Related Information Introduction to Your Brother Machine 25 ...
Page 37: ...Home Paper Handling Paper Handling Load Paper Load Documents 30 ...
Page 44: ... Choose the Right Print Media Change the Paper Size and Paper Type 37 ...
Page 173: ...Related Information Set up a Scan to Network Profile 166 ...
Page 189: ...Related Information Scan Using the Scan Button on Your Brother Machine 182 ...
Page 253: ... TWAIN Driver Settings Macintosh 246 ...
Page 278: ... Important Note 271 ...
Page 291: ...Related Information Send a Fax Fax Options 284 ...
Page 297: ... Set up Groups for Broadcasting Enter Text on Your Brother Machine 290 ...
Page 311: ... Telephone and Fax problems 304 ...
Page 326: ...Related Information Memory Receive Options 319 ...
Page 348: ...Related Information Store Fax Numbers 341 ...
Page 350: ... Store Address Book Numbers 343 ...
Page 375: ... Set the Machine to Power Off Automatically 368 ...
Page 376: ...Home Fax PC FAX PC FAX PC FAX for Windows PC FAX for Macintosh 369 ...
Page 431: ... Wi Fi Direct Network Configuration Overview 424 ...
Page 440: ...Related Information Configure Your Brother Machine for Email or I Fax 433 ...
Page 526: ...Related Information Set Up Brother Web Connect 519 ...
Page 530: ...Related Information Set Up Brother Web Connect 523 ...
Page 565: ...4 Press OK The machine scans the document Related Information NotePrint and NoteScan 558 ...
Page 675: ... My Brother Machine Cannot Print Scan or PC FAX Receive over the Network 668 ...
Page 691: ... Clean the Print Head from Your Brother Machine 684 ...
Page 814: ...UK Version 0 ...