Brother MFC-8500 Owner'S Manual Download Page 206

22 - 13

      T R O U B L E S H O O T I N G   A N D   R O U T I N E   M A I N T E N A N C E

Packing and Shipping the Machine

Whenever you transport the machine, use the packing materials that came with 
your machine.  Also, follow the steps below to pack the machine so it won’t be 
damaged, which would void the machine’s warranty.
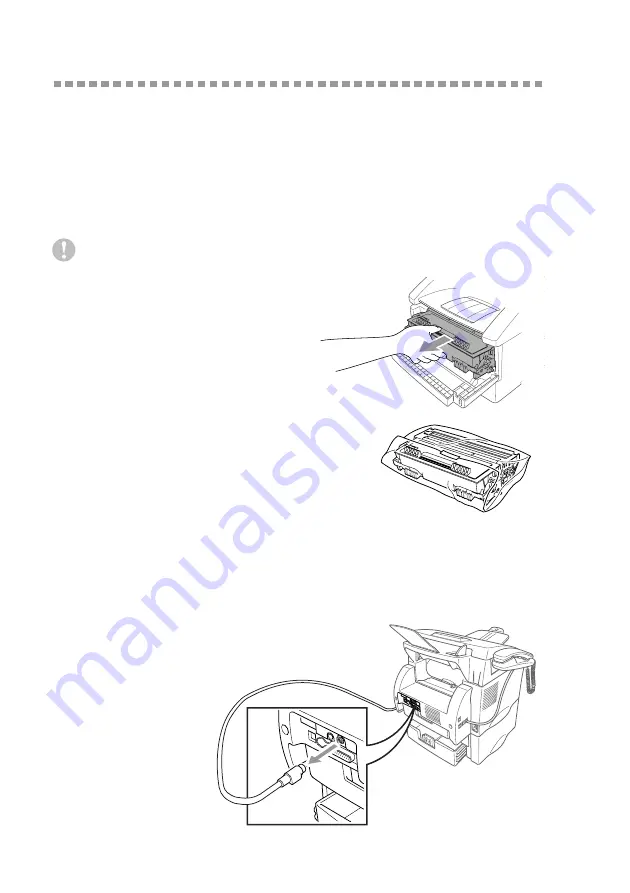
1

Remove the telephone line cord and unplug MFC from the AC outlet.

2

Open the front cover.

3

Remove the drum unit.

Caution

Remove the drum unit and toner 
cartridge assembly.  Leave the toner 
cartridge installed in the drum unit.

4

Place the drum unit and toner 
cartridge assembly into the plastic bag 
and seal the bag.

5

Close the front cover.  Fold down the 
front output bin extension. Remove 
the telephone line cord, document 
tray, document support, handset, and 
handset cord, and pack them.

6

If Cassette #2 is 
connected, unplug 
the modular cable 
from the modular 
jack of the Brother 
machine. 

Summary of Contents for MFC-8500

Page 1: ...MFC 8500 OWNER S MANUAL version C ...

Page 2: ...____________________________ Date of Purchase ______________________________________ Place of Purchase ______________________________________ The serial number is on the back of the unit Retain this manual with your sales receipt as a permanent record of your purchase in the event of theft fire or warranty service 1996 2001 Brother Industries Ltd ...

Page 3: ...ked Questions FAQs The Brother Solutions Center is our one stop resource for all your Fax Machine Multi Function Center needs You can download the latest software and utilities read FAQs and troubleshooting tips and go to the Solutions section to learn how to get the most from your Brother product For Customer Service Dealers Service Centers USA Only For the name of a Brother authorized dealer or ...

Page 4: ...d the machine Calls must be made from within that country In USA 1 888 879 3232 voice 1 800 947 1445 fax http www brothermall com In Canada 1 877 BROTHER voice Description Item Laser Fax Toner TN 430 Able to print 3000 pages TN 460 Able to print 6000 pages Laser Fax Drum DR400 Telephone Line Cord LG3077001 Telephone Handset UF6857010 Handset Curled Cord UF7204008 Document Tray and Extension UU2069...

Page 5: ...USE OR INABILITY TO USE THE SOFTWARE EVEN IF BROTHER S LICENSOR HAS BEEN ADVISED OF THE POSSIBILITY OF SUCH DAMAGES BECAUSE SOME STATES IN THE USA AND SOME PROVINCES IN CANADA DO NOT ALLOW THE EXCLUSION OR LIMITATION OF LIABILITY FOR CONSEQUENTIAL OR INCIDENTAL DAMAGES THE ABOVE LIMITATIONS MAY NOT APPLY TO YOU IN ANY EVENT BROTHER S LICENSOR S LIABILITY TO YOU FOR ACTUAL DAMAGES FROM ANY CAUSE WH...

Page 6: ...ranty Period supply Brother s representative with a copy of your dated bill of sale showing that this Product was purchased within the United States For the name of your Brother Authorized Service Center call 1 800 521 2846 After contacting the Brother Authorized Service Center you may be required to deliver or send the Product properly packaged freight prepaid to the Authorized Service Center tog...

Page 7: ...at Brother is giving for this Product It is the final expression and the exclusive and only statement of Brother s obligations to you It replaces all other agreements and under standings that you may have with Brother or its representatives This Limited Warranty and Brother s obligation to you may not be changed in any way unless you and Brother sign the same piece of paper in which we 1 refer to ...

Page 8: ...rom packing without the ink cartridges will VOID your warranty Refer to your Operation Manual for proper packaging BROTHER DISCLAIMS ALL OTHER WARRANTIES EXPRESSED OR IMPLIED INCLUDING WITHOUT LIMITATION ANY IMPLIED WARRANTIES OF MERCHANTABILITY OR FITNESS FOR A PARTICULAR PURPOSE EXCEPT TO THE EXTENT THAT ANY WARRANTIES IMPLIED BY LAW CANNOT BE VALIDLY WAIVED No oral or written information advice...

Page 9: ... For the next transmission only press or to select NEXT FAX ONLY and then press Set 4 For the next fax only press or to select ON and then press Set 5 Press 1 to select additional settings OR Press 2 to fax 6 Enter the fax number 7 Press Fax Start Receiving Faxes Select Receive Mode You can select FAX TEL TAD MANUAL or FAX ONLY by pressing the Mode button repeatedly until you have changed the FAX ...

Page 10: ...rch Speed Dial press and then press the two digit Speed Dial number If you pressed Hook to dial pick up the handset when the other party answers 3 To hang up replace the handset Search Speed Dial 1 Press Search Speed Dial then enter the first letter of the name you re looking for 2 Press or to search the memory 3 When the name is displayed lift the handset OR Press Hook 4 Press Fax Start to dial I...

Page 11: ... Problems 1 5 Fax Tones and Handshake 1 6 ECM Error Correction Mode 1 6 2 Assembly and Connections 2 1 Packing List 2 1 Choosing a Location 2 2 Assembly 2 3 Installing the Drum Unit Assembly with Toner Cartridge 2 3 Attaching the Trays 2 4 Connecting Paper Cassette 2 Option 2 4 Manual Feed Slot 2 5 Paper 2 6 Acceptable Paper 2 6 Paper Capacity of Paper Cassette 2 6 Paper Specification for the Cass...

Page 12: ...iendly Programming 3 1 Menu Mode 3 1 Menu Selection Table 3 2 4 Initial Setup 4 1 Getting Started 4 1 Setting Paper Size 4 1 Turning on Cassette 2 Option 4 1 Setting Cassette Usage 4 2 Setting Date and Time 4 2 Setting Station ID 4 3 Entering Text 4 3 Inserting Spaces 4 4 Making Corrections 4 4 Repeating Letters 4 4 Special Characters and Symbols 4 4 Setting the Ring Volume 4 5 Setting the Beeper ...

Page 13: ... Up Polling Receive 5 7 Setting Up Sequential Polling Receive 5 7 Canceling a Scheduled Job 5 8 Setting Multi Function Link Pro Mode 5 8 6 Setup Send 6 1 Before You Begin 6 1 Using the ADF Automatic Document Feeder 6 1 Sending Faxes with Multiple Settings 6 2 Manual Transmission 6 2 Automatic Transmission 6 2 Manual and Automatic Fax Redial 6 2 Dual Access 6 3 Real Time Transmission 6 3 Checking t...

Page 14: ... Manual Dialing 7 4 Search 7 4 Speed Dialing 7 5 One Touch Dialing 7 5 Broadcasting 7 6 Access Codes and Credit Card Numbers 7 7 Pause 7 7 Hold 7 7 Redial 7 7 Tone Pulse For Canada Only 7 7 8 Telephone Services 8 1 Custom Features 8 1 Distinctive Ring 8 1 What Does Your Telephone Company s Distinctive Ring Do 8 1 What Does Brother s Distinctive Ring Do 8 1 Do You Have Voice Mail 8 2 Before You Cho...

Page 15: ...etrieval Access Code 9 3 Remote Retrieval 9 4 Using Remote Retrieval Access Code 9 4 Remote Commands 9 5 Retrieving Fax Messages 9 6 Changing Fax Forwarding Number 9 6 10 Printing Reports 10 1 MFC Settings and Activity 10 1 Customizing the Transmission Verification Report 10 1 Setting the Fax Activity Report Interval 10 1 Using the Reports Key 10 2 To Print a Report 10 2 11 Making Copies 11 1 Usin...

Page 16: ...rint Setup Section 12 4 Page Setup Section 12 5 Font Configuration 12 5 Other Configuration 12 6 Console Configuration Category 12 6 13 Using Brother Machine as a Printer 13 1 Special Printing Features 13 1 Windows Printing 13 1 Popular Printer Emulation Support 13 1 Remote Printer Console Program for DOS 13 1 Bi directional Parallel Interface 13 1 Enhanced Memory Management 13 1 Printing from You...

Page 17: ...Orientation 14 3 Copies 14 3 Collate 14 4 Media Type 14 4 Advanced Tab 14 5 Print Quality 14 5 Resolution 14 5 Toner Save 14 5 Print Setting For Windows 95 98 98SE Me Users Only 14 6 Duplex Printing 14 6 Manual Duplex 14 6 Binding Offset 14 6 Watermark 14 7 Print Watermark 14 7 In background 14 7 Watermark Text 14 8 Watermark Bitmap 14 8 Position 14 8 Page Setting 14 9 Device Options 14 10 Quick P...

Page 18: ...ptions 14 20 15 Using the Windows Based Brother MFL Pro Control Center 15 1 Brother Control Center 15 1 AutoLoad the Brother Control Center 15 1 How to Turn Off AutoLoad 15 2 Using the Scan Keys 15 2 Using the Control Panel Keys 15 2 Scan Image 15 3 Scan OCR 15 3 Scan to E mail 15 3 Brother Control Center Features 15 4 Auto Configuration 15 4 Scanning Operations 15 4 Copy Operations 15 5 PC Fax Op...

Page 19: ...15 Scanner Settings 15 15 Fax Settings 15 15 16 Using ScanSoft PaperPort for Brother and ScanSoft TextBridge 16 1 Using ScanSoft PaperPort and TextBridge 16 1 Viewing Items in ScanSoft PaperPort for Brother 16 2 Organizing Your Items in Folders 16 2 Links to Many Other Applications 16 3 Using ScanSoft TextBridge OCR Converting Image Text to Text You Can Edit 16 3 Importing Items from Other Applica...

Page 20: ...ion 17 9 Deleting a Member or Group 17 10 Exporting the Address Book 17 10 Importing to the Address Book 17 11 Setting Up Cover Page 17 12 To 17 13 From 17 13 Comment 17 13 Select Cover Page Form 17 13 Import BMP file 17 13 Count Cover Page 17 13 Sending a File as a PC FAX Using the Simple Style 17 14 Sending a File as a PC FAX Using the Facsimile Style 17 15 Setting Up PC FAX Receiving 17 16 Sett...

Page 21: ...nt into Your Macintosh G3 G4 or iMac 19 8 Settings in the Scanner Window 19 9 Image 19 9 Scanning Area 19 9 Business Card Size 19 10 Miscellaneous 19 10 Contrast 19 10 PreScanning an Image 19 11 20 Optional Accessories 20 1 Paper Cassette 2 Option 20 1 21 Important Information 21 1 Standard Telephone and FCC Notices 21 1 Laser Safety 21 2 FDA Regulations 21 2 Manufactured 21 2 Important About the ...

Page 22: ...e Maintenance 22 16 Cleaning the Document Scanner 22 16 Cleaning the Printer 22 16 Cleaning the Drum Unit 22 17 Replacing the Toner Cartridge 22 18 Toner Empty Indicator 22 18 Replacing the Drum Unit 22 21 Checking the Drum Life 22 22 23 Glossary G 1 24 Specifications S 1 Product Description S 1 Fax S 1 Printer S 2 Computer Requirement S 3 Electrical and Environment S 3 Parallel Interface Specific...

Page 23: ... to perform For clarification and to help you choose the correct key presses we ve added illustrations of some of the LCD messages boldface Bold typeface identifies a specific key on the machine control panel italics Italics typeface emphasize an important point or refer you to related topic bubble dot Bubble Dot typeface identifies the messages on the LCD of the machine Additionally your machine ...

Page 24: ...roperly installed To receive a response you must set up your Station ID See Setting Station ID Page 4 3 When this document is received a confirmation sheet and Product Registration form will be sent back to your machine Please fill out the form and return it to complete your registration To Complete Your MFC 8500 Registration On Line For USA Only 1 Insert the MFL Pro CD ROM into your CD ROM drive ...

Page 25: ...ough options or text Clear Deletes entered data or backs up one step in function procedure 4Print Key Reset Clears data from the printer memory 5Scan Keys Scan Image Press this key to scan a color picture into your graphics application for viewing and editing Scan OCR Press this key to start scanning a text document ScanSoft TextBridge will convert it to editable text and display it in your word p...

Page 26: ...set volume BStop Exit Stops a fax cancels an operation or exits from function mode CFax Start Starts an operation such as sending a fax DCopy Keys Options You can quickly and easily select temporary settings for the next copy only Enlarge Lets you enlarge copies depending upon the ratio you select Reduce Lets you reduce copies depending upon the ratio you select Copy Makes a copy ESearch Speed Dia...

Page 27: ...swer after four your Voice Mail will keep your fax machine from receiving faxes If you set Voice Mail and the Brother machine to answer at the same number of rings there is no way of knowing which one will answer first It is important to remember that neither Voice Mail nor the fax machine can pass the call back to the other after the call has been answered How Can You Avoid Possible Problems A ve...

Page 28: ... Stop Exit When your machine answers in FAX TEL mode the machine listens for CNG tones and then responds with receiving tones The fax handshake is the time in which the sending machine s CNG tones and the receiving machine s chirps overlap This must be for at least 2 to 4 seconds so the machines can understand how each is sending and receiving the fax The handshake cannot begin until the call is a...

Page 29: ...ccessories and Supplies on Page ii for the correct item numbers Whenever you transport the machine use the packing materials that came with your machine If you do not pack the machine properly you may void your warranty Document Tray with Extension Telephone Wire Cord Power Cord Handset Curled Cord Telephone Handset Document Support Drum Unit Assembly With free Standard Toner Cartridge up to 3 000...

Page 30: ...ere may be a remote risk of electric shock from lightning Do not use the telephone to report a gas leak in the vicinity of the leak For PLUGGABLE EQUIPMENT the socket outlet should be installed near the equipment and should be easily accessible To reduce the risk of shock or fire use only a No 26 AWG or larger telecommunications line cord Avoid placing your machine in a high traffic area Do not pl...

Page 31: ...embly including the toner cartridge and gently rock it from side to side five or six times to distribute the toner evenly inside the cartridge 2 Open the front cover of the machine 3 Insert the drum unit assembly into the machine 4 Close the front cover To prevent damage to the drum do not expose it to light for longer than a few minutes ...

Page 32: ... Extension Unfold the extension which holds documents in place 2 Unfold the Front Output Bin Extension which holds printed pages in place Connecting Paper Cassette 2 Option 1 Carefully pick up the machine and then place it on top of Paper Cassette 2 Document Support Document Tray with Extension Front Output Bin Extension ...

Page 33: ...sette Load paper or envelopes one at a time You do not have to remove paper from the paper cassette To print or copy on labels transparencies card stock or thicker paper To select which cassette will be used for printing See Setting Cassette Usage Page 4 2 If you move the machine after connecting Cassette 2 be sure to carefully lift Cassette 2 with the machine because they are not attached Manual ...

Page 34: ...S ISO Executive A6 2 75 8 5 4 57 14 inches 70 216 116 356 mm COM 10 Monarch C5 DL 2 75 8 5 4 57 14 inches 70 216 116 356 mm 2 75 8 5 4 57 14 inches 70 216 116 356 mm We Recommend Cut sheet Labels Transparencies Xerox 4200DP 20 lb Champion Paper One 20 lb Hammermill Laser Paper 24 lb Avery laser label 5160 3M CG3300 for laser printers or equivalent Multi purpose Paper Cassette Max paper height is 1...

Page 35: ...0 13 mm Moisture Content 4 to 6 by weight Cut Sheet Envelopes Basis Weight 16 to 43 lb 60 to 161 g m2 20 to 24 lb 75 to 90 g m2 Caliper 0 003 to 0 008 inches 0 08 to 0 2 mm 0 003 to 0 005 inches 0 084 to 0 14 mm Moisture Content 4 to 6 by weight 4 to 6 by weight Fax messages can be received on only Letter Legal and A4 size paper If you use legal or A4 change the Paper Size setting Menu 1 1 ...

Page 36: ...er width and length adjusters for the paper size you want 3 Fan the paper well Load paper in the paper cassette Press down on the paper to flatten it in all four corners keeping the paper level below the guide The cassette can hold up to 250 sheets of 20 lb 75g m2 paper 4 Slide the paper cassette into the machine until it locks into place Maximum Paper Height Guide ...

Page 37: ...G This machine must be grounded using a three prong plug Since the machine is grounded through the power outlet you can protect yourself from potentially hazardous electrical conditions on the telephone line by keeping the power to your machine on when you connect it to a telephone line When you want to move your machine protect yourself by disconnecting the telephone line first and then the power...

Page 38: ...ended setting is two rings The machine cannot hear CNG tones until the TAD has answered the call and with four rings there are only 8 10 seconds of CNG tones left for the fax handshake Make sure you carefully follow the instructions in this manual for recording your outgoing message We do not recommend using the toll saver feature on your external answering machine if it exceeds 4 rings Connection...

Page 39: ...iming is important in recording this message The message sets up the ways to handle both manual and automatic fax reception 1 Record 5 seconds of silence at the beginning of your message This allows your machine time to listen for the fax CNG tones of automatic transmissions before they stop 2 Limit your speaking to 20 seconds See Easy Receive Page 5 3 3 End your 20 second message by giving your F...

Page 40: ...parate jacks RJ11 or combined into one jack RJ14 Your machine must be plugged into an RJ11 jack RJ11 and RJ14 jacks may be equal in size and appearance and both may contain four wires black red green yellow To test the type of jack plug in a two line phone and see if it can access both lines If it can you must separate the line for your machine Converting Telephone Wall Outlets There are three way...

Page 41: ...wo line telephone next to your machine 2 Plug one end of the telephone line cord for your fax machine into the L2 jack of the triplex adapter Plug the other end into the LINE jack on the left side of the machine 3 Plug one end of the first telephone line cord for your TAD into the L1 jack of the triplex adapter Plug the other end into the L1 or L1 L2 jack of the two line TAD 4 Plug one end of the ...

Page 42: ...erate correctly under all circumstances with a PBX Any cases of difficulty should be reported first to the company that handles your PBX 2 If all incoming calls will be answered by a switchboard operator it is recommended that the Receive Mode be set to MANUAL All incoming calls should initially be regarded as telephone calls 3 The machine may be used with either pulse or tone dialing telephone se...

Page 43: ... they guide you through the menu selections and programming options Menu Mode You can access the Menu by pressing Menu The LCD shows Then Press 1 for General Setup OR Press 2 for Fax Operations OR Press 3 for Copy Operations OR Press 4 for Printer Operations You can scroll more quickly by pressing Use to scroll backward and see all options in the opposite order Before you press Set after entering ...

Page 44: ... time fortheLCDdisplay and heading on fax transmissions 4 2 3 STATION ID Program your name fax number and telephone number to appear on each transmitted page 4 3 4 VOLUME 1 RING OFF LOW MED HIGH Adjusts ring volume 4 5 2 BEEPER OFF LOW HIGH Adjusts beeper volume 4 5 3 SPEAKER OFF LOW MED HIGH Adjusts speaker volume 4 5 4 HANDSET LOW HIGH Adjusts handset volume 4 6 5 VOLUME AMPLIFY ON PERMANENT TEM...

Page 45: ... DELAY 00 01 02 03 04 Number of rings beforeMFCanswers in FAX TEL FAX MANUAL or TAD mode 5 2 2 F T RING TIME 20 30 40 70 Sets the time for double ring in FAX TEL mode 5 2 3 EASY RECEIVE ON SEMI OFF Receive fax messages without pressing the Fax Start key 5 3 4 REMOTE CODE ON 51 51 OFF Activateordeactivate the MFC from a remote location You can also personalize these codes 5 5 5 AUTO REDUCTION ON OF...

Page 46: ...cuments later 6 10 5 BATCH TX ON OFF Sends all delayed faxes that are to the same fax number and at the same time as one transmission 6 10 6 REAL TIME TX NEXT FAX ONLY ON OFF You can send a fax without using memory 6 3 7 POLLED TX ON OFF Sets up your machine with a document to be retrieved by another fax machine 6 11 8 COVERPG SETUP NEXT FAX ONLY ON OFF PRINT SAMPLE Automatically sends a cover pag...

Page 47: ...OFF OFF IMAGE Initial setup for Transmission VerificationReport and Activity Report 10 1 2 ACT INTERVAL 6 12 24 Hours 2 4 7 Days OFF 10 1 5 REMOTE FAX OPT 1 FAX FWD PAGING OFF FAX FORWARD PAGING Sets the machine to forward fax messages OR to call your pager 9 1 2 FAX STORAGE ON OFF Stores incoming faxes in memory for remote retrieval 9 3 3 REMOTE ACCESS 159 Personalizes code for retrieving faxes 9...

Page 48: ...ed in memory 8 3 3 DURM LIFE You can check the percentage of drum life that remains available 22 22 3 COPY 1 COPY MODE AUTO TEXT PHOTO Selects the Copy resolution for your type of original 11 6 2 CONTRAST Adjusts the contrast 11 6 4 PRINTER 1 PRINT OPTIONS 1 INTERNAL FONT You can print resident fonts to check and confirm font types 13 7 2 CONFIGU RATION Printer settings and status are listed here ...

Page 49: ...paper size for each cassette See Turning on Cassette 2 Option 1 Press Menu 1 1 2 If you have the Cassette 2 press or to select CASSETTE 1 or CASSETTE 2 and then press Set 3 Press or to select LETTER LEGAL or A4 for the cassette you selected in Step 2 and then press Set 4 Press Stop Exit Turning on Cassette 2 Option When the optional CASSETTE 2 is set to ON you can set paper size and the cassette u...

Page 50: ...Press or to select AUTO CASSETTE 1 ONLY or CASSETTE 2 ONLY and then press Set 5 Press Stop Exit Setting Date and Time Your machine displays the date and time and prints it on every fax you send In the event of a power failure you may have to reset the date and time All other settings remain unaffected 1 Press Menu 1 2 2 Enter the last two digits of the year and then press Set 3 Enter two digits fo...

Page 51: ... Entering Text 5 Press Stop Exit The LCD returns to the date and time Entering Text When you are setting certain functions such as the Station ID you may need to type text into the machine Most keys on the dial pad have three or four letters printed above them The keys for 0 and don t have printed letters because they are used for special characters By pressing the appropriate number key repeatedl...

Page 52: ...ial Characters and Symbols Press for space Press for _ Press 0 for É À È Ê Î Ç Ë Ö 0 If you do not enter a fax number no additional information can be entered NOTICE The Telephone Consumer Protection Act of 1991 makes it unlawful for any person to use a computer or electronic device to send any message via a telephone fax machine unless such messages clearly contain in a margin at the top or botto...

Page 53: ... setting is LOW When the beeper is set to LOW or HIGH the machine beeps every time you press a key or make an error and when fax sending or receiving is finished 1 Press Menu 1 4 2 2 Press or to select your setting 3 When the LCD shows the setting you want press Set 4 Press Stop Exit Setting the Speaker Volume 1 Press Menu 1 4 3 2 Press or to select your setting LOW MED HIGH or OFF and then press ...

Page 54: ...IGH When the handset is replaced the handset volume will remain until you change it again VOLUME AMPLIFY ON TEMPORARY This setting is appropriate if some of the users are hearing impaired During a conversation users can press Volume High or Low on the control panel to adjust the volume to LOW HIGH or AMPLIFY When the handset is replaced the handset volume returns to the default setting of LOW VOLU...

Page 55: ... the users are hearing impaired select TEMPORARY and then press Set 4 Press Stop Exit Memory Storage In the event of a power failure all settings in the GENERAL SETUP SETUP RECEIVE SET AUTO DIAL and REMOTE FAX OPTIONS plus the COVERPG SETUP and COVERPG MSG from SETUP SEND operations are stored permanently You may have to reset the date and time Turning On Automatic Daylight Savings Time You can se...

Page 56: ...ode The timer automatically resets itself after the machine receives a fax or PC data or makes a copy The default setting is 5 minutes 1 Press Menu 1 8 2 Use the Dial pad to enter the length of time the machine is idle before it drops into sleep mode 00 to 99 minutes and then press Set 3 Press Stop Exit Setting Tone Pulse Dialing Mode For Canada Only Your fax machine comes set to accommodate tone ...

Page 57: ...r if you receive very few fax messages You can also use this mode with Distinctive Ring 2 FAX automatic receive The machine automatically answers every call as a fax For dedicated fax lines You cannot receive a voice call but you can call out 3 FAX TEL fax and telephone Machine controls the line and automatically answers every call If the call is a fax it will receive the fax If the call is not a ...

Page 58: ...l ringing from the phone company Only the machine rings for 20 30 40 or 70 seconds no other phones on the same line ring the special double ring However you can answer the call on any extension phone in a separate wall jack on the same line as the machine See Operation from Extension Telephone page 5 5 1 Press Menu 2 1 2 2 Press or to select how long the machine will ring to alert you that you hav...

Page 59: ...cally connect a fax call when you lift an external or extension phone handset press the Fax Receive code 5 1 At the machine lift the handset and then press Fax Start See Operation from Extension Telephone or External Telephone and For FAX TEL Mode Only Page 5 5 1 Press Menu 2 1 3 2 Use or to select ON SEMI or OFF and then press Set 3 Press Stop Exit Printing a Reduced Incoming Document Your machin...

Page 60: ...is printing too light or too dark you can adjust print density making your printed documents darker or lighter The new setting will remain until you change it again 1 Press Menu 2 1 6 2 Press to make print lighter or to make print darker 3 Press Stop Exit 6 PRINT DENSITY ...

Page 61: ...ve to press Fax Start to send the fax For FAX TEL Mode Only When the machine is in FAX TEL mode it will use the F T Ring Time double ringing to alert you to pick up a voice call If you re at the machine you can lift the handset to answer If you re at an extension phone you ll need to lift the handset during the F T Ring Time and then press 5 1 between the double rings If no one is on the line or i...

Page 62: ...ress Stop Exit Polling Polling is the process of retrieving faxes from another fax machine You can use your machine to poll other machines or you can have someone poll your machine All parties involved in polling need to set up their fax machines to accommodate polling When someone polls your machine to receive a fax they pay for the call if you poll someone s fax machine to receive a fax you pay ...

Page 63: ... fax units in a single operation Afterward a Sequential Polling Report will be printed See Canceling a Scheduled Job Page 5 8 1 Press Menu 2 1 7 2 Press or to select Polling ON or OFF and then press Set 3 Specify the destination fax machines you wish to poll using One Touch Speed Dial a Group or the dial pad You must press Broadcast between each location 4 Press Fax Start The LCD shows DIALING You...

Page 64: ...ing go to Step 3 3 Press 1 to cancel OR Press 2 to exit without canceling To cancel another job return to Step 2 4 Press Stop Exit Setting Multi Function Link Pro Mode If you connect your machine to your PC you can receive faxes into your PC After completing all setup for Multi Function Link Pro mode you can turn on Multi Function Link Pro to reroute incoming faxes to your PC 1 Press Menu 2 1 8 2 ...

Page 65: ...e width of your document The ADF automatic document feeder can hold up to 30 Pages feeding each one individually through the machine Use standard 17 lb 24 lb paper when using the ADF If you re using heavier paper feed each sheet individually to prevent paper jams Make sure documents written in ink are completely dry Before you send a fax press Resolution to select the resolution for the document y...

Page 66: ...a dial tone OR Press Hook and listen for a dial tone 3 Enter the fax number you want to call you can enter the digits using the dial pad or you can enter a One Touch or Speed Dial number or you can call from the Search See One Touch Dialing Page 7 5 4 When you hear the fax tone press Fax Start 5 If you re using the handset hang up Automatic Transmission This is the easiest way to send a fax IMPORT...

Page 67: ... send an important document immediately without waiting for memory transmission You can set REAL TIME TX to ON 1 Place the original face down in the ADF 2 Press Menu 2 2 6 3 To change the default setting and then press or to select ON or OFF and then press Set Go to Step 5 OR For the next fax transmission only press or to select NEXT FAX ONLY and then press Set 4 For the next fax only press or to ...

Page 68: ... Eject the document by pressing Stop Exit again Canceling Jobs in Memory You can cancel tasks you ve scheduled such as Delayed Fax Polling Receive Polling Transmit or faxes in memory waiting to be sent 1 Press Menu 2 6 Any waiting jobs appear on the display If no jobs are waiting the LCD shows NO JOB WAITING 2 If you have more than two jobs waiting use or to select the job you want to cancel and t...

Page 69: ...5 5 Enter a fax number and then press Fax Start to send a fax Fax Resolution When you have an original in the ADF you can use the Fax Resolution key to temporarily change the setting Press Fax Resolution repeatedly until the LCD shows the setting you want OR You can change the default setting 1 Press Menu 2 2 2 2 Press or to select the resolution you want and then press Set 3 Press Stop Exit STAND...

Page 70: ...2 8 See Setting Station ID Page 4 3 You can select a comment to include on your cover page Instead of using one of the comments above you can enter up to two customized messages each 27 characters long Use the chart on Page 4 3 to help enter characters See Composing Your Own Comments Page 6 7 Most of the SETUP SEND menu selections are temporary settings that allow you to make adjustments for each ...

Page 71: ...l include the number of pages in your document 1 Place the original face down in the ADF 2 Press Menu 2 2 8 3 When the LCD shows NEXT FAX ONLY and then press Set 4 Press or to select ON or OFF and then press Set 5 Press or to select one of the standard or custom comments and then press Set 6 Enter two digits to indicate the number of pages you are sending and then press Set For example press 02 fo...

Page 72: ...select one of the standard or custom comments and then press Set 4 Press 1 if you want to select additional settings The LCD returns to the SETUP SEND menu OR Press 2 to exit if you are finished choosing settings Using a Printed Cover Page If you prefer using a printed cover page that you can write on you can print the sample page and attach it to your fax 1 Press Menu 2 2 8 2 Press or to select P...

Page 73: ... menu OR Press 2 if you are finished choosing settings and go to Step 5 5 Enter the fax number you re calling 6 Press Fax Start Delayed Timer You can set up the time of day that delayed faxes will be sent This time will be displayed for acceptance or you can override it in Delayed Fax See Delayed Fax Page 6 10 1 Press Menu 2 2 3 2 Enter the time in 24 hour format that you want delayed faxes to be ...

Page 74: ...to select additional settings The LCD returns to the SETUP SEND menu OR Press 2 if you are finished choosing settings and then go to Step 6 The screen will prompt you to enter the fax number 6 Enter the fax number 7 Press Fax Start The machine will wait to send the fax at the time you set Delayed Batch Transmission Before sending the delayed faxes your Brother machine will economize by sorting all...

Page 75: ... the originals waiting in the document feeder OR Press 2 to scan the document into memory 5 Press 1 if you want to select additional settings The LCD returns to the SETUP SEND menu OR Press 2 if you are finished choosing settings and go to Step 6 6 Press Fax Start Note If you pressed 1 in Step 4 the original remains in the ADF until your machine is polled If you must use your machine before the po...

Page 76: ...igits and then press Set See Changing One Touch and Speed Dial Numbers Page 7 2 If you want to enter a pause in the dialing sequence for example to access an outside line press Redial Pause as you re entering digits A dash appears on the LCD pressing Redial Pause enters a 3 5 second pause when the number is dialed 4 Use the dial pad to enter the name up to 15 characters and then pressSet You can u...

Page 77: ...ne Touch and Speed Dial Numbers If you try to store a One Touch or Speed Dial number in a location where a number is already stored the LCD shows the current name stored at that location then prompts you to either 1 Press 1 to change the number or press 2 to exit without changing it 2 Enter a new number and then press Set If you want to erase the number press Clear when the cursor is to the left o...

Page 78: ...re the Group number For example press One Touch key 02 for Group 1 3 Use the dial pad to enter the Group number and then press Set For example press 1 for Group 1 4 To include One Touch or Speed Dial numbers in the Group enter them as if you were dialing For example for One Touch key 05 and then press One Touch key 05 For Speed Dial location 09 press Search Speed Dial then press 0 9 on the dial pa...

Page 79: ...eaker works only one way the other party won t be able to hear you unless you pick up the handset 4 To hang up replace the handset Search You can search for names you have stored in One Touch and Speed Dial memories Names are stored alphabetically See Storing One Touch Dial Numbers Page 7 1 and Storing Speed Dial Numbers Page 7 2 1 Press Search Speed Dial and then enter the first letter of the nam...

Page 80: ...s Page 7 1 3 If you pressed Hook to dial the call pick up the handset when the other party answers The speaker works only one way the other party won t be able to hear you unless you pickup the handset 4 To hang up replace the handset If you are sending a fax press Fax Start after pressing the Speed Dial number If you picked up the handset press Fax Start when the receiving fax machine answers wit...

Page 81: ...e broadcast is completed a Broadcast Report will be printed automatically to let you know the results To stop the broadcasting in progress press Stop Exit The LCD asks if you want to cancel all locations or the location that is being sent Enter the long dialing sequence numbers as you normally would but keep in mind that each key counts as one location so the number of locations you can call becom...

Page 82: ...and then press 7 0 0 1 using the dialing pad Pause Press Redial Pause to insert a 3 5 second pause between numbers If you are dialing overseas you can press Redial Pause as many times as needed to increase the length of the pause Hold 1 Press Hold to place a call on Hold 2 You can replace the handset without disconnecting the call 3 Pick up the machine s handset to release the call from Hold Picki...

Page 83: ...ts own distinctive ring pattern so you will know which phone number is ringing This is one way you can have a separate phone number for your fax machine What Does Brother s Distinctive Ring Do The Brother machine has a Distinctive Ring feature that allows you to use your machine to take full advantage of the telephone company s Distinctive Ring service You can dedicate the new phone number on your...

Page 84: ...tered Please refer to some popular ring pattern examples that will be provided from the phone company in the USA and Canada that are shown in the Brother compatibility table below The fax machine will answer only calls to its registered number The first two rings are silent on the fax machine This is because the fax must listen to the ring pattern compare it to the pattern that was registered If y...

Page 85: ...choose the pattern assigned by the Telephone Company 5 Press Stop Exit Caller ID The Caller ID feature of this machine lets you use the Caller ID subscriber service offered by many local phone companies This service provides the name or telephone number of your caller on the LCD as the line rings See Call Waiting Caller ID Page 8 4 After a few rings the LCD shows the telephone number of your calle...

Page 86: ... of the memory we recommend that you clear the Caller IDs stored in memory by pressing Clear when the LCD shows each caller ID number or name Printing Caller ID List 1 Press Menu 2 0 2 2 Press or to select PRINT REPORT and then press Set 3 Press Fax Start to exit Call Waiting Caller ID The Call Waiting Caller ID feature lets you use the Call Waiting Caller ID service offered by many local telephon...

Page 87: ...ore about this plan the associated rates and to order visit us online at www callmanage com brother or call us toll free at 1 877 717 2722 Registration with CallManage Requires Changing Your Carrier Selection Before using the CallManage IP aver feature you must register for this service with CallManage Inc Register via the web at www callmanage com brother OR Call 1 877 717 2722 A Customer Service...

Page 88: ...on the web at www callmanage com brother or by calling toll free 1 877 717 2722 This registration process will include selecting CallManage Inc or its underlying carrier as your carrier of record Using this service will result in the customer receiving a separate bill from CallManage or its underlying carrier This service is subject to availability and credit approval of the customer Terms and con...

Page 89: ...e fax message 1 Press Menu 2 5 1 2 Press or until the LCD shows FAX FORWARD and then press Set 3 The screen prompts you to enter the number of the fax machine where faxes will be forwarded Enter the forwarding number up to 20 digits and then press Set 4 Press Stop Exit You cannot use Paging and Fax Forwarding at the same time You cannot use Paging and Fax Forwarding when Fax Storage is set toOFF 1...

Page 90: ...t Do not include the area code if it is the same as that of your machine For example 1 8 0 0 5 5 5 1 2 3 4 4 If your pager requires a PIN enter the PIN press press Redial Pause enter your fax number followed by and then press Set For example 1 2 3 4 5 Redial Pause 1 8 0 0 5 2 1 8 4 6 OR If you do not need a PIN press Redial Pause enter the fax number of your machine followed by and then press Set ...

Page 91: ...wer goes out so you won t lose your message Changing Remote Retrieval Access Code Enter your Remote Retrieval Access Code when the machine picks up your call so you can access features remotely The access code is preset to 1 5 9 but you can change this The cannot be changed 1 Press Menu 2 5 3 2 Enter a three digit number from 000 to 999 and then press Set Do not use the same digits that appear in ...

Page 92: ... page 2 When your machine answers and beeps immediately enter your Remote Retrieval Access Code 1 5 9 3 Your machine signals the kinds of messages received 1 long beep Fax message s No long beeps No messages 4 Your machine then prompts you with two short beeps to enter a command If you wait longer than 30 seconds to enter a command your machine hangs up If you enter an invalid command your machine...

Page 93: ... have registered the number your machine will change automatically to FAX FWD ON mode 2 Fax Forwarding 3 Paging 4 FAX FWD No 6 Fax Storage ON 7 Fax Storage OFF You can set FAX STORAGE to ON or OFF 96 Retrieve a fax 2 Retrieve all faxes Enter the number of a remote fax machine to receive stored fax message s See Page 9 6 3 Erase fax from the memory If you hear one long beep you can erase fax messag...

Page 94: ...hine The remote fax machine prints your fax messages Changing Fax Forwarding Number You can change the default setting of your fax forwarding number from a remote fax machine 1 Dial your fax number 2 When your machine answers immediately enter your Remote Retrieval Access Code 1 5 9 3 When you hear two short beeps enter 9 5 4 4 Enter the new telephone number of the remote fax machine up to 20 digi...

Page 95: ...mbers to identify the faxes you must send again Selecting OFF IMAGE will print a portion of the fax s first page on the report to help you remember 1 Press Menu 2 4 1 2 Press or to select OFF OFF IMAGE ON or ON IMAGE and then press Set 3 Press Stop Exit Setting the Fax Activity Report Interval You can set the machine to print activity reports at specific intervals 6 12 24 hours 2 4 or 7 days If yo...

Page 96: ...ed in One Touch and Speed Dial memory in numerical order Lists information about the last 200 incoming and outgoing faxes TX means Transmit RX means Receive Prints a Transmission Verification Report for your last transmission Lists settings for GENERAL SETUP SETUP RECEIVE SETUP SEND SETUP REPORT REMOTE FAX OPT and MISCELLANEOUS To Print a Report 1 Press Reports 2 Press or to select the report you ...

Page 97: ...2 Use the dial pad to enter the number of copies you want up to 99 3 Press Copy Out of Memory Message If the memory becomes full while you are scanning a document to be copied the LCD shows If the OUT OF MEMORY message appears while you are scanning the first page of your original press Stop Exit to cancel You will need to clear some faxes from memory before you can continue Note To Stop the copy ...

Page 98: ...ne returns to its default settings when you finish copying Copying Using Multiple Settings You can try different combinations of settings for the best results After you finish your settings using the Enlarge Reduce or Options keys the LCD shows Press or if you want to select additional settings OR Press Copy if you are finished choosing settings PRESS COPY OR FOR NEXT OPT ...

Page 99: ...o select 50 78 94 100 and then press Set OR For more choices select ZOOM and press Set Use the dial pad to enter any percentage between 50 and 200 5 Press Copy OR Press or for additional settings When selecting a ratio you need to know the size of the paper you registered in Menu 1 1 Selecting the Ratios Press Enlarge Options Press Reduce Options 100 50 104 EXE LTR 78 LGL LTR 150 94 A4 LTR 200 AUT...

Page 100: ... Press Options and or to select OPT COPY MODE and then press Set 4 Press or to choose the type of original and then press Set 5 Press Copy OR Press or for additional settings Copy Contrast You can adjust the copy contrast to make copies darker or lighter 1 Place the original face down in the ADF 2 Use the dial pad to enter the number of copies you want up to 99 3 Press Options and or to select OPT...

Page 101: ... Copy OR Press or for additional settings Special Copy Options You can save paper by copying either two or four pages onto one page 1 Place the original face down in the ADF 2 Use the dial pad to enter the number of copies you want up to 99 3 Press Options and or to select OPT SPECIAL and then press Set 4 Press or to select 2 IN 1 COPYor 4 IN 1 COPY and then press Set 5 Press Copy 2in1 4in1 Specia...

Page 102: ...ange Press Menu and 3 Copy Mode Type of Original You can select the Copy resolution for your type of original The default setting is AUTO which is used for originals that contain both text and photographs TEXT is used for originals containing only text PHOTO is used for copying photographs 1 Press Menu 3 1 2 Press or to choose the type of original AUTO TEXT or PHOTO and then press Set 3 Press Stop...

Page 103: ...ftware Be sure the printing resolution is set to 300 dpi in your DOS application software What Does the Remote Printer Console Do The Remote Printer Console RPC is a utility program that can run in the DOS environment and comprises the following program Remote Printer Console Main Program This program allows you to change various printer settings such as emulation print quality fonts and page setu...

Page 104: ... steps to install the remote printer console program 1 Make sure your Brother machine is connected to your computer and is set to Online 2 Start your computer and go to the DOS prompt If you are in Windows exit and return to the DOS prompt 3 Insert the Brother CD ROM into your CD ROM drive 4 At the DOS prompt C type x Substitute the drive letter of your CD ROM drive for x and then press Enter 5 Ty...

Page 105: ... mouse using the cursor keys and the Enter key or by pressing the hot key commands for that sub menu Menu Press the keys Functions Direct Access Alt D You can directly control the Brother machine with Print Form Printer Setup Alt P You can enter the setting mode to change other printer settings such as margin settings continue mode font and sleep mode Console Config Alt C You can change the enviro...

Page 106: ...er Paper Cassette or Manual Emulation 1 Laser Jet IIP Selects Laser Jet IIP Paper Size 1 Letter Selects the paper size either Letter Legal A4 Executive Monarch COM10 DL C5 B5 A5 or A6 JIS B5 Orientation 1 Portrait Selects the paper direction either Portrait or Landscape Quality 1 Normal Selects the print quality either Normal or Economy Copies 1 1 Sets the number of print copies from 1 to 999 page...

Page 107: ... 0 33 0 5 1 1 5 or 2 Bottom Margin 0 5 Sets the Bottom Margin 0 0 33 0 5 1 1 5 or 2 Line Page 2 Sets the lines pages 5 128 Xoffset 0 Sets the Xoffset vertical value from 0 to 500 dots Yoffset 0 Sets the Yoffset horizontal value from 0 to 500 dots Item Default What This Item Does Font Source Internal Internal Font name Brogham10 Selects a font from any of the printer s internal fonts Brougham 10 12...

Page 108: ...the Help Information within the program Item Default What This Item Does Auto LF Off Selects Auto LF On or Off Auto CR Off Selects Auto CR On or Off Auto Wrap Off Selects Auto Wrap On or Off Auto Skip On Selects Auto Skip On or Off File Function Environment Sets the Buzzer on off Color for Remote Print Console ...

Page 109: ...r Console program to set the printer emulation Remote Printer Console Program for DOS The MFL Pro Suite CD ROM supplied with your machine includes the utility program Remote Printer Console RPC When you operate your computer in the Disk Operating System DOS environment RPC lets you easily change the Brother machine s default settings such as fonts page setup emulations etc RPC also provides a stat...

Page 110: ...s in your application software See Acceptable Paper Page 2 6 Two Sided Printing Manual Duplexing The supplied printer drivers for Windows 95 98 Me and Windows NT Workstation Version 4 0 enable manual duplex printing For more information see the Help screen for the printer driver Please select LPT1 on the printer driver The machine prints all the even numbered pages on one side of the paper first T...

Page 111: ...has a manual feed slot above the paper cassette You can load envelopes and special print media one at a time into this slot You do not have to remove paper from the paper cassette For information about acceptable paper see Page 2 6 Use the manual feed slot to print or copy on labels transparencies card stock thicker paper or envelopes To prevent the possibility of transparencies smudging as they s...

Page 112: ... roller 2 Adjust the manual feed slot to the width of the paper Loading More than One Sheet of Paper 1 Open the Setup dialog box of the Windows printer driver and select Manual Feed in the Paper Source section Follow Steps 1 and 2 to load the first page The machine starts printing automatically 2 After the first page is printed the LCD shows Insert the next sheet of paper to resume printing 3 Repe...

Page 113: ...just the manual feed paper guides to the width of the paper you re using 5 Insert a single sheet of paper into the manual feed slot until the front edge touches the paper feed rollers Let go of the paper as the machine pulls it into position 6 After the machine ejects the printed page return to Step 5 to insert the next sheet of paper The machine will wait until you insert the next sheet of paper ...

Page 114: ...before purchasing large quantities Avoid feeding carrier sheets with labels exposed or your machine will be damaged Avoid using coated paper such as vinyl coated paper Avoid using preprinted or highly textured paper For optimum printing use a recommended type of paper especially plain paper and transparencies For more information on paper specifications consult your nearest Brother authorized sale...

Page 115: ...rint Configuration List You can print a list of current printer settings 1 Press Menu 4 1 2 2 Press Fax Start The machine prints the settings 3 Press Stop Exit Restoring Factory Default Settings You can return the machine to original factory settings Permanent fonts are restored but macros are cleared You can change user settings using the Remote Printer Console program See For DOS Users Chapter 1...

Page 116: ...cription language The printer drivers are on the supplied CD ROM The latest printer driver can also be downloaded from the Brother Solutions Center at http solutions brother com Features in the PCL Printer Driver For Windows Users Only For more detailed information please see the on line Help in the printer driver You can also change settings by clicking the illustration on the left side of the ta...

Page 117: ...R I V E R S E T T I N G S F O R W I N D O W S O N L Y 14 2 Basic Tab 1 Select the Paper size Multiple Page and Orientation 2 Select number of Copies and Media Type 3 Select Paper Source First Page and Other Pages 1 2 3 ...

Page 118: ...r or enlarging the image size for printing on page on multiple sheets of paper Border Line When printing multiple pages on one sheet with the Multiple Page feature you can select to have a solid border dash border or no border around each page on the sheet Orientation Orientation selects the position of how your document will be printed Portrait or Landscape Copies The copies selection sets the nu...

Page 119: ...d for all the copies selected before the next page in the document is printed Media Type You can use the following types of media in your printer For the best print quality select the type of media that you wish to use Plain Paper Thin Paper Thick Paper Thicker Paper Bond Paper Transparencies When using ordinary plain paper select Plain Paper When using heavier weight paper envelopes or rough pape...

Page 120: ... by selecting one of the following icons 1 Print Quality 2 Duplex Printing 3 Watermark 4 Page Setting 5 Device Option Print Quality Resolution You can change the resolution as follows 300 dpi 600 dpi Toner Save You can save running costs by turning on the Toner Save Mode which reduces the print density 1 2 3 4 5 ...

Page 121: ...ghtness Contrast and Graphics Quality options manually Duplex Printing Choosing the Duplex Printing icon displays the Manual Duplex features available Manual Duplex Check the Manual Duplex box and there are six types of duplex directions available for each orientation In this mode the MFC prints all the even numbered pages first Then the printer driver stops and shows the instructions required to ...

Page 122: ...our source file or select one of the preset Watermarks Print Watermark The Print Watermark feature offers printing choices of On all pages On first page only From second page Custom In background With the In background feature checked the Watermark will print behind your document on the page If this feature is not checked then the Watermark will print on top of your document ...

Page 123: ...lick the New button and select Text or Bitmap from the Watermark Style Watermark Text Enter your Watermark text into the Text Box and select the Font Size Darkness and Style Watermark Bitmap Enter the file name and location of your bitmap image in the File box or Browse for the file location You can also set the scaling size of the image Position The position settings offer controls on where the W...

Page 124: ...the Scaling feature 1 Check Off if you want to print the document as it appears on your screen 2 Check Fit to Paper Size if your document has an unusual size or if you have only the standard size paper 3 Check the Free box if you want to reduce or enlarge the output You can also use the Mirror or Reverse Print feature for your page setting ...

Page 125: ...P R I N T E R D R I V E R S E T T I N G S F O R W I N D O W S O N L Y 14 10 Device Options Set one of the following Printer Functions Quick Print Setup Administrator Print Date Time ...

Page 126: ... mouse button on the task tray icon This feature can be set to ON or OFF from the Device Options section Administrator For Windows 95 98 98SE Me Users Only The administrator selection permits the Copy Scaling and Watermark features to be locked and password protected Note Record your password and keep it in a safe place for future reference If you forget your password these settings can not be acc...

Page 127: ...etting button to change the Date and Time Format Position and Font To include a background with the Date and Time select Opaque When Opaque is selected you can set the Darkness of the Date and Time background by changing the percentage Note The Date and Time indicated in the selection box represents the format the will be printed The actual Date and Time printed on your document is automatically r...

Page 128: ...ct the Paper Size from the pull down box and click Update The Paper Source Setting is used when selecting Auto Select in the Basic Tab Default Source The Default Source allows you to choose which paper source will be used when the paper size of the document being sent does not match the Paper Source Settings Available Options In order to access the optional 2nd paper tray the option must be instal...

Page 129: ...date Web sites Brother Solutions Center The Brother Solutions Center is a Web site offering information about your Brother product including FAQ s User Guides Driver updates and Tips for using your machine Web Update Web Update checks the brother web site for updated drivers and automatically downloads and updates the driver on your computer Check Setting The Check Setting selection displays a lis...

Page 130: ...er For Windows 2000 The Windows 2000 printer driver utilizes Microsoft s uni driver architecture The following section describes the driver features and selections available for Windows 2000 General Tab Printing Preferences In the General tab click the Printing Preferences button to access the Layout tab ...

Page 131: ... D R I V E R S E T T I N G S F O R W I N D O W S O N L Y 14 16 Layout Tab 1 Orientation Select the Orientation which is how your document will be positioned on the paper Portrait or Landscape Portrait Landscape 1 2 ...

Page 132: ...Automatically Select Auto Upper Paper Tray Lower Paper Tray optional cassette 2 and Manual Feed Slot When Automatically Select is chosen the machine automatically will choose the cassette with the appropriate size of paper Note The paper size for each paper source must be set in the Device Settings tab for the Automatically Select feature to work properly The Auto option is for machines that can a...

Page 133: ...n using heavier weight paper envelopes or rough paper select Thick Paper or Thicker Paper For OHP transparencies select Transparency Advanced Options Click the Advanced button in the Paper Quality tab to access the screen below 1 Paper Output Paper Size Select the paper size of the document you are printing This size should be the same as the paper size that is set in your application software Cop...

Page 134: ...3 Document Options Advanced Printing Features You can Enable or Disable Advanced Printing Features from this selection If you disable it Page Order Pages Per Sheet Copy and Collate will be disabled Halftoning This selection is for changing the dither pattern to achieve the best print results when printing graphics The choices are as follows Auto Select Super Cell Dither 6 6 Dither 8 8 ...

Page 135: ...paper size set for each source must match the actual size of paper loaded The available options are A4 A5 B5 JIS Executive Legal Letter Installable Options Printer Memory If you installed optional memory in your machine you must select the correct size of total memory in the machine for the driver to access the additional memory Lower Tray If an optional lower tray is installed this selection must...

Page 136: ...ions The Brother Control Center provides three categories of functions 1 Scanning directly to a file E mail word processor or graphic application of choice 2 Copy operations 3 PC Faxing using the Brother PC Fax software MFC 8500 AutoLoad the Brother Control Center The Control Center is initially configured to automatically load each time Windows is started When the Control Center is loaded the Con...

Page 137: ...lications The advantage of using the Scan keys is that you avoid the mouse clicks required to scan from your PC Using the Control Panel Keys Before you can use the Scan keys on the control panel you must have connected the MFC to your Windows based PC and loaded the appropriate Brother Drivers for your version of Windows When you are ready to use the Scan keys make sure the Brother Control Center ...

Page 138: ...iting 1 Place your original face down in the ADF 2 Press Scan OCR 3 The MFC will scan the original perform OCR in ScanSoft TextBridge and then display the result in your word processing application for viewing and editing Scan to E mail You can scan an original into your E mail application as a file attachment Although the Brother Control Center can be configured to send only black and white file ...

Page 139: ...listed for the Word Processor Scanning Operations Scan to File allows you to scan directly to a disk file with two mouse clicks You can change the file type destination directory and file name as needed Scan to E mail enables you with just two mouse clicks to scan a picture or text document directly into an E mail application as a standard attachment You have the option of selecting the file type ...

Page 140: ...r installed on the PC PC Fax Operation Send a Fax allows you to scan a picture or text original and automatically send the image as a fax from the PC using the Brother MFL Pro fax software Scanner Settings for Scan Copy and PC Fax Buttons When the Pop Up screen is displayed you can access the Scanner Settings window Click the Smart Click icon at the top right of the Brother Control Center screen O...

Page 141: ...djuster from 0 to 100 Contrast Slide the adjuster from 0 to 100 Click OK to save your changes If you make a mistake or later decide to return to the original default setting just click the Restore Defaults button when the scanning mode is displayed To Access the Scanner Configuration Screen 1 Place the original in the ADF 2 Right click the appropriate Control Center button to display Configuration...

Page 142: ...o File Scanner Settings From the pull down list select the scanning mode that is appropriate for the type of file Faxing Filing and Copying Text for OCR Photos Photos High Quality Photos Quick Scan Custom Draft Copy or Fine Copy To change any of the settings for that mode click the Modify Settings button ...

Page 143: ...list select the type of file PaperPort Files MAX Self Viewing Files EXE PaperPort 5 0 Files MAX PaperPort 4 0 Files MAX PaperPort 3 0 Files MAX Windows Bitmap BMP PC Paintbrush PCX Multi page PCX DCX JPEG Image Files JPG TIFF Uncompressed TIF TIFF Group 4 TIF TIFF Class F TIF Multi Page TIFF Uncompressed TIF Multi Page TIFF Group 4 TIF Multi Page TIFF Class F TIF PDF Files PDF Portable Network Gra...

Page 144: ...ngs button E mail Application E mail Package From the pull down list select your E mail application E mail Settings Click the EMail Settings button to set up links The Links Preferences window will appear File Attachments Do not convert files Click this checkbox if you do not want to change the file type of attachments The Conversion Options will not be available grayed Convert MAX files only Clic...

Page 145: ...cipient window to be displayed when you choose Scan to E mail This feature works only with MAPI type E mail applications such as Microsoft Exchange Microsoft Outlook and Eudora QuickSend List You can create a list of Email names and addresses for quick selection To add a name s to your QuickSend list click the New button Your Email phone book listing will be displayed so you can select stored name...

Page 146: ...d Processor Scanner Settings From the pull down list select the scanning mode that is appropriate for the type of file Faxing Filing and Copying Text for OCR Photos Photos High Quality Photos Quick Scan Custom Draft Copy or Fine Copy To change any of the settings for that mode click the Modify Settings button ...

Page 147: ...package that was installed with the Brother software Click the OCR Settings button to choose how the OCR application will read the pages you scan into your word processor application The Preferences window will appear Select your setting and click OK Auto Orientation Check this checkbox if you want your word processor application to read the page as it is set up Decolumnized Output Check this chec...

Page 148: ...he type of file Faxing Filing and Copying Text for OCR Photos Photos High Quality Photos Quick Scan Custom Draft Copy or Fine Copy To change any of the settings for that mode click the Modify Settings button Target Application Application From the pull down list select the application you want to add to this Pop Up screen Click the Custom Link Settings button to set up links for your user defined ...

Page 149: ...the type of file Faxing Filing and Copying Text for OCR Photos Photos High Quality Photos Quick Scan Custom Draft Copy or Fine Copy To change any of the settings for that mode click the Modify Settings button Copy Settings Brother MFC 8500 Copies Enter the number of copies you want to print To change the copy options click the Copy Options button Click the OK button to save your Copy settings ...

Page 150: ...uick Scan Custom Draft Copy or Fine Copy To change any of the settings for that mode click the Modify Settings button Fax Settings Brother MFL Pro Fax FAX Resolution Fine 200 200 To change the fax options click the FAX Options button Click the OK button when you are ready to save your FAX settings The Brother PC FAX Properties screen appears Select the Paper Size and Orientation Portrait or Landsc...

Page 151: ...cessed through the PaperPort program group See On Line Documentation for Multi Function Link Pro on the CD ROM The complete ScanSoft PaperPort Owner s Manual including ScanSoft TextBridge OCR is in the On Line Documentation on the CD ROM This chapter is only an introduction to the basic operations When you install Multi Function Link Pro ScanSoft PaperPort for Brother and ScanSoft TextBridge OCR a...

Page 152: ... application on your computer to display it you can also double click a non PaperPort item to open it Organizing Your Items in Folders PaperPort has an easy to use filing system for organizing your items The filing system consists of folders and items that you select to view in Desktop View An item can be a PaperPort item or a non PaperPort item Folders are arranged in a tree structure in the Fold...

Page 153: ... automatically installed with PaperPort when you install Multi Function Link Pro on your computer PaperPort can quickly convert the text on a PaperPort item which is really just a picture of the text into text that you can edit with a word processing application PaperPort uses the optical character recognition application ScanSoft TextBridge which comes with PaperPort OR PaperPort uses your applic...

Page 154: ...ill be displayed 2 Select the drive and directory where you want to store the file 3 Enter the new file name and choose the file type or select a name from the File Name text box You can scroll through the Directories and File Name listing for prompting 4 Select the OK button to save your file or Cancel to return to the PaperPort without saving it Accessing the Scanner To choose the Brother Multi ...

Page 155: ...e to Gray Error Diffusion or True Gray Gray Error Diffusion is used for documents that contain photographic images or graphics Error Diffusion is a method for creating simulated gray images by placing black dots in a specific matrix instead of true gray dots 256 True Gray mode is used for documents containing photographic images or graphics This mode requires the most memory and longest transfer t...

Page 156: ... 1 2 11 in A4 210 297 mm Legal 8 1 2 14 in A5 148 210 mm B5 182 257 mm Executive 7 1 4 10 1 2 in Business Card 60 90 mm Custom User adjustable from 0 35 0 35 in to 8 5 14 in After you select a custom size you can adjust the scanning area further by using the left mouse button to drag the dotted outline of the scanning area This is required when you want to crop an image when scanning Business Card...

Page 157: ... into the PC and will appear in the Scanning Area of the Scanner window 3 To crop a portion of the document to be scanned drag any side or corner of the dotted outline in the Scanning Area with the left mouse button Adjust the dotted outline until it surrounds only the portion of the document you wish to scan 4 Place document in the document feeder of the machine again 5 Adjust the settings for Re...

Page 158: ...pter 16 Using ScanSoft PaperPort for Brother and ScanSoft TextBridge Brother Resource Manager The Brother Resource Manager application must be running for you to use your MFC with your Windows computer Multi Function Link Pro software and the MFL Pro Printer Driver automatically load the Resource Manager as needed The Resource Manager allows the single bi directional Parallel port on the MFC to si...

Page 159: ... the process of uploading the data to the MFC and exiting the remote setup program If an error message is displayed enter the correct data again then click OK Cancel This exits the remote setup application without uploading the data to the MFC Apply This uploads the data to the MFC but does not exit the remote setup application Print This command prints the selected items on the MFC You can not pr...

Page 160: ...ers or Groups in your PC FAX Address Book Then you can use the Address Book Search feature to quickly find them to address your fax Setting Up User Information 1 Access the User Information from the FAX Sending dialog box by clicking OR From the Start menu select Programs Brother Brother MFL Pro Suite and then select PC FAX Setting The Brother PC Fax Setup dialog box will appear 2 Enter the requir...

Page 161: ...ded to access an outside line This is sometimes required by the local PBX telephone system Include header To add header information to the top of the fax pages being sent check the Header box Address Book file You can select different database files for use with the Address Book You must enter the path and file name of the database file or use the Browse button to view the file system to select th...

Page 162: ... 5 SETTING UP AND USING PC FAX FOR WINDOWS ONLY User interface To select User Interface for the sending dialog box You have a choice of the Simple Style or the Facsimile Style Simple Style Facsimile Style ...

Page 163: ...ser interface You can register any address or group on one of the ten Speed Dial buttons To register an address on a Speed Dial location 1 Click the Speed Dial location you want to program 2 Click the address or group you wish to assign to the Speed Dial location 3 Click the Add button to program the Speed Dial location To clear a Speed Dial location 1 Click the Speed Dial location you want to cle...

Page 164: ...7 SETTING UP AND USING PC FAX FOR WINDOWS ONLY The Address Book From the Start menu select Programs Brother Brother MFL Pro Suite and then click Address Book The Brother Address Book dialog box will appear ...

Page 165: ...and delete stored information for members and groups 1 In the Address Book dialog box click the icon to add a member The Brother Address Book Member Setup dialog box will appear 2 In the Brother Address Book Member Setup dialog box type the member s information Name and Fax are required fields Click the OK button to save the member s information ...

Page 166: ...up Setup dialog box appears 2 Type the name of the new group in the Group Name field 3 In the Available Names box select each member to be included in the Group and then click Add Members you add to the group will be listed in the Group Members box 4 After all the members have been added click OK Editing Member Information To edit a Member or Group 1 Select the Member or Group you want to edit 2 C...

Page 167: ... telephone book 1 From the Address Book select File point to Export and then click Text OR Click Vcard and go to Step 5 2 Select the data fields you wish to Export from the Available Items column and then click Add 3 If you are exporting to an ASCII file select Divide Character Tab or Comma This selection inserts a Tab or Comma between each data field when it is Exported 4 Select the OK button to ...

Page 168: ... import an ASCII text file 1 From the Address Book select File point to Import and then click Text OR Click Vcard and go to Step 5 2 Select the data fields you wish to Import from the Available Items column and then click Add 3 Select Divide Character Tab or Comma based on what file format you are importing 4 Select the OK button to import the data Note Select items in the order you want them list...

Page 169: ...NDOWS ONLY 17 12 5 Type the name of the file and then select Open Setting Up Cover Page Access the Brother PC FAX Cover Page Setting from the FAX Sending dialog box by clicking The Brother PC FAX Cover Page Setup dialog box will appear ...

Page 170: ...want Import BMP file You can insert a bitmap file such as your company logo in the cover page Select the BMP file by using the browse button and then select the alignment style Count Cover Page When this box is checked the Cover Page will be included in the page numbering When this box is not checked the Cover Page will not be included Note If you are sending a fax to multiple recipients the recip...

Page 171: ...r PC FAX as your printer and then click OK The FAX Sending dialog box will appear 4 In the To field type the fax number of the receiving party You can also use the Address Book to select destination fax numbers If you made a mistake entering a number click the Clear button to clear all entries 5 To send a Cover Page and note click the Cover Page check box 6 When you are ready to send your fax clic...

Page 172: ...PC FAX Using the Facsimile Style 1 Create a file in Word Excel Paint Draw or any other application on your PC 2 From the File menu select Print The Print dialog box will appear 3 Select Brother PC FAX as your printer and then click OK The FAX Sending dialog box will appear ...

Page 173: ...u wish to cancel the fax click Stop Setting Up PC FAX Receiving You can set up your PC to receive incoming faxes into your PC Setting Up Your MFC 1 Press Menu 2 1 8 2 Press or to select ON or OFF and then press Set 3 Press Stop Exit Running PC FAX Receiving Form the Start menu select Program File Brother Brother MFL Pro Suite and then select PC FAX Receiving The PC FAX icon will appear on your PC ...

Page 174: ... Format is checked for max Default Required to use with PaperPort 6 If you want to you can check the Play wave file when receiving FAX check box and then enter the path 7 To load PC FAX receiving automatically when you statup Windows select the Add to Startup folder check box Viewing New PC FAX Messages Each time you start to receive a PC FAX the Blue and Red icons will blink on the PC Task Bar Th...

Page 175: ...ive and print e mail data at the same time by searching for a specified character string in the mail header It allows you to see the sender subject and relevant part of the mail content To Access the On Line Documentation To Install Automatic E mail Printing Optional Application 1 Insert MFL Pro CD ROM into your CD ROM drive 2 Click on Install Software from the main CD ROM screen 3 Click Automatic...

Page 176: ...le Macintosh must be set up with Mac OS 8 5 8 51 8 6 9 0 9 0 4 9 1 The Brother Scanner Driver works only with Mac OS 8 6 9 0 9 0 4 9 1 Using Brother Printer Driver with Your Apple Macintosh To select the Printer 1 From the Apple menu open the Chooser 2 Click HL 1200 MFL Pro icon On the right side of the Chooser click the printer to which you want to print Close the Chooser Note Before you can conn...

Page 177: ...select Page Setup You can change the settings for Paper Size Orientation and Scaling and then click OK 4 From application software such as PaperPort click File menu and select Print Click Print to start printing Note If you want to change Copies Pages Resolution Paper Source and Media Type select your settings before clicking Print Option Setup allows you to select Duplex ...

Page 178: ...using the following steps 1 Create a document in a Macintosh application 2 To begin the fax transmission select Print from the File menu The Printer dialog box appears When Printer is selected the top button shows Print and the Address button is grayed 3 From the Output pop up menu select Facsimile When Facsimile is selected the top button shows Send Fax and the Address button is available ...

Page 179: ...stination Fax Numbers box 6 If you want to you can add your new recipients to the Address Book at this time by clicking New to open the Address Book dialog box See Adding a New Member page 19 5 OR You can add a new group by clicking Group See Adding a New Group page 19 6 7 If you are finished addressing your fax click Send Fax Click OK to return to the Send Fax dialog box Note You can select sever...

Page 180: ...ou are addressing a fax Adding a New Member 1 To add a new member to the Address Book in the Facsimile dialog box click Address The Address Book dialog box appears 2 Click New The following dialog box appears 3 Type the name and fax number 4 If you want to you can store a comment in the Memo field if you wish up to 15 characters 5 Click OK to return to the Address Book dialog box ...

Page 181: ... In the Group Name field type a name for your Group 3 From the Stored Fax Numbers box select the recipients for your Group and then click Your selection will appear in the box under the Group Name field 4 Click OK The Address Book dialog box reappears 5 Click OK The Print Facsimile dialog box reappears 6 If you are ready to send your fax click Send Fax Follow the steps on page 19 3 for sending a f...

Page 182: ...C IBOOK Using Brother TWAIN Scanner Driver with Your Apple Macintosh The Brother MFC software includes a TWAIN Scanner driver for Macintosh This Macintosh TWAIN Scanner driver can be used with application that supports the TWAIN specification You can use PaperPort for scanning ...

Page 183: ... the Select Source and then click the PaperPort icon Afterward for each original you scan choose Acquire Image by clicking the PaperPort icon The Scanner setup dialog box will appear Scanning a Document into Your Macintosh G3 G4 or iMac 1 Place the original in the ADF 2 Adjust the following settings if needed in the scanner setup dialog box Resolution Color Type Brightness Contrast Scanning Area 3...

Page 184: ...ifferent resolutions See Specification Scanning Area Set the Size to one of the following Letter 8 5 11 inches A4 210 297 mm Legal 8 5 14 inches A5 148 210 mm B5 182 257 mm Executive 7 25 10 5 inches Business Card 90 60 mm Custom User adjustable from 0 35 0 35 inches to 8 5 14 inches After you choose a custom size you can adjust the scanning area Click and hold the mouse button as you drag the mou...

Page 185: ...e brightness level by dragging the slidebar to the right to lighten the image or to the left to darken the image You can also type a value in the box to set the setting Click OK If the scanned image is too light set a lower brightness value and scan the document again If the image is too dark set a higher brightness value and scan the document again Contrast The contrast setting is adjustable only...

Page 186: ...Start to scan the image 1 Insert the original face down in the ADF 2 Click PreScan The entire original will be scanned into your Macintosh G3 or iMac and will appear in the Scanning Area of the Scanner dialog box 3 To scan a portion of the prescanned image click and drag the mouse to crop it 4 Insert original in the ADF of the Brother MFC again 5 Adjust the settings for Resolution Color Type Gray ...

Page 187: ... Cassette 2 holds up to 250 sheets of 20 lb 75 g m2 paper Multi purpose Paper Cassette 2 Holds approx 250 sheets of 20 lb 75 g m2 Basis Weight 16 to 28 lb 60 to 105 g m2 Caliper 0 003 to 0 005 inches 0 08 to 0 13 mm Moisture Content 4 to 6 by weight Smoothness 100 to 250 Sheffield We Recommend Cut sheet Xerox 4200 DP 20 lb Champion Paper One 20 lb Hammermill Laser Paper 24 lb ...

Page 188: ...be connected to the telephone line or premises wiring using a compatible modular jack that is Part 68 compliant See the Installation section of this manual for details The REN is useful to determine the quantity of devices you may connect to your telephone line and still have those devices ring when your telephone number is called In most but not all areas the sum of the RENs of all devices connec...

Page 189: ... warranties extended or granted by this document Laser Safety This equipment is certified as a Class I laser product under the U S Department of Health and Human Services DHHS Radiation Performance Standard according to the Radiation Control for Health and Safety Act of 1968 This means that the equipment does not produce hazardous laser radiation Since radiation emitted inside the equipment is com...

Page 190: ...his equipment has been tested and found to comply with the limits for a Class B digital device pursuant to Part 15 of the FCC Rules These limits are designed to provide reasonable protection against harmful interference in a residential installation This equipment generates uses and can radiate radio frequency energy and if not installed and used in accordance with the instructions may cause harmf...

Page 191: ...ructions 2 Save them for later reference 3 Follow all warnings and instructions marked on the product 4 Unplug this product from the wall outlet before cleaning Do not use liquid or aerosol cleaners Use a damp cloth for cleaning 5 Do not place this product on an unstable cart stand or table The product may fall causing serious damage to the product 6 Slots and openings in the cabinet and the back ...

Page 192: ...nnected quickly 13 Unplug this product from the wall outlet and refer servicing to Authorized Service Personnel under the following conditions A When the power cord is damaged or frayed B If liquid has been spilled into the product C If the product has been exposed to rain or water D If the product does not operate normally when the operating instructions are followed Adjust only those controls th...

Page 193: ...sh is a registered trademark and iMac is a trademark of Apple Computer Inc TextBridge and PaperPort are registered trademarks of ScanSoft Inc Windows Microsoft MS DOS Excel and Word are registered trademarks of Microsoft in the U S and other countries NT is a trademark of Northern Telecom Limited TrueType is a trademark of Apple Computer Inc Centronics is a trademark of Genicom Corporation Epson i...

Page 194: ...e Action CHANGE DRUM SOON The drum unit is near the end of its life Use the drum unit until you have a print quality problem then replace the drum unit with a new one The drum counter was not reset 1 Open the front cover and then press Clear 2 Press 1 to reset CHECK PAPER CHECK PAPER 1 CHECK PAPER 2 The machine is out of paper or paper is not properly loaded in the paper cassette Refill the casset...

Page 195: ...t feed properly or document was too long Do not pull paper out until you read Page 22 4 MACHINE ERROR XX Machine has a mechanical problem Turn the power off Then call Brother Customer Service at In USA 1 800 284 4329 In Canada 1 877 BROTHER In Montreal 1 514 685 6464 OUT OF MEMORY May occur when the machine is used as a printer Machine memory capacity has been exceeded If you have installed the Wi...

Page 196: ...ervice and tell them the Machine Error number at In USA 1 800 284 4329 In Canada 1 877 BROTHER In Montreal 1 514 685 6464 PAPER JAM The paper is jammed in the machine Do not pull the paper out until you see page 22 4 TONER EMPTY Toner cartridge is not installed OR Toner is used up and printing is not possible Reinstall the toner cartridge OR Replace the toner cartridge with a new one See Page 22 1...

Page 197: ... Jam Before you can clear a printer jam error you must find out where the paper is stuck See the following three types of paper jams WARNING Do not use force to pull the jammed paper from the paper tray because you may damage the machine and cause toner to scatter on the next printed pages After you use the machine some internal parts are extremely HOT When you open the front or the rear cover nev...

Page 198: ...en the front cover 2 Remove the drum unit but do not force it if it cannot be removed easily Instead pull the edge of the jammed paper from the paper cassette 3 Gently pull out the jammed paper 4 Reinstall the drum unit 5 Close the front cover Paper is Jammed in the Fuser Unit 1 Open the rear cover 2 Pull out jammed paper When you have to pull paper out the back of the machine the fuser may get di...

Page 199: ...or 1 514 685 6464 in Montreal Fax Machine Hears voice as CNG tone If your fax machine is set to Easy Receive ON it is more sensitive to sounds Your fax machine may mistakenly interpret certain voices or music on the line as a calling fax machine and respond with fax receiving tones Deactivate the fax by pressing 51 if you are at an extension phone or press Stop Exit if you are at the fax machine o...

Page 200: ...party says the picture is not clear Sometimes the resolution mode you chose when you sent your fax may not have been appropriate Send the fax again but try using the FINE or SUPERFINE mode Also your machine s scanner may be dirty so try cleaning it See Page 22 16 When the receiving says vertical streaks appear on the faxes they receive Your machine s scanner may be dirty or the party receiving par...

Page 201: ... and a fax communication signal comes through on Call Waiting Caller ID you can verify that the second call is a fax by switching to it You have the option to receive the fax call by asking the first caller to hang up to clear the line Copy Quality Difficulties Vertical streaks appear in copies Sometimes you may see vertical streaks on your copies Either the scanner or the primary corona wire for ...

Page 202: ...ot print from my application software Make sure the Windows printer driver is installed and you select it in your application software DOS Setup Printing Difficulties I cannot print from my application software Check that the DOS application software interface settings match those of your printer for example if you are using a parallel printer cable you would probably set your DOS software printer...

Page 203: ...out of paper or not properly installed If it is empty load a new stack of paper into the feeder If there is paper in the multi purpose paper cassette make sure it is straight If the paper is curled you should straighten it Sometimes it is helpful to remove the paper turn the stack over and put it back into the multi purpose paper cassette Reduce the amount of paper in the multi purpose paper casse...

Page 204: ...SOON replace the drum unit with a new one Check the machine s environment conditions such as high humidity may cause this situation to occur Toner scatters and stains the printed page Scattering Toner Adjust the print conditions by setting the Print Density function Remove the drum unit and clean the machine s interior See Routine Maintenance Cleaning the Printer and Cleaning the Drum Unit on Page...

Page 205: ...mperatures etc may cause this condition to occur Make sure the machine is placed on a flat horizontal surface Remove the drum unit with the toner cartridge installed Try rocking them from side to side You may clear a blurred page by wiping the scanner windows with a clean soft cloth See Routine Maintenance Cleaning the Printer and Cleaning the Drum Unit on Pages 22 16 and 22 17 If a blurred page o...

Page 206: ... and unplug MFC from the AC outlet 2 Open the front cover 3 Remove the drum unit Caution Remove the drum unit and toner cartridge assembly Leave the toner cartridge installed in the drum unit 4 Place the drum unit and toner cartridge assembly into the plastic bag and seal the bag 5 Close the front cover Fold down the front output bin extension Remove the telephone line cord document tray document ...

Page 207: ...lly pick up the machine and remove Cassette 2 to pack it separately 8 Pack additional parts cord paper cassette printed materials into the carton Note If you are returing the MFC to Brother as part of the Exchange Service pack only the MFC Keep all separate parts to use with your Exchange machine Cassette 2 Bottom Layer ...

Page 208: ...22 15 T R O U B L E S H O O T I N G A N D R O U T I N E M A I N T E N A N C E 9 Close the carton and tape it shut Middle Layer Top Layer ...

Page 209: ...hone line 2 Lift the control panel cover 3 Clean the white bar and glass cover under the white bar Moisten a small clean soft lint free cloth with isopropyl alcohol and carefully remove dirt from the glass cover and the white bar Cleaning the Printer Caution Do not use isopropyl alcohol to remove dirt from the control panel It may crack the panel Do not use isopropyl alcohol to clean the scanner w...

Page 210: ...ndow by wiping with a clean soft dry cloth Do not use isopropyl alcohol Cleaning the Drum Unit We recommend placing the drum unit on a drop cloth or large disposable paper to avoid spilling and scattering toner 1 Clean the primary corona wire inside the drum unit by gently sliding the tab from right to left several times 2 Return the tab and snap it into the home position Caution If the tab is not...

Page 211: ...cs It is a good idea to keep a new toner cartridge ready for use when you see the toner low warning Discard the used toner cartridge according to local regulations If you are not sure of them consult Brother Customer Service Be sure to seal the toner cartridge tightly so toner powder does not spill out of the cartridge When discarding used toner cartridges keep them separate from domestic garbage ...

Page 212: ... drum unit on a drop cloth or large piece of disposable paper to avoid spilling and scattering the toner 2 Hold down the lock lever on the right as you pull the toner cartridge out of the drum unit assembly Caution Handle the toner cartridge carefully If toner scatters on your hands or clothes immediately wipe it off or wash it with cold water 3 Unpack the new toner cartridge Place the used toner ...

Page 213: ...e top print quality Using another brand of toner cartridge may void your machine s warranty 4 Gently rock the toner cartidge from side to side five or six times to distribute the toner evenly inside the cartridge 5 Remove the protective cover 6 Install the new toner cartridge into the drum unit until it clicks into place 7 Clean the primary corona wire inside the drum unit by gently sliding the bl...

Page 214: ...e Page 22 17 Caution When removing the drum unit handle it carefully because it contains toner If toner scatters and your hands or clothes get dirty immediately wipe or wash with cold water WARNING Just after you have used the machine some internal parts of the machine are extremely HOT So please be careful The drum unit is a consumable item and it is necessary to replace it periodically There are...

Page 215: ...the new drum unit keeping the front cover open 7 Press Clear 8 Press 1 and when the LCD shows ACCEPTED and close the front cover Caution If toner scatters and your hands or clothes get dirty immediately wipe off or wash with cold water Checking the Drum Life You can see the percentage of the drum s life that remains available 1 Press Menu 2 0 3 2 For five seconds the LCD shows the available percen...

Page 216: ...hone and can switch back and forth between two calls Cancel Job Cancels a programmed job like Delayed Fax or Polling CNG tones Special tones beeps sent by fax machines during automatic transmission telling the receiving machine that a fax machine is calling communication error or Comm Error An error during fax sending or fax receiving usually caused by line noise or static coding method Method of ...

Page 217: ...TAD Telephone Answering Device or telephone that is plugged into the EXT jack of your machine F T Ring Time The length of time the machine rings when the receive mode setting is FAX TEL to notify you to pick up a voice call that it answered Fax Activity Report Lists information about the last 200 incoming and outgoing faxes TX means Transmit RX means Receive Fax Forwarding Sends a fax received int...

Page 218: ... your fax unit to call your pager when a fax is received into its memory Pause Allows you to place a 3 5 second delay in the dialing sequence stored in One Touch and Speed Dial numbers Photo mode A resolution setting that uses varying shades of gray for the best representation of photographs Polling The process of a fax machine calling another fax machine to retrieve waiting fax messages print red...

Page 219: ...ct certain options for each fax transmission without changing the default settings Tone A form of dialing on the telephone line used for Touch Tone telephones toner cartridge Accessory that holds toner for the drum unit on Brother laser models Toner Save A process of affixing less toner to the page to extend the life of the toner cartridge This will make the print on received documents significant...

Page 220: ...mm Printing Width 8 2 inches 208 mm Scanning Width 8 15 inches 207 mm Paper Size Letter Legal A4 Automatic Document Feeder ADF Up to 30 sheets 20 lbs Multi purpose Paper Cassette 250 sheets 20 lbs Gray Scale 64 levels Polling Types Standard or Sequential Contrast Control Automatic Super Light Super Dark manual setting Resolution Horizontal Vertical 203 dot inch 8 dot mm Standard 98 line inch 3 85 ...

Page 221: ...y Normal printing mode Economy printing mode saves up to 50 of the normal toner usage Print Speed Up to 15 pages minute when loading letter size or Letter paper from paper cassette Consumable Items Toner cartridge Life Expectancy Up to 6 000 pages high yield toner cartridges Up to 3 000 pages standard toner cartridges when printing letter size or A4 paper at 5 print coverage Toner life expectancy ...

Page 222: ...B A Stand by 30 dB A Humidity Operating 20 to 80 without condensation Storage 20 to 80 without condensation Dimensions 17 1 17 4 12 7 inches 435 442 323 mm Weight 26 4 lbs 12 kg CPU Pentium 75MHz 75MHz 133MHz 150MHz For Windows Operating System 95 98 98SE NT Workstation4 0 2000 Professional Me RAM 24MB 32MB recommended 32MB 64MB recommended 64MB 128MB recommended 32MB 64MB recommended Hard Disk Sp...

Page 223: ...re available for the above Pin Assignment Pin No Signal Direction Pin No Signal Direction 1 DATA STROBE Input 19 0V S G 2 DATA 1 Input 20 0V S G 3 DATA 2 Input 21 0V S G 4 DATA 3 Input 22 0V S G 5 DATA 4 Input 23 0V S G 6 DATA 5 Input 24 0V S G 7 DATA 6 Input 25 0V S G 8 DATA 7 Input 26 0V S G 9 DATA 8 Input 27 0V S G 10 ACKNLG Output 28 0V S G 11 BUSY Output 29 0V S G 12 PE Output 30 0V S G 13 SL...

Page 224: ...sh ISO4 UK ISO16 Portuguese ISO25 French ISO84 Portuguese ISO69 French ISO85 Spanish HP German PC 8 ISO21 German PC 8 D N ISO15 Italian PC 8 Turkish ISO6 ASCII PC 850 Legal PC 852 ISO2 IRV PC 860 PC 863 PC 865 If you want to know which characters are in each symbol character set print the CHARSETS PRN file from The Print Form option in the Direct Access Menu of the Remote Printer Console Program ...

Page 225: ... shows characters available only in the corresponding character set The numbers at the top of the table are code values with which characters are to be replaced in the Roman 8 character set For other characters see character set of Roman 8 ...

Page 226: ...v Brother Control Center using and configurating 15 1 to 15 15 C Call Waiting Caller ID 8 4 Caller ID 8 3 CallManage 8 5 canceling Fax Forwarding 9 1 9 5 9 6 fax jobs in memory 5 8 jobs awaiting redial 6 4 Paging 9 5 Connecting Multi line PBX 2 14 control panel 1 3 converting telephone wall outlets 2 12 Copy contrast 11 6 default settings 11 6 keys 11 1 Copy Settings 11 2 copy ies enlarging 11 3 m...

Page 227: ...ode 9 3 Telephone Answer Code 5 5 troubleshooting 5 5 Fax Forwarding changing remotely 9 5 9 6 programming a number 9 1 Fax Storage printing from 5 6 setting 9 3 fax es stand alone receiving 5 1 difficulty 22 6 erasing from memory 9 5 forwarding 9 1 9 5 polling 5 6 reducing to fit on paper 5 3 sending 6 5 automatic fax redial 6 2 automatic transmission 6 2 Broadcasting 7 6 canceling from memory 6 ...

Page 228: ...ending faxes 6 9 P packing list 2 1 Paging programming a number 9 2 paper size 2 6 4 1 specifications S 1 paper jam 22 4 PaperPort 16 1 PaperPort for Brother exporting an image file 16 4 prescanning an image 16 7 scanning into PC accessing 16 4 exporting 16 4 importing 16 3 settings 16 5 uninstall 16 1 viewing faxes and files 16 2 pause 7 7 PC FAX For Windows 17 3 sending address book 17 7 cover p...

Page 229: ...13 6 Sleep mode 4 8 Software for DOS users 12 1 using Brother Control Center 15 1 ScanSoft Paper Port 16 1 software using ScanSoft PaperPort TextBridge OCR 16 1 Speaker Volume 4 5 Speed Dial changing 7 2 dialing 7 5 storing 7 2 Station ID fax header 4 3 Federal regulation 4 4 T TAD telephone answering device external connecting 2 10 receive mode 5 1 recording outgoing message 2 11 Telephone Answer...

Page 230: ...pture to PC 16 1 Voice calls FAX TEL double ring 5 2 voice mail Volume setting beeper 4 5 handset 4 6 amplify for Hearing impaired 4 7 ring 4 5 speaker 4 5 W Warranties Canada vi Notice of Disclaimer iii USA iv v Windows 13 1 ...

Page 231: ...e Access Code 1 Dial your fax number from a fax machine using touch tone 2 When your machine answers and beeps immediately enter your Remote Retrieval Access Code 159 3 Your machine signals the kinds of messages received 1 long beep Fax message s No beeps No messages 4 After 2 short beeps enter a command 5 Press 9 0 to reset your machine when you finish 6 Hang up 1 4 Press 9 7 1 1 long beep Fax me...

Page 232: ...ieve all faxes press 2 then enter the number of remote fax machine and press After the beep hang up and wait Erase all fax messages press 3 Changing Remote Retrieval Access Code 1 2 Enter a three digit number from 000 to 999 The cannot be changed 3 Press Set 4 Press Stop Exit Remote Commands C HANGE P AGING F AX F ORWARDING S ETTING Press 9 5 then to Turn feature off press 1 Select Fax Forwarding ...

Page 233: ...a representative designated by the supplier Any repairs or alterations made by the user to this equipment or equipment malfunctions may give the telecommunications company cause to request the user to disconnect the equipment Users should ensure for their own protection that the electrical ground connections of the power utility telephone lines and internal metallic water pipe system if present ar...

Page 234: ...center may not be compatible with the power available in foreign countries Using USA or CANADA models overseas is at your own risk and will void your warranty Brother International Corporation 100 Somerset Corporate Boulevard P O Box 6911 Bridgewater NJ 08807 0911 USA Brother International Corporation Canada Ltd 1 rue Hôtel de Ville Dollard des Ormeaux QC CANADA H9B 3H6 Visit us on the World Wide ...

Reviews: