5-06
5. ADJUSTMENTS
LZ2-B850,B851
r
u
w
t
q
e
w
A
1
2
A
1
2
C
1
2
C
1
2
For zigzag width 8mm
B850W, B851
1051S
1050S
For zigzag width 5mm
B850-1
0601M
0602M
y
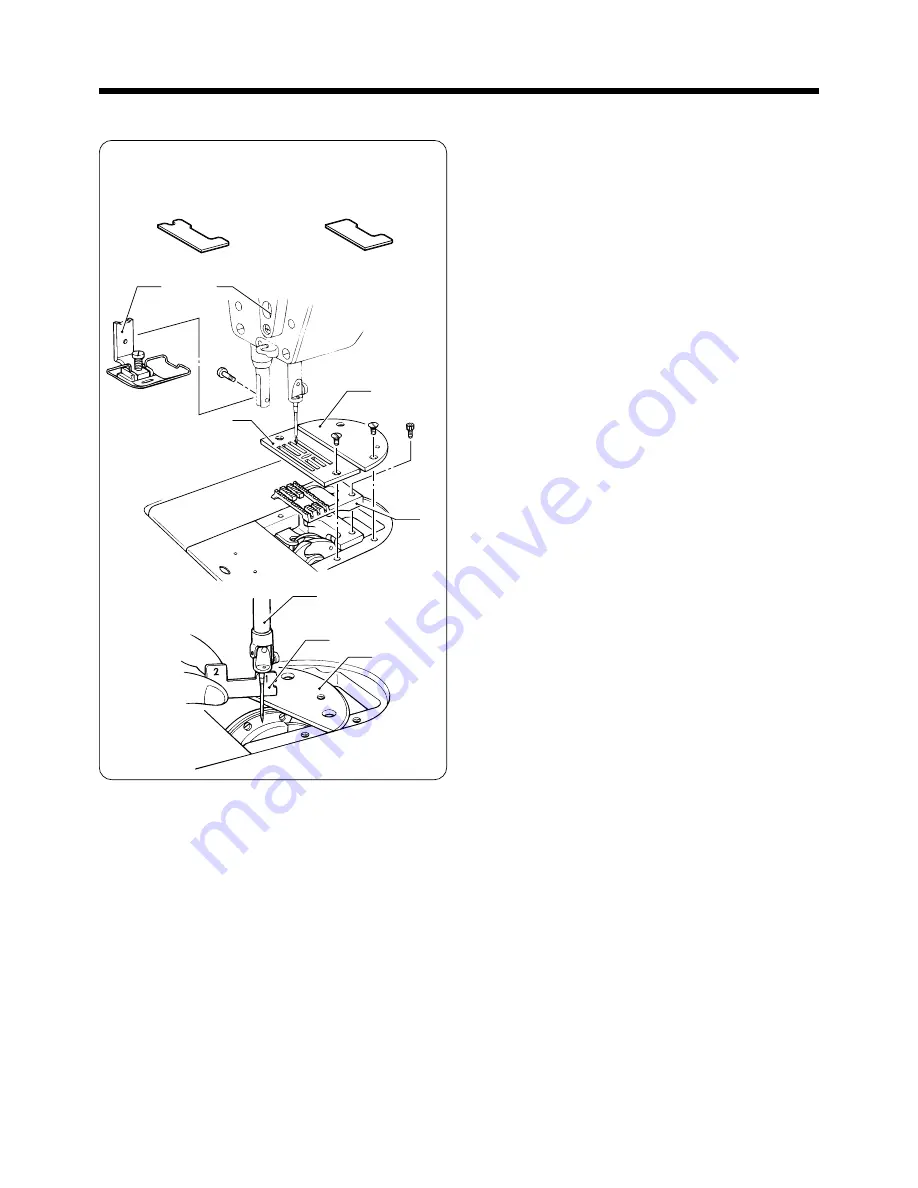
5-8. Adjusting the needle bar height
When the needle bar
q
is at its lowest position, the dis-
tance from the top of the auxiliary needle plate
w
to the
bottom edge of the needle bar
q
should be the same as
the height of accessory timing gauge 1
e
.
1. Remove the presser foot
r
, needle plate
t
, auxiliary
needle plate
w
and feed dog
y
.
2. Place the auxiliary needle plate
w
on the needle plate
installation surface of the machine bed.
3. Turn the machine pulley to move the needle bar
q
to
its lowest position.
4. Loosen the screw
u
.
5. Move the needle bar
q
up or down to adjust the dis-
tance from the top of the auxiliary needle plate
w
to
the bottom edge of the needle bar
q
so that it is the
same as the height of accessory timing gauge 1
e
.
Note:
The needle plate
t
and the auxiliary needle plate
w
are of different thicknesses, so be sure to use the aux-
iliary needle plate
w
.
6. Securely tighten the screw
u
.
7. Install the presser foot
r
, needle plate
t
, auxiliary
needle plate
w
and feed dog
y
.
*
When adjusting the needle bar height, be sure to ad-
just “5-15. Adjusting the needle and rotary hook tim-
ing” also. (Refer to page 5-12.)
*
When remove the feed dog. be sure to adjust “5-5.
Adjusting the forward/back, right/left position of the
feed dog”. (Refer to page 5-03.)


