background image

R

Lower Tray Unit for HL-2400C

Color Laser Printer

SERVICE MANUAL

MODEL: LT-24CL

Feb., 1999
54S004BE0

Summary of Contents for LT-24CL

Page 1: ...R Lower Tray Unit for HL 2400C Color Laser Printer SERVICE MANUAL MODEL LT 24CL Feb 1999 54S004BE0 ...

Page 2: ...art of this publication may be reproduced in any form or by any means without permission in writing from the publisher Specifications are subject to change without notice Trademarks The brother logo is a registered trademark of Brother Industries Ltd ...

Page 3: ...nd unit This service manual covers the LT 24CL lower tray unit Information in this manual is subject to change due to improvement or re design of the product All relevant information in such cases will be supplied in service information bulletins Technical Information A thorough understanding of this unit based on information in this service manual and service information bulletins is required for...

Page 4: ...3 3 1 Install the lower tray unit to the printer 5 3 3 2 Connect the LT signal connector into the printer 8 3 3 3 Install the covers 9 3 3 4 Relocate the printer Test print 9 4 MAINTENANCE 10 4 1 DAILY MAINTENANCE 10 4 2 PERIODIC MAINTENANCE 10 5 DISASSEMBLY PROCEDURE 11 5 1 PAPER SENSOR OHP SENSOR 12 5 2 PAPER SIZE SENSOR 12 5 3 PAPER FEEDING CLUTCH 12 5 4 PAPER FEEDING ROLLER SEPARATION PAD 13 6...

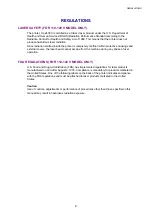
Page 5: ...and external covers the laser beam cannot escape from the machine during any phase of user operation FDA REGULATIONS FOR 110 120 V MODEL ONLY U S Food and Drug Administration FDA has implemented regulations for laser products manufactured on and after August 2 1976 Compliance is mandatory for products marketed in the United States One of the following labels on the back of the printer indicates co...

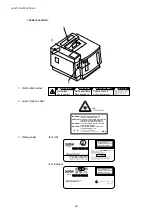
Page 6: ...is attached near the scanner unit 5mW 780nm 800nm DANGER INVISIBLE LASER RADIATION WHEN OPEN AVOID DIRECT EXPOSURE TO BEAM VORSICHT UNSICHTBARE LASERSTRAHLUNG WENN ABDECKUNG GEÖFFNET UND SICHERHEITSVERRIEGELUNG ÜBERBRÜCKT NICHT DEM STRAHL AUSSETZEN DANGER RAYON LASER INVISIBLE LORS DE L OUVER TURE EVITER L EXPOSITION DIRECTE PELIGRO RADIACION LASER INVISIBLE AL ABRIR EVITAR LA EXPOSICION DIRECTA A...

Page 7: ...l be aware of the potential of human injuries Follow the recommended precautions and safety operation practices Understanding Signal Words DANGER is used to indicate the presence of a hazard which will cause severe human injuries or a fatal accident if the warning is ignored WARNING is used to indicate the presence of a hazard or unsafe practices which may cause severe human injuries or a fatal ac...

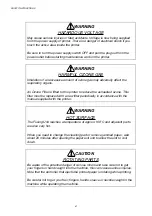
Page 8: ...ted ozone This filter must be replaced with a new filter periodically in accordance with the manual supplied with the printer WARNING HOT SURFACE The Fusing Unit reaches a temperature of approx 160 C and adjacent parts are also very hot When you need to change the cleaning pad or remove jammed paper wait about 20 minutes after opening the paper exit unit to allow the unit to cool down CAUTION ROTA...

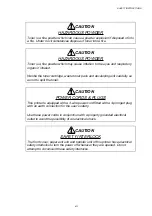
Page 9: ...eveloping unit carefully so as not to spill the toner CAUTION POWER CORDS PLUGS This printer is equipped with a 3 wire power cord fitted with a 3 pronged plug with an earth connection for the user s safety Use these power cords in conjunction with a properly grounded electrical outlet to avoid the possibility of an electrical shock CAUTION SAFETY INTERLOCK The front cover paper exit unit and trans...

Page 10: ... SERIES COVERED BY ONE OR MORE FOLLOWING PATENTS U 5 2 4 9 2 L 7 H 1 1 1 1 0 1 MADE IN JAPAN CLASS 1 LASER PRODUCT APPAREIL Å LASER DE CLASSE 1 LASER KLASSE 1 PRODUKT MANUFACTURED BROTHER INDUSTRIES LTD 15 1 Naeshiro cho Mizuho ku Nagoya 467 Japan This product complies with FDA radiation performance standards 21 CFR Subchapter J This device complies with Part 15 of the FCC Rules Operation is subje...

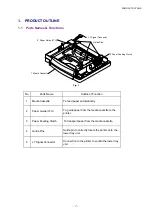
Page 11: ... guide paper from the media cassette to the printer 3 Paper Feeding Clutch To transport paper from the media cassette 4 Guide Pins Guide pin to correctly locate the printer onto the lower tray unit 5 LT Signal Connector Connection to the printer to control the lower tray unit 5 LT Signal Connector 3 Paper Feeding Clutch 2 Paper Guide LTU 1 Media Cassette 4 Guide Pins ...

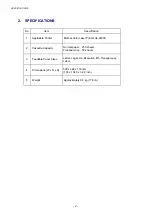
Page 12: ...Brother Color Laser Printer HL 2400C 2 Cassette Capacity Normal paper 250 sheets Transparency 50 sheets 3 Feedable Paper Sizes Letter Legal A4 Executive B5 Transparency Label 4 Dimensions W x D x H 500 x 484 x 116 mm 139 x 134 5 x 32 2 inch 5 Weight Approximately 8 0 kg 17 6 lb ...

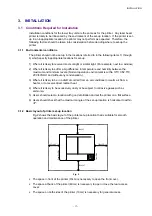
Page 13: ... maximum and minimum levels Normal operation environment is within 10 C 32 5 C 20 80 RH and without any condensation 3 Where it is likely to be in a draft of cold air from an air conditioner or warm air from a heater or to receive direct radiant heat 4 Where it is likely to be excessively dusty or be subject to corrosive gases such as ammonia 5 Users should select a location with good ventilation ...

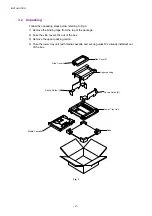
Page 14: ... the top of the package 2 Take the side covers R L out of the box 3 Remove the upper packing carton 4 Take the lower tray unit with media cassette and set up guides R L already installed out of the box Fig 3 Side Cover R Lower Tray Unit Set up Guide R Upper packing Base Media Cassette Set up Guide L Side Cover L ...

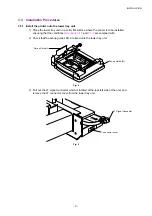
Page 15: ...talled ensuring that the conditions in sections 3 1 1 and 3 1 2 are complied with 2 Check that the set up guides R L are fixed onto the lower tray unit Fig 4 3 Pull out the LT signal connector which is located at the rear left side of the unit and remove the LT connector cover from the lower tray unit Fig 5 LT connector cover Set up Guide R Set up Guide L LT Signal Connector ...

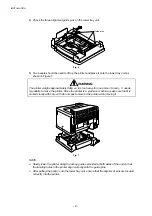
Page 16: ... needs two adults to move the printer Since the printer is a precision machine make sure that it is carried slowly with care so that no impact occurs to the printer while moving it Fig 7 NOTE Slowly lower the printer along the set up guides provided at both sides of the unit so that the locating holes in the printer align correctly with the guide pins After putting the printer onto the lower tray ...

Page 17: ...tal fixtures into both sides of the lower tray unit from above 8 Tighten the screws to secure the fixtures Fig 9 NOTE Check that the two metal fixtures and the two screws were supplied with the lower tray unit Lower Tray Unit Metal Fixture Screw Printer Set up Guide R Set up Guide L ...

Page 18: ...gnal connector into the connector of the printer NOTE Connect the LT signal connector into the printer connector correctly until it clicks as it locks into position 3 Install the LT connector cover onto the printer 4 Install the LT connector cover U onto the lower tray unit Fig 10 LT connector cover U LT connector cover LT Signal Connector ...

Page 19: ...ect the printer to any unnecessary shock during moving the printer Fig 12 CAUTION The printer with the lower tray unit installed weighs approximately 40kg so it is too heavy for one person to carry It needs two adults to move the printer If the printer and the lower tray unit are relocated separately ensure that you disconnect the LT signal connector from the printer before lifting up the printer ...

Page 20: ...ce You need not to replace any parts periodically However it is recommended for high performance of paper feeding that the following parts are replaced in accordance with the periodic replacement cycle of printer parts Description Part No Replacement Cycle Paper Feeding Roller UH3485001 Every 120K print Separation Pad UH3486001 Every 120K print ...

Page 21: ...ns below referring to Figure 13 Back cover LTU Paper guide LTU OHP Sensor Paper Feeding Roller Paper Sensor Paper Feeding Clutch Separation Pad Side cover R Base cover LTU R Paper Size Sensor Media cassette L Base cover LTU L Side cover L Front cover LTU Cassette guide L Paper guide L Paper guide UL Fig 13 ...

Page 22: ...front cover LTU 3 Remove the BT3x8 screw of the cassette guide L assembly 4 Pull the cassette guide L toward you while pushing the front catch to release the guide from the plastic catches 5 Remove the connector of the paper size sensor 6 Remove the cassette guide L assembly from the frame 7 Remove the BT3x8 screws 2 pcs to remove the paper size sensor from the cassette guide L 5 3 Paper Feeding C...

Page 23: ...ve the ST3x6 screws 2 pcs to remove the paper guide L 4 Remove the ST3x6 screws 2 pcs to remove the paper guide UL 5 Disconnect the harness from the paper guide UL 6 Remove the paper feeding roller by pushing it to the right viewed from the rear of the unit 7 Pull up and remove the separation pad CAUTION Do not touch the surface of the paper feeding roller and separation pad ...

Page 24: ...sette L 2 Remove the paper remaining inside the printer 3 Open the rear cover to check no paper remains 4 Close the rear cover 6 2 Inner Jam Outer Jam Both inner jam and outer jam actually occur inside the printer Refer to Section 3 2 3 3 in Chapter VIII of the HL 2400C service manual ...

Reviews: