APPENDIX
A–9
English: HL-YL User’s Guide, Appendix A
❏
HP LaserJet IIP, EPSON FX-850, IBM Propritner XL
EPSON FX-850
Page 1: ...L YL User s Guide Cover Please read this manual thoroughly before using the printer Brother Laser Printer HL 700 Series User s Guide Keep this manual in a convenient place for quick and easy reference at all times ...
Page 2: ... adequately insured with the carrier Warning When shipping the Printer the DRUM UNIT assembly including the TONER CARTRIDGE must be removed from the Printer and placed in the plastic bag Failure to remove and place it in the plastic bag during shipping will cause severe damage to the Printer and will VOID THE WARRANTY 1 Remove the drum unit 2 Place it in the plastic bag and seal the bag completely...
Page 3: ...git number for your password Our BBS supports modem speeds up to 14 400 8 bits no parity 1 stop bit Fax Back SM System For USA only Brother Customer Service has installed an easy to use Fax Back SM System so you can get instant answers to common technical questions and product information for all Brother products This is available 24 hours a day 7 days a week You can use the system to send the inf...
Page 4: ...t Corporation Windows is a registered trademark of Microsoft Corporation in the U S and other countries All other brand and product names mentioned in this User s Guide are registered trademarks of their respective companies Compilation and Publication Notice Under the supervision of Brother Industries Ltd this manual has been compiled and published covering the latest product s descriptions and s...
Page 5: ...tes notes and useful tips to remember when using the printer To Use the Printer Safely Warning After you have just used the printer some internal parts of the printer are extremely hot When you open the top cover of the printer never touch the shaded parts shown in the following illustration High Temperature Inside the Printer Warning There are high voltage electrodes inside the printer Before cle...
Page 6: ...PURPOSE SHEET FEEDER 2 4 Loading Paper into the Feeder 2 5 Two Side Printing Manual Duplexing 2 7 MANUAL FEED SLOT 2 8 OUTPUT TRAY AND PAPER SUPPORT WIRE 2 10 CHAPTER 3 CONTROL PANEL 3 1 LAMPS AND SWITCH 3 1 Ready Paper Lamp 3 1 Data Toner Lamp 3 2 Drum Lamp 3 2 Alarm Lamp 3 2 Switch 3 3 Other Control Features 3 3 Sleep Mode 3 3 Test Print Mode 3 4 CHAPTER 4 OPTIONS 4 1 SERIAL INTERFACE BOARD RS10...
Page 7: ...CE 6 1 Operator Calls 6 1 Service Calls 6 4 PAPER JAMS 6 5 Q A 6 8 Setting Up the Printer Hardware 6 8 Setting Up the Printer for Windows 6 8 Setting Up the Printer for DOS For HL 730 series Only 6 9 Setting Up the Printer for Apple Macintosh Computers For HL 730 series Only 6 10 Paper Handling 6 10 Printing 6 11 Print Quality 6 12 APPENDIX A A 1 PRINTER SPECIFICATIONS A 1 Printing A 1 Functions A...
Page 8: ...e separation between the equipment and receiver Connect the equipment into an outlet on a circuit different from that to which the receiver is connected Consult the dealer or an experienced radio TV technician for help Important A shielded interface cable should be used in order to ensure compliance with the limits for a Class B digital device Changes or modifications not expressly approved by Bro...
Page 9: ...nistration FDA has implemented regulations for laser products manufactured on and after August 2 1976 Compliance is mandatory for products marketed in the United States One of the following labels on the back of the printer indicates compliance with the FDA regulations and must be attached to laser products marketed in the United States MANUFACTURED Brother Corporation Asia Ltd Brother Buji Nan Li...
Page 10: ...amended by 91 263 EEC and 92 31 EEC Issued by Brother International Europe Ltd European Technical Services Division IEC 825 Specification For 220 240 V Model Only This printer is a Class 1 laser product as defined in IEC 825 specifications The label shown below is attached in countries where required This printer has a Class 3B Laser Diode which emits invisible laser radiation in the Scanner Unit ...
Page 11: ...r point which is properly grounded through normal household wiring Extension cords used with the equipment must be three pin plug type and correctly wired to provide proper grounding Incorrectly wired extension cords may cause personal injury and equipment damage The fact that the equipment operates satisfactorily does not imply that the power is grounded and that the installation is completely sa...
Page 12: ...er lead of this printer may not correspond with the markings which identify the terminals in your plug If you need to fit a different plug proceed as follows Remove a length of the cord outer sheath taking care not to damage the coloured insulation of the wires inside Cut each of the three wires to the appropriate length If the construction of the plug permits leave the green and yellow wire longe...
Page 13: ...our printer and to ensure proper connection with your computer It also contains information for installing the printer driver fonts and Remote Printer Console Program HL 730 series only 2 Read the User s Guide to get information about the following Features and operating environment requirements of your printer Chapter 1 Paper Handling Chapter 2 Control Panel Chapter 3 Options Chapter 4 Maintenanc...
Page 14: ...Port containing an RS 422A RS 232C Slide Switch and DIP Switches for Serial setting is optionally available Some models may have this option pre installed RS 422A RS 232C Serial Interface Port HL 730 series only Multi Purpose Sheet Feeder Control Panel Output Tray Extension Support Wire Paper Support Paper Guide Manual Feed Slot Top Cover Power Cord Parallel Interface Port Power Switch ...
Page 15: ...epending upon document complexity Versatile Paper Handling The printer has a multi purpose sheet feeder and straight paper path mechanism Using this mechanism you can load A4 letter legal B5 A5 and executive sizes of paper and various types of paper including envelopes postcards organizer paper and your custom paper size The multi purpose sheet feeder also allows manual paper loading so you can al...
Page 16: ...lation switching between HP and Epson or HP and IBM If you want to select the printer emulation you can do it using the Remote Printer Console Program Printer Status Monitor with Bi directional Parallel Interface The printer driver can monitor your printer s status using bi directional parallel communications A high quality bi directional parallel printer cable is recommended The printer status mo...
Page 17: ...for proof reading You can select from two economy modes 25 toner saving and 50 toner saving through the Windows printer driver supplied with your printer Sleep Mode Power Save Mode When the printer is not used for a certain amount of time sleep mode automatically reduces power consumption The printer consumes less than 7 W when in sleep mode Low Running Cost Since the toner cartridge is separate f...
Page 18: ...cy noise filter Use a voltage regulator if the power source is not stable Environment The printer should be installed near a power outlet which is easily accessible Use the printer only within the following ranges of temperature and humidity Ambient temperature 10 C to 32 5 C 59 F to 90 5 F Ambient humidity 20 to 80 without condensation The printer should be used in a well ventilation room Place t...
Page 19: ...nter to strong physical shocks or vibrations Do not expose the printer to open flames or salty or corrosive gasses Do not place objects on top of the printer Do not place the printer near an air conditioner Keep the printer horizontal when carrying Do not cover the slots in the top cover ...
Page 20: ...Blank Page ...
Page 21: ... Paper Capacity in Feeder Multi purpose Sheet Feeder Up to 22 mm 0 87 inch in height up to the mark Approx 200 sheets of 75 g m2 20 lb or 50 sheets of 158 g m2 42 lb A4 Letter paper or 10 envelopes Output Tray Approx 100 sheets of 75 g m2 20 lb A4 Letter paper Cut Sheet Envelope Basis Weight 60 to 158 g m 2 16 to 42 lb 75 to 90 g m 2 20 to 24 lb single thickness Caliper 0 03 to 0 08 in 0 08 to 0 2...
Page 22: ...our nearest authorized sales representative or the place of purchase of your printer We recommend you use label or transparencies which are designed for use in laser printers We recommend you use long grained paper for the best print quality If the paper has problems feeding from the multi purpose sheet feeder use the manual feed slot and try again You can use recycled paper in this printer Before...
Page 23: ...es with self adhesive closures Envelopes of baggy construction Envelopes not sharply creased Embossed envelopes Envelopes already printed by a laser printer Envelopes pre printed on the inside Envelopes that cannot be arranged uniformly when placed in a pile Fig 2 2 Envelopes Printable Area The figure below shows the physically printable area Except 9 x12 envelope Unprintable area Approximately 4 ...
Page 24: ...cation software does not support your custom paper size select the next paper size up that is closest but larger than the custom size Then adjust the print area by changing the right and left margins in your application software 2 Make sure that the multi purpose sheet feeder contains the selected size of paper in the selected orientation If necessary change the paper in the feeder 3 Send your fil...
Page 25: ...ace face down Caution The feeder can hold up to 200 sheets of plain paper 75 g m2 20 lb If you load too many sheets paper jams could occur Make sure that the paper is stacked below the mark If there is still some paper in the feeder you must first remove it put it together with the new paper and then insert the stack in the feeder Fig 2 4 Opening the Feeder and Loading Paper or Envelopes in the Fe...
Page 26: ...ing the Paper Guide and Closing the Feeder Note If the multi purpose sheet feeder runs out of paper when you try to print the Alarm and Paper lamps blink to alert you to a paper empty error You have to load paper in the feeder and push the panel switch to cancel the alarm and continue printing If paper jams in the printer the Alarm and Paper lamps also blink If the error is a paper jam clear it re...
Page 27: ...ting the even numbered sides of the paper the driver instructs you to re insert the paper by a pop up message on the computer screen Follow the instructions on how to reinsert the paper Note Before re inserting the sheets you have to straighten them or you will get paper errors The use of very thin or very thick paper is not recommended If you encounter a double feeding error we recommend that you...
Page 28: ...ll the way Move the paper guide of the manual feed slot to the paper width you are using Fig 2 7 Moving the Paper Guide When you load more than one sheet of paper manually Open the Setup dialog box of the supplied Windows printer driver and choose Manual Feed in the Paper Source section Follow the above instructions to load the first page The printer automatically starts printing After the first p...
Page 29: ...CHAPTER 2 PAPER HANDLING 2 9 English HL YL User s Guide Chapter 2 Note Insert paper firmly into the manual feed slot Be sure to load sheet by sheet when using the manual feed slot ...
Page 30: ... open the tray sheets can be stacked on the tray Follow these steps to open the output tray 1 Pull the top of the tray down 2 Extend the extension support wire Fig 2 8 Opening the Output Tray and Extending the Extension Support Wire You can stack up to 100 sheets in the output tray Caution When you use transparencies remove each sheet immediately after printing Stacking sheets may cause paper curl...
Page 31: ...r Lamp The Ready lamp indicates the current status of the printer Lamp Printer status Off The power switch is off or the printer is in sleep mode If the printer is in sleep mode it will wake up automatically when it receives data or you press the control panel switch Blinking The printer is warming up Fast Blinking The printer is cooling down and stops printing until the printers internal temperat...
Page 32: ...er error See REPLACING THE TONER CARTRIDGE in Chapter 5 and Operator Calls in Chapter 6 Drum Lamp The Drum lamp indicates the drum unit is nearly at the end of its life Lamp Printer status Off The drum unit can be used On The drum unit is nearly at the end of its life Installing a new drum unit turns off this lamp See REPLACING THE DRUM UNIT in Chapter 5 Alarm Lamp The Alarm lamp blinks to indicat...
Page 33: ... data for a certain period of time time out it enters sleep mode Sleep mode acts as though the printer was turned off The default time out is 5 minutes While the printer is in sleep mode all the lamps are off and it is as if it was turned off but the printer can still receive data from the computer Receiving a print file or document automatically wakes up the printer to start printing Pressing the...
Page 34: ...g upon the printer model as follows Lamp Lit Choice Function Drum Test sample page The printer prints a test sample page The printer returns to the ready status after printing Alarm Print Config Print Fonts I The printer prints the current configuration of the printer and a list of the internal fonts The printer returns to the ready status after printing HL 730 series only Ready Factory Reset The ...
Page 35: ...the factory or dealer The serial interface for Apple Macintosh RS 422A will only print at 300 dpi The serial interface board is installed onto the main controller board inside the printer For the details about installation see the instruction guide which was provided with the serial interface board Selecting the RS 422A Apple or RS 232C IBM Serial Interface Note This section is only for printer mo...
Page 36: ...puter as follows Never change the RS 422A parameters for Apple Macintosh computers Because the RS 422A parameters have been correctly set at the factory for Apple Macintosh computers you do not need to change the settings You may skip this section If you change parameters for the RS 232C serial interface and you switch back to RS 422A for Apple Macintosh computers be sure to restore the parameters...
Page 37: ...tch ON 1 2 3 4 5 6 7 8 Fig 4 2 Setting the Serial Interface Parameters Table 1 Serial Interface Parameters Settings Selector Parameters On up Off down 1 Baud Rate See Table 2 2 Baud Rate See Table 2 3 Data Length 7 bits 8 bits 4 Stop Bit 2 bits 1 bit 5 Parity See Table 3 6 Parity See Table 3 7 Protocol Xon Xoff DTR DTR only 8 Robust Xon On Off Table 2 Baud Rate Settings Selector 1 Selector 2 For R...
Page 38: ...o connect your printer and computer Note Consult your dealer for a serial interface cable If you are a Macintosh user you can easily find the necessary cable at a local computer store Look for Apple serial cables labeled as Macintosh to ImageWriter II or Macintosh to Personal LaserWriter 300 or the Apple System Peripheral 8 Cable Do not purchase a serial cable labeled as Straight through or LocalT...
Page 39: ...able and then connect the serial interface cable as follows 1 Make sure that the power switch is turned off Caution Be sure to turn off the power switch before connecting or disconnecting the interface cables or the printer may be damaged 2 Insert and secure the parallel interface connector into the parallel interface port of your printer 3 Insert and secure the serial interface connector into the...
Page 40: ...rd The memory capacity can be expanded up to 2 MB with an optional memory board Only one size of memory board is available as an option giving 1 5 MB memory expansion The HL 730 series printer has 0 5 MB of memory as standard The memory capacity can be expanded up to 2 MB with an optional memory board Two sizes of memory boards are optionally available 1 MB memory expansion giving you a total of 1...
Page 41: ... for use for when you get the toner low warning Discard the used toner cartridge according to local regulations If you are not sure of them consult your local dealer Be sure to seal up the toner cartridge tightly so that toner powder does not spill out of the cartridge Do not discard used toner cartridges together with domestic rubbish It is recommended that you clean the printer when you replace ...
Page 42: ...Turn off the power switch 2 Close the output tray and open the top cover Remove the drum unit by holding each side of the drum and gently lifting the drum forwards towards you Note Make sure that the top cover is correctly latched open indicated by a click Fig 5 2 Removing the Drum Unit Note It is recommended to put the drum unit on a piece of disposable paper or cloth in case of accidental toner ...
Page 43: ...the top cover of the printer never touch the shaded parts shown in the following illustration High Temperature Fig 5 3 Inside the Printer 3 Gently turn the lever on the toner cartridge forward until it stops Note The toner cartridge cannot be removed unless the shutter is completely closed by turning the lever fully to the front Fig 5 4 Turning the Lever to Close the Shutter ...
Page 44: ...ner cartridge gently shake it five or six times and then remove the protective part Caution Only unpack the toner cartridge immediately before installing it into the printer If toner cartridges are left unpacked for a long period of time the toner life is shortened You can only use a Brother genuine toner cartridge TN 200 series which is specially formulated to ensure top print quality Using anoth...
Page 45: ...ide slot in the drum unit and pushed fully home into the drum unit to ensure that the toner cartridge and the drum unit fit together correctly Fig 5 7 Installing the Toner Cartridge into the Drum Unit 7 Gently turn the lever on the toner cartridge backward until it stops Fig 5 8 Turning the Lever to Open the Shutter 8 Re install the drum unit into the printer and close the top cover Then turn on t...
Page 46: ...should clean the printer when you replace the drum unit See CLEANING THE PRINTER in this chapter Note The drum unit is a consumable and it is necessary to replace it periodically The drum unit is rated at approximately 20 000 pages There are many factors that determine the actual drum life such as temperature humidity type of paper and toner that you use the number of pages per print job etc The d...
Page 47: ...e following illustration High Temperature Fig 5 11 Inside the Printer 3 Remove the toner cartridge from the drum unit and keep it in a safe place For more information see REPLACING THE TONER CARTRIDGE in this chapter Note Discard the used drum unit according to local regulations If you are not sure of them consult your local dealer retailer Be sure to seal up the drum unit tightly so that toner po...
Page 48: ...starter sheet Fig 5 14 Do Not Remove the Starter Sheet Only unpack a drum unit immediately before installing it into the printer If an unpacked drum unit is subjected to excessive direct sunlight or room light the unit may be damaged Handle the toner cartridge and the drum unit carefully as it contains toner If toner scatters and your hands or clothes get dirty wipe or wash it off with cold water ...
Page 49: ...tion see REPLACING THE TONER CARTRIDGE in this chapter 7 Install the new drum unit into the printer Fig 5 15 Installing the Drum Unit 8 Close the top cover 9 Turn on the power switch The printer can automatically ejects the starter sheet Ejecting this sheet resets the drum life alarm Fig 5 16 Ejecting the Starter Sheet Starter Sheet ...
Page 50: ...tions may change causing darker or lighter printouts Use a screwdriver to turn the print density dial gently clockwise for darker printouts and counterclockwise for lighter printouts The dial has been factory set to the middle position Fig 5 17 Adjusting the Print Density Dial Warning After you have just used the printer some internal parts of the printer are extremely hot When you open the top co...
Page 51: ...ctrodes inside the printer Before cleaning the printer make sure to turn off the power switch and unplug the power cord from the power outlet Fig 5 19 Turning off the Switch and Unplugging 2 Remove the paper in the multi purpose sheet feeder 3 Use a damp cloth for cleaning Caution Use water or neutral detergents for cleaning Cleaning with volatile liquids such as thinners or benzene will damage th...
Page 52: ...g the printer make sure to turn off the power switch and unplug the power cord from the outlet Fig 5 20 Turning off the Switch and Unplugging 2 Open the top cover of the printer 3 Take the drum unit out of the printer and put it aside Warning After you have just used the printer some internal parts of the printer are extremely hot When you open the top cover of the printer never touch the shaded p...
Page 53: ...aution Do not touch the scanner window with your finger Do not wipe the scanner window with cleaning alcohol isophorol 5 Turn the drum unit upside down carefully Caution Handle the drum unit carefully as it contains toner If toner scatters and your hands or cloths get dirty wipe or wash it off with cold water immediately Note It is recommended to put the drum unit on a piece of disposable paper or...
Page 54: ...the Primary Corona Wire 7 Return the tub to the home position mark position before reinstalling drum unit Caution Be sure to position the tab at the home position or printed pages may have vertical stripes 8 Install the drum unit into the printer See the section REPLACING THE DRUM UNIT in Chapter 5 9 Close the top cover 10 Plug in the power cord and turn on the power switch Home Position ...
Page 55: ...ter Also follow the steps below to re pack the printer or the printer may be damaged which will void the printer s warranty 1 Turn off the power switch and unplug the printer from the AC outlet 2 Open the top cover 3 Remove the drum unit assembly referring to the previous section Note Remove the drum unit assembly with the toner cartridge included Fig 5 24 Removing the Drum Unit Assembly ...
Page 56: ...ire and the output tray 6 Wrap the printer in the plastic bag and place it in the original carton box with the original Styrofoam packing material 7 Place any documents manual and any documentation describing the reason for repacking printer and drum unit assembly in the carton box as shown below 8 Close the carton box and tape it Fig 5 26 Repacking the Printer Drum Unit Including Toner Cartridge ...
Page 57: ... as described below Blinking Lamp Error Action Paper Alarm Paper jam Clear the paper jam referring to the next section PAPER JAMS and press the panel switch if the printer does not automatically resume printing Paper empty Load paper in the printer referring to Chapter 2 and press the panel switch Misfeed Reinstall the paper and press the panel switch Toner Alarm every 5 seconds Toner low Indicate...
Page 58: ...print the data remaining in the printer Reduce the print resolution or reduce the complexity of your document Expand the printer memory with an optional memory board Parallel Interface Line Error Press the panel switch to resume printing Check that the connection between your computer and printer is secure and correct and check the interface cable Serial Interface Framing Error For HL 730 series O...
Page 59: ...de Chapter 6 Note If the printer does not operate as you expect it to it is recommended that you turn off the power switch wait a few seconds and then turn it on again If you still have problems consult your dealer or our authorized service representative ...
Page 60: ...arm Ready Data Service Call Service D Service E0 Service E1 Service P Drum Alarm Ready Data Service Call NV RAM error Drum Alarm Ready Data ON OFF If you see any of these service call indications turn off the power switch wait a few seconds and then turn it on again and try to print again If you cannot clear the error and see the same service call indication after turning on the printer consult yo...
Page 61: ...g to the following descriptions If the jammed paper is removed completely and the top cover is closed the printer may resume printing automatically If the printer does not resume printing press the control panel switch Warning After you have just used the printer some internal parts of the printer are extremely hot When you open the top cover of the printer never touch the shaded parts shown in th...
Page 62: ...er from the Output Tray Paper Jam in the Multi Purpose Sheet Feeder If a paper jam has occurred inside the multi purpose sheet feeder open the multi purpose sheet feeder to pull the jammed paper upward out of the feeder then close the multi purpose sheet feeder Also open the top cover and check that a torn piece of paper does not remain inside the printer referring to the next section Fig 6 4 Pape...
Page 63: ...e the drum unit Then pull the jammed paper upwards and out of the printer Install the drum unit and close the top cover Fig 6 5 Paper Jam near the Drum Unit Paper Jam in the Fuser Unit If a paper jam has occurred in the fuser unit open the top cover and remove the drum unit Then pull the jammed paper out of the fuser Install the drum unit and close the top cover Fig 6 6 Paper Jam Inside the Printe...
Page 64: ...king refer to the Operator Call section of this manual Check to see if the Ready lamp is blinking If the lamp is blinking fast the printer might be cooling down to lower the printers internal temperature Open the top cover of the printer to lower the temperature Setting Up the Printer for Windows Question Recommendation I cannot print from my application software Make sure the supplied Windows pri...
Page 65: ...he printer s emulation do not match Check in your application software which printer you have selected to make sure the printer is set up correctly Remember this printer emulates three widely used printer selections HP LaserJet IIP Epson FX 850 and IBM Proprinter XL Try setting the printer into HP emulation and then select the HP LaserJet IIP printer in your application software The printer does n...
Page 66: ...n the printer control panel If so the multi purpose sheet feeder may be out of paper or not properly installed If it is empty load a new stack of paper into the feeder If there is paper in the multi purpose sheet feeder make sure it is straight If the paper is curled you should straighten it before printing Sometimes it is helpful to remove the paper turn the stack over and put it back into the pa...
Page 67: ...If you are using Windows 95 or Windows 3 1 with the supplied printer driver see the Setting up the Printer for Windows section Try to reduce the complexity of your document or reduce the print resolution The printer prints the first couple of pages correctly then some pages have text missing For HL 730 series Only This is a problem usually relating to serial interface settings Your computer is not...
Page 68: ...or and Drum unit in Chapter 5 If the same problem occurs and the Drum lamp is still on after cleaning replace the drum unit with a new one Printed pages are stained with toner or have vertical stripes Here come Flat top he come One thing I can tell you is you go to be free Come together right now over me Here come Flat top he come One thing I can tell you is you go to be free Come together right n...
Page 69: ...ou is you go to be free Come together right now over me Here come Flat top he A come One thing I can tell you is you go to be free Come together right now over me Here come Flat top he come One thing I can tell you is you go to be free Come together right now over me Here come Flat top he come One thing I can tell you is you go to be free Come together right now over me Here come Flat top he come ...
Page 70: ...e Pat top he come One thing I can tell you is you go to be free Come together right now over me Here come Pat top he come One thing I can tell you is you go to be free Come together right now over me Here come v he come Lucy Diamonde in the sky with One thing I can tell you is you go to be free Come tin the skyright now over me Here come Pat top he come One thing I can tell you is you go to be fre...
Page 71: ...e paper from the multi purpose sheet feeder NOTE Maximum print speed is obtained by printing several copies of the same page Print speed may vary depending on interface type emulation processing power of the computer memory allocated to the print job paper size and graphic quality Warm Up Max 20 seconds at 23 C 73 4 F The warm up time depends on the ambient temperature and humidity First Print 20 ...
Page 72: ...dows Automatic emulation selection among HP LaserJet IIP PCL level 4 EPSON FX 850 or IBM Proprinter XL Printer Driver Windows 3 1 3 11 and Windows 95 driver supporting Brother Native Compression mode and bi directional capability Optional Macintosh driver available for System 6 0 7 or higher For HL 730 series Only Interface Bi directional parallel RS 422A RS 232C serial interface RS 100M is option...
Page 73: ... less Stand by 35 W or less Sleep 7 W or less Noise Printing 48 dB A or less Sleep 35 dB A or less Temperature Operating 10 to 32 5 C 59 to 90 5 F Storage 0 to 40 C 38 to 104 F Humidity Operating 20 to 80 without condensation Storage 20 to 80 without condensation Dimensions W x H x D 366 x 250 x 353 mm 14 4 x 9 8 x 13 9 inches when the output tray is closed Weight Approx 6 5 kg 14 3 lb including t...
Page 74: ...nter Side Amphenol FCN 685J036 L X or equivalent A shielded cable should be used Pin Assignment Pin No Signal Direction Pin No Signal Direction 1 DATA STROBE Input 19 0V S G 2 DATA 1 Input 20 0V S G 3 DATA 2 Input 21 0V S G 4 DATA 3 Input 22 0V S G 5 DATA 4 Input 23 0V S G 6 DATA 5 Input 24 0V S G 7 DATA 6 Input 25 0V S G 8 DATA 7 Input 26 0V S G 9 DATA 8 Input 27 0V S G 10 ACKNLG Output 28 0V S G...
Page 75: ...ote To use bi directional communication an interface cable which has the pin connections above must be used 1 2 14 25 1 2 36 15 16 17 18 19 20 21 22 23 24 14 15 16 17 18 19 20 21 22 23 24 25 26 27 28 29 30 31 32 33 34 35 Fig A 1 Parallel Interface Cable ...
Page 76: ...fonts are resident in this printer Brougham 10 12 point upright normal upright bold italic normal italic bold Brougham 12 10 point upright normal upright bold italic normal italic bold Letter Gothic 16 66 8 5 point upright normal upright bold italic normal italic bold Portrait and Landscape are available for the above ...
Page 77: ... PC 865 PC 8 Turkish HP mode ISO14 JIS ASCII ISO57 Chinese ISO11 Swedish HP Spanish ISO17 Spanish ISO10 Swedish ISO16 Portuguese ISO84 Portuguese ISO85 Spanish PC 8 PC 8 D N PC 8 Turkish PC 850 PC 852 PC 860 PC 863 PC 865 Roman 8 ISO Latin 1 ECMA 94 ISO60 Norwegian 1 ISO61 Norwegian 2 ISO4 UK ISO25 French ISO69 French HP German ISO21 German ISO15 Italian ISO6 ASCII Legal ISO2 IRV Note If you want ...
Page 78: ... IIP The following table shows characters available only in the corresponding character set The numbers at the top of the table are code values with which characters are to be replaced in the Roman 8 character set For other characters see the character set of Roman 8 ...
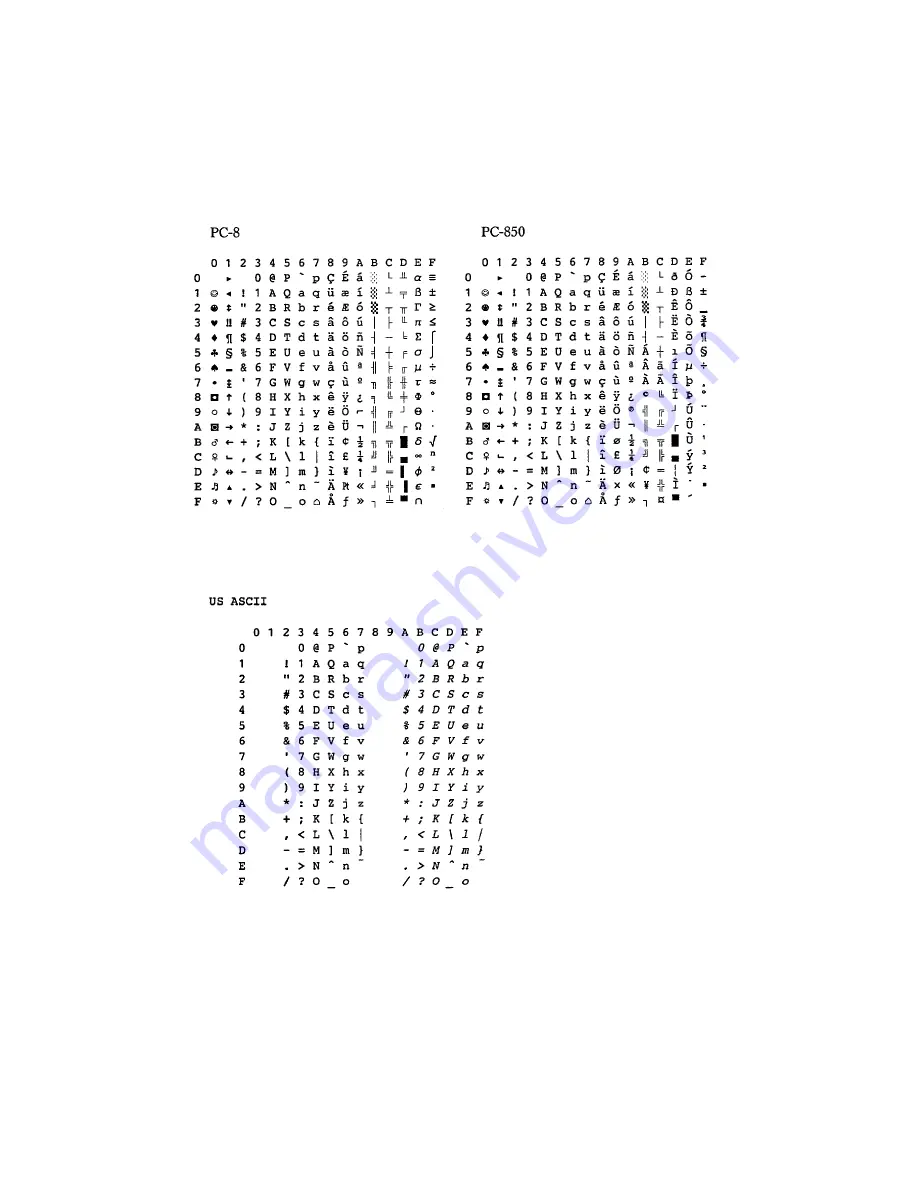
Page 79: ...APPENDIX A 9 English HL YL User s Guide Appendix A HP LaserJet IIP EPSON FX 850 IBM Propritner XL EPSON FX 850 ...
Page 80: ... following table shows characters available only in the corresponding character set The numbers at the top of the table are code values with which characters are to be replaced in the US ASCII character set For other characters see the character set of US ASCII ...
Page 81: ...n 1 4 A 2 envelope 2 1 error message 6 2 recoverable 6 1 unrecoverable 6 4 extension wire 1 2 F Factory Reset 3 4 H hex dump print 3 4 I interface A 2 error 6 2 J jammed paper 6 5 L label 2 1 M Macintosh 1 4 6 10 manual feed slot 1 2 2 8 memory A 2 board 4 6 full 6 2 misfeed 6 1 multi purpose sheet feeder 1 2 2 4 capacity 2 1 O operator call 6 1 6 3 organizer 2 1 output tray 1 2 2 10 capacity 2 1 ...
Page 82: ...ter Console 1 4 resident font A 6 resolution 1 3 A 1 robust 4 3 RPC 1 4 RS 232C 4 2 RS 422A 4 2 S scanner window 5 13 serial interface 4 1 cable 4 4 parameter 4 3 RS 422A RS 232C port 1 2 service call 6 4 sleep mode 1 5 3 3 slide switch 1 2 4 2 starter sheet 5 9 stop bit 4 3 switch 3 3 symbol set A 7 T test print mode 3 5 test sample page 3 4 time out 3 3 toner empty 6 1 low 6 1 toner cartridge 5 ...
Page 83: ...ord Our BBS supports modem speeds up to 14 400 8 bits no parity 1 stop bit Fax Back SM System For USA only Brother Customer Service has installed an easy to use Fax Back SM System so you can get instant answers to common technical questions and product information for all Brother products This is available 24 hours a day 7 days a week You can use the system to send the information to any fax machi...
Page 84: ...IV English HL YL User s Guide Cover UL6857001 A Printed in China ...