Brother HL-5470DW Installation Manual Download Page 12

12

ZLT 2/4 - MANUAL EN/NL

V

1.6

Download the BRAdmin Professional application and the updated firmware files from the same location you downloaded
the customised driver.

Double-click the “.exe” file to start the BRAdmin installation. Choose your language when prompted and accept the
License Agreement. Continue the installation until it is complete.

Click

Start

, click

All Programs

, click

Brother Administrator Utilities

, click the

Brother BRAdmin

Professional 3

folder and then click the

BRAdmin Professional 3

icon to start the application. The network will

be searched, and networked printers will be displayed in the list. Locate the printer you installed earlier, right-click on its
entry and select “Load Firmware (Manual).” Make sure the “TFTP PUT” option is selected and click

OK

.

The

Load Firmware

dialog box is displayed. Click

Browse

to find the firmware file where you downloaded it, and

then enter the Brother machine’s password for authorisation. Then click

OK

to apply the firmware update.

The printer’s LCD will light up and “Program Updating” will be displayed while the

Data

LED flashes. The display will

change to “Please Wait”, then the printer will reboot with the new firmware. Click

OK

in the

Load Firmware

dialog

box to complete the update. Repeat the proces with the secondfirmware file.

Click

Start

and open

Devices and Printers

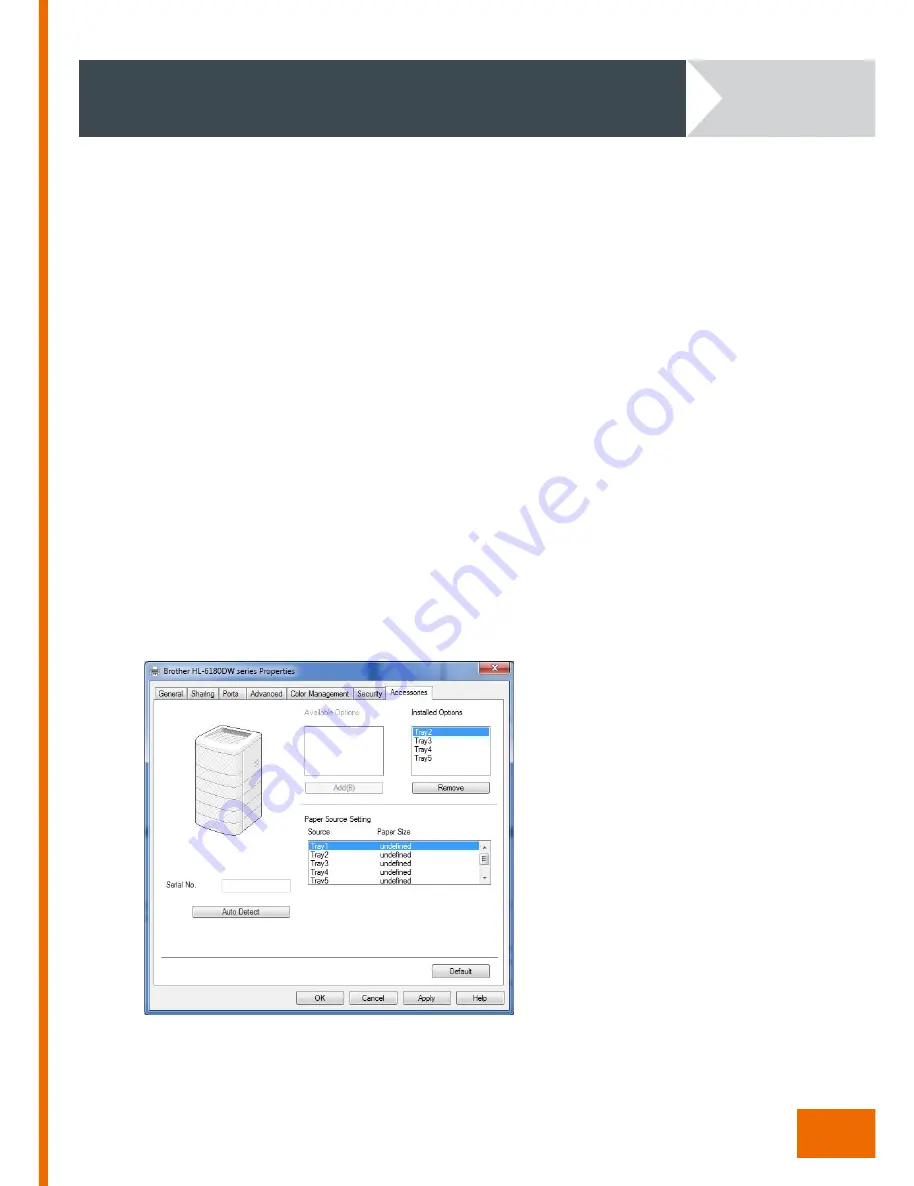
. Right-click the icon for your printer and select “Printer properties” from

the menu. Click the

Accessories

tab.

The ZLT trays will be displayed under

Available Options

. Click the

Add(B)

button to add each tray to the

Installed Options

list, and then click

Apply

.

Click

OK

to exit. Your printer is now ready to use.

Update Firmware

STEP 5 - UPDATE FIRMWARE AND CONFIGURE TRAY OPTIONS

All manuals and user guides at all-guides.com

Summary of Contents for HL-5470DW

Page 1: ...ZLT Installation Guide COMPATIBLE WITH HL 6180DW HL 5470DW HL 5450DN All manuals and user guides at all guides com a l l g u i d e s c o m ...

Page 2: ...llation Sequence 5 STEP BY STEP 6 STEP 1 UNPACKING 6 STEP 2 CHECKING 6 STEP 3 INSTALLATION AND CONNECTION 7 ZLT2 7 ZLT4 8 STEP 4 DRIVER INSTALLATION 9 STEP 5 UPDATE FIRMWARE 12 Maintenance and Cleaning 13 ZLT Self Testing 14 Troubleshooting 15 Copyright 16 All manuals and user guides at all guides com ...

Page 3: ...f is to be used for the intended purpose only The manufacturer cannot be held responsible for damage caused by improper assembly or disassembly Hier können Sie diese Anleitung in weiteren Sprachen herunterladen You can download versions of this manual in other languages from Téléchargement de ce manuel dans d autres langues sur U kunt de handleiding in verschillende talen downloaden door gebruik t...

Page 4: ...logy Warning Indicates a potentially hazardous situation which if not avoided could result in death or serious injury Caution Indicates a potentially hazardous situation which if not avoided may result in minor injury Important Indicates a potentially hazardous situation that may result in damage to property or a non functioning product WARNING CAUTION IMPORTANT User Guide All manuals and user gui...

Page 5: ...board and plastic packaging before you proceed with the installation Place the ZLT on a flat stable surface Installation Requirements Printer not included Power cord Allen key AC Adaptor Holder USB cable Quick Setup USB Cable Power Cord Allen Key Screw ZLT4 only AC Power Brother Printer Holder All manuals and user guides at all guides com ...

Page 6: ...proceeding with the with installation Take a moment to check if all the parts belonging to the ZLT are present If a part is missing contact the nearest ZLT distributor in your country ZLT 2 ZLT2 Power Adapter Holder USB cable ZLT 4 ZLT4 Power adapter Holder Allen screws with allen key Stabiliser USB cable 2 castors with brake for the front of the stabiliser 2 castors without brake for the rear of ...

Page 7: ...e care that the AC powercord is facing downwards Connect the USB cable from the printer to the USB socket on the ZLT Connect the power connector to the back of the ZLT Plug the power cord directly into the wall socket Note Ensure the USB cable is fully inserted into the USB socket on the ZLT Warning Do not use extension cords multi socket or otherwise Fill the trays with paper Switch the ZLT on Be...

Page 8: ...e and keep both the holder and screws in a safe place Place the power supply unit into the holder then using the screws securely fit the power supply unit and the holder in place at the appropriate place on the rear of the unit Take care that the AC powercord is facing downwards Place the printer onto the ZLT4 Connect the USB cable from the printer to the USB socket on the ZLT4 Connect the power c...

Page 9: ...ense Agreement dialog box appears Read the Agreement and click Yes to accept the terms and continue installation The Connection Type dialog box appears asking you to select a connection type for the printer Select Wired Network Ethernet and click Next The Select Connection dialog box appears Select Brother Peer to Peer Network Printer and click Next Driver Installation Driver Installation STEP 4 D...

Page 10: ...ayed list and click Next to continue If your chosen machine is not displayed check the machine is on and is connected to the network Some windows will open and close automatically as the installation continues Depending on your Windows Security settings the following dialog box may appear asking you to confirm the device software installation Click Install to continue Driver Installation All manua...

Page 11: ...dvice for Imaging Equipment and On Line Registration dialog boxes Read the information and click Next to continue Finally the Setup Complete dialog box appears Choose your required options if necessary and then click Finish The driver installation is complete Next you must update the firmware and configure the ZLT tray options Driver Installation All manuals and user guides at all guides com a l l...

Page 12: ...he Load Firmware dialog box is displayed Click Browse to find the firmware file where you downloaded it and then enter the Brother machine s password for authorisation Then click OK to apply the firmware update The printer s LCD will light up and Program Updating will be displayed while the Data LED flashes The display will change to Please Wait then the printer will reboot with the new firmware C...

Page 13: ...ed To clean the exterior of the ZLT use a damp cloth Do not use detergents as these may cause damage to the unit To clean dust from the paper trays remove the trays from the ZLT unit Remove any paper from the trays and then dust the trays using a soft brush Warning To prevent damage to the paper exit sensor arms please do not reach into the paper tray openings Warning Make sure that no liquids ent...

Page 14: ... left edge of the sheet on the top cover of the ZLT you can now mark the position of the paper Remove the sheet from this waiting position The ZLT will automatically feed the next sheet You can now compare the position of the left edge of the next sheet Ideally this second sheet should be fed in the same way as the first If the left position is different or from left to right or vice versa this ma...

Page 15: ...connected to the printer via the USB cable Has the power been interrupted by a switch or a blown fuse Check if any other equipment plugged into the electrical outlet is not working properly If after checking all the above points the problem persists switch the printer off wait 10 seconds and then switch the printer back on as this can often fix problems If the problem persists please contact your ...

Page 16: ...315 LG Dordrecht Netherlands T 31 0 78 630 90 30 F 31 0 78 630 74 44 support key2printing com www key2printing com All rights reserved 2014 Brother is a registered trademark of Brother Industries Ltd All manuals and user guides at all guides com a l l g u i d e s c o m ...

Reviews: