Brother DCP-750CW Network User'S Manual Download Page 65

Wireless Configuration for Macintosh

®

58

5

r

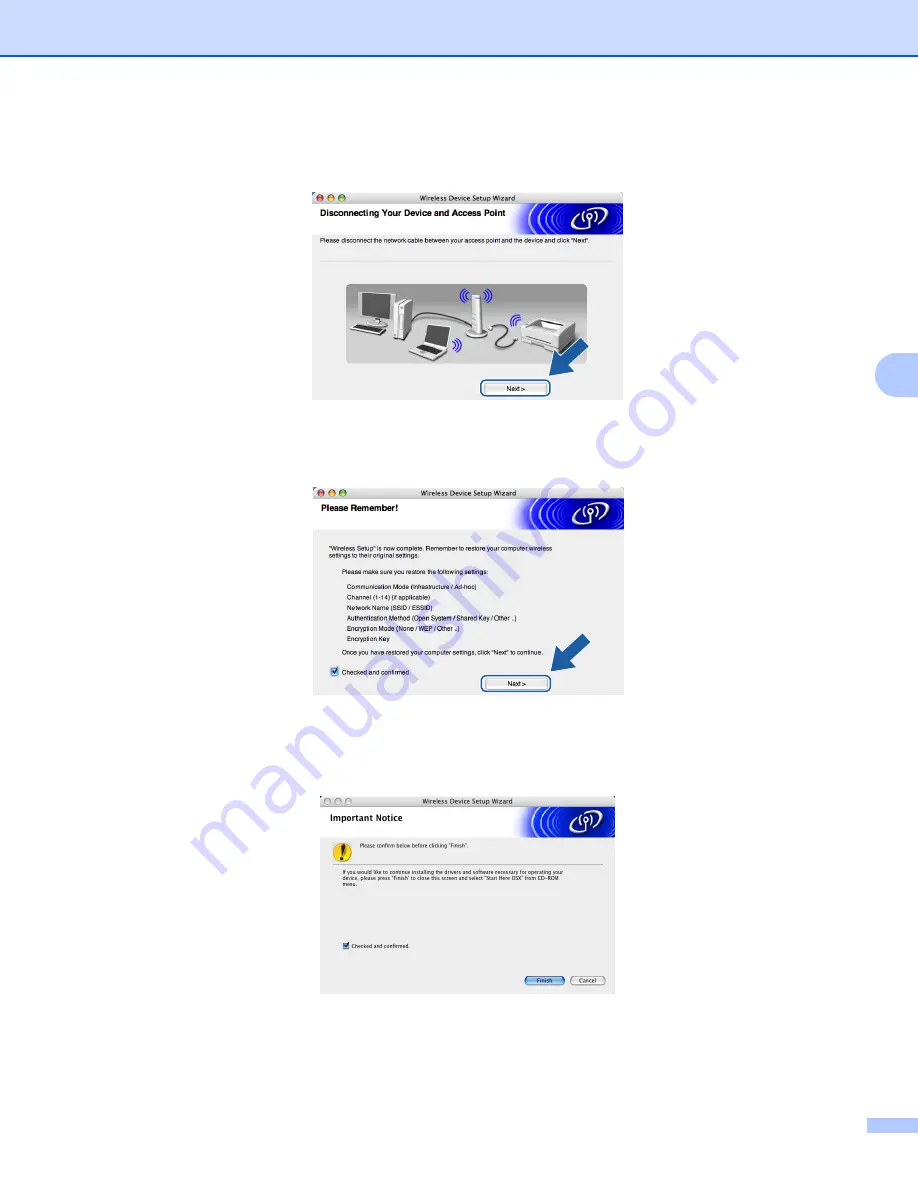
Disconnect the network cable between your access point (hub or router) and the machine, and click 

Next

.


s

Using the information you recorded in 

k

, return the wireless settings of your computer back to their 

original settings. Click 

Next

.


t

You have completed the wireless setup. Click 

Finish

. If you would like to continue installing drivers and 

software necessary for operating your device, please select 

Start Here OSX

 from CD-ROM menu.


Summary of Contents for DCP-750CW

Page 1: ...ur network You can print or view this manual from the CD ROM at any time please keep the CD ROM in a convenient place for quick and easy reference at all times The Brother Solutions Center http solutions brother com is your one stop resource for all your printing needs Download the latest drivers and utilities for your machine read FAQs and troubleshooting tips or learn about special printing solu...

Page 2: ...i Alliance All other terms brand and product names mentioned in this User s Guide are registered trademarks or trademarks of their respective companies Compilation and publication notice Under the supervision of Brother Industries Ltd this manual has been compiled and published covering the latest product s descriptions and specifications The contents of this manual and the specifications of this ...

Page 3: ...country If you have any comments or suggestions please write to us at Brother fax back system USA Brother has set up an easy to use fax back system so you can get instant answers to common technical questions and information about all our products This is available 24 hours a day seven days a week You can use the system to send the information to any fax machine Call the number below and follow th...

Page 4: ...a For the location of a Brother authorized service center call 1 877 BROTHER Internet addresses Brother Global Web Site http www brother com For Frequently Asked Questions FAQs Product Support Driver Updates and Utilities http www brother com In USA Only For Brother Accessories Supplies http www brothermall com In USA only 1 800 521 2846 ...

Page 5: ...our machine for a network 12 Changing the print server settings 13 Using the BRAdmin Professional utility to change the print server settings for Windows only 13 Using the control panel to change the print server settings 13 Using the Remote Setup to change the print server settings for Windows and Mac OS X 10 2 4 or greater Not available for DCP models 13 3 Configuring your machine for a wireless...

Page 6: ... Infrastructure mode 50 For Mac OS X 10 2 4 or greater 50 Configuration with an access point that supports SecureEasySetup 59 For Mac OS X 10 2 4 or greater 59 Configuration in Ad hoc Mode 62 For Mac OS X 10 2 4 or greater 62 6 Control panel setup 70 LAN menu 70 TCP IP Wired TCP IP WLAN 70 Setup WLAN for wireless network only 78 WLAN Status for wireless network only 78 Setup Misc 80 Network I F 81...

Page 7: ...nection problem 99 A Appendix A 100 Using services 100 Other ways to set the IP address for advanced users and administrators 100 Using DHCP to configure the IP address 100 Using BOOTP to configure the IP address 100 Using RARP to configure the IP address 101 Using APIPA to configure the IP address 101 Using ARP to configure the IP address 102 Using the TELNET console to configure the IP address 1...

Page 8: ... s running Windows XP Professional x64 Edition To use the Brother machine through a network you need to configure the print server and set up the computers you use For Wireless Users To achieve optimum results with normal every day document printing place the Brother machine as close to the network access point router as possible with minimal obstructions Large objects and walls between the two de...

Page 9: ...file as a PC FAX over your network See Brother PC FAX Software for Windows and Sending a Fax for Macintosh in the Software User s Guide for a complete description Windows users can also PC FAX receive See PC FAX receiving in the Software User s Guide Network PhotoCapture Center 1 You can view retrieve and save data from a media card inserted into the Brother machine For Windows double click the Ne...

Page 10: ...4 or greater 1 BRAdmin Light is a utility for viewing machine status and configuring network settings from a computer running Mac OS X 10 2 4 or greater Remote Setup Not available for DCP models 1 The Remote Setup software allows you to configure network settings from a Windows or Macintosh Mac OS X 10 2 4 or greater See Remote Setup for Windows and Remote Setup PhotoCapture Center for Macintosh i...

Page 11: ...k printer your machine In a smaller network of 2 or 3 computers we recommend the Peer to Peer printing method as it is easier to configure than the Network Shared Printing method described on the following page See Network Shared Printing on page 5 Each computer must use the TCP IP Protocol The Brother machine needs an appropriate IP address configuration If you are using a router the Gateway addr...

Page 12: ...ing of all print jobs 1 Network Shared 2 Also known as Server or Print Server 3 Network printer your machine In a larger network we recommend a Network Shared printing environment The Server or the Print Server must use the TCP IP Print Protocol The Brother machine needs an appropriate IP address configuration unless the machine is shared via the parallel port or USB port of the server Windows Win...

Page 13: ... wired network When the Brother wireless machine your machine is part of this network it receives all print jobs via an access point Connected to a wireless capable computer without an access point in the network Ad hoc mode 1 This type of network does not have a central access point Each wireless client communicates directly with each other When the Brother wireless machine your machine is part o...

Page 14: ... most popular set of protocols used for communication such as Internet and E mail This protocol can be used in almost all operating systems such as Windows Macintosh and Linux The following TCP IP protocols are available on this Brother product DHCP BOOTP RARP 1 By using the DHCP BOOTP RARP protocols the IP address can be automatically configured Note To use the DHCP BOOTP RARP protocols please co...

Page 15: ...e Brother print server to automatically configure itself to work in a Mac OS X Simple Network Configured system Mac OS X 10 2 4 or greater TELNET 1 The Brother print server supports TELNET server for command line configuration SNMP 1 The Simple Network Management Protocol SNMP is used to manage network devices including computers routers and Brother network ready machines ...

Page 16: ...umbers that identifies each device connected to a network An IP address consists of four numbers separated by dots Each number is between 0 and 255 Example In a small network you would normally change the final number 192 168 1 1 192 168 1 2 192 168 1 3 If you have a DHCP BOOTP RARP server in your network typically a UNIX Linux or Windows 2000 XP network the print server will automatically obtain ...

Page 17: ...ommunicate with anything that has an IP address that begins with 192 168 1 X Gateway and router 2 A gateway is a network point that acts as an entrance to another network and sends data transmitted via the network to an exact destination The router knows where to direct data that arrives at the gateway If a destination is located at an external network the router transmits data to the external net...

Page 18: ...are using Personal Firewall software e g the Internet Connection Firewall available in Windows XP disable it Once you are sure that you can print re start your Personal Firewall software Node name Node name appears in current BRAdmin Professional window The default Node name is BRN_xxxxxx xxxxxx is the last six digits of Ethernet address For other models no password is required by default To set a...

Page 19: ...onfiguration List on your print server d Double click the unconfigured device e Enter the IP address Subnet Mask and Gateway if needed of your print server f Click OK g With the correctly programmed IP address you will see the Brother print server in the device list Using the control panel to configure your machine for a network 2 You can configure your machine for a network using the control pane...

Page 20: ...ick the device you want to set a password Click Control tab and then click Change Password Enter the new password f You can now change the print server settings Using the control panel to change the print server settings 2 You can configure and change the print server settings using the control panel LAN menu See Control panel setup on page 70 Using the Remote Setup to change the print server sett...

Page 21: ...ss this application the settings on your machine will be downloaded automatically to your Macintosh and displayed on your Macintosh screen If you change the settings you can upload them directly to the machine a Double click the Macintosh HD icon on your desktop Library Printers Brother then Utilities b Double click the Remote Setup icon c Click TCP IP Wired or Setup Misc d You can now change the ...

Page 22: ...Then in Network printing from Windows basic TCP IP Peer to Peer printing on page 87 and Network printing from a Macintosh on page 89 you will learn how to install the network software and drivers into the operating system running on your computer Confirm your network environment 3 Wireless network connection example 3 Connected to a wireless capable computer with an access point in the network Inf...

Page 23: ...machine your machine is part of this network it receives all print jobs directly from the computer sending the print data An access point is in the network but the computer is not wireless capable 3 This type of network has a central access point at the heart of the network The access point is connected to a computer which is not wireless capable with the Ethenet cable When the Brother wireless ma...

Page 24: ... to configure the printer The access point router and your machine can automatically negotiate using the SecureEasySetup procedure Configuration temporarily using a network cable 3 If there is an Ethernet Hub or Router in the same network as the wireless access point of your machine you can temporarily connect the Hub or Router to the machine using an Ethernet cable B this is an easy way to config...

Page 25: ...ld match the access point The access point and wireless network devices regularly send wireless packets referred to as a beacon which has the SSID information When your wireless network device receives a beacon you can identify the wireless network that is close enough for the radio waves to reach your device Channels 3 Wireless networks use channels Each wireless channel is on a different frequen...

Page 26: ... WPA2 PSK Enables a Wi Fi Protected Access Pre shared key WPA PSK WPA2 PSK which enables the Brother wireless machine to associate with access points using TKIP for WPA PSK or AES for WPA PSK and WPA2 PSK encryption WPA Personal Encryption methods 3 Encryption is used to secure the data that is sent over the wireless network The Brother machine supports the following encryption methods None No enc...

Page 27: ... the control panel 3 You can configure your print server by using the Setup Wizard function This is located in the LAN menu on the machine s control panel See to the steps below for further information a Press Menu b Press a or b to select LAN Press OK c Press a or b to select Network I F Press OK d Press a or b to select WLAN Press OK The wireless network interface will be activated e Press a or ...

Page 28: ...ing a or b and press OK If you select the key which shows go to o If you select a blank key go to p o If you want to change the key you selected in n press a or b to select Change Press OK Go to p If you want to keep the key you selected in n press a or b to select Keep Press OK Go to s p Enter a new WEP key Press OK Go to s To manually enter the text see Entering Text on page 112 q Select the Enc...

Page 29: ...elect Setup WLAN Press OK e Press a or b to select SecurEasySetup Press OK f The wireless network connection status using the SecureEasySetup software will be displayed Connecting WLAN Connected or Connection Error Connecting WLAN is displayed when the print server is trying to make connections to your router or access point Wait till either Connected or Connection Error is displayed Connected is ...

Page 30: ...ows XP disable it Once you are sure that you can print re start your Personal Firewall software Node name Node name appears in current BRAdmin Professional window The default Node name is BRN_xxxxxx or BRW_xxxxxx xxxxxx is the last six digits of Ethernet address a Start the BRAdmin Professional utility from Windows 98 98SE Me 2000 XP by clicking Start Programs Brother Administrator Utilities Broth...

Page 31: ...nfiguration List See Printing the Network Configuration List on page 81 for information on how to print the Network Configuration List on your print server Using the control panel to change the print server settings 3 You can configure and change the print server settings using the control panel LAN menu See Control panel setup on page 70 Using other methods to configure your machine for a wireles...

Page 32: ...AN then Remote Setup where XXXX is your model name b Enter a password if you have set it c Click TCP IP WLAN d You can now change the print server settings Remote Setup for Macintosh 3 The Remote Setup application allows you to configure many MFC settings from a Macintosh When you access this application the settings on your machine will be downloaded automatically to your Macintosh and displayed ...

Page 33: ...r cord b Turn on your computer For Windows 2000 XP and XP Professional x64 Edition you must be logged on with Administrator rights Note Before configuration if you are using personal firewall software disable it Once you are sure that you can print after the installation restart your personal firewall software A wireless network connection is supported only between the Brother machine and an acces...

Page 34: ...n menu will appear Click Install Other Drivers or Utilities Note If this window does not appear use Windows Explorer to run the setup exe program from the root folder of the Brother CD ROM e Click Wireless LAN Setup Wizard f Choose Manual and then click Next ...

Page 35: ...an temporarily connect with a network cable Choose I m able to temporarily connect my device to my access point with a network cable and then click Next Go to h If you do not have a network cable or cannot temporarily connect the Brother wireless device to your access point Choose I m not able to connect my device to my access point with a network cable and then click Next Go to j h Read the Impor...

Page 36: ...Wireless Configuration for Windows 29 4 i Connect the Brother wireless device to your access point using a network cable and click Next Go to n ...

Page 37: ...k Next Go to k If you are using a wired computer choose This PC uses a network cable to connect to the wireless network you must configure the wireless settings from the control panel Click Next and follow the on screen instructions to complete the setup See Using the Setup Wizard from the control panel on page 20 k Read the Important Notice and click Next ...

Page 38: ... take notes on all the settings such as SSID or channel of your PC You will need them to return your PC back to its original wireless settings Item Record the current wireless computer settings Communication mode Infrastructure Ad hoc Channel 1 14 Network name SSID ESSID Authentication method Open system Shared key Encryption None WEP WPA WPA2 PSK Encryption key ...

Page 39: ...eless settings on your PC following the steps below 1 Click Start and then Control Panel 2 Click Network Connections icon 3 Select and right click Wireless Network Connection Click View Available Wireless Networks 4 You can see the Brother wireless machine in the list Select SETUP and click Connect 5 Check the Wireless Network Connection status It may take a few minutes to change from 0 0 0 0 to 1...

Page 40: ...iate the machine with and then click Next Note If your access point is set to not broadcast the SSID you can manually add it by clicking the Add button Follow the on screen instructions for entering the Name SSID and the Channel number If the list is blank check that the access point has power and is broadcasting the SSID and then see if the machine and the access point are within range for wirele...

Page 41: ... appear When configuring your Brother wireless machine you must ensure that it is configured to match the Authentication and Encryption settings of your existing wireless network Choose the Authentication Method and Encryption Mode from the pull downs in each setting box Then enter the Network key and click Next Note If you want to set more than one WEP key click Advanced If you do not know the Au...

Page 42: ...your machine click Change IP Address and enter the necessary IP address settings for your network After making your selection click Next and the Wizard will search for available wireless networks The control panel settings will be automatically changed to WLAN when the wireless settings are sent to your machine s Disconnect the network cable between your access point hub or router and the machine ...

Page 43: ...rn the wireless settings of your computer back to their original settings Click Next u You have completed the wireless setup Click Finish If you would like to continue installing drivers and software necessary for operating your device please select Install MFL Pro Suite from CD ROM menu ...

Page 44: ...a Turn on the machine by plugging in the power cord b Turn on your computer For Windows 2000 XP XP Professional x64 Edition you must be logged on with Administrator rights Note Before configuration if you are using personal firewall software disable it Once you are sure that you can print after the installation restart your personal firewall software A wireless network connection is supported only...

Page 45: ...4 d The CD ROM main menu will appear Click Install Other Drivers or Utilities Note If this window does not appear use Windows Explorer to run the setup exe program from the root folder of the Brother CD ROM e Click Wireless LAN Setup Wizard ...

Page 46: ... function of my access point to configure my wireless dev ice and click Next g Read the Important Notice and click Next h Ensure the on screen message and click Next i Refer to the instruction manual that came with your access point to set the SecureEasySetup mode of your access point ...

Page 47: ...EasySetup and press OK Note If the LCD shows Connection Error please try again k Click Finish l The configuration is finished Relocate the machine to a location that is within range of your access point You have completed the wireless setup If you would like to continue installing drivers and software necessary for operating your device please select Install MFL Pro Suite from CD ROM menu ...

Page 48: ...ccept the change The machine will restart automatically a Turn on the machine by plugging in the power cord b Turn on your computer For Windows 2000 Professional XP you must be logged on with Administrator rights Note Before configuration if you are using personal firewall software disable it Once you are sure that you can print after the installation restart your personal firewall software c Put ...

Page 49: ...n menu will appear Click Install Other Drivers or Utilities Note If this window does not appear use Windows Explorer to run the setup exe program from the root folder of the Brother CD ROM e Click Wireless LAN Setup Wizard f Choose Manual and then click Next ...

Page 50: ...not able to connect my device to my access point with a network cable Click Next h Choose This PC has wireless capability and make sure I am using an access point in infrastructure mode is not checked Click Next i Read the Important Notice and click Next ...

Page 51: ... take notes on all the settings such as SSID or channel of your PC You will need them to return your PC back to its original wireless settings Item Record the current wireless computer settings Communication mode Infrastructure Ad hoc Channel 1 14 Network name SSID ESSID Authentication method Open system Shared key Encryption None WEP WPA WPA2 PSK Encryption key ...

Page 52: ...nstall skipping steps 9 10 and 11 For Windows XP SP2 usersYou can temporarily change the wireless settings on your PC following the steps below 1 Click Start and then Control Panel 2 Click Network Connections icon 3 Select and right click Wireless Network Connection Click View Available Wireless Networks 4 You can see the Brother wireless machine in the list Select SETUP and click Connect 5 Check ...

Page 53: ...Next Note The Default Node name of the NC xxxx where xxxx is your model name is BRW_xxxxxx where xxxxxx is the last six digits of Ethernet address m The wizard will search for wireless networks available from your machine Choose the Ad hoc network you wish to associate the machine with and then click Next If no Ad hoc wireless networks are available you need to create a new wireless network Go to ...

Page 54: ...your network is not configured for Authentication and Encryption the following screen will appear To continue configuration click OK and go to q o If your network is configured for Authentication and Encryption the following screen will appear When configuring your Brother wireless machine you must ensure that it is configured to match the Authentication and Encryption settings of your existing wi...

Page 55: ...x Then enter the Network key and click Next Note If you do not know the Authentication or Encryption settings for network contact your network administrator q Click Next The settings will be sent to your machine The settings will remain unchanged if you click Cancel Note If you want to manually enter the IP address settings of your machine click Change IP Address and enter the necessary IP address...

Page 56: ...tings on your PC to match the machine s wireless settings shown on this screen Click Next The settings shown on this screen are for example only Your settings will not be the same s You have completed the wireless setup Click Finish If you would like to continue installing drivers and software necessary for operating your device please select Install MFL Pro Suite from CD ROM menu ...

Page 57: ...s before you can configure the wireless settings again Press Menu a or b for Factory Reset and select Yes to accept the change The machine will restart automatically a Turn on the machine by plugging in the power cord b Turn on your Macintosh c Put the supplied CD ROM into your CD ROM drive d Double click the Utilities icon and then Wireless LAN Setup Wizard Wireless Configuration for Macintosh 5 ...

Page 58: ... or router using a network cable If you can temporarily connect with a network cable Choose I m able to temporarily connect my device to my access point with a network cable and then click Next Go to g If you do not have a network cable or cannot temporarily connect the Brother wireless device to your access point Choose I m not able to connect my device to my access point with a network cable and...

Page 59: ...Wireless Configuration for Macintosh 52 5 g Read the Important Notice and click Next h Connect the Brother wireless device to your access point using a network cable and click Next Go to m ...

Page 60: ...ck Next Go to j If you are using a wired computer choose This PC uses a network cable to connect to the wireless network you must configure the wireless settings from the control panel Click Next and follow the on screen instructions to complete the setup See Using the Setup Wizard from the control panel on page 20 j Read the Important Notice and click Next ...

Page 61: ... return your PC back to its original wireless settings l To communicate with the un configured wireless machine temporarily change the wireless settings on your PC to match machine s default settings shown on this screen Click Next Item Record the current wireless computer settings Communication mode Infrastructure Ad hoc Channel 1 14 Network name SSID ESSID Authentication method Open system Share...

Page 62: ... Refresh Choose the machine you wish to configure and click Next Note The Default Node name of the NC xxxx where xxxx is your model name is BRW_xxxxxx where xxxxxx is the last six digits of Ethernet address n The wizard will search for wireless networks available from your machine Choose the access point you wish to associate the machine with and then click Next ...

Page 63: ...nnel number If the list is blank check that the access point has power and is broadcasting the SSID and then see if the machine and the access point are within range for wireless communication Then click Refresh SETUP is the default SSID of the machine Do not choose this SSID o If your network is not configured for Authentication and Encryption the following screen will appear To continue installa...

Page 64: ...te If you want to set more than one WEP key click Advanced If you do not know the Authentication or Encryption settings for network contact your network administrator q Click Next The settings will be sent to your machine The settings will remain unchanged if you click Cancel Note If you want to manually enter the IP address settings of your machine click Change IP Address and enter the necessary ...

Page 65: ...ick Next s Using the information you recorded in k return the wireless settings of your computer back to their original settings Click Next t You have completed the wireless setup Click Finish If you would like to continue installing drivers and software necessary for operating your device please select Start Here OSX from CD ROM menu ...

Page 66: ... the machine you must reset the network LAN settings before you can configure the wireless settings again Press Menu a or b for Factory Reset and select Yes to accept the change The machine will restart automatically a Turn on the machine by plugging in the power cord b Turn on your Macintosh c Put the supplied CD ROM into your CD ROM drive d Double click the Utilities icon and then Wireless LAN S...

Page 67: ...up function of my access point to configure my wireless device and click Next f Read the Important Notice and click Next g Ensure the on screen message and click Next h Refer to the instruction manual that came with your access point to set the SecureEasySetup mode of your access point ...

Page 68: ...ecureEasySetup and press OK Note If the LCD shows Connection Error please try again j Click Finish k The configuration is finished Relocate the machine to a location that is within range of your access point You have completed the wireless setup If you would like to continue installing drivers and software necessary for operating your device please select Start Here OSX from CD ROM menu ...

Page 69: ...ust reset the network LAN settings before you can configure the wireless settings again Press Menu a or b for Factory Reset and select Yes to accept the change The machine will restart automatically a Turn on the machine by plugging in the power cord b Turn on your Macintosh c Put the supplied CD ROM into your CD ROM drive d Double click the Utilities icon and then Wireless LAN Setup Wizard ...

Page 70: ... Manual and then click Next f Choose I m not able to connect my device to my access point with a network cable Click Next g Choose This PC has wireless capability and make sure I am using an access point in infrastructure mode is not checked Click Next ...

Page 71: ...s Please make sure you take notes on all the settings such as SSID or channel of your PC You will need them to return your PC back to its original wireless settings Item Record the current wireless computer settings Communication mode Infrastructure Ad hoc Channel 1 14 Network name SSID ESSID Authentication method Open system Shared key Encryption None WEP WPA WPA2 PSK Encryption key ...

Page 72: ...achine s default settings shown on this screen ClickNext k The following list appears If the list is blank check if the machine is powered on and then click Refresh Choose the machine you wish to configure and click Next Note The Default Node name of the NC xxxx where xxxx is your model name is BRW_xxxxxx where xxxxxx is the last six digits of Ethernet address ...

Page 73: ...ireless network Go to o Note If your target Ad hoc network does not appear on the list you can manually add it by clicking the Add button Follow the on screen instructions for entering the Name SSID and the Channel number If the list is blank check if the machine is within range for wireless communication Then click Refresh m If your network is not configured for Authentication and Encryption the ...

Page 74: ...od and Encryption Mode from the pull downs in each setting box Then enter the Network key and click Next Note If you want to set more than one WEP key click Advanced If you do not know the Authentication or Encryption settings for network contact your network administrator o Enter a new SSID and choose the Authentication Method and Encryption Mode from the pull downs in each setting box Then enter...

Page 75: ...necessary IP address settings for your network After making your selection click Next and the Wizard will search for available wireless networks q To communicate with the configured wireless device you must configure your PC to use same wireless settings Manually change the wireless settings on your PC to match the machine s wireless settings shown on this screen Click Next The settings shown on t...

Page 76: ...tion for Macintosh 69 5 r You have completed the wireless setup Click Finish If you would like to continue installing drivers and software necessary for operating your device please select Start Here OSX from CD ROM menu ...

Page 77: ...ons for Windows and Macintosh which also can be used to configure many aspects of the network See Changing the print server settings on page 13 for wired connection or Changing the print server settings on page 23 for wireless connection TCP IP Wired TCP IP WLAN 6 If you connect the machine with the Ethernet cable to your network use the TCP IP Wired menu selections If you connect the machine to t...

Page 78: ...wireless network Where the first entry is the Ethernet address of the print server and the second entry is the name of the print server the name must be the same as the one you put in the etc hosts file If the rarp daemon is not already running start it depending on the system the command can be rarpd rarpd a in rarpd a or something else type man rarpd or refer to your system documentation for add...

Page 79: ...tion Protocol DHCP is one of several automated mechanisms for IP address allocation If you have a DHCP server in your network typically a UNIX Windows 2000 XP network the print server will automatically obtain its IP address from a DHCP server and register its name with any RFC 1001 and 1002 compliant dynamic name services Note If you do not want your print server configured via DHCP BOOTP or RARP...

Page 80: ... not using DHCP or BOOTP to obtain the subnet mask enter the desired subnet mask Check with your network administrator for the subnet mask to use a Press Menu b Press a or b to select LAN Press OK c For Wired Press a or b to select TCP IP Wired For Wireless Press a or b to select TCP IP WLAN Press OK d Press a or b to select Subnet Mask Press OK e Press a or b to select Change Press OK f Enter the...

Page 81: ...DCP models press a or b repeatedly to enter the first three digit number for the Gateway address Press c to enter the second three digit number Repeat this step until you have entered the fourth three digit number to complete the Gateway address Press OK g Press Stop Exit Node Name 6 You can register the machine name on the Network This name is often referred to as a NetBIOS name it will be the na...

Page 82: ...ireless Press a or b to select TCP IP WLAN Press OK d Press a or b to select WINS Config Press OK e Press a or b to select Auto or Static Press OK f Press Stop Exit Auto 6 Automatically uses a DHCP request to determine the IP addresses for the primary and secondary WINS servers You must set the BOOT Method to Auto for this feature to work Static 6 Uses a specified IP address for the primary and se...

Page 83: ...o value the machine will contact this server to register its name with the Windows Internet Name Service Secondary WINS Server IP Address 6 This field specifies the IP address of the secondary WINS server It is used as a backup to the Primary WINS server address If the Primary server is unavailable the machine still can register itself with a secondary server If set to a non zero value the machine...

Page 84: ...rver It is used as a backup to the Primary DNS server address If the Primary server is unavailable the machine will contact the Secondary DNS server APIPA 6 The setting of On will cause the print server to automatically allocate a Link Local IP address in the range 169 254 1 0 169 254 254 255 when the print server cannot obtain an IP address through the BOOT Method you have set see BOOT Method on ...

Page 85: ...t you can complete setup and secure the wireless network Your router or access point must also support SecureEasySetup See Using the SecureEasySetup software to configure your machine for a wireless network on page 22 WLAN Status for wireless network only 6 Status 6 This field displays the current wireless network status Active 11b Active 11g or Connection Error a Press Menu b Press a or b to sele...

Page 86: ...Signal Press OK e The current wireless network signal strength will be displayed Strong Medium Weak or None f Press Stop Exit SSID 6 This field displays the current wireless network SSID The display shows up to 32 characters of the SSID name a Press Menu b Press a or b to select LAN Press OK c Press a or b to select WLAN Status Press OK d Press a or b to select SSID Press OK e The current wireless...

Page 87: ...allows the print server to operate in 100BaseTX full or half duplex or in 10BaseT full or half duplex mode by auto negotiation 100BASE TX Full Duplex 100B FD or Half Duplex 100B HD and 10BASE T Full Duplex 10B FD or Half Duplex 10B HD fix the print server link mode This change is valid after the print server has been reset default is Auto Note If you incorrectly set this value you may not be able ...

Page 88: ...Configuration List The default Node name is BRN_xxxxxx for a wired network or BRW_xxxxxx for a wireless network xxxxxx is the last six digits of Ethernet address The Network Configuration List prints a report listing all the current network configuration including the network print server settings a Press Menu b Press a or b to select Print Reports Press OK c Press a or b to select Network Config ...

Page 89: ...to select Factory Reset Press OK d Press 1 for Factory Reset e Press 1 for Reboot Note For DCP model press for Factory Reset and then press for Reboot f The machine will re start You can now reconnect the network cable and configure the network settings to work with your network ...

Page 90: ...on of a printer driver The remote PC does not have to be connected to a network Note Driver Deployment Wizard is not supported in Windows XP Professional x64 Edition Connection methods 7 The Driver Deployment Wizard supports the two connection methods Brother Peer to peer Network printer 7 The device is connected to the network but each user prints directly to the printer WITHOUT printing through ...

Page 91: ...n the Wizard for the first time you will see a welcome screen Click Next b Select the Device Type you own and click Next c Choose your connection type to the device that you want to print to d Choose the option you require and click Next e If you select the Brother Peer to Peer Network printer the following screen is displayed f Select the printer you wish to install and click Next Print Server Ne...

Page 92: ... to specify information such as the IP address subnet mask and also the gateway address a Choose the printer driver you want to use b If the driver you want to use is not installed on your PC click the Have Disk button and then specify the path of the printer driver c Click Next after you choose the correct driver d After you choose the appropriate driver a summary screen appears Confirm the setti...

Page 93: ... option if you wish to install the driver onto YOUR PC and also create a self running executable file for use with another PC using the same operating system as your own Only Create an Installation Program for other users 7 Select this option if the driver is already installed on your PC and you wish to create a self running executable file without installing the driver again onto your own PC Note...

Page 94: ...rint Queue or Share printer driver only on page 104 for installation details For Windows 98 Me 2000 XP XP Professional x64 Edition users 8 Windows 98 Me 2000 XP XP Professional x64 Edition users can send print job using Brother Peer to Peer Print software provided on the CD ROM which we have supplied with the machine If you have already installed the printer driver jump to Printer driver already i...

Page 95: ...o use Typically this would be Standard TCP IP Port Then click the New Port button e The Standard TCP IP Port Wizard will start f Close Add Port and Properties dialog box For Windows 98 Me users 8 a From the Printers windows select the printer driver you wish to configure b Select File and then Properties c Click the Details tab and click Add Port d In the Add Port dialog select Other and then Brot...

Page 96: ...intosh visit the Brother Solutions Center at http solutions brother com How to select the print server TCP IP 9 a Switch the machine ON b From the Go menu select Applications c Open the Utilities folder d Double click the Printer Setup Utility Icon Mac OS X 10 2 x users click the Print Center icon e Click Add For Mac OS X 10 2 4 to 10 3 x Go to f For Mac OS X 10 4 Go to g Network printing from a M...

Page 97: ...4 to 10 3 x Make the following selection Mac OS X 10 2 4 10 3 x 9 g Select Brother MFC XXXX XXXX is your model name and then click Add Mac OS X 10 4 9 h Click the printer then click Make Default to set the printer as the default printer The printer is now ready ...

Page 98: ...duct You can also download the latest version of the BRAdmin Light utility from http solutions brother com This utility is only available for Macintosh users Node name Node name appears in current BRAdmin Light The default Node name is BRN_xxxxxx for a wired network or BRW_xxxxxx for a wireless network where xxxxxx is the last six digits of the Ethernet address a Start the BRAdmin Light utility by...

Page 99: ...r inserting the CD ROM In this case execute setup exe in the root directory of the CD ROM How to reset the Brother print server to factory default 10 You can reset the print server back to its default factory settings resetting all information such as the password and IP address information See Restoring the network settings to factory default on page 81 My computer cannot find the machine print s...

Page 100: ... The LCD displays LAN Active The print server is connected to the network The LCD does not display LAN Active The print server is not connected to the network c Print the Network Configuration List and check if the settings such as IP address settings are correct for your network The problem may be the result of mismatched or duplicate IP address Verify that the IP address is correctly loaded into...

Page 101: ...dows If the installation failed the Firewall on your computer may be blocking the necessary network connection to the machine In this case you will need to disable the Firewall on your computer and re install the drivers Windows XP SP2 users 1 Click the Start button Settings and then Control Panel 2 Double click Windows Firewall 3 Click the General tab Verify that Off not recommended is selected 4...

Page 102: ...le the Firewall on your computer whenever you install the network drivers Note After the Brother software package is installed enable again your Firewall For instructions on how to re enable your Firewall software refer to your User s Guide or contact the Firewall software manufacturer For Macintosh for a wireless network Select again your machine in the DeviceSelector application located in Macin...

Page 103: ...work have this IP address c Verify that the print server is on your network as follows For Windows 1 Try pinging the print server from the host operating system command prompt with the command ping ipaddress Where ipaddress is the print server IP address note that in some instances it can take up to two minutes for the print server to load its IP address after setting the IP address 2 If a success...

Page 104: ...fault factory settings see Restoring the network settings to factory default on page 81 Error during printing 10 If you try to print while other users are printing large amounts of data e g many pages or color pages with high resolution the printer is unable to accept your print job until the ongoing printing is finished If the waiting time of your print job exceeds a certain limit a time out situ...

Page 105: ...re using a personal Firewall software see the User s Guide for your software or contact the software manufacturer Windows XP SP2 users a Click the Start button Settings and then Control Panel b Double click Windows Firewall c Click the General tab Verify that On is selected d Click the Exceptions tab and Add port button e Enter any name port number 54925 for network scanning and 54926 for PC FAX r...

Page 106: ...lso need to change your machine s network setting to wired LAN temporarily Your machine s network setting will be changed to wireless LAN automatically or during the course of the setup For Windows Wireless Configuration for Windows on page 26 Using the Setup Wizard from the control panel on page 20 For Macintosh Wireless Configuration for Macintosh on page 50 Using the Setup Wizard from the contr...

Page 107: ...you do not want your print server configured via DHCP BOOTP or RARP you must set the BOOT METHOD to static so that the print server has a static IP address This will prevent the print server from trying to obtain an IP address from any of these systems To change the BOOT METHOD use the BRAdmin Professional utility Using BOOTP to configure the IP address A BOOTP is an alternative to rarp that has t...

Page 108: ...t server s IP address can be configured using the Reverse ARP RARP facility on your host computer This is done by editing the etc ethers file if this file does not exist you can create it with an entry similar to the following BRN below is BRW for a wireless network 00 80 77 31 01 07 BRN_310107 Where the first entry is the Ethernet address of the print server and the second entry is the name of th...

Page 109: ...e You must be on the same Ethernet segment that is there cannot be a router between the print server and operating system to use the arp s command If there is a router you may use BOOTP or other methods described in this chapter to enter the IP address If your Administrator has configured the system to deliver IP addresses using BOOTP DHCP or RARP your Brother print server can receive an IP addres...

Page 110: ... use For example Local SET IP SUBNET 255 255 255 0 If you do not have any subnets use one of the following default subnet masks 255 0 0 0 for class A networks 255 255 0 0 for class B networks 255 255 255 0 for class C networks The leftmost group of digits in your IP address can identify the type of network you have The value of this group ranges from 1 through 127 for Class A networks e g 13 27 7 ...

Page 111: ... software e g the Internet Connection Firewall available in Windows XP disable it Once you are sure that you can print re start your Personal Firewall software a Start the CD ROM installation menu program according to the Quick Setup Guide b Select the model name and your language if necessary and then click Install Other Drivers or Utilities c Click Printer Driver Only d Click Next in response to...

Page 112: ...ssional x64 Edition Mac OS 10 2 4 or greater Send only Network scanning Windows 98 98SE Me 2000 XP XP Professional x64 Edition Mac OS 10 2 4 or greater Network PhotoCapture Center Windows 98 98SE Me 2000 XP XP Professional x64 Edition Mac OS 10 2 4 or greater Windows Computer requirements for drivers BRAdmin Professional Peer to Peer software Processor Minimum Speed Pentium II or equivalent for Wi...

Page 113: ...m Speed All base models meet minimum requirements Minimum RAM 128MB for Mac OS X 10 2 4 or greater Recommended RAM 160MB for Mac OS X 10 2 4 or greater Management utilities BRAdmin Professional Windows 98 98SE Me 2000 XP XP Professional x64 Edition BRAdmin Light 1 Mac OS X 10 2 4 or greater Web BRAdmin 1 Windows 2000 Professional Server Advanced Server Windows XP Professional ...

Page 114: ...4 802 11g 1 13 Communication mode Infrastructure Ad hoc 802 11b only Data rates 802 11b 11 5 5 2 1 Mbps 802 11g 54 48 36 24 18 12 11 9 6 5 5 2 1 Mbps Link distance 70m 233 ft at lowest data rate The distance rate will vary upon environment and other equipment location Network Security SSID ESSID 128 104 64 40 bit WEP WPA WPA2 PSK TKIP AES Network printing Windows 98 98SE Me Peer to Peer printing W...

Page 115: ... for Windows XP 256MB for WIndows XP Professional x64 Edition Recommended RAM 128MB for Windows 98 98SE Me 256MB for Windows 2000 Professional 256MB for Windows XP 512MB for WIndows XP Professional x64 Edition Macintosh Computer requirements Computer Wireless AirPort ready Power Macintosh Processor Minimum Speed All base models meet minimum requirements Minimum RAM 128MB for Mac OS X 10 2 4 or gre...

Page 116: ...Subnet Mask Change 000 255 000 255 000 255 000 255 000 000 000 000 1 Exit Gateway Change 000 255 000 255 000 255 000 255 000 000 000 000 Exit Node Name Change BRN_XXXXXX last 6 figures of Ethernet address up to 15 characters BRN_XXXXXX Exit WINS Config Auto Static WINS Server Primary Secondary 000 255 000 255 000 255 000 255 000 000 000 000 DNS Server Primary Secondary 000 255 000 255 000 255 000 ...

Page 117: ...fig Auto Static WINS Server Primary Secondary 000 255 000 255 000 255 000 255 000 000 000 000 DNS Server Primary Secondary 000 255 000 255 000 255 000 255 000 000 000 000 APIPA On Off Setup WLAN Setup Wizard Searching SSID Select SSID Set Select SSID from list or manually add SSID SecureEasySetup Connecting WLAN Connected Connect ion Error LAN WLAN Status Status Active 11b Active 11g Connection Er...

Page 118: ... are shown in bold 1 On connection to the network the machine will automatically set the IP address and Subnet Mask to value appropriate for your network Network I F Wired LAN WLAN Factory Reset Yes No Level1 Level2 Level3 Options Options ...

Page 119: ...r you want For setting a wireless network B For setting other menu selections B Putting spaces B To enter a space in a fax number press c once between numbers To enter a space in a name press c twice between characters Press Key one time two times two times four times five times six times seven times eight times 2 a b c A B C 2 a 3 d e f D E F 3 b 4 g h i G H I 4 g 5 j k l J K L 5 j 6 m n o M N O ...

Page 120: ...ls B Press l or 0 and then press d or c to move the cursor under the special character or symbol you want Then press OK to choose it For DCP models B Press a or b repeatedly to enter the text and press OK press d or c repeatedly to move the cursor Making corrections B If you entered an incorrect letter and want to change it press d to move the cursor under the incorrect letter Press Stop All lette...

Page 121: ...DNS 8 N Network Configuration List 81 Network key 20 Network Printing 87 Network Shared Printing 5 Node Name 74 O Open system 19 P Peer to Peer 4 Ping 93 96 Port9100 8 Print Server Setting 13 23 Protocol 7 R RARP 7 71 101 Remote Setup 13 25 Restoring the network settings 81 RFC 1001 100 S SecureEasySetup 22 Service 100 Shared key 19 Simple Network Configuration 93 SNMP 8 Specifications 105 SSID Se...

Page 122: ...Index 115 W WEP 19 Windows 2000 87 Windows 2000 XP Printing 87 Windows XP 87 WINS Config 75 WINS Server 75 Wireless network 15 WPA PSK 19 ...

Reviews: