background image

12

1

PUNTADA DE UNIÓN

3-6,5 

(1/8-1/4)

 Fija

2,5 (3/32)

37

PUNTADA DECORATIVA

6,5 

(1/4)

 Fija

2,5 (3/32)

37

PUNTADA DECORATIVA

6,5 

(1/4)

 Fija

2,5 (3/32)

37

PUNTADA OVERLOCK 

PESPUNTO

3-6,5 

(1/8-1/4)

 Fija

2,5 (3/32)

37

PUNTADA OVERLOCK 

PESPUNTO

3-6,5 

(1/8-1/4)

 Fija

2,5 (3/32)

37

PUNTADA SMOKING

3-6,5 

(1/8-1/4)

 Fija

2,5 (3/32)

37

PUNTADA DECORATIVA

6,5 

(1/4)

 Fija

2,5 (3/32)

37

PUNTADA DECORATIVA

6,5 

(1/4)

 Fija

2,5 (3/32)

37

PUNTADA DE HOJA

3-6,5 

(1/8-1/4)

 Fija

2,5 (3/32)

37

PUNTADA DE ÁRBOL

3-6,5 

(1/8-1/4)

 Fija

2,5 (3/32)

37

PUNTADA DE HORQUILLA

3-6,5 

(1/8-1/4)

 Fija

2,5 (3/32)

37

PUNTADA DECORATIVA

6,5 

(1/4)

 Fija

2,5 (3/32)

37

PUNTADA DECORATIVA

6,5 

(1/4)

 Fija

2,5 (3/32)

37

PUNTADA DECORATIVA

6,5 

(1/4)

 Fija

2,5 (3/32)

37

PUNTADA DECORATIVA

6,5 

(1/4)

 Fija

2,5 (3/32)

37

PUNTADA DECORATIVA

6,5 

(1/4)

 Fija

2,5 (3/32)

37

PUNTADA DECORATIVA

6,5 

(1/4)

 Fija

2,5 (3/32)

37

PUNTADA DECORATIVA

6,5 

(1/4)

 Fija

2,5 (3/32)

37

PUNTADA DECORATIVA

6,5 

(1/4)

 Fija

2,5 (3/32)

37

Dibujo

Nombre de la puntada

Anchura

recomendada

[mm (pulg.)]

Longitud 

recomendada

[mm (pulg.)]

Página de 

referencia

35

1

36

1

37

1

38

39

40

41

42

43

44

45

46

47

48

49

50

51

52

53

Summary of Contents for 888-X39

Page 1: ...888 X39 Máquina de coser Lea este documento antes de utilizar la máquina Recomendamos que tenga este documento a mano por si necesita consultarlo más adelante Be sure to read this document before using the machine We recommend that you keep this document nearby for future reference ENGLISH ESPAÑOL ...

Page 2: ...red or in use if you notice anything unusual such as an odor heat discoloration or deformation stop using the machine and immediately unplug the power cord When transporting the machine be sure to carry it by its handle Lifting the machine by any other part may damage the machine or result in the machine falling which could cause injuries When lifting the machine be careful not to make any sudden ...

Page 3: ...r adjustment If the Light unit light emitting diode is damaged it must be replaced by authorized dealer In the event a malfunction occurs or adjustment is required first follow the troubleshooting table in the back of the operation manual to inspect and adjust the machine yourself If the problem persists please consult your local authorized Brother dealer Use this machine only for its intended use...

Page 4: ...d dog position switch 14 THREADING THE MACHINE 14 Winding the bobbin 14 Lower threading 17 Upper threading 19 Drawing up the lower thread 23 FABRIC THREAD AND NEEDLE COMBINATIONS 24 2 SEWING BASICS 25 Please read before sewing 25 Starting sewing 25 Trial sewing 26 Changing the sewing direction 26 Sewing thick fabrics 27 Sewing thin fabrics 28 Sewing stretch fabrics 28 Stitching cylindrical pieces ...

Page 5: ...2137 001 5 Blind stitch foot XF1639 001 6 Non stick foot SA114 7 Extra spool pin XE2241 001 8 Spool cap A 130012 024 9 Spool cap B 130013 124 10 Bobbin One is on machine SA156 11 Twin needle 2 0 75 needle X57521 021 12 Needle set 90 14 needle 3 piece set XE5328 001 2 piece set XE7064 001 13 Finger Guard XG3437 001 14 Disc shaped screwdriver XC1074 051 15 Screwdriver XF3557 001 16 Foot controller S...

Page 6: ...I Main power and sewing light switch Page 7 You can turn the main power and sewing light switch on and off J Foot controller jack socket Page 6 Plug in the foot controller plug and connect the machine to the power supply K Presser foot lever Page 19 Used to raise and lower the presser foot L Buttonhole lever 1 Step automatic buttonhole Page 38 Lower the buttonhole lever when sewing buttonholes M H...

Page 7: ...ug on the power cord into an electrical outlet that is in poor condition Turn off the main power and remove the plug in the following circumstances When you are away from the machine After using the machine When the power fails during use When the machine does not operate correctly due to a bad connection or a disconnection During electrical storms Use only the power cord included with this machin...

Page 8: ...y Put the flat side of the needle on a flat surface Check the needle from the top and the sides Dispose of any bent needles safely 1 Parallel space 2 Level surface bobbin cover glass etc Replacing the needle CAUTION 1 Turn off the machine 2 Raise the needle by turning the handwheel toward you counterclockwise so that the mark on the wheel points up 3 Lower the presser foot lever 1 Presser foot lev...

Page 9: ...r foot holder to release the presser foot 4 Put a different presser foot on the needle plate so that the bar on the presser foot is in line with the slot on the shank Before replacing the needle place fabric or paper under the presser foot to prevent the needle from falling into the hole in the needle plate 1 Use a disc shaped screwdriver 2 Needle stopper 3 Needle 2 1 2 3 1 Make sure you insert th...

Page 10: ...ting the stitch length dial to changes the selected pattern to a stretch stitch To set the dial to SS2 set it to SS1 and then turn the dial further to the left direction of the arrow 1 2 If the presser foot is not installed with the correct orientation the needle may strike the presser foot which may bend or break the needle and cause injury When you use the pattern selection dial to choose a patt...

Page 11: ...RETCH BLIND HEM STITCH 3 6 5 1 8 1 4 F 1 5 1 64 1 16 32 44 SCALLOP STITCH 3 6 5 1 8 1 4 F 1 5 1 64 1 16 37 DOUBLE ACTION STITCH 3 6 5 1 8 1 4 F 3 1 64 1 8 35 BRIDGING STITCH 3 6 5 1 8 1 4 F 3 1 64 1 8 35 RAMPART STITCH 3 6 5 1 8 1 4 F 3 1 64 1 8 35 ELASTIC SHELL TUCK STITCH 3 6 5 1 8 1 4 F 3 1 64 1 8 36 BEAD STITCH 3 6 5 1 8 1 4 F 1 5 1 64 1 16 37 ARROWHEAD STITCH 3 6 5 1 8 1 4 F 1 5 1 64 1 16 37 ...

Page 12: ...1 4 Fixed 2 5 3 32 36 COMB STITCH 3 6 5 1 8 1 4 Fixed 2 5 3 32 36 DECORATIVE STITCH 6 5 1 4 Fixed 2 5 3 32 37 FAGOTING STITCH 3 6 5 1 8 1 4 Fixed 2 5 3 32 35 DECORATIVE STITCH 3 6 5 1 8 1 4 Fixed 2 5 3 32 35 DECORATIVE HEM STITCH 3 6 5 1 8 1 4 Fixed 2 5 3 32 35 DECORATIVE STITCH 6 5 1 4 Fixed 2 5 3 32 37 DECORATIVE STITCH 6 5 1 4 Fixed 2 5 3 32 37 DECORATIVE STITCH 6 5 1 4 Fixed 2 5 3 32 37 DECORA...

Page 13: ...4 Fixed 2 5 3 32 37 TREE STITCH 3 6 5 1 8 1 4 Fixed 2 5 3 32 37 LEGS STITCH 3 6 5 1 8 1 4 Fixed 2 5 3 32 37 DECORATIVE STITCH 6 5 1 4 Fixed 2 5 3 32 37 DECORATIVE STITCH 6 5 1 4 Fixed 2 5 3 32 37 DECORATIVE STITCH 6 5 1 4 Fixed 2 5 3 32 37 DECORATIVE STITCH 6 5 1 4 Fixed 2 5 3 32 37 DECORATIVE STITCH 6 5 1 4 Fixed 2 5 3 32 37 DECORATIVE STITCH 6 5 1 4 Fixed 2 5 3 32 37 DECORATIVE STITCH 6 5 1 4 Fi...

Page 14: ...ked on the dial represent the stitch width 1 Stitch width dial When the Straight or Triple Stretch Stitch is selected the needle position can be changed from left to right by adjusting the stitch width dial CAUTION Reverse sewing lever You can use reverse sewing for back tacking and reinforcing seams To sew in reverse push the reverse sewing lever in as far as possible and hold it in that position...

Page 15: ...turn the handwheel toward you counterclockwise once and after the feed dogs are raised lower them using the feed dog position switch 1 Feed dog position switch 2 Down position 3 Up position THREADING THE MACHINE Winding the bobbin CAUTION 1 2 3 We designed the bobbin that comes with this machine If you use bobbins from other models the machine will not work properly Only use the bobbin that comes ...

Page 16: ... bottom CAUTION 6 Slide the spool cap onto the spool pin With the slightly rounded side of the spool cap positioned toward the left slide the spool cap onto the spool pin as far as possible to the right so that the spool is moved to the right end of the spool pin Memo When sewing with fine cross wound thread use the small spool cap and leave a small space between the cap and the spool 1 Spool cap ...

Page 17: ...d through the bobbin winding thread guide use your right hand to wind the end of the thread clockwise around the bobbin five or six times a Pass the end of the thread through the slit in the bobbin winder seat and then pull the thread to the right to cut it 1 Slit in bobbin winder seat with built in cutter X The thread is cut to a suitable length CAUTION b Press the foot controller to start c When...

Page 18: ...about bobbin winding 2 Raise the needle by turning the handwheel toward you counterclockwise and raise the presser foot lever 3 Remove the bobbin cover by sliding it and lift toward you 1 Bobbin cover 4 Put the bobbin in so the thread comes out in the direction shown by the arrow CAUTION Not winding the bobbin properly may cause the thread tension to loosen and may break the needle 1 Wound evenly ...

Page 19: ...the thread through the slit 1 and 2 Then pull the thread toward you to cut it with the cutter 3 At this time check that the bobbin easily rotates counterclockwise 1 Slit 2 Cutter Cut the thread with the cutter 7 Replace the bobbin cover Put the projection into the race retainer groove and push closed 1 Groove 2 Projection Start sewing after threading the lower and upper thread When sewing gathers ...

Page 20: ...ad may become tangled or the needle may bend or break Never use a thread weight of 20 or lower Use the needle and the thread in the correct combination For details on the correct combination of needles and threads refer to FABRIC THREAD AND NEEDLE COMBINATIONS on page 24 The needle threader can be used with a 75 11 through 100 16 home sewing machine needle However the needle threader cannot be use...

Page 21: ...ding the spool with your right hand pull the thread with your left hand and then pass the thread under the thread guide A 1 Thread guide A 8 Pass the thread under the thread guide B from the back to the front Hold the thread with your right hand so that there is no slack in the thread that is pulled out and then pass the thread under the thread guide B with your left hand 1 Thread guide B If the s...

Page 22: ...t be wrapped around the thread take up lever Make sure you raise the needle by turning the handwheel toward you counterclockwise so that the mark on the wheel points up a Put the thread behind the guide above the needle The thread can easily be passed behind the needle bar thread guide by holding the thread in your left hand then feeding the thread with your right hand 1 Needle bar thread guide b ...

Page 23: ... make sure that the hook grabs it f While lightly holding the thread turn the needle threader lever toward the front of the machine toward you The hook will pull the thread through the needle g Raise the needle threader lever h Pull the loop of the thread passed through the eye of the needle toward the rear of the machine 1 Loop of thread CAUTION Note Needle threader cannot be used when using the ...

Page 24: ...u draw up the lower thread put the bobbin back in 1 Raise the presser foot lever 2 Remove the bobbin cover and then reinstall the bobbin 3 Pass the thread along the slit in the direction of the arrow and leave it there without cutting it The bobbin cover should still be removed 4 While lightly holding the end of the upper thread slowly turn the handwheel toward you counterclockwise by hand to lowe...

Page 25: ...n thread 60 90 75 11 90 14 Taffeta Synthetic thread Flannel Gabardine Silk thread 50 Thin fabrics Lawn Cotton thread 60 90 65 9 75 11 Georgette Synthetic thread Challis Satin Silk thread 50 Thick fabrics Denim Cotton thread 30 100 16 50 90 14 100 16 Corduroy Synthetic thread 50 60 Tweed Silk thread Stretch fabrics Jersey Thread for knits 50 60 Ball point needle 75 11 90 14 gold colored Tricot Easi...

Page 26: ...tch or pull the fabric during sewing otherwise the needle may be damaged and you may be injured Do not use bent or broken needles otherwise you may be injured Take care that the needle does not hit basting pins or other objects during sewing The needle may break and you may be injured Always use the correct presser foot If you use the wrong presser foot the needle may hit the presser foot and bend...

Page 27: ...on page 13 for the details a Raise the needle by turning the handwheel toward you counterclockwise b Raise the presser foot lever c Pull the fabric to the left side of the machine and then pass the threads through the thread cutter to cut them 1 Thread cutter Trial sewing A trial piece of fabric should be sewn Use a piece of fabric and thread that are the same as those used for your project and ch...

Page 28: ...he presser foot remains level while sewing allowing the fabric to be fed smoothly 1 Sewing direction 2 Misalignment 1 Raise the presser foot lever 2 Align the beginning of stitching and then position the fabric 3 While holding zigzag foot J level hold the presser foot locking pin black button on the left side pressed in and lower the presser foot lever 3 Presser foot locking pin black button 4 Rel...

Page 29: ...ng is possible Note When you are finished with free arm sewing install the flat bed attachment back in its original position 2 Slide the part that you wish to sew onto the arm and then sew from the top Sewing with a twin needle We have designed your machine so you can sew with this needle and two top threads You can use the same color or two different colors of thread for making decorative stitche...

Page 30: ...ou pass it through the eye of the right needle 1 Left needle thread passes through the needle bar thread guide 2 Right needle thread passes in front of the needle bar thread guide 3 Needle bar thread guide 4 Attach zigzag foot J For details on changing the presser foot refer to Changing the presser foot on page 8 CAUTION 5 Turn on the machine CAUTION 6 Select a stitch CAUTION 1 Bobbin winder shaft...

Page 31: ... bobbin thread was incorrectly threaded the upper thread may be too tight In this case refer to Lower threading on page 17 and rethread the bobbin thread Solution Reduce the tension by turning the upper tension control dial to a lower number Upper tension is too loose Loops appear on the back of the fabric Note If the upper thread was incorrectly threaded the upper thread may be too loose In this ...

Page 32: ...SEWING BASICS 31 ...

Page 33: ... range and set the stitch width dial between 3 and 6 5 Blind hem stitching You can use the Blind Hem Stitch to finish the edge of a project like the hem of a pair of trousers without the stitch showing Blind Hem Stitch sewing on non stretch fabrics Stretch Blind Hem Stitch for stretch fabrics Memo When the size of cylindrical pieces is too small to slide onto the arm or the length is too short the...

Page 34: ... fabric under the presser foot and then adjust the stitch width until the needle slightly catches the fold of the hem 1 Wrong side of fabric 2 Right side of fabric 3 Edge of fabric 4 Desired edge of hem Thick fabric Normal fabric Seen from the side 1 Wrong side of fabric 2 Right side of fabric 3 Edge of fabric 4 Basting stitching 5 5 mm 3 16 inch 6 Desired edge of hem Thick fabric Normal fabric Se...

Page 35: ... sewn slightly over the folded edge 3 Sew at a slow speed 1 Straight stitches 2 Zigzag stitches Elastic stitching You can use the Elastic Stitch for mending sewing elastic or joining fabric Each is explained below Mending 1 Place the reinforcement fabric under the area you want to mend Use the basting pins to hold the reinforcement fabric 2 Following the line of the tear sew using the Elastic Stit...

Page 36: ...ht Stitch 3 Double Action Stitch Fagoting These stitches are used to join two pieces of fabric while leaving a space between their edges This stitch is more decorative when thicker thread is used 1 Use an iron to fold the two pieces of fabric along their seams 2 Baste the two pieces of fabric separated by about 2 mm 1 16 inch onto thin paper or a sheet of water soluble stabilizer 1 Thin paper or w...

Page 37: ...way any excess fabric after stitching Memo When sewing the Elastic Overlock Stitch position the fabric so that its edge is on the left of the needle Feather stitching Use the Feather Stitch as a decorative top stitch when embroidering or when hemming blankets tablecloths or draperies 1 Place the fabric right side up and sew 1 cm 1 2 inch from the edge of the fabric 2 Trim close to the stitching Th...

Page 38: ...stitch width and length of each stitches Stitch Name Pattern Stitch Length mm inch Stitch Width mm inch Triple Zigzag Stretch Stitch Fixed 2 5 3 32 3 6 5 1 8 1 4 Stitch Name Pattern Stitch Name Pattern Scallop Stitch Link Stitch Stretch Overlock Stitch Bead Stitch Arrowhead Stitch Smocking Stitch Parallelogram Stitch Leaf Stitch Lightning Stitch Tree Stitch Square Stitch Legs Stitch 21 1 8 35 16 3...

Page 39: ...f the fabric Making a buttonhole 1 Using tailor s chalk mark the position and length of the buttonhole on the fabric 1 Marks on fabric 2 Buttonhole sewing 2 Attach the buttonhole foot A and set the pattern selection dial to Buttonhole 3 Open the button plate and insert the button 1 Button plate If the button does not fit in the button guide plate Add together the diameter and thickness of the butt...

Page 40: ...he machine 8 The bar tacks of the buttonhole are sewn in the order shown 9 Stop the machine when buttonhole stitching is finished Note If buttonhole sewing was interrupted sew trial stitching one or two times on a scrap piece of fabric before continuing to sew the project Stitching that is continued after being interrupted may be sewn incorrectly If thick seams are being sewn and the fabric does n...

Page 41: ...ake the following adjustments 1 Set the stitch length dial between F and 1 5 and sew the buttonhole on a scrap piece of fabric to observe how the material is fed 2 If the right side of the buttonhole is too open or tight adjust the feeding of the material with the stitch length dial 1 Right side 2 Shorter 3 Longer 3 After obtaining a satisfactory feed on the right side stitch the buttonhole and ob...

Page 42: ...he needle enters the holes without hitting the button If it hits see step 1 7 At a slow speed sew about 10 stitches CAUTION 8 Pull the upper thread at the end of the stitching to the wrong side of the fabric and then tie it with the bobbin thread X Use scissors to cut the upper thread and the bobbin thread at the beginning of the stitching 9 When you are finished attaching the button slide the fee...

Page 43: ... the fabric facing up continue sewing with the zipper on the right side of the presser foot 1 End of zipper opening 2 Basting stitching 3 Zipper Sew the stitching in order from 1 to 3 CAUTION 5 When you have finished sewing remove the basting stitching Always turn off the machine before replacing the presser foot Otherwise injuries may occur if the foot controller is accidentally pressed and the m...

Page 44: ...fabric stretched in order to keep the fabric held down 6 Repeat this motion until the section being darned is filled with parallel lines of stitching 7 When you are finished darning slide the feed dog position switch to see page 14 and turn the handwheel to raise the dogs Memo The feed dog position switch is normally set to the right side The feed dogs come up when you start sewing again Appliqués...

Page 45: ... 32 inch center Align the foot guide with the needle position 4 Set the pattern selection dial to the Zigzag Stitch 5 Place the fabric under the foot so the foot guide is aligned between both edges of the fabric 6 Lower the presser foot and start sewing When blind hem stitching When blind hem stitching using the blind stitch foot turn the screw to adjust the guide to the folded hem For more detail...

Page 46: ...e temperature changes Exposed to high humidity or steam Near a flame heater or air conditioner Outdoors or exposed to direct sunlight Exposed to extremely dusty or oily environments Note In order to extend the life of this machine periodically turn it on and use it Storing this machine for an extended period of time without using it may reduce its efficiency Cleaning CAUTION 1 Turn off the machine...

Page 47: ... sure that the indicated points are aligned before installing the bobbin case 8 Install the needle plate and then tighten the screws 1 Screws Make sure that you install the needle plate securely CAUTION 1 2 2 1 2 1 3 Never use a bobbin case that is scratched otherwise the upper thread may become tangled the needle may break or sewing performance may suffer For a new bobbin case part code XE9326 00...

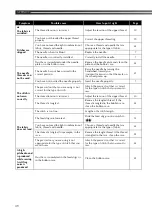
Page 48: ...ve not used the right combination of fabric thread and needle Choose a thread and needle that are appropriate for the type of fabric 24 The presser foot you are using is not appropriate for the type of stitch that you want to sew Attach the presser foot that is correct for the type of stitch that you want to sew The upper thread tension is too tight Loosen the upper thread tension 30 You are pulli...

Page 49: ...d properly 14 You have not threaded the right combination of thread and needle for the fabric you are using Choose a thread and needle that are appropriate for the type of fabric 24 You have not attached the presser foot holder properly Attach the presser foot holder properly The thread tension is incorrect Adjust the tension of the upper thread 30 You have not used a bobbin that has been designed...

Page 50: ...hat you are using is not correct for the type of stitch Attach the presser foot that is correct for the type of stitch that you want to sew The thread tension is incorrect Adjust the tension of the upper thread 30 The thread is tangled Remove the tangled thread If the thread is tangled in the bobbin case clean the bobbin case 45 The fabric does not feed The stitch is too fine Lengthen the stitch l...

Page 51: ...ch 7 Lower threading 17 quick set bobbin 17 23 M Main parts 5 Main power 7 Maintenance 45 N Needle checking 7 combinations with fabric and thread 24 replacing 7 Needle threader 22 O Overedge stitching 36 P Pattern selection dial 9 Patterns 10 Presser foot changing 8 Q Quick set bobbin 17 23 R Race cleaning 45 Reverse sewing lever 13 S Satin stitch 32 Shell tuck stitching 34 Spool cap 15 20 Spool p...

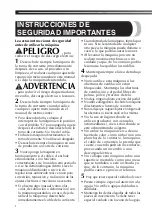
Page 52: ...ada o en uso deje de utilizar la máquina y desenchufe inmediatamente el cable de la corriente Cuando traslade la máquina tómela por su asa Si se levanta desde cualquier otra pieza la máquina puede dañarse o caerse lo que podría causar lesiones Al levantar la máquina procure no realizar movimientos bruscos o sin cuidado ya que de lo contrario podría lesionarse la espalda o las rodillas 4 Mantenga s...

Page 53: ...minación diodo emisor de luz está dañada deberá cambiarla un distribuidor autorizado En caso de que se produzca una avería o se requiera un ajuste consulte primero la tabla de solución de problemas al final del manual de instrucciones para inspeccionar y ajustar la máquina usted mismo Si el problema persiste póngase en contacto con su distribuidor de Brother autorizado más cercano Utilice esta máq...

Page 54: ...ientes de arrastre 14 ENHEBRADO DE LA MÁQUINA 14 Devanado de la bobina 14 Enhebrado del hilo inferior 17 Enhebrado del hilo superior 19 Procedimiento para tirar del hilo inferior 23 COMBINACIONES DE TELA HILO Y AGUJA 24 2 FUNCIONES DE COSTURA BÁSICAS 25 Lea lo siguiente antes de utilizar la máquina 25 Comienzo de la costura 25 Costura de prueba 26 Cambio de la dirección de costura 26 Costura en te...

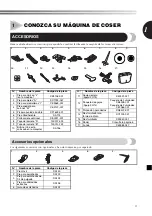
Page 55: ...Pie antiadherente SA114 7 Portacarrete adicional XE2241 001 8 Tapa del carrete A 130012 024 9 Tapa del carrete B 130013 124 10 Bobina Una está colocada en la máquina SA156 11 Aguja gemela aguja 2 0 75 X57521 021 12 Paquete de agujas Aguja 90 14 Paquete de 3 unidades XE5328 001 Paquete de 2 unidades XE7064 001 13 Protección para dedos XG3437 001 14 Destornillador con forma de disco XC1074 051 15 De...

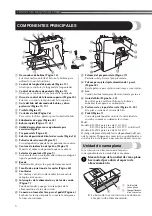
Page 56: ...té en uso I Interruptor de la alimentación y de luz de cosido Página 7 Puede encender y apagar el interruptor de la alimentación y de luz de cosido J Conexión o toma eléctrica para el pedal Página 6 Enchufe la clavija del pedal y conecte la máquina a la toma de corriente K Palanca del pie prensatela Página 19 Permite subir y bajar el pie prensatela L Palanca para ojales ojal automático de 1 paso P...

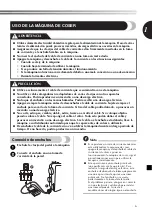
Page 57: ...a No inserte el enchufe del cable de corriente en una toma en mal estado Apague la máquina y desenchufe el cable de la corriente en las situaciones siguientes Cuando se aleje de la máquina Cuando haya terminado de utilizar la máquina Si se produce un fallo de tensión durante el funcionamiento Si la máquina no funciona correctamente debido a una mala conexión o a una desconexión Durante tormentas e...

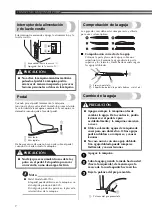
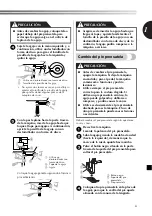
Page 58: ...una superficie lisa Examine la aguja desde la parte superior y los laterales Deseche de manera segura las agujas dobladas 1 Espacio paralelo 2 Superficie nivelada tapa de la bobina cristal etc Cambio de la aguja PRECAUCIÓN 1 Apague la máquina 2 Suba la aguja girando la rueda hacia usted hacia la izquierda de manera que la marca de la rueda apunte hacia arriba 3 Baje la palanca del pie prensatela 1...

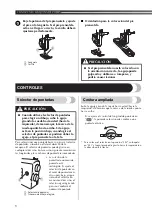
Page 59: ...otón negro situado en la parte trasera del soporte del pie prensatela para soltar el pie prensatela 4 Coloque otro pie prensatela en la placa de la aguja para que la varilla del pie quede alineada con la ranura de la lengüeta Antes de cambiar la aguja coloque tela o papel debajo del pie prensatela para evitar que la aguja caiga en el orificio de la placa de la aguja 1 Utilice un destornillador con...

Page 60: ...riba Si se ajusta el control de longitud de puntada en la puntada seleccionada cambia a una puntada elástica Para colocar el selector en la posición SS2 colóquelo en SS1 y luego termine de girarlo hacia la izquierda en la dirección de la flecha 1 2 Si el pie prensatela no está colocado con la orientación correcta la aguja puede golpearlo y doblarse o romperse y podría causar lesiones Cuando utilic...

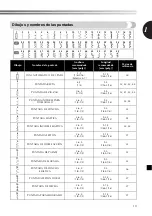
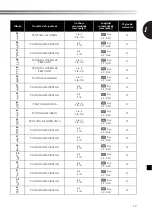
Page 61: ...64 3 32 34 PUNTADA INVISIBLE ELÁSTICA 3 6 5 1 8 1 4 F 1 5 1 64 1 16 32 44 PUNTADA FESTÓN 3 6 5 1 8 1 4 F 1 5 1 64 1 16 37 PUNTADA DE DOBLE ACCIÓN 3 6 5 1 8 1 4 F 3 1 64 1 8 35 PUNTADA DE PUENTE 3 6 5 1 8 1 4 F 3 1 64 1 8 35 PUNTADA DE MURALLA 3 6 5 1 8 1 4 F 3 1 64 1 8 35 PUNTADA DE CONCHA ELÁSTICA 3 6 5 1 8 1 4 F 3 1 64 1 8 36 PUNTADA FESTÓN DOBLE 3 6 5 1 8 1 4 F 1 5 1 64 1 16 37 PUNTADA DE FLECH...

Page 62: ...Fija 2 5 3 32 36 PUNTADA COMBINADA 3 6 5 1 8 1 4 Fija 2 5 3 32 36 PUNTADA DECORATIVA 6 5 1 4 Fija 2 5 3 32 37 VAINICA 3 6 5 1 8 1 4 Fija 2 5 3 32 35 PUNTADA DECORATIVA 3 6 5 1 8 1 4 Fija 2 5 3 32 35 PUNTADA DE DOBLADILLO DECORATIVO 3 6 5 1 8 1 4 Fija 2 5 3 32 35 PUNTADA DECORATIVA 6 5 1 4 Fija 2 5 3 32 37 PUNTADA DECORATIVA 6 5 1 4 Fija 2 5 3 32 37 PUNTADA DECORATIVA 6 5 1 4 Fija 2 5 3 32 37 PUNTA...

Page 63: ... 3 32 37 PUNTADA DE ÁRBOL 3 6 5 1 8 1 4 Fija 2 5 3 32 37 PUNTADA DE HORQUILLA 3 6 5 1 8 1 4 Fija 2 5 3 32 37 PUNTADA DECORATIVA 6 5 1 4 Fija 2 5 3 32 37 PUNTADA DECORATIVA 6 5 1 4 Fija 2 5 3 32 37 PUNTADA DECORATIVA 6 5 1 4 Fija 2 5 3 32 37 PUNTADA DECORATIVA 6 5 1 4 Fija 2 5 3 32 37 PUNTADA DECORATIVA 6 5 1 4 Fija 2 5 3 32 37 PUNTADA DECORATIVA 6 5 1 4 Fija 2 5 3 32 37 PUNTADA DECORATIVA 6 5 1 4 ...

Page 64: ... que la marca de la rueda apunte hacia arriba Los números marcados en el control representan la anchura de la puntada 1 Control de anchura de puntada Cuando se selecciona la puntada recta o la puntada elástica triple puede cambiarse la posición de la aguja de izquierda a derecha mediante el control de anchura de puntada PRECAUCIÓN Pulsador de retroceso Con el pulsador de retroceso puede hilvanar e...

Page 65: ...acia usted hacia la izquierda y una vez levantados los dientes de arrastre bájelos utilizando el selector de posición de dientes de arrastre 1 Selector de posición de dientes de arrastre 2 Posición bajada 3 Posición levantada ENHEBRADO DE LA MÁQUINA Devanado de la bobina PRECAUCIÓN 1 2 3 Hemos diseñado la bobina que se proporciona con esta máquina Si utiliza bobinas de otros modelos la máquina no ...

Page 66: ...rior PRECAUCIÓN 6 Introduzca la tapa del carrete en el portacarrete Con la cara ligeramente redonda de la tapa del carrete colocada hacia la izquierda introduzca dicha tapa en el portacarrete lo máximo posible hacia la derecha de forma que el carrete se desplace hacia el extremo derecho del portacarrete Recuerde Cuando cosa con hilo fino cruzado utilice la tapa de carrete pequeña y deje un pequeño...

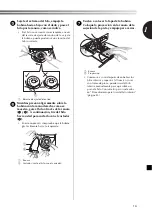
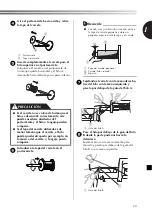
Page 67: ...na utilice la mano derecha para enrollar cinco o seis veces el extremo del hilo en sentido de las agujas del reloj alrededor de la bobina a Pase el extremo del hilo por la ranura de la base de la devanadora y luego tire del hilo hacia la derecha para cortarlo 1 Ranura de la base de la devanadora con cortador integrado X El hilo se corta a una longitud adecuada PRECAUCIÓN b Pulse el pedal para come...

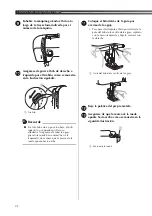
Page 68: ...la página 14 si desea información sobre el devanado de la bobina 2 Suba la aguja girando la rueda hacia usted hacia la izquierda y suba la palanca del pie prensatela 3 Retire la tapa de la bobina deslizándola y levántela hacia usted 1 Tapa de la bobina 4 Coloque la bobina de modo que el hilo salga en la dirección que indica la flecha PRECAUCIÓN Un devanado incorrecto de la bobina puede disminuir l...

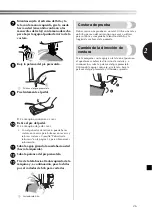
Page 69: ... y 2 A continuación tire del hilo hacia usted para cortarlo con el cortador 3 En este momento compruebe que la bobina gira fácilmente hacia la izquierda 1 Ranura 2 Cortador corte el hilo con el cortador 7 Vuelva a colocar la tapa de la bobina Coloque la proyección en la ranura de la sujeción de la pista y empuje para cerrar 1 Ranura 2 Proyección Comience a coser después de enhebrar los hilos infer...

Page 70: ...ancharse o la aguja puede doblarse o romperse No utilice en ningún caso un hilo del 20 o inferior Utilice la combinación correcta de aguja e hilo Si desea información sobre la combinación correcta de agujas e hilos consulte COMBINACIONES DE TELA HILO Y AGUJA en la página 24 El enhebrador de aguja puede utilizarse con una aguja de máquina de coser doméstica de 75 11 a 100 16 No obstante el enhebrad...

Page 71: ...a 2 Carrete hilo cruzado 3 Espacio 7 Sujetando el carrete con la mano derecha tire del hilo con la mano izquierda y páselo por debajo de la guía del hilo A 1 Guía del hilo A 8 Pase el hilo por debajo de la guía del hilo B desde la parte posterior hacia la delantera Sujete el hilo con la mano derecha para tensarlo y páselo por debajo de la guía del hilo B con la mano izquierda 1 Guía del hilo B Si ...

Page 72: ...dor Asegúrese de subir la aguja girando la rueda hacia usted hacia la izquierda de manera que la marca de la rueda apunte hacia arriba a Coloque el hilo detrás de la guía por encima de la aguja Para pasar fácilmente el hilo por detrás de la guía del hilo de la varilla de la aguja sujételo con la mano izquierda y hágalo avanzar con la derecha 1 Guía del hilo de la varilla de la aguja b Baje la pala...

Page 73: ... aguja para asegurarse de que lo agarra con el ganchillo f Mientras sujeta suavemente el hilo gire la palanca del enhebrador de aguja hacia la parte delantera de la máquina hacia usted El ganchillo tirará del hilo a través de la aguja g Suba la palanca del enhebrador h Saque el lazo del hilo pasado por el ojo de la aguja hacia la parte trasera de la máquina 1 Lazo de hilo PRECAUCIÓN Nota El enhebr...

Page 74: ...tes de tirar del hilo inferior vuelva a colocar la bobina 1 Suba la palanca del pie prensatela 2 Retire la tapa de la bobina y a continuación vuelva a colocar la bobina 3 Pase el hilo por la ranura en la dirección de la flecha y no lo corte Deberá quitar la tapa de la bobina 4 Mientras sujeta ligeramente un extremo del hilo superior gire lentamente la rueda a mano hacia usted hacia la izquierda pa...

Page 75: ...Hilo sintético Franela gabardina Hilo de seda 50 Telas finas Lino Hilo de algodón 60 90 65 9 75 11 Punto Georgette Hilo sintético Challis satén Hilo de seda 50 Telas gruesas Tejano Hilo de algodón 30 100 16 50 90 14 100 16 Pana Hilo sintético 50 60 Tweed Hilo de seda Telas elásticas Tejido de punto Hilo para punto calado 50 60 Aguja de punta redonda 75 11 90 14 color dorado Punto de lana Telas que...

Page 76: ...iezas en movimiento No estire ni empuje la tela durante la costura pues la aguja podría dañarse y producir lesiones No utilice agujas dobladas o rotas ya que podría lesionarse Tenga cuidado de que la aguja no golpee los alfileres de hilvanado ni otros objetos durante la costura La aguja podría romperse y usted podría lesionarse Utilice siempre el pie prensatela adecuado Si utiliza un pie prensatel...

Page 77: ... más información a Suba la aguja girando la rueda hacia usted hacia la izquierda b Suba la palanca del pie prensatela c Tire de la tela hacia el lado izquierdo de la máquina y a continuación pase los hilos por el cortador de hilo para cortarlos 1 Cortador de hilo Costura de prueba Debe coserse una prueba en un retal Utilice una tela y un hilo que sean del mismo tipo que vaya a utilizar para su lab...

Page 78: ...zca nivelado durante la costura y la tela se deslice bien 1 Dirección de costura 2 Alineación incorrecta 1 Suba la palanca del pie prensatela 2 Alinee el principio de la costura y a continuación coloque la tela 3 Con el pie para zig zag J nivelado mantenga pulsada la patilla de bloqueo del pie prensatela botón negro situado en la parte izquierda y baje la palanca del pie prensatela 3 Patilla de bl...

Page 79: ...re Nota Cuando termine con la costura de brazo libre vuelva a colocar la unidad de cama plana en su posición original 2 Deslice la parte que desee coser sobre el brazo y a continuación cosa desde la parte superior Costura con aguja gemela La máquina está diseñada para que pueda coser con esta aguja y dos hilos superiores Puede utilizar hilo de un mismo color o de diferentes colores para realizar p...

Page 80: ...uja izquierda pasa a través de la guía del hilo de la varilla de la aguja 2 El hilo de la aguja derecha pasa delante de la guía del hilo de la varilla de la aguja 3 Guía del hilo de la varilla de la aguja 4 Coloque el pie para zig zag J Si desea información sobre cómo cambiar el pie prensatela consulte Cambio del pie prensatela en la página 8 PRECAUCIÓN 5 Encienda la máquina PRECAUCIÓN 6 Seleccion...

Page 81: ...ra incorrectamente el hilo superior puede quedar demasiado tenso En este caso consulte Enhebrado del hilo inferior en la página 17 y vuelva a enhebrar el hilo de la bobina Solución Reduzca la tensión girando el disco de control de la tensión superior a un número inferior El hilo superior está demasiado flojo Aparecerán ondas en el revés de la tela Nota Si el hilo superior no está enhebrado correct...

Page 82: ...FUNCIONES DE COSTURA BÁSICAS 31 ...

Page 83: ... 6 5 Costura invisible para dobladillo La costura invisible para dobladillo puede utilizarse para terminar el borde de una labor de costura como el dobladillo de unos pantalones sin que se vea la puntada Costura invisible para dobladillo costura en telas no elásticas Costura invisible elástica para telas elásticas Recuerde Cuando el tamaño de las piezas cilíndricas sea demasiado pequeño para desli...

Page 84: ...que la tela debajo del pie prensatela y a continuación ajuste la anchura de la puntada hasta que la aguja llegue ligeramente al pliegue del dobladillo 1 Tela del revés 2 Tela del derecho 3 Borde de la tela 4 Borde del dobladillo deseado Tela pesada Tela normal Visto desde el lateral 1 Tela del revés 2 Tela del derecho 3 Borde de la tela 4 Costura de hilvanado 5 5 mm 3 16 pulg 6 Borde del dobladill...

Page 85: ...ima del borde doblado 3 Cosa a una velocidad baja 1 Puntadas rectas 2 Puntadas de zig zag Costura elástica La puntada elástica puede utilizarse para zurcir coser gomas o unir trozos de tela A continuación se explica cada opción Zurcido 1 Coloque la tela de refuerzo debajo del área que desee zurcir Utilice los alfileres de hilvanado para sujetar la tela de refuerzo 2 Siga la línea de la zona rasgad...

Page 86: ...ón Vainica Estos tipos de puntada se utilizan para unir dos trozos de tela dejando un espacio entre sus bordes Esta puntada es más decorativa cuando se utiliza un hilo más grueso 1 Utilice una plancha para doblar los dos trozos de tela por sus costuras 2 Dejando una separación de unos 2 mm 1 16 pulg hilvane los dos trozos de tela a un papel fino o una hoja de un estabilizador soluble en agua 1 Pap...

Page 87: ... la costura Recuerde Al utilizar al puntada overlock elástica coloque la tela de forma que su borde quede a la izquierda de la aguja Costura de plumas La puntada de plumas puede emplearse como costura sobrepuesta decorativa para el bordado o para los dobladillos de mantas manteles y paños 1 Coloque la tela con el derecho hacia arriba y cosa 1 cm 1 2 pulg desde el borde de la tela 2 Corte cerca de ...

Page 88: ...endadas de cada puntada Nombre de la puntada Dibujo Longitud de la puntada mm pulg Anchura de la puntada mm pulg Puntada elástica en zig zag triple Fija 2 5 3 32 3 6 5 1 8 1 4 Nombre de la puntada Dibujo Nombre de la puntada Dibujo Puntada festón Puntada de unión Puntada overlock pespunto Puntada festón doble Puntada de flecha Puntada smoking Puntada paralelogramo Puntada de hoja Puntada escalera ...

Page 89: ... la tela Realización de un ojal 1 Con un trozo de tiza marque en la tela la posición y la longitud del ojal 1 Marcas sobre la tela 2 Costura de ojales 2 Coloque el pie para ojales A y ajuste el selector de puntadas en ojal 3 Abra la placa para botones e inserte el botón 1 Placa para botones Si el botón no cabe en la placa de la guía del botón Sume el diámetro y el grosor del botón y a continuación...

Page 90: ...quina 8 Las tachuelas del ojal se cosen en el orden que se muestra 9 Pare la máquina cuando termine de coser el ojal Nota Si se ha interrumpido la costura del ojal cosa unas puntadas de prueba una o dos veces en un retal antes de proseguir con la labor Es posible que la costura que se continúe después de la interrupción no se realice correctamente Si se van a coser costuras gruesas y la tela no av...

Page 91: ... longitud de puntada entre F y 1 5 y cosa el ojal en un retal para observar cómo se arrastra el material 2 Si el lado derecho del ojal está demasiado abierto o apretado ajuste el avance del material con el control de longitud de puntada 1 Lado derecho 2 Más corta 3 Más larga 3 Tras obtener el avance satisfactorio del material en el lado derecho cosa el ojal y observe el avance 4 Si el lado izquier...

Page 92: ...ificios sin golpear el botón Si golpeara consulte el paso 1 7 Cosa unas 10 puntadas a una velocidad baja PRECAUCIÓN 8 Saque el hilo superior al final de la costura por el revés de la tela y a continuación anúdelo al hilo de la bobina X Con unas tijeras corte el hilo superior y el hilo de la bobina al comienzo de la costura 9 Una vez colocado el botón deslice el selector de posición de dientes de a...

Page 93: ...la máquina PRECAUCIÓN 4 Con el derecho de la tela hacia arriba continúe cosiendo con la cremallera en el lado derecho del pie prensatela 1 Extremo de la abertura de la cremallera 2 Costura de hilvanado 3 Cremallera Cosa las puntadas en orden de 1 a 3 PRECAUCIÓN 5 Una vez finalizada la costura quite la costura de hilvanado Apague siempre la máquina antes de cambiar el pie prensatela De lo contrario...

Page 94: ...sta que la zona por zurcir quede rellenada de líneas paralelas de puntadas 7 Una vez finalizado el zurcido deslice el selector de posición de dientes de arrastre hasta la posición consulte la página 14 y gire la rueda para levantar los dientes de arrastre Recuerde Normalmente el selector de posición de dientes de arrastre está colocado en el lado derecho Los dientes de arrastre se levantan cuando ...

Page 95: ...n la posición de la aguja 4 Ajuste el selector de puntadas en la puntada de zig zag 5 Coloque la tela debajo del pie de manera que la guía del pie quede alineada entre ambos bordes de la tela 6 Baje el pie prensatela y comience a coser Para coser puntadas invisibles para dobladillo Para coser costuras invisibles para dobladillo utilizando el pie para puntada invisible gire el tornillo para ajustar...

Page 96: ...bios extremos de temperatura Lugares expuestos a alta humedad o vapor Cerca de una llama calefactor o aparato de aire acondicionado En el exterior o lugares expuestos a la luz directa del sol Entornos extremadamente polvorientos o con grasa Nota Para prolongar la vida útil de esta máquina enciéndala y utilícela de vez en cuando Si se guarda durante un período de tiempo prolongado sin utilizarse su...

Page 97: ...ueden alineados antes de colocar la caja de bobina 8 Coloque la placa de la aguja y apriete los tornillos 1 Tornillos Compruebe que haya instalado correctamente la placa de la aguja PRECAUCIÓN 1 2 2 1 2 1 3 Nunca utilice una caja de bobina que esté rayada pues de hacerlo es posible que el hilo superior se enganche la aguja se rompa o se vea afectado el rendimiento de la costura Si desea una caja d...

Page 98: ...or con forma de disco para apretar firmemente el tornillo 8 La aguja está doblada o poco afilada Cambie la aguja 7 El hilo superior no se ha enhebrado correctamente Corrija el enhebrado del hilo superior 19 No ha utilizado la combinación correcta de tela hilo y aguja Elija un hilo y una aguja que sean adecuados para el tipo de tela 24 El pie prensatela que utiliza no es adecuado para el tipo de pu...

Page 99: ...s para esta máquina 14 La bobina no está colocada correctamente Vuelva a colocar correctamente el hilo de la bobina 17 La tensión del hilo no es correcta No ha enhebrado el hilo superior correctamente Corrija el enhebrado del hilo superior 19 No ha enrollado el hilo de la bobina correctamente Enrolle el hilo de la bobina correctamente 14 No ha enhebrado la combinación correcta de hilo y aguja para...

Page 100: ...manera que la marca de la rueda apunte hacia arriba 21 No ha insertado la aguja correctamente Inserte la aguja correctamente 7 Al coser el resultado de las puntadas no es el correcto El pie prensatela que está utilizando no es el correcto para el tipo de puntada Coloque el pie prensatela adecuado para el tipo de puntada que desea realizar La tensión del hilo no es correcta Ajuste la tensión del hi...

Page 101: ...bujos 10 Dientes de arrastre 14 Disco de control de la tensión superior 30 E Enhebrado aguja gemela 29 enhebrador de aguja 22 hilo inferior 17 hilo superior 19 Enhebrado del hilo inferior 17 bobina rápida 17 23 Enhebrado del hilo superior 19 Enhebrador de aguja 22 Estilo de brazo libre 28 F Fruncidos 43 I Interruptor de la alimentación 7 Interruptor de luz de cosido 7 L Limpieza 45 Limpieza de la ...

Page 102: ......

Page 103: ......
Page 104: ...sit us at http support brother com where you can get product support and answers to frequently asked questions FAQs Visítenos en http support brother com donde hallará consejos para la solución de problemas así como la lista de preguntas y respuestas más frecuentes ...

Reviews: