30
V. 1.3-24-04-19
brookvent.co.uk
T: +44 (0) 28 9061 6505
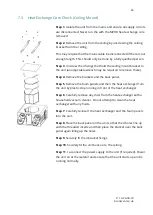
7.3 Heat Exchange Core Check (Ceiling Mount)
Step 1.
Isolate the unit from the mains and ensure all supply circuits
are disconnected. Never run the with the MVHR heat exchange core
removed.
Step 2
. Remove the unit from the ceiling by unscrewing the ceiling
bracket from the ceiling.
This may require that the mains cable be disconnected if there is not
enough length. This should only be done by a fully qualified person.
Step 3
. Unscrew the 4 fixings that hold the ceiling mount bracket to
the unit (an adjustable wrench may be required to remove these).
Step 4
. Remove the brackets and the back panel.
Step 5
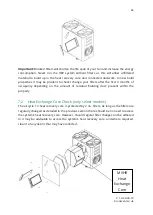
. Remove the foam panels and then the heat exchanger from
the unit by plastic strip running in front of the heat exchanger.
Step 6
. Carefully remove any dust from the heat exchanger with a
household vacuum cleaner. Do not attempt to clean the heat
exchanger with any fluids.
Step 7
. Carefully re-insert the heat exchanger and the foam panels
into the unit.
Step 8
. Place the back panel on the unit so that the 4 holes line up
with the threaded inserts and then place the bracket over the back
panel again lining up the holes.
Step 9
. Securely fit the 4 bracket fixings.
Step 10
. Securely fit the unit back on to the ceiling.
Step 11
. re-connect the power supply to the unit (if required). Power
the unit on at the isolator and ensure that the unit starts up and is
running normally.

