background image

TESSERA - V3.0 | USER M ANUAL - REV B | 16.2 - GENERAL

241

For  a correct  com m unication  within  a network between  processors and/or  rem ote com puters, 

different IP addresses within the sam e IP range should be defined in each device.   

16.2 - GENERAL

16.2.1 - AUTO LOAD PREVIOUS PROJECT

When the processor  is switched on it will display the Start Screen with options to create new or  

open existing projects. A list of project files will appear  in the order  of last used and if no file is 

selected within 10 seconds, the processor will autom atically load the previously opened file. 

To  disable the Auto  load  feature, untick  Auto-load  Previous Project. The tim e for  a project  to  

auto-load is also adjusted here. 

N OTE      It is possible to change the autoload countdown tim e to a value between 0-3600 

seconds. For using this in a live situation, set this value to zero. In the event of a 

power cut the processor will reboot straight into the current project file with m inim al 

delay.

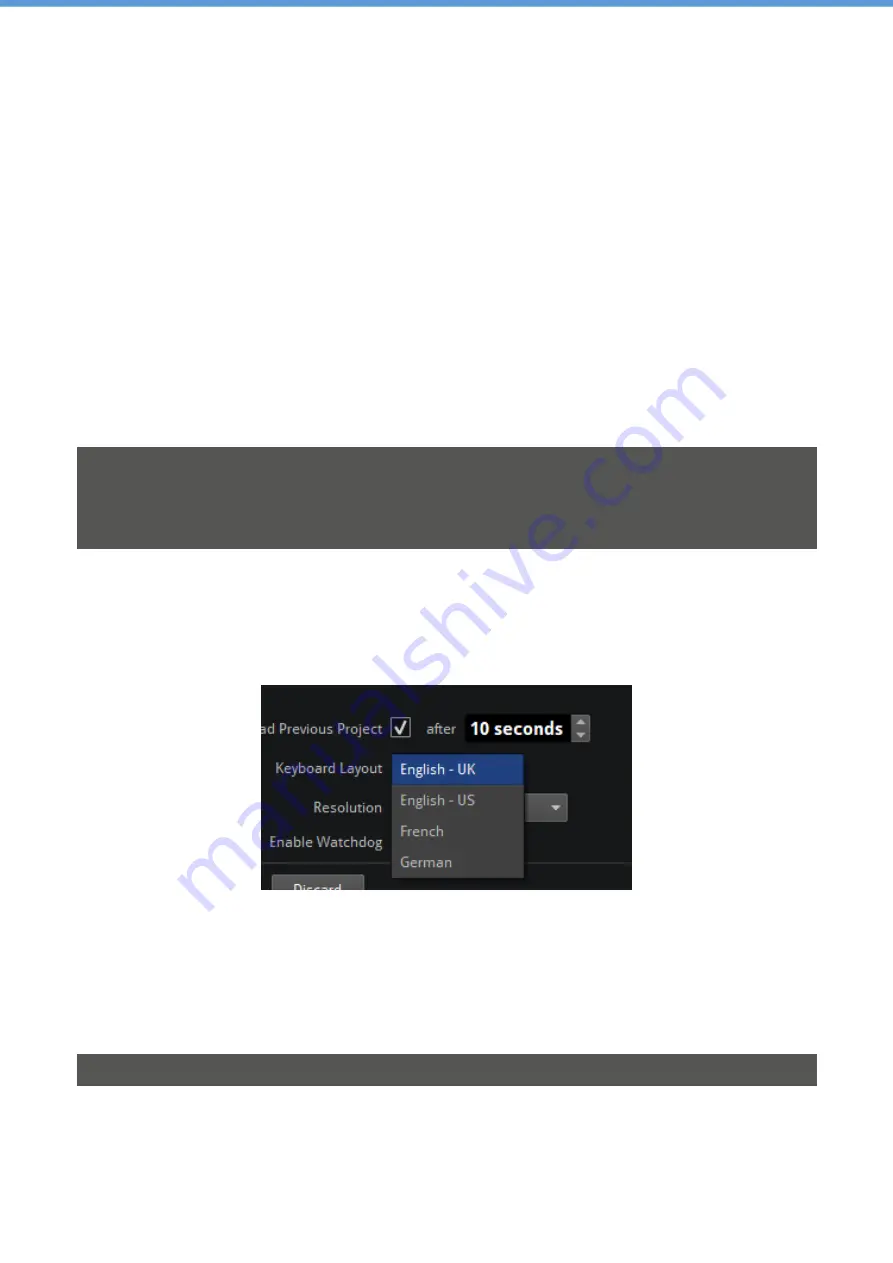
16.2.2 - KEYBOARD LAYOUT

Different   options   can   be   selected   to   switch   between   languages   that   use   different   keyboard  

layouts.

Fig 16.3 - Keyboard Layout options 

16.2.3 - RESOLUTION

Display resolutions for  the m onitor  connected  via DisplayPort  to  display the local  UI can  be 

changed. This value is set by default to read the native resolution form  the connected m onitor.

N OTE      This option doesn’t affect the video input or output of the project.

Summary of Contents for TESSERA M2

Page 1: ...USER MANUAL TESSERA PROCESSING Tessera Version 3 0...

Page 2: ...2 TESSERA V3 0 USER MANUAL REV B...

Page 3: ...ntact our support team using the following details EU SUPPORT Available between 10 00 and 18 00 EST l Tel 44 0 20 7471 9444 l Email support bromptontech com Urgent out of hours support l Tel 44 0 20 7...

Page 4: ...w section Enable HDR on page 65 l New section Device Properties on page 74 l New section ThermaCal on page 79 l Updated Tessera S8 details for Inputs 4K Sources for SX40 and S8 on page 139 l New secti...

Page 5: ...esets UI images page 125 and page 126 l Updated Processing and ChromaTune tiles and figure captions page 155 and page 171 l New section ChromaTune Curves on page 176 l Section update Genlock Settings...

Page 6: ...2 7 Tessera T1 LED Processor 29 Section 3 Quickstart 31 3 1 Tessera LED Processor Setup 31 3 2 Tessera Project Setup 32 3 3 Connecting Fixtures 33 Section 4 System Configuration 35 4 1 Connecting Fixt...

Page 7: ...Canvas Resolutions 65 7 4 Low Latency Mode 67 7 5 Mapping Options 68 Section 8 Fixtures 71 8 1 Fixture Libraries 71 8 2 Fixture Properties 71 8 3 Device Properties 74 8 4 OSD 77 8 5 Studio mode 78 8...

Page 8: ...ection 11 Processing 155 11 1 Scaling and Cropping 155 11 2 Scaling and Cropping 160 11 3 Active Area 167 11 4 ChromaTune 171 Section 12 Test Patterns 177 12 1 Processor Test Patterns 177 12 2 Custom...

Page 9: ...Rate 223 Section 15 Live Control 225 15 1 Enabling Live Control 226 15 2 Parameter Indicators 227 15 3 Control Profiles 228 15 4 DMX Control 234 15 5 EDMX Control 235 15 6 Tessera Control 236 Section...

Page 10: ...B Cable Requirements For Tessera SX40 and XD 265 Tessera SX40 and XD Cable Requirements 265 10G Ethernet Compatibility 266 Appendix C Setting IP Addresses 269 Setting the IP Address on Windows Systems...

Page 11: ...ight to make improvements and changes to the hardware and software described in this document at any time and without notice Brompton Technology Ltd assumes no responsibility or liability for any erro...

Page 12: ...of the processor should never be supported entirely on the rack ears as this can lead to distortion especially if the rack is roughly handled The processors and distribution units should only be open...

Page 13: ...ly offer It is capable of supporting a nominal 9 million pixels and 4k canvas resolutions with HDMI 2 0 and 12G SDI inputs Eight 10 Gigabit ports over 4 trunks that allow data transfer using single mo...

Page 14: ...upporting a nominal 4 5 million pixels half of the Tessera SX40 and 4k canvas resolutions with HDMI 2 0 and 12G SDI inputs Eight 1 Gigabit ports that allow data transfer over CAT5e copper cable See Te...

Page 15: ...ame number of pixels across four Gigabit outputs as the Tessera M2 See Tessera S4 LED Processor on page 27 for more information 2 1 5 TESSERA T1 LED PROCESSOR The Tessera T1 is ideal for creative show...

Page 16: ...ssera Remote software on a Windows PC or Mac connected to the processor via a Gigabit Ethernet network The Tessera Remote software can be used in Offline Editor mode to allow preparation of project fi...

Page 17: ...V3 0 USER MANUAL REV B 2 2 SYSTEM OVERVIEW 17 2 2 1 SYSTEM SETUP DIAGRAM TESSERA M2 Fig 2 1 Typical system set up for a Tessera M2 LED Processor A similar diagram can be applied to the Tessera S8 S4...

Page 18: ...18 TESSERA V3 0 USER MANUAL REV B 2 2 SYSTEM OVERVIEW 2 2 2 SYSTEM SETUP DIAGRAM TESSERA SX40 Fig 2 2 Typical system set up for the Tessera SX40 LED Processor...

Page 19: ...the base firmware 2 x USB 2 0 type A ports To connect USB memory storage devices and peripherals e g keyboard and mouse 2 3 2 FRONT PANEL STATUS LEDS LED Name Indication Active On Processor in operati...

Page 20: ...tri level sync 12G SDI Input A 12G SDI input is available The SDI inputs supports HD SDI 3G SDI level A or level B 6G SDI and 12G SDI 2SI format SQ not supported 12G SDI accepts a progressive signal...

Page 21: ...d troubleshooting This includes l All Ethernet port link states l Processor connection state l The name of the current project open in the Tessera SX40 l XD name for easy identification in large proje...

Page 22: ...rs Requires 1310nm 9 125um single mode fibre up to 2KM with PCor UPC connectors One of the 10G ports can be used as thru connection for daisy chaining of additional XDs Auto switching between fibre an...

Page 23: ...e base firmware 2 x USB 2 0 type A ports To connect USB memory storage devices and peripherals e g keyboard and mouse 2 4 2 FRONT PANEL STATUS LEDS LED Name Indication Active On Processor in operation...

Page 24: ...eference Input Used for analog bi level or tri level sync 12G SDI Input A 12G SDI input is available The SDI inputs supports HD SDI 3G SDI level A or level B 6G SDI and 12G SDI 2SI format SQ not suppo...

Page 25: ...use 2 5 2 FRONT PANEL STATUS LEDS LED Name Indication Active On Processor in operation Blinking Processor booting up Ethernet The processor is detecting a network connection DMX In A DMX Signal is bei...

Page 26: ...ut Used for analog bi level or tri level sync 3G SDI Input Two 3G SDI inputs are available Both inputs can be used concurrently as an independent input The SDI inputs support 3G SDI level A or level B...

Page 27: ...ct files and Fixture Packs not included with the base firmware 2 x USB 2 0 type A ports To connect USB memory storage devices and peripherals e g keyboard and mouse 2 6 2 FRONT PANEL STATUS LEDS LED N...

Page 28: ...nt or rear panel DVI Input A DVI input of up to 1920x1080 60Hz 148 5MHz pixel clock is supported This is a DVI D input with a re clocked DVI D thru See Canvas Resolutions on page 65 for more informati...

Page 29: ...age devices and peripherals e g keyboard and mouse 2 7 2 FRONT PANEL STATUS LEDS LED Name Indication Active On Processor in operation Blinking Processor booting up Ethernet The processor is detecting...

Page 30: ...Input A DVI input of up to 1920x1080 60Hz 148 5MHz pixel clock is supported This is a DVI D input with a re clocked DVI D thru See Canvas Resolutions on page 65 for more information DMX 512 A Input F...

Page 31: ...XD Unit to the processor using either copper or fibre optic cables Fixtures are required to be connected to the Tessera XD Unit NOTE Tessera SX40 does not support sub fixtures 2 Connect the video inpu...

Page 32: ...aining the processor s model with a date and time stamp is assigned 2 Select a canvas size from the drop down menu When selecting a resolution other than the native 1920x1080 Tessera M2 and T1 LED Pro...

Page 33: ...wn in the UI Each string is assigned a unique numeric code which appears on the first fixture of the string during association Fig 3 5 The Add Fixtures From Network toolbar the right side shows connec...

Page 34: ...6 Clicking and dragging will draw an array of fixtures The topology is defined by the direction taken when drawing the array 7 Repeat the process for all strings then press Enter or click the Back ar...

Page 35: ...TE Tessera Protocol only supports gigabit ethernet compliant equipment and does not function with 100BASE T Fast Ethernet or 10BASE T The 10 gigabit connection between the Tessera XD and SX40 LED Proc...

Page 36: ...ocol does not support connection over Wi Fi due to the bandwidth required to alter content and fixtures 4 2 2 10 GIGABIT DATA CONNECTION The connection between the Tessera SX40 LED Processor and its T...

Page 37: ...t acts as the backup In the case of signal loss or errors with the primary feed the backup port takes control and re allocates fixtures to use the backup feed The change is done within one frame ensur...

Page 38: ...NOTE The system load will double when redundancy is enabled this is because twice the amount of bandwidth is needed to ensure primary and backup signals are maintained In the Tessera SX40 10Gb trunk...

Page 39: ...amount of Tessera XD Units would be required l The total network load for the two ports combine into a single bar indicating the load for that pair l Switching in and out of redundancy mode will momen...

Page 40: ...ocessor either primary or backup 4 Different criteria can be set for auto failover behaviour l If the primary processor fails for x seconds The backup processor takes control if the primary processor...

Page 41: ...position in the canvas video input and colour correction can be modified independently so precautions should be taken to avoid differences between processors Using the same settings with the same vide...

Page 42: ...42 TESSERA V3 0 USER MANUAL REV B 4 3 REDUNDANCY CONFIGURATION Fig 4 6 Tessera SX40 LED Processor and loop redundancy...

Page 43: ...bit 24 Hz 1 312 500 1 050 000 875 000 25 Hz 1 260 000 1 008 000 840 000 30 Hz 1 050 000 840 000 700 000 50 Hz 630 000 504 000 420 000 60 Hz 525 000 420 000 350 000 120 Hz 262 500 210 000 175 000 144 H...

Page 44: ...finest fixture and the output capacity is calculated according to the physical dimensions of the fixture See Mapping Options on page 68 for more information 4 4 1 3 SMALL FIXTURES Small fixtures with...

Page 45: ...editor showing system load and port load To help with estimating the number of processors required for a project we have created a simple web based calculator tool which models all the factors outline...

Page 46: ...tency Mode on page 67 M2 3 frames 2 frames in Low Latency Mode on page 67 When working with different types of processors the video latency requires re adjusting per processor I e If using T1 and SX40...

Page 47: ...is automatically detected To change the default resolution navigate to Settings Processor select a resolution from the dropdown menu and click Commit The minimum supported resolution for M2 T1 and S4...

Page 48: ...from the remote app 5 3 INSTALLATION FOR WINDOWS PC 1 Download Tessera Remote Windows software from our Brompton Support web page https www bromptontech com support 2 Open the downloaded file to begin...

Page 49: ...TESSERA V3 0 USER MANUAL REV B 5 3 INSTALLATION FOR WINDOWS PC 49...

Page 50: ...plications folder 5 5 NETWORK SETTINGS FOR REMOTE MANAGEMENT To connect a computer to a Tessera LED Processor connect to the same network via Ethernet by setting the computer and processor to the same...

Page 51: ...box to start Tessera Remote or the Offline Editor Fig 5 1 Start up menu for Tessera Remote Click Start Tessera Remote to start the application in Remote mode The application automatically detects con...

Page 52: ...rocessor and click Connect 5 6 1 TESSERA REMOTE SETTINGS The Tessera Remote offline mode Settings menu contains preferences which allow general customisation of the canvas Fixture Packs management and...

Page 53: ...ote closing the app options Disconnecting from the processor Fig 5 5 Tessera Remote disconnection from processor options l Clicking Leave the project open on the processor will return control to the p...

Page 54: ...f the processor is shown A reboot button is located underneath this message if the user requires a reboot Fig 5 6 Processor shutdown screen 5 6 3 OFFLINE EDITOR When using Tessera Remote in Offline Ed...

Page 55: ...supports connection to one processor at a time it is possible to run several instances of Tessera Remote on the same computer for remote control of several processors from one device Use the Tessera C...

Page 56: ...nt processors is then as straightforward as tabbing Alt Tab in Windows Tab in Mac OSX to the relevant instance of Tessera Remote as required Several monitors can also be used to control different inst...

Page 57: ...Range output is fully featured and optimised with an updated processing pipeline offering enhanced processing capabilities and new exclusive features 6 1 SUPPORTED HDR FORMATS Fig 6 1 PQ HLG and SDR...

Page 58: ...the SX40 and S8 LED Processors interpret and handle HDR video can be flexibly controlled via the input controls available from the input source tile See Input Override on page 145 for more informatio...

Page 59: ...hat does not lock the panel to a fixed calibration as is done by calibration methods that are commonly used in the LED panel manufacturing processes Dynamic Calibration is a fundamental feature enabli...

Page 60: ...ls that have been Dynamically Calibrated to deliver the full benefits of High Dynamic Range on page 57 To be Dynamically Calibrated LED panels need to meet 2 requirements 1 The LED panels need to be f...

Page 61: ...Importing projects in the project management screen To import a project using the processor 1 Insert a USB flash drive containing the project file into a USB port of the processor 2 Click Open on the...

Page 62: ...allows the user to save the project on the processor and on the local computer Save a copy saves to the computer Fig 7 2 Exporting projects in the project management window In the Local user interface...

Page 63: ...an 1920x1080 are used Ticking the Enable HDR checkbox will modify the EDID of the processor SX40 and S8 signalling to the source that it is able to receive HDR video 3 The Tessera SX40 and S8 feature...

Page 64: ...project file to be saved to 3 Select a canvas size Low Latency Mode is automatically enabled on Tessera T1 and M2 LED Processors if canvas sizes other than 1920x1080 are used Ticking the Enable HDR c...

Page 65: ...HDR it is recommended to keep this checkbox un ticked NOTE Keeping this feature disabled does not guarantee the source will respect the EDID and only send SDR 7 3 CANVAS RESOLUTIONS Tessera systems al...

Page 66: ...7 6 The Canvas Properties the user can adjust the canvas size on the fly There are some rules to bear in mind when using custom resolutions l Width l Minimum 720 pixels l Maximum 4094 pixels l It must...

Page 67: ...upscaling and downscaling As a result the active area modifications are disabled l Deinterlace l Frame rate conversion forcing the processor to lock to the source framerate Colour functions such as co...

Page 68: ...n working in 1 1 the physical size and pixel pitch is not taken into account every pixel is sent to the correspondent position independently of the fixture size Fig 7 7 Fixture output in 1 1 mode In I...

Page 69: ...Count 1 1 A 10 000 500x500 10 000 10 000 B 4096 500x500 10 000 4096 C 2048 1000x500 20 000 2048 Fixture type A counts 10 000 pixels towards the capacity regardless of whether interpolated mapping is...

Page 70: ...formation l Input colour provides controls for modifying the colour balance of a specific input DVI SDI or analogue See Input Colour Control on page 149 for more information l On Screen Colour Adjustm...

Page 71: ...nstalled with every version of the processor s firmware and updated Fixture Packs can be found on our website See Fixture Library on page 246 for more information 8 2 FIXTURE PROPERTIES When selecting...

Page 72: ...ifications for the selected fixture are enabled and Global Colour property editor values have no effect on the fixture 8 2 3 PER FIXTURE AND PER GROUP COLOUR OVERRIDE Fig 8 2 Global Colour Override op...

Page 73: ...the previous settings l Brightness l Colour Temperature l Gamma NOTE Once a selection has been overridden on the Colour property editor the Global Colour controls have no effect on the selected fixtu...

Page 74: ...the rear status indicator LED of the panels blinks yellow Fig 8 3 A Beaconed panel showing the Identify internal test pattern l Reload firmware Re applies firmware for selected fixtures from the prio...

Page 75: ...fixture which can be used to activate test patterns by holding on the button for 4 seconds Refer to fixture manufacturer documentation for specific functionality 8 3 4 SELECTED CALIBRATION The Select...

Page 76: ...IES 8 3 5 DISABLE STATUS INDICATOR The status indicator of the root nodes can be disabled if necessary by toggling the tick box 8 3 6 SENSORS INFORMATION Information from sensors such as temperature o...

Page 77: ...r select multiple fixtures to reveal the Fixture properties editor Click on the OSD button to activate click again to deactivate To navigate OSD use the left and right arrows to cycle through categori...

Page 78: ...ow PWM bit depth 14 bit or below See Studio Mode on page 189 for more information For fixtures supporting this feature Studio Mode can be enabled or disabled using the Studio Mode checkbox Below are s...

Page 79: ...noticeable cyan patterning Fig 8 7 Thermal sensitivity of RGB LEDs within a fixture Dynamically Calibrated LED panels enable all Tessera LED Processors to access the ThermaCal correction features to d...

Page 80: ...apply a ThermaCal correction by 1 Selecting the problematic panels from the canvas 2 Under the panel Device Properties on page 74 3 Dial in the ThermaCal Amount slider until the cyan patterning disap...

Page 81: ...MENU Right click a fixture to open a context menu with a list of options These options are grouped by type and some options have keyboard shortcuts displayed on the right side column If a fixture is u...

Page 82: ...aking the group To select one or several fixtures from a group hold the Shift key while selecting the fixture fixtures Reorient Rotates square fixtures around their own axis by 90 and rectangular fixt...

Page 83: ...w is most convenient for their project including a combination of the two 8 8 1 ADD FIXTURES FROM NETWORK On the toolbar above the canvas space a circular indicator on the Add Fixtures from Network bu...

Page 84: ...digits as the number of the last string detected e g 01 or 005 Fig 8 13 Use the keyboard to enter the shown number on fixture string to add to canvas 8 8 1 1 2 MOUSE SELECTION ASSOCIATION Associating...

Page 85: ...hile panels remain off This feature can be toggled on off in Add Fixtures from Network view To enter this mode with fixtures always off hold the Alt button when clicking on Add fixtures from network 8...

Page 86: ...1 7 GRID ARRAYS Contain a set of options to allow the user to adjust position change grid size define spacing between fixtures or rotate to a desired location Fig 8 17 Grid fixture layout property ed...

Page 87: ...9 RADIAL ARRAYS Differs to the circle option by offering the option to place multiple fixtures in a circle spanning outwards to create a wider display Unique options with Radial include adjusting the...

Page 88: ...processor or on Tessera Remote Fig 8 20 Fixture library with list of installed fixture firmware on the processor The Search bar can be used to filter the list or find a specific fixture To only displa...

Page 89: ...e to associate 3 Alternatively continue to associate fixtures individually by clicking each fixture on the canvas in turn If the user creates a new topology for panels which have already been associat...

Page 90: ...ction Tessera SX40 processor includes support for sub fixtures from firmware version 2 3 and upwards similar to Brompton s HD processors a maximum of 2000 fixtures sub fixtures or a combination of bot...

Page 91: ...n 8 9 1 1 ROOT NODES PROPERTIES Fig 8 22 Device property editor The device property editor shows the information of the Tessera R2 Receiver Card and the root node 8 9 1 1 1 DEVICE INFORMATION The firs...

Page 92: ...are generated on the fixtures R2 receiver card The patterns can be displayed on all connected sub fixtures whether they are associated to the processor See Sub Fixture Internal Test Patterns on page...

Page 93: ...ures from Library or Add Fixtures from Network 2 Select the root node and place it on the canvas 3 Press Enter to return to the Canvas view 4 Right click in the root node and select Add Sub fixtures 5...

Page 94: ...trip control box configuration menu 5 The control box stores the last configuration from previous projects To delete all associated sub fixtures click Clear all ports or to delete individual sub fixtu...

Page 95: ...ary menu Select the sub fixtures and add them to the canvas Fig 8 29 Adding a sub fixture to canvas 5 Repeat steps 3 and 4 until all your fixtures are placed 6 Press Enter or Escape to confirm the ass...

Page 96: ...t in the canvas and continue to other connected ports 8 Press escape to got to the previous menu or enter to finish association and return to Canvas view If the configuration is correct all sub fixtur...

Page 97: ...and select Correct Association to automatically correct the topology for the root node and all connected sub fixtures Fig 8 31 Context menu to correct association once a fixture on canvas is discover...

Page 98: ...l the user makes changes If the real world topology is changed after fixtures are associated For example a video wall is re cabled the fixture association is not automatically re configured by the pro...

Page 99: ...place and will offer the user the option to perform Correct Association 8 10 1 1 TO PERFORM A SWAP OUT OF ONE FIXTURE 1 Disconnect and remove the fixture 2 Insert and connect a new fixture into the s...

Page 100: ...1 and 2 Fig 8 35 Fixtures with topology changed to balance laod on ports Due to the port capacity restrictions the topology of some fixtures need to be changed from port 1 to port 2 to balance the lo...

Page 101: ...rs the canvas topology 8 10 1 3 CHANGING CANVAS TOPOLOGY The topology can be manually changed using the topology toolbar that appears when pressing the Edit Topology button Fig 8 37 Topology view opti...

Page 102: ...nd select Disassociate 2 Click Edit Topology to view the Topology toolbar and select the string of fixtures requiring correction by double clicking on the dot in the centre of a fixture The whole stri...

Page 103: ...er to the centre spot of the second fixture on the string A dotted red line is drawn which turns solid as the line becomes pinned to the centre spot of the next fixture in the string 5 Repeat the proc...

Page 104: ...ent association and displays the Correct Association message for 10 seconds Fig 8 43 The incorrect topology notification 8 Click the Correct Association button to finish the process The fixture icons...

Page 105: ...ixtures can be combined into a group When changes are made with the group selected such as moving or adjusting colour the fixtures contained within the group always change together This feature saves...

Page 106: ...8 45 Group properties Group The group property editor is divided in three sections Group info l Name Change the name of the group l To see the name in the canvas activate Show Group Names in the View...

Page 107: ...abled and Global Colour property editor values do not have an effect on the fixture 8 11 3 2 GROUP CONTEXT MENU Right click in a group to open a context menu with a list of options Group options are a...

Page 108: ...ndwidth required to drive the fixtures Fig 8 47 Network load is increased when rotating fixtures by 90 degrees Fixtures can be individually rotated around their top left corners by first selecting the...

Page 109: ...rty editor to enter rotation mode Fixtures can also be rotated during association by pressing the Alt key and using the mouse wheel to change the rotation angle NOTE The Tessera SX40 S8 and S4 LED Pro...

Page 110: ...110 TESSERA V3 0 USER MANUAL REV B 8 11 FIXTURE LAYOUT...

Page 111: ...to the tools for image adjustment in the LED devices and troubleshooting l Topology view only in Tessera SX40 Provides a representation of the connections between the processors XD Units and fixtures...

Page 112: ...source must fit within the width and height dimensions Depending on the selected resolution some limitations might apply See Canvas Resolutions on page 65 for more information 9 1 1 2 PIXEL PITCH This...

Page 113: ...l ratio When the selected units are pixels a 1px value will show the real size of the image values lower than 1px reduces the image size while values above increase its size Press edit to click and dr...

Page 114: ...AS VIEW 9 1 3 3 CANVAS EDITS ENABLED Enables or disables modifiying the active area size or position of the canvas This can be done by clicking the edges of the canvas and dragging to resize it See Ac...

Page 115: ...ition to fit the selected fixtures in the centre of the screen Zoom 1 1 Adjust the zoom to show the canvas with a 1 to 1 resolution of the display Toggle Navigator Show or hide the navigator window Sh...

Page 116: ...s connected to the processor Gives access to a menu for associating physically connected fixtures See Adding Fixtures to a Project on page 83 for more information Edit Topology Modify and correct the...

Page 117: ...default mode for the canvas and allows fixture positioning In Edit mode the fixtures are displayed as viewed from the front Rear Edit Mode Keyboard Shortcut F2 Fixtures are commonly cabled from behind...

Page 118: ...input onto the Canvas including Viewport and Active Area settings This mode shows how input content is displayed on fixtures in real time NOTE Video on Canvas mode is not available when l Using a Tess...

Page 119: ...ly selected video input as it is being displayed on the fixtures 9 1 6 2 2 VIDEO AND FIXTURE MODE Keyboard Shortcut F4 Video and Fixture Mode displays the current video input on both the fixtures and...

Page 120: ...hin the Active Area on the canvas without displaying the fixtures This mode is useful to preview the input source size and position in the canvas 9 1 6 4 HEAT MAP Keyboard Shortcut F6 Selecting Heat M...

Page 121: ...e easily duplicated on two sets of fixtures such as when using two screens showing the same content on either side of the stage Layers make it easier and more accurate to select between the two groups...

Page 122: ...of the canvas When selecting pipeline tiles a fixture a group or a combination of fixtures and or groups a property editor with information and properties is shown in the Properties area 9 1 6 7 WORKI...

Page 123: ...p is selected a property editor opens closing all other Property editors except those pinned Properties editors can also be closed by using the close button located on the right side of the editor tit...

Page 124: ...ick Pipeline tile enabled property editor shown 9 1 6 8 2 OPEN THE PROPERTY EDITOR Pipeline tile properties can be viewed and adjusted by single clicking on a tile to prompt the property editor to app...

Page 125: ...ecting only selected groups or fixtures l Fixture or group colour with override global colour enabled l Group position on the canvas Only affects groups The group must be selected during preset record...

Page 126: ...will be stored within the preset Colour position and or video are user definable options click to deselect and the preset will not store this data 9 2 2 RECORDING PRESETS 1 Group the required fixture...

Page 127: ...y preset tile to store the new preset 8 When double clicking a preset the preset recalls settings for associated groups 9 2 3 EDITING PRESETS To change any parameters of a stored preset the preset mus...

Page 128: ...presets to crossfade from one input to another follow these steps 1 Select the first input for the preset all tiles are changed to this input 2 Click the Preset Record button 3 Select a slot for the...

Page 129: ...V B 9 3 LOG 129 9 3 LOG Information about the processes and errors that occur within the processor can be viewed by clicking on Log This information can be stored in a USB drive or on the computer usi...

Page 130: ...ursor becomes a double headed arrow Move the active area Modify the scaler options On the top left of the active area click and drag as the hand cursor appear 9 4 1 NAVIGATOR The Navigator provides a...

Page 131: ...sing at the edges of small and rotated fixtures 9 5 2 EXPORT DEVICE LAYOUT To export the device layout data as a CSV file navigate to the Tools dropdown menu and select Export Device Layout The CSV fi...

Page 132: ...l Authentication Navigate to the Tools dropdown menu and select Export Discovered Devices or from Online view and selecting Export Discovered Panels Data is exported in Comma Separated Values CSV form...

Page 133: ...31 for more information 9 6 2 NETWORK ERROR MONITORING To help track down faulty cables and connectors in a large system the Online tab shows an error counter for each connected fixture Error counters...

Page 134: ...ate every couple of seconds which helps to correlate errors with intermittent external events that might cause data corruption such as using radios or the switching of high power loads nearby In this...

Page 135: ...recognition If fixture chains are connected to any ports the number of fixtures in the chain is displayed in the topology Other topologies like daisy chained Tessera XD Units and fixtures in closed l...

Page 136: ...136 TESSERA V3 0 USER MANUAL REV B 9 7 TOPOLOGY VIEW...

Page 137: ...be selected from the user interface when a connection is detected If more than one source is available crossfade between sources is also available for the Tessera M2 LED Processor See Preset Properti...

Page 138: ...Dual Link Level B Dual Stream is not supported l HD SDI l SD SDI Standard broadcast resolutions up to 1920x1080 are supported with framerates between 23 98Hz to 60Hz and fractional frame rates such as...

Page 139: ...Hz to 60Hz and fractional frame rates such as 59 94Hz and 23 98Hz The supported video properties are l 10 bits per channel l YCbCr 4 2 2 The physical connections to the SDI inputs are via standard BNC...

Page 140: ...V3 0 USER MANUAL REV B 10 3 4K SOURCES FOR SX40 AND S8 l 8 10 or 12 bits per channel l RGB l YCbCr 4 2 0 l YCbCr 4 2 2 l YCbCr 4 4 4 In addition to the HDMI 2 0 input there is also a re clocked HDMI...

Page 141: ...e content has been authored with accurate metadata Different metadata will be available based on both the source input and content types 10 4 1 HDMI 2 0 SX40 AND S8 Fig 10 4 Incoming metadata from an...

Page 142: ...s the HDRFormat Colour Space and Max CLL Format The HDRformat used to author the incoming content Can be PQ HDR10 or Hybrid Log Gamma HLG Colour Space Colour space used for the incoming HDRcontent Min...

Page 143: ...ion such as the colour space and HDR format SX40 and S8 only will have to be provided manually from the Input Override See Input Override on page 145 for more information Metadata Property Property Ex...

Page 144: ...eyond the resolution and frame rate Information about the colour format and colour space need to be set manually from the Input Override See Input Override on page 145 for more information Metadata Pr...

Page 145: ...rols for the Tessera SX40 and S8 Because the Tessera SX40 and Tessera S8 LED Processors are capable of outputting HDR they have dedicated input override controls to set the required properties for inc...

Page 146: ...PQ MaxCLL Override Allows the MaxCLL value to be specified by the user when ticked for incoming PQ content This overrides any value received by InfoFrames PQ Gain A multiplier adjustment to all brigh...

Page 147: ...the format of the incoming video content l SDR Standard Dynamic Range not HDR default l PQ PQ HDR10 as specified by ST2084 l HLG Hybrid Log Gamma PQ MaxCLL Override Allows the MaxCLL value to be speci...

Page 148: ...ies This means the values will need to be set manually For the Tessera M2 S4 and T1 they are set to the values shown above Metadata Property Property Explanation Colour Format Define the incoming colo...

Page 149: ...ust as the black level control sets the threshold of the base level of dark content the contrast slider sets the threshold level of bright content Boosting this level will increase the differential in...

Page 150: ...to 100 a column is used to indicate how much content there is at that percentage of the given colour The Y Axis shows the amount of content as a percentage it automatically scales to fill the axis The...

Page 151: ...0 show the highest concentrations of columns there are now more areas visible There are some small amounts of colour which deviate from the three values and the image is not perfectly composed of 75 c...

Page 152: ...illing the entire spectrum of colour and brightness NOTE When choosing an image to balance use an image from live event content throughout the project an image with a wide variety of colours and hues...

Page 153: ...TESSERA V3 0 USER MANUAL REV B 10 7 HISTOGRAMS 153 Fig 10 13 Adjusting the black level control will make the blacks look darker and the concentrations of colour now reach down to 0 on the scale...

Page 154: ...to the 100 threshold assuming some areas contain white content in the image and is desirable NOTE If specific colours do not render correctly adjust RGB Highlight and Shadow controls to work on that...

Page 155: ...Chromatune s Colour Replace 14 Way Colour Correction and Curves 11 1 SCALING AND CROPPING The Tessera M2 and T1 LED processors support scaling and cropping of the incoming feed The Tessera SX40 and S8...

Page 156: ...the incoming feed which is captured to the canvas By default when activating the Scaler pipeline tile the settings will be set to fit the canvas with full size viewport and full size Active Area with...

Page 157: ...t Determine the column of pixels that will appear on the left of the canvas l Top Determine the row of pixels that will appear on the top of the canvas l Width Determine the total width of the source...

Page 158: ...column of pixels that will appear on the left of the canvas l Top Determine the row of pixels that will appear on the top of the canvas l Width Determine the total width of the source before being st...

Page 159: ...umn of pixels that will appear on the left of the canvas l Top Determine the row of pixels that will appear on the top of the canvas l Width Determine the total width of the source before being stretc...

Page 160: ...he canvas l Width Determine the total width of the source before being stretched maximum width will be the canvas width minus the Left value l Height Determine the total height of the source before be...

Page 161: ...fine the region of interest from the incoming feed which is captured to the canvas By default when activating the Scaler pipeline tile the settings will be set to fit the canvas with full size viewpor...

Page 162: ...size 11 2 1 1 1 DIMENSIONS l Left Determine the column of pixels that will appear on the left of the canvas l Top Determine the row of pixels that will appear on the top of the canvas l Width Determi...

Page 163: ...TESSERA V3 0 USER MANUAL REV B 11 2 SCALING AND CROPPING 163 Fig 11 10 Canvas is scaled to 1 1...

Page 164: ...column of pixels that will appear on the left of the canvas l Top Determine the row of pixels that will appear on the top of the canvas l Width Determine the total width of the source before being str...

Page 165: ...umn of pixels that will appear on the left of the canvas l Top Determine the row of pixels that will appear on the top of the canvas l Width Determine the total width of the source before being stretc...

Page 166: ...of pixels that will appear on the left of the canvas l Top Determine the row of pixels that will appear on the top of the canvas l Width Determine the total width of the source before being stretched...

Page 167: ...ask with a dashed border Fig 11 14 The canvas with the Active Area shown by a dashed border Having determined the region of interest to be captured from the incoming feed using the Viewport that regio...

Page 168: ...Left Determine the position of the left edge of the active area l Top Determine the position of the top edge of the active area l Width Determine the final width of the active area l Height Determine...

Page 169: ...ions can also be determined by adjusting the top and left coordinates manually 11 3 1 2 SNAP TO INPUT Adjust the active area size to match the input source size Fig 11 16 Snap to Input 11 3 1 2 1 SNAP...

Page 170: ...170 TESSERA V3 0 USER MANUAL REV B 11 3 ACTIVE AREA 11 3 1 2 2 SNAP TO CANVAS Adjust the active area size to match the canvas size Fig 11 18 The active are is set to the canvas dimensions...

Page 171: ...e to be replaced by another The Enable toggle button shown in the top left activates the effect Fig 11 20 Colour Replace property editor l From Select the original colour to be modified Select a colou...

Page 172: ...oother the transition between the area affected by the colour change and those areas not affected l Strength Determines how much the modifications affect the original image l View Matte This shows the...

Page 173: ...lect a red colour from the from the canvas using the eyedropper tool and a suitable green from the colour picker Fig 11 24 From and To colour chips with red changed to green This results in the follow...

Page 174: ...The resulting green pepper after increasing the Hue Tolerance It is recommended to use the View Matte feature when using Colour Replace as this shows the areas of the image that will be affected by t...

Page 175: ...the primary secondary and tertiary colours Black and white can be adjusted using RGB gains Fig 11 29 14 way colour correct property editor Adjustments are made by entering a numerical value or by clic...

Page 176: ...curves To adjust the colour first select the desired curve from the drop down menu then use the mouse to select a point on the curve and drag to desired position For each change made a dot will appea...

Page 177: ...pixel horizontally and or vertically therefore motion should be perfectly smooth Any juddering double dropped frames or tearing between fixtures would indicate issues on the network issues with the fi...

Page 178: ...era supports a maximum file size of 8MB and supports file types J PG PNG BMP and TIFF formats Fig 12 5 Test pattern property editor with custom test pattern selected l Video snapshot Capture a frame f...

Page 179: ...ndefinitely Pressing the freeze button again will resume live video Freeze can also be triggered by clicking the enable button in the Freeze property editor Double clicking the Blackout pipeline tile...

Page 180: ...g 12 7 Tessera Test pattern property editor with Freeze button behaviour drop down menu options If needed failover can also be triggered by pressing both buttons at the same time when Tessera SX40 is...

Page 181: ...able in the Global Colour pipeline tile and apply to all fixtures in a project unless those fixtures or groups have been overridden See Per Fixture and Per Group Colour Override on page 72 for more in...

Page 182: ...ightness values at default and modify the intensity slider 13 2 COLOUR TEMPERATURE The Temperature slider allows the user to adjust the white balance of attached fixtures in a range from 2 000 11 000...

Page 183: ...set Since Mac OSX Snow Leopard release Apple has changed their default gamma values to a value more in line with the 0 45 2 2 ratio used by other manufacturers Though HDR video does not use a gamma c...

Page 184: ...ark Magic will increase the visual quality of the output when operating at low brightness A small amount of noise may become visible at short viewing distances therefore in some circumstances when the...

Page 185: ...TESSERA V3 0 USER MANUAL REV B 13 4 DARK MAGIC 185 Fig 13 4 Dark Magic disabled with visible banding compared with enabled...

Page 186: ...ne greyscale colour cast correction below Dynamically Calibrated LED panels enable all Tessera LED Processors to access the PureTone correction which accounts for the non linearity of each RGB channel...

Page 187: ...e checkbox 13 6 GAIN CONTROLS 13 6 1 INTENSITY The Intensity Gain slider allows users to modify the luminosity in the input source As a result the intensity output of all fixtures will change in a per...

Page 188: ...w End Boost adjusts the brightness of darker video content areas For accurate reproduction this control is recommended to remain at 0 but in some cases a higher setting can recover detail in dark area...

Page 189: ...um benefit is seen on particularly bright panels especially those running at relatively low PWM bit depth Fig 13 8 A comparison of Dark Magic and Studio Mode Studio Mode is enabled by selecting the de...

Page 190: ...the output fixtures themselves showing the mouse position and highlighting selected seams fixtures or modules for quick and intuitive adjustments 13 9 1 OSCA MODE OSCA Mode can be accessed by either s...

Page 191: ...r seams and using the keyboard arrow keys will change the selected object Layers are also supported While in OSCA mode the processor outputs a solid colour on all connected fixtures By default it is s...

Page 192: ...ace or Ctrl Space to cycle through the different colours Pressing the shortcuts keys as marked above the colour pattern buttons will also display the desired colour on screen Fig 13 13 The Display Col...

Page 193: ...hen viewing certain content Seam adjustments allows the user to correct luminance at the seams between fixtures or between adjacent modules within fixtures Fixture or module seams can be selected in s...

Page 194: ...T Fig 13 15 Different seam selection methods When seams are selected on the OSCA canvas the relevant seams are highlighted on the physical fixtures Fig 13 16 OSCA on fixtures showing selected seams an...

Page 195: ...lection Currently displayed layers are checked to hide layers uncheck the corresponding check box Hidden layers do not output whilst in OSCA Mode See Layers on page 121 for more information l Hide adj...

Page 196: ...calibrations OSCA is a fixture based adjustment and OSCA values are stored within the fixture This means the adjustments travel with the panels themselves so if a LED wall is re assembled from fixtur...

Page 197: ...up and down arrows to increase and decrease values 2 Click and drag with the mouse over the thumbwheel 3 Hover the mouse pointer over the thumbwheel and use the mouse scroll wheel The shortcuts will o...

Page 198: ...en for a better view of the modifications Disable this option to keep the selection always active l Fine controls Enabling Fine controls gives the user the finest amount of control a single key press...

Page 199: ...ns done to the selected modules press the Reset All Selected Modules option located below the adjustments thumbwheels 13 9 5 CONFIRMING OSCA SETTINGS After seams fixtures or modules have been colour c...

Page 200: ...g Tessera Remote it is possible to copy OSCA colour settings from one processor to another From processor 1 copy the OSCA colour settings and paste them to connected fixtures in the OSCA window of pro...

Page 201: ...S Display Green D Display Blue F Display Cyan G Display Magenta H Display Yellow J Display Video Tab Change Display Colour forwards Space Change Display Colour backwards Ctrl Space 13 9 6 2 OSCA COLOU...

Page 202: ...EEN COLOUR ADJ USTMENT 13 9 6 3 WHITE ADJUSTMENT Function Shortcut Key Luminance Adjustment Q Red Gain W Green Gain E Blue Gain R 13 9 6 4 RED GREEN BLUE CYAN MAGENTA AND YELLOW ADJUSTMENT Function Sh...

Page 203: ...amic Calibration interface described below are available to all Tessera LED Processors that are paired with Dynamically Calibrated LED panels The Dynamic Calibration interface is designed to quickly m...

Page 204: ...SHIFT D 3 By clicking the DynaCal button within the Input Override on page 145 controls shown after clicking any Input 4 By clicking the DynaCal button at the bottom of the Global Colour on page 181...

Page 205: ...which by default is capped to the value of the panel with the highest calibrated brightness Fig 13 27 Enabling Brightness Overdrive changes the brightness slider cap Once overdrive has been enabled th...

Page 206: ...e colour space for a given input left click to select it once it is highlighted like HDMI in Video Input Colour Space controls on a Tessera SX40 above both colour space controls at the bottom will bec...

Page 207: ...rgets See Customising Colour Spaces on page 213 for more information 13 10 4 PANEL OUTPUT COLOUR SPACE Fig 13 30 Panel Output Colour Space controls The Panel Output Colour Space controls are used to s...

Page 208: ...on on page 59 process The achievable colour space is dependent on the type and quality of LEDs each individual panel uses Fig 13 32 Available output colour space options The drop down menu offers 3 op...

Page 209: ...coordinates shared by all connected panels Colours outside the triangle formed by the square RGB targets will be clipped to the nearest achievable colour by the panels as they cannot be reproduced by...

Page 210: ...ayer of functionality 1 Momentary will show the primary test colour on screen associated with either the input round or output square colour target that is being held moved with a continuous left mous...

Page 211: ...3 36 Button to enable disable Zebra Tools from the Global Colour panel To enable either simply click the desired Zebra Tool button likewise to disable any that is turned on Once either Zebra Tool has...

Page 212: ...e or Custom The slider allows the calibration to be set to either Full colour Luminance only or a percentage mix of the two by either using the slider or typing in a percent value When using Full colo...

Page 213: ...when compared to calibrations other than Dynamic Calibration However this is expected behaviour as when using Full colour Dynamic Calibration the system will be outputting the most accurate primary c...

Page 214: ...Video Input Colour Space white point value is not related to the Colour Temperature on page 182 in the Global Colour on page 181 panel even when set to Colour Temperature The two effects will work add...

Page 215: ...USER MANUAL REV B 13 10 DYNAMIC CALIBRATION DYNACAL USER INTERFACE 215 above The indicator will show two intercept points the first on the Video Input Colour Space and the second on the Panel Output...

Page 216: ...216 TESSERA V3 0 USER MANUAL REV B 13 10 DYNAMIC CALIBRATION DYNACAL USER INTERFACE...

Page 217: ...epth NOTE When changing fixtures between ports they will be re associated automatically the processor will read the MAC address to re associate the fixtures See Assigning or Modifying Online Fixture T...

Page 218: ...he network bit depth allows for more panels to be attached to the processor The network bit depth should always be equal or better than the input source bit depth For example DVI is 8 bit and SDI is 1...

Page 219: ...the input source frame rate The processor will automatically compensate where the source frame rate and the internal refresh rates are different 14 4 2 REFERENCE IN Tessera SX40 S8 and M2 LED Process...

Page 220: ...a S4 and T1 have only one input and the M2 has two video processing pipelines and can crossfade between inputs so dynamically switching the genlock source on these processors is not as desirable 14 4...

Page 221: ...ning genlock This achieves the best possible combination of good on camera performance due to genlock as well as smooth motion when viewed by eye due to running at 60fps rather than 30fps This can als...

Page 222: ...which respect the processor s EDID should be able to support ultra low latency while video production sources such as cameras or production switchers may ignore the EDID and therefore be incompatible...

Page 223: ...up to 120 Hz QHD 2560 x 1440 up to 144 Hz and HD 1920 x 1080 up to 144 Hz It s also possible to specify any custom resolution and refresh rate that remains within the pixel capacity limit This genera...

Page 224: ...224 TESSERA V3 0 USER MANUAL REV B 14 6 HIGH FRAME RATE...

Page 225: ...ors into larger control systems and provide reactive control to external factors such as adjusting panel brightness in outdoor environments Parameters can be controlled directly so their values corres...

Page 226: ...led by double clicking the pipeline tile or enabling from the property editor The pipeline tile displays the active button on when live control is enabled Once enabled any parameters included in a sel...

Page 227: ...ng received it will show the protocol type in green letters but the active light will remain OFF The parameters will be responding to the GUI and not the incoming signal because live control is not en...

Page 228: ...r values will be enabled for manual adjustments Fig 15 4 Control profile configured and Live Control disabled 15 3 CONTROL PROFILES Tessera LED Processors contain a selection of control profiles with...

Page 229: ...le sets of group position orientation and Red Green Blue and Intensity Gain controls Input Controls 38 channels total if fully assigned 1x Global control of Red Green Blue and Intensity Gain 3x Assign...

Page 230: ...ofile is selected all user assignable sets will have the legend No assigned group or in the case of input controls No assigned video input 15 3 2 FOR FIXTURE GROUPS Clicking on this legend will reveal...

Page 231: ...FILES 231 Fig 15 7 Configuring Fixture Groups In the illustration above the project includes 4 fixture groups The user can assign each screen to a set of DMX channels and parameters that are controlla...

Page 232: ...ssigned to any bank of 10 channels Fig 15 8 Configuring selected input parameters 15 3 4 MINIMUM AND MAXIMUM VALUES Minimum and maximum values contained within control profiles parameters set the rang...

Page 233: ...he initial position on the canvas If live control is disabled and the assigned group is moved on the canvas when re enabling live control the new position of the group will become the default position...

Page 234: ...ontrol Protocol drop down menu 3 Enter a Start Address for the processor The Start Address will correspond with the DMX address of the first parameter in the selected Control Profile 4 Enable Live Con...

Page 235: ...se for the processor The Start Address will correspond with the DMX address of the first parameter in the selected control profile and the universe will determine which eDMX universe the processor wil...

Page 236: ...anel either directly or via switch 4 Go to the Live Control property editor and select Tessera Control from the Control Protocol drop down menu 5 Choose a channel number and set this in both the Tesse...

Page 237: ...able Live Control by double clicking the Live Control pipeline tile or enabling from the Live Control property editor 7 If the computer running Tessera Control is detected the Live Control button will...

Page 238: ...238 TESSERA V3 0 USER MANUAL REV B 15 6 TESSERA CONTROL...

Page 239: ...39 SECTION 16 PROCESSOR SETTINGS Access to settings from the left side menu on the Project Management Screen Fig 16 1 Project Management screen select Settings from the left menu If a project is open...

Page 240: ...processors If no Processor name is defined the processor will display its serial number in the Discovered Processors list in Tessera Remote and in the Remote windows title bar for recognition when usi...

Page 241: ...e untick Auto load Previous Project The time for a project to auto load is also adjusted here NOTE It is possible to change the autoload countdown time to a value between 0 3600 seconds For using this...

Page 242: ...ooted This may be desirable when seeking the cause of the issue It is recommended to leave this option enabled by default watchdog is enabled to ensure processor uptime 16 2 5 LIMITED SETTINGS WINDOWS...

Page 243: ...REV B 16 2 GENERAL 243 16 2 6 1 TESSERA REMOTE WHILE DISCONNECTED FROM PROCESSOR When using Tessera Remote without connecting to a processor Fig 16 5 Processor settings when not connected to a proces...

Page 244: ...connects to the processor via Tessera Remote application they will be prompted to enter the password The password will be reset if factory settings are restored or it can be removed by re entering th...

Page 245: ...16 4 DATE AND TIME A date and time can be applied to the processor click on each value and use the keyboard to make modifications Fig 16 8 Tessera LED Processor Date and Time settings NOTE The date a...

Page 246: ...xture library Group of fixtures packs installed in a processor All processor firmware releases contain the latest Tessera Fixture Pack at the time of the release In most cases using the latest process...

Page 247: ...by default the version in the highest priority pack higher in the list is used and the same fixture will appear greyed out in lower priority packs Fig 16 10 All fixture firmware contained in a Fixture...

Page 248: ...ity In the fixture library select the fixture personality whose priority needs to be modified At the bottom of the page the source pack dropdown menu will show all the Fixture Packs installed in the p...

Page 249: ...es used within the current project 16 5 3 TRANSFERRING PACKS Fixture Packs can be transferred between processors using the Export option All user imported packs can be deleted by selecting Restore Def...

Page 250: ...LIBRARY 16 5 4 ADDING AND REMOVING PACKS To import a new Fixture Pack click Manage Packs and click Add Select the location where the pack is stored Select the Fixture Pack and press open to load it in...

Page 251: ...bottom of the Project Canvas It provides helpful tips and information of where the mouse cursor is located Unticking the option in the preferences menu hides the bar Fig 16 16 The status bar is locate...

Page 252: ...LECTION MODE Selection modes alter the users mouse cursor for dragging a selection box around fixtures on Canvas View To change Selection Mode navigate to Settings Preferences Inside selection area Th...

Page 253: ...SH MANAGEMENT Fig 16 18 Crash Management options in Processor Settings The processor will pause after a crash before rebooting to allow time for the user to enter information about what actions were p...

Page 254: ...fined characteristics of the processor and revert all settings back to default Project files any imported fixture definition files and fixture firmware not included in the current software release wil...

Page 255: ...notification before formatting Formatting internal storage will clear the memory of the processor This will delete all project files any imported fixture definition files and fixture firmware not incl...

Page 256: ...this click Browse and navigate to the location where the firmware is stored A dialog box with the heading Reload Firmware is displayed for the user to confirm selection Clicking Yes will reload the f...

Page 257: ...iles will remain It is best practice to export copies of important project files before a firmware upgrade NOTE Newer firmware versions are backwards compatible with older versions of firmware However...

Page 258: ...the current software and hardware setup to data about the temperature network settings and revision numbers of processor components Processor status information can be exported to USB storage by clic...

Page 259: ...are version currently in use the end user license agreement between Brompton and the user Third party license agreements relevant to the software and the Brompton contact details including l Our compa...

Page 260: ...260 TESSERA V3 0 USER MANUAL REV B 16 12 ABOUT...

Page 261: ...rties for selected fixtures or groups or for canvas if there is no selection While moving a slider hold Alt It will not snap to default value F1 Go to Edit mode F2 Go to Rear Edit mode F3 Go to Video...

Page 262: ...selected fixtures or groups by one pixel Ctrl F Fit to screen Space Drag Scrolls around canvas Ctrl Alt 0 9 Select OSD page for selected panels Ctrl Alt Up or Down Change OSD font size WHILE ADDING FI...

Page 263: ...colour Space Toggle to the next display colour to the right Ctrl Space Toggle to the previous display colour to the left Tab Toggle to video input 1 Up Down arrow Luminance Master Control 2 Up Down a...

Page 264: ...264 TESSERA V3 0 USER MANUAL REV B OSCA...

Page 265: ...ctrical isolation of the connected devices However copper cables are typically more widely available lower cost and easier to terminate so may be preferred in some situations FIBRE For fibre connectio...

Page 266: ...used Cat6A should generally be used in preference to Cat5e where possible Cat7 or higher may also be used but has not been tested by Brompton Technology Shielded cables will typically provide better...

Page 267: ...to achieve this Up to five XDs may be daisy chained together as required to achieve any necessary signal conversion or repetition The use of 10G Ethernet switches is not supported as these can disrupt...

Page 268: ...268 TESSERA V3 0 USER MANUAL REV B 10G ETHERNET COMPATIBILITY...

Page 269: ...k Connections Select the network adapter corresponding to the Tessera LED Processor 2 For Windows 8 and above click on the start menu and type control panel select it from the list then open Network a...

Page 270: ...the following IP address to manually enter an IP address Given that the default IP address of a Tessera LED Processor is 192 168 0 50 in a subnet mask 255 255 255 0 choose an IP address that isn t alr...

Page 271: ...N MAC OS X SYSTEMS Current Mac computers do not feature a wired Ethernet network interface To connect to a Tessera LED Processor without using a WLAN requires either a USB Thunderbolt or USB C Gigabit...

Page 272: ...2 Open the Configure IPv4 dropdown menu and select Manual from the list of options 3 In the IP Address box enter 192 168 0 and a value between 1 and 254 except 50 and a subnet mask of 255 255 255 0 C...

Page 273: ...TESSERA V3 0 USER MANUAL REV B SETTING THE IP ADDRESS ON MAC OS X SYSTEMS 273...

Page 274: ...V3 0 USER MANUAL REV B APPENDIX D DMX CHANNEL ALLOCATIONS 274 APPENDIX D DMX CHANNEL ALLOCATIONS Below is a example list of the Processor Profiles on a Tessera M2 LED Processor with the channel assig...

Page 275: ...X DMX Range 0 255 Actual Range Red Gain 9 255 0 255 0 100 Green Gain 10 255 0 255 0 100 Blue Gain 11 255 0 255 0 100 Intensity Gain 12 0 0 255 0 100 Group 3 Channel Function DMX Default DMX DMX Range...

Page 276: ...NNEL ALLOCATIONS 276 Colour Intensity Gain 24 0 0 255 0 100 Group 6 Channel Function DMX Default DMX DMX Range 0 255 Actual Range Red Gain 25 255 0 255 0 100 Green Gain 26 255 0 255 0 100 Blue Gain 27...

Page 277: ...et 15 16 32767 0 65536 180 180 Red Gain 17 255 0 255 0 100 Green Gain 18 255 0 255 0 100 Blue Gain 19 255 0 255 0 100 Intensity Gain 20 0 0 255 0 100 Group 3 Channel Function DMX Default DMX DMX Range...

Page 278: ...Offset 45 46 32767 0 65536 180 180 Red Gain 47 255 0 255 0 100 Green Gain 48 255 0 255 0 100 Blue Gain 49 255 0 255 0 100 Intensity Gain 50 0 0 255 0 100 Group 6 Channel Function DMX Default DMX DMX...

Page 279: ...al Range Black Level 11 127 0 255 100 100 Contrast 12 127 0 255 100 100 Hue 13 127 0 255 180 180 Saturation 14 127 0 255 100 100 Red Shadow 15 127 0 255 100 100 Green Shadow 16 127 0 255 100 100 Blue...

Page 280: ...Blue Shadow 9 127 0 255 100 100 Red Highlight 10 127 0 255 100 100 Green Highlight 11 127 0 255 100 100 Blue Highlight 12 127 0 255 100 100 SDI B Channel Function DMX Default DMX DMX Range 0 255 Actua...

Page 281: ...49 Magenta Test Pattern 50 54 Yellow Test Pattern 55 59 Black Test Pattern 60 64 Grid Test Pattern 65 69 Scrolling Grid Test Pattern 70 74 Checkerboard Test Pattern 75 79 Scrolling Checkerboard Test P...

Page 282: ...TESSERA V3 0 USER MANUAL REV B APPENDIX D DMX CHANNEL ALLOCATIONS 282 Input Controls 128 255 Presets 1 127...

Page 283: ...283 TESSERA V3 0 USER MANUAL REV B APPENDIX D DMX CHANNEL ALLOCATIONS...

Page 284: ...eturned with a recognised RMA number that has been issued by Brompton 4 Warranty repairs must be carried out by a nominated Brompton employee or Brompton approved agent or service technician No reimbu...

Page 285: ...islation arising from the purchase are not affected by this warranty The rights under this warranty are the customer s sole rights and Brompton shall not be liable for any indirect or consequential lo...

Page 286: ...TESSERA V3 0 USER MANUAL REV B WARRANTY CONDITIONS 286...

Page 287: ...rrector A feature giving the ability to adjust primary secondary tertiary white and black colours available on Tessera SX40 S8 and M2 3 3G SDI Single serial link that allows that supports Bitrates up...

Page 288: ...ds such as 4 3 or 16 9 Association Placing panels either online or added from network to your canvas B Beaconing A mode in which a fixture on the network displays its Identify test pattern and the sta...

Page 289: ...d image onto the canvas which can be used as a guide when mapping panels Colour Replace A feature to replace and manipulate one specific colour available on Tessera SX40 S8 and M2 Custom Test Pattern...

Page 290: ...or abnormal termination failover is switching to a redundant or standby processor Fibre optic A fiber optic cable is a network cable that contains strands of glass fibers inside an insulated casing T...

Page 291: ...terface for transmitting uncompressed video data and compressed or uncompressed digital audio data from an HDMI compliant source device HDMI 2 0 HDMI 2 0 increases the maximum bandwidth to 18 0 Gbit s...

Page 292: ...d many other options Module As fixture refers to a whole LED panel a module is often a removable smaller LED panel with a connector plugged into the fixture N Network bit depth Network bit depth refer...

Page 293: ...en 2 processors are cabled together through XD units and outputting identical content to the same fixtures If one processor crashes or fails the backup processor will take over outputting Currently on...

Page 294: ...ails String An unbroken sequence of fixtures from a port on a switch or direct from the processor output Sub fixtures Sub fixtures do not have a Tessera interface and so cannot be connected directly t...

Page 295: ...ransfer using fibre or CAT6 copper cable The SX40 can support up to 2000 connected fixtures and offers maximum flexibility with the use of the XD distribution system Tessera T1 Ideal for creative show...

Page 296: ...designs comefrom years of industry and engineering experience and an acuteunderstanding of thecurrent marketplace This has resulted in it fast becoming a globally known and respected brand within thi...

Reviews: