


NOTE
If a fan assembly has failed, do not remove it from chassis unless a FRU is available for replacement. If the slot is left empty for
an extended time period, this could cause chassis air-leakage and overheating.
NOTE
Make sure that captive screws securing fan assemblies to chassis are tightened. If not, high pressure from fan operation may
unseat fan from chassis connectors.
Replacing fan assembly (hot-swap)
If your chassis is up and running, but a fan assembly has failed, complete the following steps.
1. Remove fan assembly.
2. Insert new fan assembly into empty slot as soon as possible.
3. Verify that the fan assembly status LED is green.
Replacing fan assembly (cold-swap)
If your chassis is up and running, but you want to power down the chassis to replace a failed fan assembly, complete the following steps.
1. Shut down the system using the
sysShutdown
command.
2. Unplug power cords from receptacles on all power supply assemblies.
3. Remove faulty fan assembly.
4. Insert new fan assembly.
5. Plug power cords into all power supply assemblies from power sources to power chassis on.
6. Verify that fan assembly status LEDs are green.
Time and items required
The replacement procedure for each fan assembly takes less than 5 minutes. The following items are required for the blower assembly
replacement:
•
Replacement fan assembly
•
#1 Phillips screwdriver
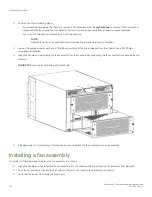
Removing a fan assembly
Complete the following steps to remove a fan assembly from the chassis.
1. Before removing a fan assembly, Verify if you can remove a power supply and leave the chassis operating (hot swap
replacement), by referring to
Precautions specific to fan assemblies
on page 192.
Removing a fan assembly
Brocade X6-4 Director Hardware Installation Guide
53-1004106-07
193
Summary of Contents for X6-4
Page 12: ...Brocade X6 4 Director Hardware Installation Guide 12 53 1004106 07...
Page 20: ...Brocade X6 4 Director Hardware Installation Guide 20 53 1004106 07...
Page 28: ...Brocade X6 4 Director Hardware Installation Guide 28 53 1004106 07...
Page 64: ...Brocade X6 4 Director Hardware Installation Guide 64 53 1004106 07...
Page 86: ...Brocade X6 4 Director Hardware Installation Guide 86 53 1004106 07...
Page 102: ...Brocade X6 4 Director Hardware Installation Guide 102 53 1004106 07...
Page 130: ...Brocade X6 4 Director Hardware Installation Guide 130 53 1004106 07...
Page 140: ...Brocade X6 4 Director Hardware Installation Guide 140 53 1004106 07...
Page 166: ...Brocade X6 4 Director Hardware Installation Guide 166 53 1004106 07...
Page 196: ...Brocade X6 4 Director Hardware Installation Guide 196 53 1004106 07...
Page 200: ...Brocade X6 4 Director Hardware Installation Guide 200 53 1004106 07...
Page 204: ...Brocade X6 4 Director Hardware Installation Guide 204 53 1004106 07...
Page 210: ...Brocade X6 4 Director Hardware Installation Guide 210 53 1004106 07...
Page 224: ...Brocade X6 4 Director Hardware Installation Guide 224 53 1004106 07...
Page 238: ...Brocade X6 4 Director Hardware Installation Guide 238 53 1004106 07...