


Hot-swap replacement
You may replace one WWN card assembly at a time with the system powered on using the following steps to avoid interruption of
system operation.
Use this procedure if Brocade Customer Support has determined that a WWN card needs replaced and you have received replacement
cards. These procedures require that you use the
wwnrecover
utility. For more information on this utility, refer to
You can use this procedure to replace one WWN card assembly at a time while power is on. Follow all steps for one card, and then repeat
the same steps to replace the other card assembly. To replace both WWN card assemblies simultaneously, use procedures under
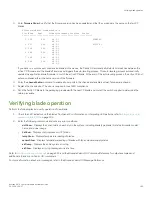
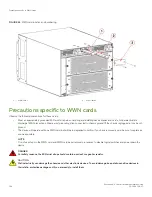
1. Remove the defective WWN card assembly using procedures under
Removing the WWN card and bezel
on page 176.
Removing a WWN card assembly will result in RASlog messages indicating that a WWN card cannot be detected. Since the
system will be in a degraded state, replace the WWN card as soon as possible.
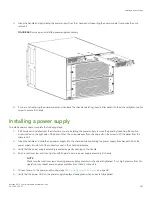
2. Install the replacement WWN card assembly into the empty slot using the following steps:
a)
Holding the card assembly by its edges with both hands along its length, slide it into the chassis slot.
b) Push with your thumb on the end of assembly to fully seat into the backplane connector.
c)
Use a Phillips screwdriver to tighten the captive screw and secure the card assembly to the chassis.
NOTE
Be sure that captive screws are tightened. If not, high pressure from fan operation may unseat cards from chassis
connectors.
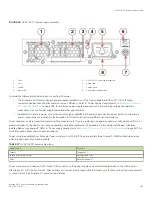
3. Verify that the WWN card is correctly connected by noting if the LEDs on the card reflects the status of the components.
4. Address any issues flagged by any RASlog EM-1220 and EM-1222 messages that display for the new card before
proceeding.
NOTE
Issues relating to data recovery on new WWN cards must be resolved at this point before proceeding to avoid invalid
WWN data, errors, and operating problems. If EM-1220 messages indicate that IP addresses on installed WWN
cards do not match, follow instructions in the message to recover the IP address so that both cards use the same
address.
5. Determine the active CP blade by entering the
haShow
command.
6. On the active CP blade, run the
wwnrecover
command and specify the WWN card that you replaced (WWN 2 or WWN 1) when
prompted.
7. If
wwnrecover
messages prompt for a system reboot, reboot both CP blades to ensure the system is running with valid WWN
card data.
8. Enter the
hafailover
command to force failover so that the standby CP blade becomes the active CP blade.
This command is necessary so that the correct IP address for the new card displays for the
ipaddrshow
command. For more
information on these commands, refer to the
Brocade Fabric OS Command Reference
.
Hot-swap replacement
Brocade X6-4 Director Hardware Installation Guide
53-1004106-07
173
Summary of Contents for X6-4
Page 12: ...Brocade X6 4 Director Hardware Installation Guide 12 53 1004106 07...
Page 20: ...Brocade X6 4 Director Hardware Installation Guide 20 53 1004106 07...
Page 28: ...Brocade X6 4 Director Hardware Installation Guide 28 53 1004106 07...
Page 64: ...Brocade X6 4 Director Hardware Installation Guide 64 53 1004106 07...
Page 86: ...Brocade X6 4 Director Hardware Installation Guide 86 53 1004106 07...
Page 102: ...Brocade X6 4 Director Hardware Installation Guide 102 53 1004106 07...
Page 130: ...Brocade X6 4 Director Hardware Installation Guide 130 53 1004106 07...
Page 140: ...Brocade X6 4 Director Hardware Installation Guide 140 53 1004106 07...
Page 166: ...Brocade X6 4 Director Hardware Installation Guide 166 53 1004106 07...
Page 196: ...Brocade X6 4 Director Hardware Installation Guide 196 53 1004106 07...
Page 200: ...Brocade X6 4 Director Hardware Installation Guide 200 53 1004106 07...
Page 204: ...Brocade X6 4 Director Hardware Installation Guide 204 53 1004106 07...
Page 210: ...Brocade X6 4 Director Hardware Installation Guide 210 53 1004106 07...
Page 224: ...Brocade X6 4 Director Hardware Installation Guide 224 53 1004106 07...
Page 238: ...Brocade X6 4 Director Hardware Installation Guide 238 53 1004106 07...