background image

10

© 2020 Brivo Systems LLC. All rights reserved.

P-MAN-PUB-Panel Networking Guide

Panel Networking Guide

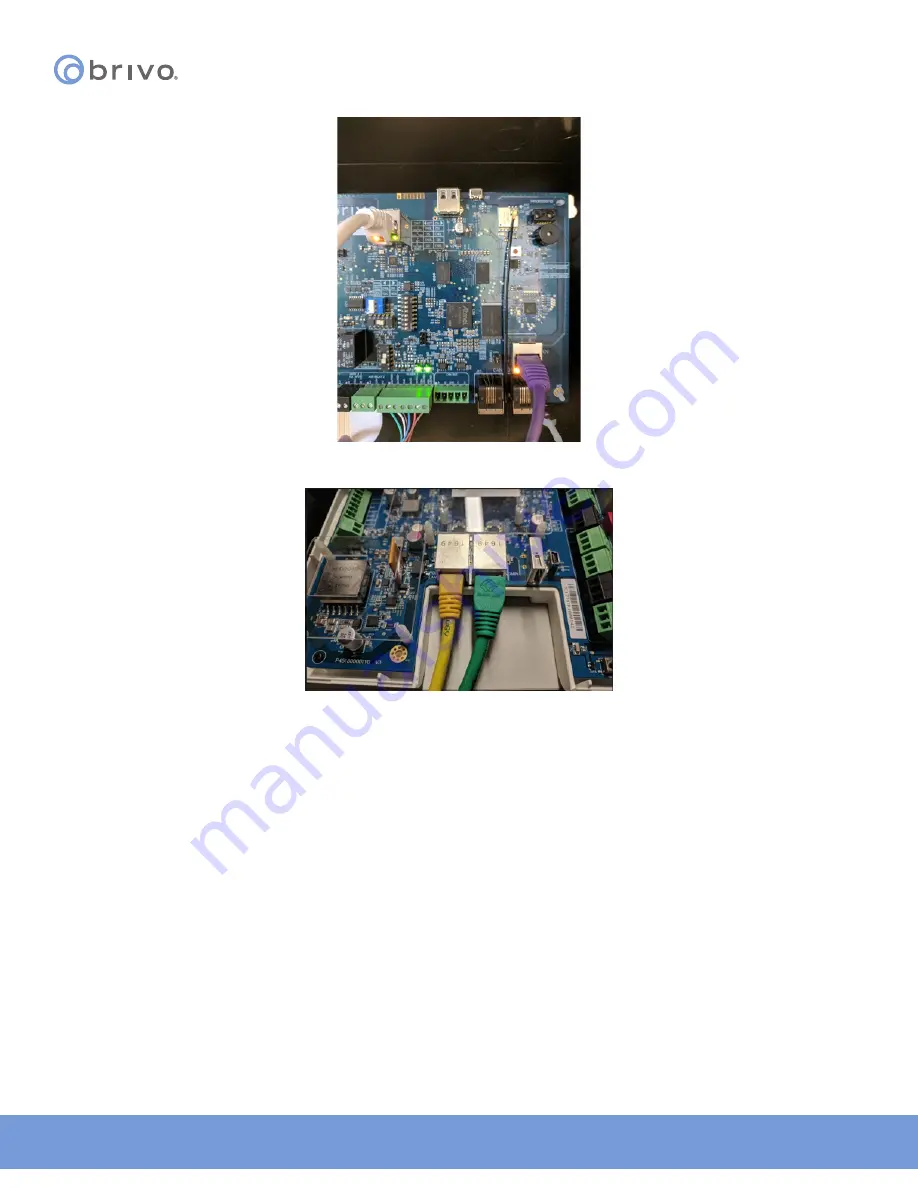
Figure 5: 

ACS6000 - Connect Main Board to LAN

Figure 6: 

ACS300 - Connect Main Board to LAN

When the Ethernet connection is working properly, you will see a green LED illuminated on the right side of the 

socket. If the green light is not illuminated, check the connection on the control panel as well as the connection on 

the Ethernet hub to which the panel is wired.

Power on the Laptop

Now that you have connected a cable from the laptop to the Main Board, power on your laptop.

During the power-on sequence, your laptop will obtain local network settings from the Main Board, provided your 

laptop’s network configuration is set to “Automatically Obtain IP Address.” This is the most common setting for 

computers running Microsoft Windows. 

If your laptop is not configured to obtain network settings automatically, use the Help utilities on your laptop to 

determine how to change the settings for your operating system.

Summary of Contents for ACS100

Page 1: ...erations 7 E Control Panels and Proxy Servers 7 ACS6000 ACS300 ACS5000 and IPDC II Accessing the Administrative Interface 8 Main Tab 12 Networking Tab 13 System Tab 22 Hardware Tab 27 Application Tab 33 Cellular Module Tab 35 Troubleshooting ACS6000 ACS300 ACS5000 IPDC 36 ACS100 III Accessing the Administrative Interface 38 Main Tab 40 Networking Tab 41 System Tab 48 Hardware Tab 52 Application Ta...

Page 2: ...cted Consult the dealer or an experienced radio TV technician for help These devices comply with Part 15 of the FCC Rules Operation is subject to the following two conditions 1 These devices may not cause harmful interference and 2 These devices must accept any interference received including interference that may cause undesired operation of the device FCC RF Radiation Exposure Statement ACS6000 ...

Page 3: ...acturing except as authorized with the written permission of Brivo Systems LLC The information contained within this document or within the product itself is considered the exclusive property of Brivo Systems LLC All information in this document or within the hardware and software product themselves is protected by the copyright and or other intellectual property laws of the United States Product ...

Page 4: ...s provided below are the ones intended in this Installation Manual and certain terminology may not apply to all models Control chassis The main chassis for a control panel The control chassis contains the MAIN BOARD and for the ACS5000 and ACS6000 may also contain one expansion board either a DOOR BOARD or an INPUT OUTPUT BOARD if using a standard chassis or three expansion boards in any combinati...

Page 5: ...nair Cloud Server for the E or the Brivo Onsite Server for the A Please refer to the Brivo Installation Worksheets and Brivo Onair Quick Start Guide Brivo Onsite Server Quick Start Guide available at www brivo com Additional Resources The following additional resources are available for the installer as well as the client Installation Manuals Installation Worksheets https www brivo com Technical S...

Page 6: ...Onair Cloud Server For the E it periodically polls the Brivo Onair Cloud Server using HTTPS to query for new data that may be available NOTE The polling period is set by default to a five minute interval for the E panel version For the A the panel will contact the Brivo Onsite Server each time it encounters a situation where the data is not in the panel s current database Additionally the Brivo On...

Page 7: ...o return through the firewall provided the original POST message originated from within the firewall as it does in the case of an installed E panel E Control Panels and Proxy Servers If there is a proxy server on your network which ordinarily blocks outbound network traffic please see your network administrator to obtain the required proxy server settings login ID password port number and IP addre...

Page 8: ...en described throughout this document as the WebCLI NOTE In most cases the Brivo control panel will self configure its network settings without any input from the installer You will only need to use access the Administrative Interface if you need to configure your network settings manually or for troubleshooting Connect a Laptop to the Admin Port With your laptop powered down connect a CAT 5 netwo...

Page 9: ...een light is not illuminated check both the connection on the control panel and on the Ethernet hub to which the panel is wired Connect the Main Board to a LAN both E or A Connect an Ethernet cable from a 10 100 Base T hub to the RJ45 LAN port located on the Main Board as shown in the figures below NOTE Only the Main Board requires an Ethernet connection any other boards that are slaved off the Ma...

Page 10: ...connection on the Ethernet hub to which the panel is wired Power on the Laptop Now that you have connected a cable from the laptop to the Main Board power on your laptop During the power on sequence your laptop will obtain local network settings from the Main Board provided your laptop s network configuration is set to Automatically Obtain IP Address This is the most common setting for computers r...

Page 11: ... your computer has finished booting up 1 Open your web browser 2 In the address bar enter http 192 168 207 1 A pop up login screen similar to the one shown in the figure below will display Figure 7 Login Screen 3 Enter cli as the default user name and new5cli as the default password You are now ready to begin configuring your Brivo control panel ...

Page 12: ... NOTE For ease of presentation the screenshots below display ACS6000 or ACS300 as the model type When you log in the model that displays will match your device type Figure 8 Info page of the Administrative Interface 4 For IPDC only To upgrade the IPDC controller from a one door controller to a two door controller click on the Upgrade link under the Main tab To complete the upgrade process contact ...

Page 13: ...us The Network Status page is useful for diagnosing various network conditions To access this page 1 Click Networking to access the Networking menu bar 2 Click Status to access the Network Status page Explanations of the various status fields are provided in the text on the right side of the page Figure 10 Network Status ...

Page 14: ...ire custom settings either by design or by policy This section explains how to change network settings if you need to do so If you are uncertain whether the network requires manual configuration of networks settings contact the network administrator at the site Deactivating DHCP Before you can set network parameters manually you must first deactivate DHCP 1 Select the Networking tab The Networking...

Page 15: ...nal 3 After entering the data click Set Static Params Figure 12 IP Address Configuration NOTE Incorrect parameters may prevent the control panel from communicating with the Brivo Onair Cloud Server Please confirm all settings with the LAN network administrator first WARNING LAN Port IP Address The Admin port uses the IP address range 192 168 207 NNN do NOT use this range on the LAN port If you mus...

Page 16: ...a link speed between the panel and the network 1 Click Networking to access the Networking menu bar 2 Click Advanced Settings to access the Advanced Settings page Figure 13 Advanced Settings Static Routes Establishing static routes is rarely required and should be performed only with the advice of the network administrator for the site where the control panel is being installed Figure 14 Static Ro...

Page 17: ...ver to control access to the internet you will need to manually configure the proxy server settings Before changing these settings first work with the network administrator to determine valid values 1 Click Networking to access the Networking menu bar 2 Click Proxy Server to access the SOCKS5 Proxy Server page Figure 15 Proxy Server Configuration ...

Page 18: ... connectivity problems To access this page 1 Click Networking to access the Networking menu bar 2 Click Tools to access the Network Tools page 3 If you want to reinitialize the Brivo control panel networking click Restart Network 4 To diagnose network connectivity problems enter a valid Command and Target then click Go The system performs the specified command and displays the output Descriptions ...

Page 19: ...s performed are provided in the text on the right side of the page Figure 17 Network Troubleshooting Assistant ADMIN Settings The ADMIN port uses a small subnet to interface directly with laptops to provide access to the setup and diagnostic functions of the control panel This subnet by default is 192 168 207 1 through 24 If this conflicts with the host network the internal net used by the control...

Page 20: ...els Wi Fi can also function as a failover for Ethernet If both Wi Fi and Ethernet are enabled the ACS6000 and ACS300 control panels will default to using the Ethernet connection The Administrative Interface includes a tab for configuring Wi Fi network settings To access this tool 1 Click Networking to access the Networking menu bar 2 Click WiFi to access the Wi Fi settings page 3 To configure WiFi...

Page 21: ...i or Cellular The Administrative Interface includes a tab for configuring the connection priority of the panel To access this tool 1 Click Networking to access the Networking menu bar 2 Click Connection Priority to access the Connection Priority page 3 To set the First Priority select Ethernet WiFi or Cellular from the dropdown list 4 Repeat this step for Second Priority and Third Priority Do not ...

Page 22: ...during normal operation of the panel and should be used only in conjunction with assistance from Brivo Technical Support Status To view a status report of the performance and state of the control panel at the level of the operating system 1 Click System to access the System menu bar 2 Click Status to access the System Status page Figure 21 System Status ...

Page 23: ... 22 System Date Time NOTE A properly functioning control panel obtains its date and time information from the Brivo Onair Cloud Server or Brivo Onsite Server Setting the date and time manually should seldom be required if ever Daemons The Administrative Interface provides tools for enabling telnet access through the local interface only but is never used except for debugging purposes This page sho...

Page 24: ...System Tools page Figure 24 System Tools 3 The three options from the Command dropdown menu are a View Kernel Log this displays the system level output of the control panel This is generally only useful to Brivo Technical Support b View System Log this displays the contents of the various logging mechanisms in the control panel c Reboot this restarts the control panel This is the recommended metho...

Page 25: ...em to access the System menu bar 2 Click Administration to access the Change the Login Password page 3 If desired enter the new Username 4 If desired enter the new Password 5 Enter the same Password in the Confirm Password field 6 Click Apply Figure 25 Change the Username and Password NOTE New usernames and passwords must comply with the following rules The minimum character length is six characte...

Page 26: ...drive into the USB Host port prior to performing this operation WARNING System Restore All current configuration settings will be overwritten when the System Restore functionality is used 4 To restore the current panel settings click on Choose File and select the backup file you wish to restore to the control panel The restoration begins immediately and automatically To receive a confirmation mess...

Page 27: ... number of notifications reported for certain events to assign OSDP addressing to OSDP readers and to upgrade firmware for OSDP readers Status The Hardware Status page provides a complete view of the state of all major components of the control panel hardware To access this page 1 Click Hardware to access the Hardware menu bar 2 Click Status to access the Brivo Hardware Status page Status values a...

Page 28: ...eader LED to indicate a waiting state By default the system will show a blinking amber LED to indicate a waiting state on the reader To access this page NOTE You may wish to disable this feature if it is not compatible with 3rd party integration 1 Click Hardware to access the Hardware menu bar 2 Click LED Settings to access the LED Settings page 3 Click the checkbox to disable the Reader LED indic...

Page 29: ...the maximum number of event pairs Lost Restored and the number of hours the default for each is one 5 To limit Tamper event notifications check the Tamper Event rate control checkbox 6 Enter the maximum number of event pairs Open Closed and the number of hours the default for each is one 7 To limit Wiring Input Output event notifications check the Wiring Input IO Event rate control checkbox 8 Ente...

Page 30: ...ACS6000 only The Hardware Troubleshooting page provides a view of any hardware error conditions that the control panel is able to detect through self diagnostics To access this page 1 Click Hardware to access the Hardware menu bar 2 Click Troubleshooting to access the Hardware Troubleshooting page Figure 30 Expansion Board Troubleshooting ...

Page 31: ...n to discover peripheral devices attached to the RS485 bus When successful the scan results will appear on the OSDP Tool page 5 Choose the Baud Rate of the peripheral device from the Baud Rate dropdown list the default is 9600 6 Select the PD Address for the peripheral device from the available dropdown list This choice assigns the selected PD Address to the peripheral device permanently once you ...

Page 32: ...ONLY be sent by Brivo to the administrator Do not use any other firmware upgrades files provided from other sources 1 Click Hardware to access the Hardware menu bar 2 Click Upgrade Reader Firmware to access the Reader Module Information page 3 To upgrade the firmware of a reader click on Choose File and select the firmware upgrade file you wish to use from your local storage device Select the appr...

Page 33: ...d a set of tools used for diagnosing control panel problems Log The Application Log contains an entry for every major event that occurs in the control panel For example it can answer such questions as Did the control panel receive a Wiegand value from the card reader Did the control panel detect the door closure switch change of state To access this page 1 Click Application to access the Applicati...

Page 34: ...art of diagnostic procedures where you might suspect that the panel is not operating correctly or data may have been corrupted To access this page 1 Click Application to access the Application menu bar 2 Click Tools to access the Brivo Application Tools page 3 From the pull down menu select a Restart Brivo Apps to shut down the access control applications on the control panel and then restart them...

Page 35: ... cellular network module a minimum firmware version of 6 0 0 for Brivo Onair and 3 4 6 for Brivo Onsite Server is required Hardware The Administrative Interface provides a simple list for which kind of communication this panel is configured If the configuration listed does not match expectations contact Brivo Technical Support for assistance Figure 36 Wireless Hardware Status The Administrative In...

Page 36: ...k Status page of the Administrative Interface on the control panel itself 4 Read the results of the ping command 5 If successful it will provide packet response times and other information 6 If not it will say that the node could not be reached Pinging another Computer from the Control Panel You may also wish to verify correct network operation by using the command line interface to ping another c...

Page 37: ...PASS the control panel is connected to the Brivo Onair Cloud Server Connectivity to Brivo Onsite Server A panels only Follow the steps in the Brivo Onsite Server Quick Start Guide to make sure that you have performed all the tasks necessary to set up your account In particular you should at least have registered the control panel you are testing Connectivity to the Brivo Onsite Server can be verif...

Page 38: ... you need to configure your network settings manually or for troubleshooting Connect a Laptop to the same subnet as the ACS100 Accessing the ACS100 local administrative interface is similar to other control panels ACS300 ACS6000 except there is only one LAN port Therefore instead of connecting your laptop directly to the control panel you need to connect a CAT 5 network cable with RJ45 jacks from ...

Page 39: ... up 1 Go to your laptop s PC s networking settings page and manually set your IP address on your laptop PC to 169 254 242 122 and net mask 255 255 255 0 If asked for subnet length instead of net mask enter 24 2 Open your web browser and navigate to 169 254 242 121 3 A pop up login screen similar to the one shown in the figure below will display Figure 39 Login Screen 4 Enter cli as the default use...

Page 40: ...ays the control panel Administrative Interface NOTE If you were NOT able to reach this page for any reason see the Troubleshooting section at the end of this document NOTE For ease of presentation the screenshots below display ACS100 as the model type When you log in the model that displays will match your device type Figure 40 Administrative Interface ...

Page 41: ...us The Network Status page is useful for diagnosing various network conditions To access this page 1 Click Networking to access the Networking menu bar 2 Click Status to access the Network Status page Explanations of the various status fields are provided in the text on the right side of the page Figure 41 Network Status ...

Page 42: ...ire custom settings either by design or by policy This section explains how to change network settings if you need to do so If you are uncertain whether the network requires manual configuration of networks settings contact the network administrator at the site Deactivating DHCP Before you can set network parameters manually you must first deactivate DHCP 1 Select the Networking tab The Networking...

Page 43: ...Address Configuration page 1 IP Address Netmask Gateway and Primary DNS are required fields on this page 2 Secondary DNS and Tertiary DNS are optional 3 After entering the data click Set Static Params Figure 43 IP Address Configuration NOTE Incorrect parameters may prevent the control panel from communicating with the Brivo Onair Cloud Server Please confirm all settings with the LAN network admini...

Page 44: ...a link speed between the panel and the network 1 Click Networking to access the Networking menu bar 2 Click Advanced Settings to access the Advanced Settings page Figure 44 Advanced Settings Static Routes Establishing static routes is rarely required and should be performed only with the advice of the network administrator for the site where the control panel is being installed Figure 45 Static Ro...

Page 45: ...ver to control access to the internet you will need to manually configure the proxy server settings Before changing these settings first work with the network administrator to determine valid values 1 Click Networking to access the Networking menu bar 2 Click Proxy Server to access the SOCKS5 Proxy Server page Figure 46 Proxy Server Configuration ...

Page 46: ... connectivity problems To access this page 1 Click Networking to access the Networking menu bar 2 Click Tools to access the Network Tools page 3 If you want to reinitialize the Brivo control panel networking click Restart Network 4 To diagnose network connectivity problems enter a valid Command and Target then click Go The system performs the specified command and displays the output Descriptions ...

Page 47: ... connected to the local network and ultimately to the Brivo Onair Cloud Server To access this tool 1 Click Networking to access the Networking menu bar 2 Click Troubleshooting to access the Network Troubleshooting Assistant 3 If any one of the connectivity tests fails a message displays describing the failure and offering suggestions for resolving it Descriptions of the tests performed are provide...

Page 48: ...during normal operation of the panel and should be used only in conjunction with assistance from Brivo Technical Support Status To view a status report of the performance and state of the control panel at the level of the operating system 1 Click System to access the System menu bar 2 Click Status to access the System Status page Figure 49 System Status ...

Page 49: ...page Figure 50 System Date Time NOTE A properly functioning control panel obtains its date and time information from the Brivo Onair Cloud Server Setting the date and time manually should seldom be required if ever Daemons The Administrative Interface provides tools for enabling telnet access through the local interface only but is never used except for debugging purposes This page should be acces...

Page 50: ...System Tools page Figure 52 System Tools 3 The three options from the Command dropdown menu are a View Kernel Log this displays the system level output of the control panel This is generally only useful to Brivo Technical Support b View System Log this displays the contents of the various logging mechanisms in the control panel c Reboot this restarts the control panel This is the recommended metho...

Page 51: ...he Confirm Password field 6 Click Apply Figure 53 Change the Username and Password NOTE New usernames and passwords must comply with the following rules The minimum character length is six characters and the maximum character length is 1024 characters All CAPS and the following non alphanumeric characters are permitted _ except and space Diagnostic Dump The Diagnostic Dump functionality has no par...

Page 52: ... of notifications reported for certain events to upgrade firmware for OSDP readers and manage fluid access and mobile credential functionality Status The Hardware Status page provides a complete view of the state of all major components of the control panel hardware To access this page 1 Click Hardware to access the Hardware menu bar 2 Click Status to access the Brivo Hardware Status page Status v...

Page 53: ...eader LED to indicate a waiting state By default the system will show a blinking amber LED to indicate a waiting state on the reader To access this page NOTE You may wish to disable this feature if it is not compatible with 3rd party integration 1 Click Hardware to access the Hardware menu bar 2 Click LED Settings to access the LED Settings page 3 Click the checkbox to disable the Reader LED indic...

Page 54: ... limit Tamper event notifications check the Tamper Event rate control checkbox 4 Enter the maximum number of event pairs Open Closed and the number of hours the default for each is one 5 To limit Wiring Input Output event notifications check the Wiring Input IO Event rate control checkbox 6 Enter the maximum number of event s and the number of hours the default for each is one 7 To limit Unauthori...

Page 55: ...ded from other sources 1 Click Hardware to access the Hardware menu bar 2 Click Upgrade Reader Firmware to access the Reader Module Information page 3 Firmware upgrades to the ACS100 may also include firmware upgrades to the OSDP reader s To enable the automatic upgrade of bundled firmware check the Upgrade bundled firmware automatically checkbox 4 To upgrade the firmware of a reader manually clic...

Page 56: ... by touch functionality make sure the Capacitive Touch checkbox is unchecked 4 To disable Fluid Access by pressing the key available only on ACS100 units with keypads make sure the Asterisk Key checkbox is unchecked 5 If mobile credential devices are not being detected in a pocket or purse increase the Transmit Power DB value 6 If mobile credential holders are experiencing interference from other ...

Page 57: ...ng control panel problems Log The Application Log contains an entry for every major event that occurs in the control panel For example it can answer such questions as Did the control panel receive a Wiegand value from the card reader Did the control panel detect the door closure switch change of state To access this page 1 Click Application to access the Application menu bar 2 Click Log to view th...

Page 58: ...access the Brivo Application Tools page 3 From the pull down menu select a Restart Brivo Apps to shut down the access control applications on the control panel and then restart them Generally this command should be used only when Brivo Technical Support requests that you do so b Reset Brivo Data to erase the local database of credentials schedules door settings etc and forces the control panel to ...

Page 59: ...age of the Administrative Interface on the control panel itself 4 Read the results of the ping command 5 If successful it will provide packet response times and other information 6 If not it will say that the node could not be reached Pinging another Computer from the Control Panel You may also wish to verify correct network operation by using the command line interface to ping another computer on...

Page 60: ... to the Brivo Onair Cloud Server can be verified by using the Network Troubleshooting Assistant 1 Log into the control panel s Administrative Interface as described in Accessing the Administrative Interface 2 Click Networking and then click Troubleshooting on the Networking menu bar 3 If all the tests listed on that page show a green PASS the control panel is connected to the Brivo Onair Cloud Ser...

Page 61: ...4 LMW 5 24 17 Added System Configuration and Diagnostic Dump instructions 1 5 LMW 10 11 17 Corrected error on page 20 1 6 LMW 11 30 17 Updated Wi Fi section to describe Scan Network functionality 1 7 LMW 2 2 18 Added username password change functionality 1 8 LMW 2 13 19 Added cellular network module connection priority functionality and proxy server options for cellular connectivity 1 9 LMW 8 6 2...

Reviews: