background image

11. WEEKLY TIMER


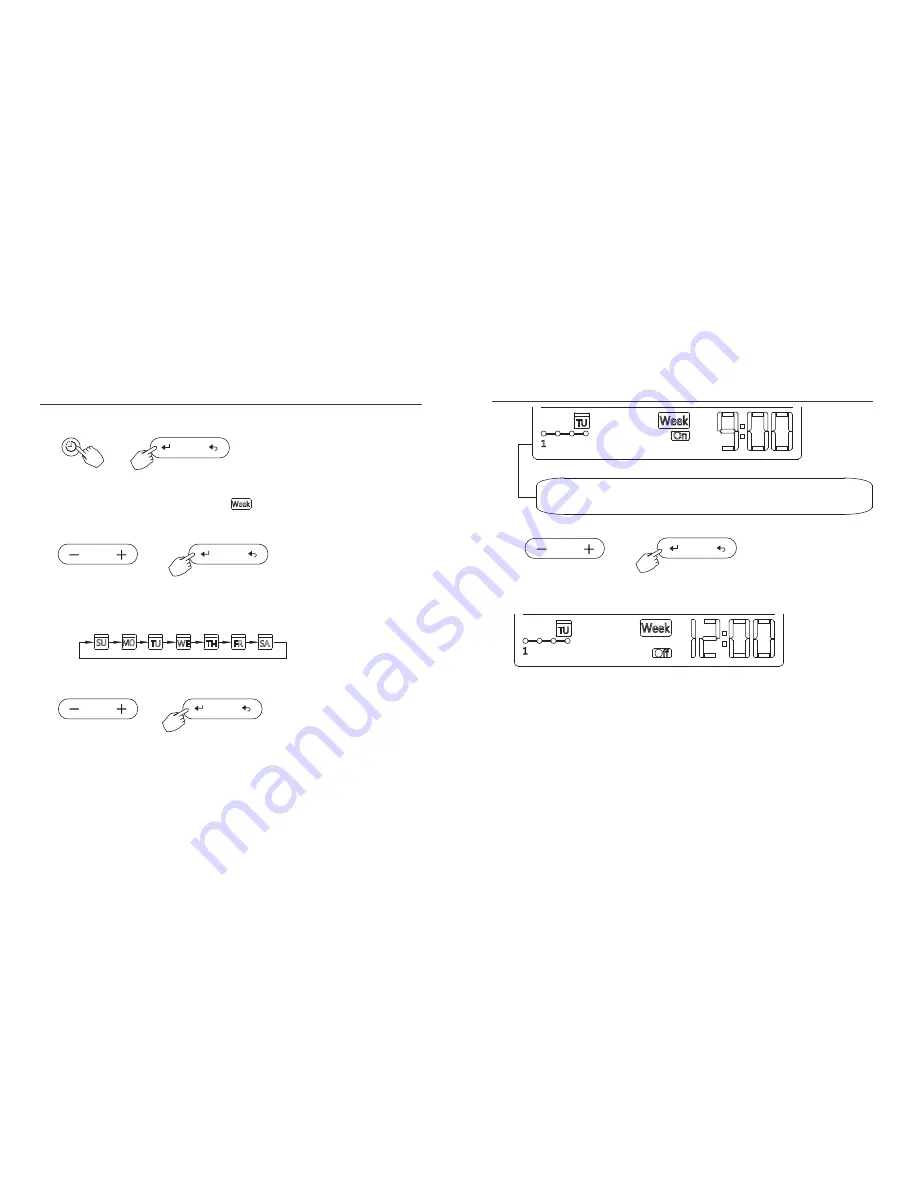
Weekly timer setting


Press the TIMER button to select the         , press the CONFIRM button 
to conrm.

1


Press the “ + ” or “ - ” adjust buttons to select the day of the week. 

    Press the CONFIRM button to conrm the setting.

Day of the week setting


TIMER

CONFIRM


Press the  “ + ” or “ - ” adjust buttons to set the timer On time.  Press the 
CONFIRM  button to conrm the setting.

ON timer setting of timer setting 1

3

CONFIRM

11. WEEKLY TIMER

Example: Tuesday time period 1

    Up to 4 timer settings can be saved for each day of the week. This 

allows the user to congure the week timer to suit their lifestyle.

Different timer settings can be set by repeating step 3 to 4.

Other days in the week can be set by repeating step  2 to 5.

NOTE:    The weekly timer setting can be returned to the previous step by

                 pressing the BACK button.


The time of timer setting can be deleted by pressing the DAY OFF button


The current setting will be restored and the system will exit the weekly 


                 timer setting automatically if there is no operation for 30 seconds.

Off timer setting of timer period 1

Press the “ + ” or “ - ” adjust buttons to set the timer Off time.
Press the Conrm button to conrm the setting.

6

21 

22 

CONFIRM

CONFIRM

2

4

5

Example: Tuesday time period 1

Summary of Contents for B061526

Page 1: ...Ltd 69 Marsden Street Lower Hutt 5010 New Zealand PO Box 38523 Wellington Mail Centre Wellington 5043 New Zealand 0800 WARMAIR 0800 9276 247 Ph 64 04 920 1670 Fax 64 04 920 1681 www warmair co nz email sales warmair co nz Brivis South Africa Distributor Lorenz and Associates Northlands Deco Park Cnr Witkoppen and Newmarket Roads North Riding Johannesburg South Africa 2194 0861 BRIVIS 0861 274 847 ...

Page 2: ...For convenience and for future reference please keep this manual in a safe place after reading it This manual provides detailed descriptions of precautions the unit CONTENTS 1 SAFETY PRECAUTIONS 1 Due to our policy of continuous improvement product details and speci cations are subject to change without notice This appliance is not intended for use by persons including children with reduced physic...

Page 3: ...tly sized wiring may overheat and cause a re The speci ed cables shall be applied in the wiring Do not allow external forces to pull on the terminals Damage to the control and overheating may cause a re NOTE 2 3 4 2 INSTALLATION ACCESSORIES 1 SAFETY PRECAUTION 1 1 3 4 1 2 1 1 Don t install in an area contaminated with heavy oils vapors or gases that may cause the control to deform this may lead to...

Page 4: ...re adequately separated 3 A 6 metre wired control wiring loom is provided with plugs with the wired control 4 The wired control wiring between the control and the indoor unit can be made Installation diagram Fig 3 1 main board Interconnecting wiring loom Fig 3 2 1 Connect the female wiring connector from the indoor unit main board with the male connector of the interconnecting wiring loom See Fig ...

Page 5: ... is level on the wall surface then reinstall the bottom cover of the wall control See g 3 4 Over tightening the mounting screws will damage the control and LCD screen When installing please ensure that the screws and wired control are at the same height without protruding and deforming the control LCD screen When installing please ensure that there is a small loop of excess cable available 3 INSTA...

Page 6: ... 90 Input voltage Temperature Range Humidity Range The pictures in this manual are diagrammatic for explanation purposes only The wired control may appear slightly Indoor Unit Main PC board on main PC Board Cn40 connector 4 core shielded Rear of wired control See g 4 1 control box cable to control 6 metre cable provided Operational Limits different to that as shown ...

Page 7: ...plicable 6 Follow me indicator 7 Temperature C F indicator 1 2 3 4 5 6 7 8 9 10 11 13 12 8 Temperature display 9 Lock indicator 10 Room temperature indicator 11 Clock display 12 On Off timer 13 Timer display 1 2 3 4 5 6 7 8 9 10 11 POWER MODE 12 FAN SPEED TIMER SWING SWING FOLLOW ME DELAY DAY OFF CONFIRM BACK COPY 6 LCD DISPLAY LAYOUT 9 10 13 ...

Page 8: ... the current time Press repeatedly to adjust the time in 1 minute increments Press and hold to adjust the time rapidly ex Monday AM 11 20 1 2 3 4 5 Press the or adjust buttons to set the date The selected date will ash After setting the day and time press the TIMER button to exit The control will exit if no buttons are pressed within 10 seconds The setting is complete after pressing TIMER button o...

Page 9: ...30 C Down Operation mode setting Up POWER Fan speed setting Press the FAN SPEED button to set the fan speed This function is unavailable in AUTO or DRY modes Room temperature sensor selection Indoor Unit Press the FOLLOW ME button to select whether the room temperature is detected up at the indoor unit or at the wired control position When the Follow me function indication is lit the room temperat...

Page 10: ...CK and COPY button simultaneously for 3 seconds to turn off the keypad tone Press the same buttons again for 3 seconds to turn on the keypad tone BACK Left Right swing applicable products Press the button to start Left Right swing function Press the button again to stop When the Left Right swing function is activated the indicator 15 16 C F temperature scale selection Press and hold and buttons to...

Page 11: ...tons to select the adjustment of the four louvers Each time you push the button the wired control selects the louver in the following sequence The icon denotes the four louvers move simultaneously 3 Use the button to adjust the Up Down direction of the selected louver 0 WEEKLY timer Use this timer function to set operating times for each day of the week On timer Use this timer function to start th...

Page 12: ...er the required time is set and con rmed the timer is enabled Example Off timer set at PM 6 00 4 TIMER CONFIRM CONFIRM Press the CONFIRM button to complete the To set the On and Off TIMER Press the TIMER button to select the 1 2 Press the CONFIRM button the Clock display is ashing 3 Press the or adjust buttons to set the timer On time Press the CONFIRM button to complete the setting 4 Press the or...

Page 13: ...e week This allows the user to con gure the week timer to suit their lifestyle Different timer settings can be set by repeating step 3 to 4 Other days in the week can be set by repeating step 2 to 5 NOTE The weekly timer setting can be returned to the previous step by pressing the BACK button The time of timer setting can be deleted by pressing the DAY OFF button The current setting will be restor...

Page 14: ...ssed once quickly at 10 00 the system will turn on again at the next set time of 14 00 2 Press the POWER button for 2 seconds to turn the system off completely this overrides the weekly timer function In weekly timer mode press the CONFIRM 1 button Press the or adjust buttons to select the day of the week CONFIRM Press the BACK button to go back to the Press the DAY OFF button to set the DAY OFF 3...

Page 15: ...de once can be copied into another day of the week All of the settings of the selected day of the week will be copied The copy function simpli es the programming functions and saves setting time Press the Back button to go back to the weekly Press the COPY button to con rm Other days can be copied by repeating step 4 and 5 Example Copy the setting of Monday to Wednesday The icon ashes quickly 6 7 ...

Page 16: ...door unit E1 E7 EEPROM electronic control malfunction E4 E5 Sensor T2B fault Sensors T3 T4 fault or compressor discharge sensor fault E6 12 FAULT CODE DEFINITION EA Compressor current protection four times E8 E9 EC ED NO 10 11 12 13 14 15 16 17 18 Communication error between the main and sub board display Fan speed error Fresh Air malfunction Outdoor unit protection fault IPM malfunction EB EE EF ...

Reviews: