
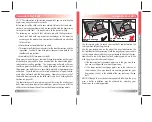
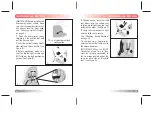


Use this simple guide to check your seat belts and determine the
safest position for your Expressway.
Use the gray shaded area on the side of this page to determine the
best position for the Expressway. Hold the page against your vehicle
seat (as shown above) with the gray area toward the back of the seat.
Now check to see if the lower seat belt anchorage points are in line
with the gray or the red area of this page.
• If the lower seat belt anchorage points are in the gray area, then
you can use this position for your Expressway.
• If the lower seat belt anchorage points are in the red area, as
shown above, then you should use another position for your
Expressway, such as in the middle of the rear seat using the lap
belt.
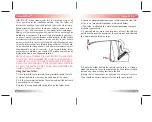
NOTE:
Although the seat belt anchorage points fall within the gray
area, a better installation may be achieved by adjusting your
Expressway to a reclining position.
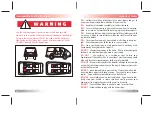
Compatible Seat Belts
8
NOTE:
The information in this section only applies if you are installing the
Expressway using the vehicle seat belts.
Before you install the child seat in your vehicle, first note that some vehi-
cles have no seating positions which are compatible with the Expressway
(or any other child seat). If in doubt, return to the dealer for help.
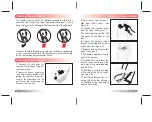
The following are seat belts that will not work with the Expressway:
• Front seat belts with top or bottom anchorages in the door (an
anchorage is the point where your seat belt and buckle are attached
to the vehicle).
• Motor driven automatic belts of any kind.
• Three-point belts that have retractors for the shoulder section and the
lap section. Such belts have latch plates (tongues) sewn both to the
shoulder and lap sections.
• Non-locking (ELR) two-point seat belts.
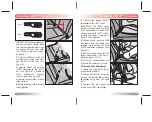
The owner's manual for your vehicle will have information on the types
of seat belts in your vehicle. If you have belts of the above-listed types,
select another seating position. The Expressway will work with rear
seat three-point seat belts with a sliding latch plate, and with rear seat
three-point seat belts that are specifically marked as appropriate for
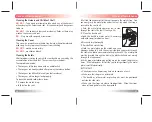
child seats. The middle rear seat of most vehicles has a lap belt which
most often will work with the Expressway. However, make sure that
the buckle does not catch on the child seat frame (see Checking Buckle
Position on page 20).
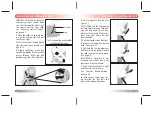
The Expressway can fit securely in many vehicles using the existing seat
belts. However, some types of vehicle designs prevent a secure fit of the
child seat due to the position of the seat belt lower anchorage points.
Compatible Seat Belts
Lower Ancorage
Point
Lower Ancorage
Point
Seat Belt Anchorage Points MUST
Fall W
ithin This Shaded Area
Seat Belt Anchorage Points MUST
Fall W
ithin This Shaded Area
9