background image

30

31

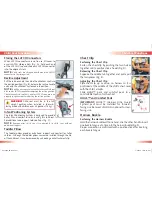
Infant-Positioning System

The  Infant-Positioning  System  is  designed  to  provide 

better fit and comfort for infants using this child seat. 
For additional side support, fold side flaps (Fig. C).

NOTE:

Remove  after  child  can  sit  comfortably  in  child  seat  without 

additional support.

Toddler Pillow

The  toddler  pillow  provides  extra  head  support  and  comfort  for  taller 

children. Although the toddler pillow can remain installed through the life 
of the child seat, it can be removed by unhooking each attachment clip.

Storing the LATCH Connectors  

When LATCH connectors are not in use, lift cover to 

access LATCH storage slots (Fig. A).  Fold each end 

of the LATCH strap and slide each LATCH connector 
into the adjacent slots.

NOTE:

Child  seats  are  shipped  from  Britax  with  LATCH 

connectors in the storage slots.

Recline Adjustment

Pull the recline handle then slide the child seat shell into 

the desired position. (Fig. B)  Release the recline handle 
and verify the child seat has locked into position.

NOTE:

It will be necessary to loosen the tether, vehicle seat 

belt, and/or LATCH strap before adjusting the recline position. 

The  tether,  vehicle  seat  belt,  and/or  LATCH  strap  must  be 
properly re-tightened after adjusting the recline position.

Child Seat Functions

A

B

C

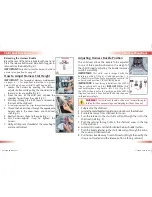
Chest Clip

Fastening the Chest Clip

Fasten the chest clip by pushing the two halves 

together until a positive click is heard (Fig. D). 

Releasing the Chest Clip

Squeeze  the  middle  tab  together  and  pull  apart 

the two pieces (Fig. E).

Adjusting the Chest Clip

Slide  chest  clip  up  or  down  on  harness  so  it  is 

positioned at the middle of the child’s chest, level 

with the child’s armpits. 

Slide  HUGS™  pads  and  comfort  pads  to  a 

comfortable location for the child.

HUGS™ and Comfort Pads

IMPORTANT:

  HUGS™  (Harness  Ultra  Guard 

System)  pads  must  be  installed  for  forward-

facing use. Removal of HUGS is optional for rear-

facing use.

Harness Buckle

Fastening the Harness Buckle 

Hold the harness buckle with one hand. Use the other hand to insert 

one buckle tongue at a time into the harness buckle (Fig. F). 

Proper connection is confirmed with a positive click after inserting 

each buckle tongue.

D

E

x 2

F

Child Seat Functions

WARNING!

  Child  seat  must  be  in  the  full 

upright  position  when  installed  in  forward-

facing mode with children over 33 pounds (15 kg.).

P276000_R2.indd   30-31

1/2/2008   10:16:18 AM

Summary of Contents for DECATHLON

Page 1: ...Decathlon User Guide PLEASE READ INSTRUCTIONS STORE UNDER COVER ...

Page 2: ...Installation 14 Lap Belt Installation 16 Installation Forward facing LATCH Installation 18 Lap Shoulder Belt Installation 20 Lap Belt Installation 22 Installation Aircraft 24 Installation Versa Tether Safety Information 25 Using the Versa Tether 26 Tether Connector Strap 27 Energy Absorbing Tether 28 Child Seat Functions Switching the LATCH Connectors 29 Storing the LATCH Connectors 30 Recline Adj...

Page 3: ...revent injury due to deterioration or hidden damage discontinue use of a child seat that is older than six years or has been in a moderate or severe crash See date of manufacture located on child seat This child seat must not be used in the home in boats or other non certified applications Based on crash statistics the National Highway Traffic Safety Administration NHTSA recommends that parents se...

Page 4: ... child as well as it should Do not allow children to play with this or any child seat Do not use anything to raise child seat off vehicle seat except as described in these instructions In a crash child seat could slide and may not adequately protect the child Certification This child seat system conforms to all applicable Federal Motor Vehicle Safety Standards This child seat is certified for use ...

Page 5: ...kg in weight or the child exceeds 33 lbs 15 kg in weight or the top of the head is less than 1 2 5 cm from the top of the child seat Fig A or the harness straps are in a slot above the child s shoulders WARNING Do NOT use the child seat forward facing if the child is less than one year of age or the child is less than 20 lbs 9 1 kg in weight or the child exceeds 65 lbs 29 5 kg in weight or the chi...

Page 6: ...se Button LATCH Connector Toddler Pillow Infant Positioning System Infant Pillow Infant Positioning System Body Pillow 11 12 13 14 15 16 17 18 19 20 1 8 9 10 11 12 13 2 3 4 5 6 7 Comfort Pads Chest Clip HUGS Shoulder Pads Harness Buckle Harness Adjuster Release Button Harness Adjuster Strap Recline Handle IMPORTANT When not in use this user guide should be stored under the cover DO NOT discard the...

Page 7: ...cing or rear facing seats CANNOT be used See diagram below DO NOT place a child seat rear facing in the front seat of a vehicle with a passenger air bag DEATH or SERIOUS INJURY can occur The back seat is the safest place for children under 12 If the buckle lies near the position marked wrong when the vehicle belt is tightened try fitting the child seat in another seating position in the vehicle OR...

Page 8: ...the farthest LATCH anchor Fig E Rotate seat into rear facing position Verify the LATCH strap is not twisted and attach the remaining LATCH connector to the adjacent LATCH anchor Fig F NOTE It may be necessary to switch LATCH connectors as shown on page 29 if ANY of the following conditions exist LATCH connector is not in an upright position as shown in figure D 1 2 3 4 5 6 7 8 Installation Rear fa...

Page 9: ...2 3 4 5 6 7 Installation Rear facing Rear Facing Rear Facing A B C D To prevent breakage never extend the lock off arm beyond its normal open position and always keep lock off closed when not in use If your vehicle is equipped with an automatic locking retractor ALR use of lock offs is not required as long as the ALR is locked Check your vehicle owner s manual to determine type of retractor your v...

Page 10: ...xtend the lock off arm beyond its normal open position and always keep lock off closed when not in use 1 2 3 4 5 6 7 Installation Rear facing Rear Facing Rear Facing A B C If your vehicle is equipped with an automatic locking retractor ALR use of lock offs is not required as long as the ALR is locked Check your vehicle owner s manual to determine type of retractor your vehicle has and how to lock ...

Page 11: ...H strap is not twisted and attach closest LATCH connector to the vehicle seat back to the farthest LATCH anchor Fig F A positive click confirms attachment Rotate seat into forward facing position VerifyLATCHstrapisnottwistedandattachremaining LATCH connector to adjacent LATCH anchor A positive click confirms attachment Push the child seat into the vehicle seat while pulling each LATCH adjuster str...

Page 12: ...ck or side to side more than 1 inch 2 5 cm at the belt path Removal If connected disconnect the Versa Tether from the tether anchor Press the red release button on the vehicle belt buckle and pull the vehicle buckle from the child seat belt path 5 6 7 8 9 10 Installation Forward Facing D E F IMPORTANT Britax recommends that the Versa Tether be used at all times Using the tether will improve the st...

Page 13: ...s secure when it cannot be moved front to back or side to side more than 1 inch 2 5 cm at the belt path Removal If connected disconnect the Versa Tether from the tether anchor Press the red release button on the vehicle belt buckle and pull the vehicle buckle from the child seat belt path 5 6 7 Lap Belt Installation Figure A illustrates a typical forward facing lap belt installation When not in us...

Page 14: ...g Lap Belt Installation instructions on pages 22 23 A B Aircraft Installation Safety Information Installation Versa Tether WARNING When using the child seat in forward facing mode attach the Versa Tether only to tether anchors identified by the vehicle manufacturer as tether anchorage points Use of other locations is not approved or permitted DO NOT modify the vehicle without advice from the vehic...

Page 15: ...level surface Figs B and C The rear facing recline angle can be adjusted by placing a rolled towel or pool noodle in the crease of the vehicle seat 1 2 3 4 5 6 7 8 Installation Versa Tether A 30 45º 0º 90º B 30 45º 0º 90º C Because every vehicle model is different sometimes you cannot find a location to properly anchor the tether or the structural part of the seat is too large for the hook Use the...

Page 16: ...ng the LATCH Connectors The LATCH strap may need to be switched for proper alignment in rear facing Fig C versus forward facing Fig D installations If a proper connection cannot be achieved complete the following procedure to switch the connectors Lift the front of the cover to access the LATCH connectors Pull the LATCH strap and connectors from the child s right side of the child seat Thread the ...

Page 17: ...CH strap before adjusting the recline position The tether vehicle seat belt and or LATCH strap must be properly re tightened after adjusting the recline position Child Seat Functions A B C Chest Clip Fastening the Chest Clip Fasten the chest clip by pushing the two halves together until a positive click is heard Fig D Releasing the Chest Clip Squeeze the middle tab together and pull apart the two ...

Page 18: ... child Properly adjusting the buckle increases comfort and safety IMPORTANT This child seat is shipped with the buckle in position 1 Fig E Use buckle position 1 2 or 3 that is closest to but not underneath your child Do not use buckle position 3 in rear facing mode IMPORTANT In rear facing installations the LATCH strap or vehicle belt must rest IN FRONT OF the child seat buckle when using buckle s...

Page 19: ... should fit low on the child s body 1 2 3 4 5 6 7 8 Securing Your Child A B C D Slowly pull the adjuster strap to tighten the harness around the child Fig E Position the chest clip at the middle of the child s chest level with the armpits Verify that harness is not twisted and child is properly secured IMPORTANT Always pull on the harness after securing the child to ensure the buckle tongues are s...

Page 20: ... slide through the child seat shell Fig B Push the retainer through slots in the shell and cover to the top of the child seat Pull lower harness straps buckle tongues HUGS pads and chest clip through lower slots in cover Remove entire cover from child seat For additional demonstration please visit www BritaxUsa com 1 2 3 4 5 6 7 8 9 10 B Refitting the Cover To refit the cover reverse the previous ...

Page 21: ... Push the retainer through slots in the shell and cover to the bottom of the child seat Pull harness buckle away from child seat until tight and verify the strap is not twisted and the release button is facing outward 1 2 3 4 5 1 2 3 4 A Care and Maintenance Cleaning the Harness Buckle If a child eats and drinks while in the child seat the harness buckle may need to be periodically checked and cle...

Page 22: ...s accessories or tightening devices is not approved by Britax Their use could cause this child seat to fail Federal Safety Standards or not perform as intended in a crash Their use automatically voids the Britax warranty LIMITATION OF DAMAGES The warranty and remedies as set forth above are exclusive and in lieu of all others oral or written express or implied In no event will Britax or the retail...

Page 23: ... seat cannot be moved front to back or side to side more than one inch at the connection point Double Check Child to Car Seat Installation Tug on the buckle to ensure proper locking Confirm harness straps are snug and over both shoulders and hips You should not be able to pinch excess harness strap webbing at the child s shoulder Make sure the chest clip is properly fastened and positioned in the ...

Reviews: