Bristan OP TS1503 CL C Installation Instructions And User Manual Download Page 1

Installation Instructions 

and User Guide

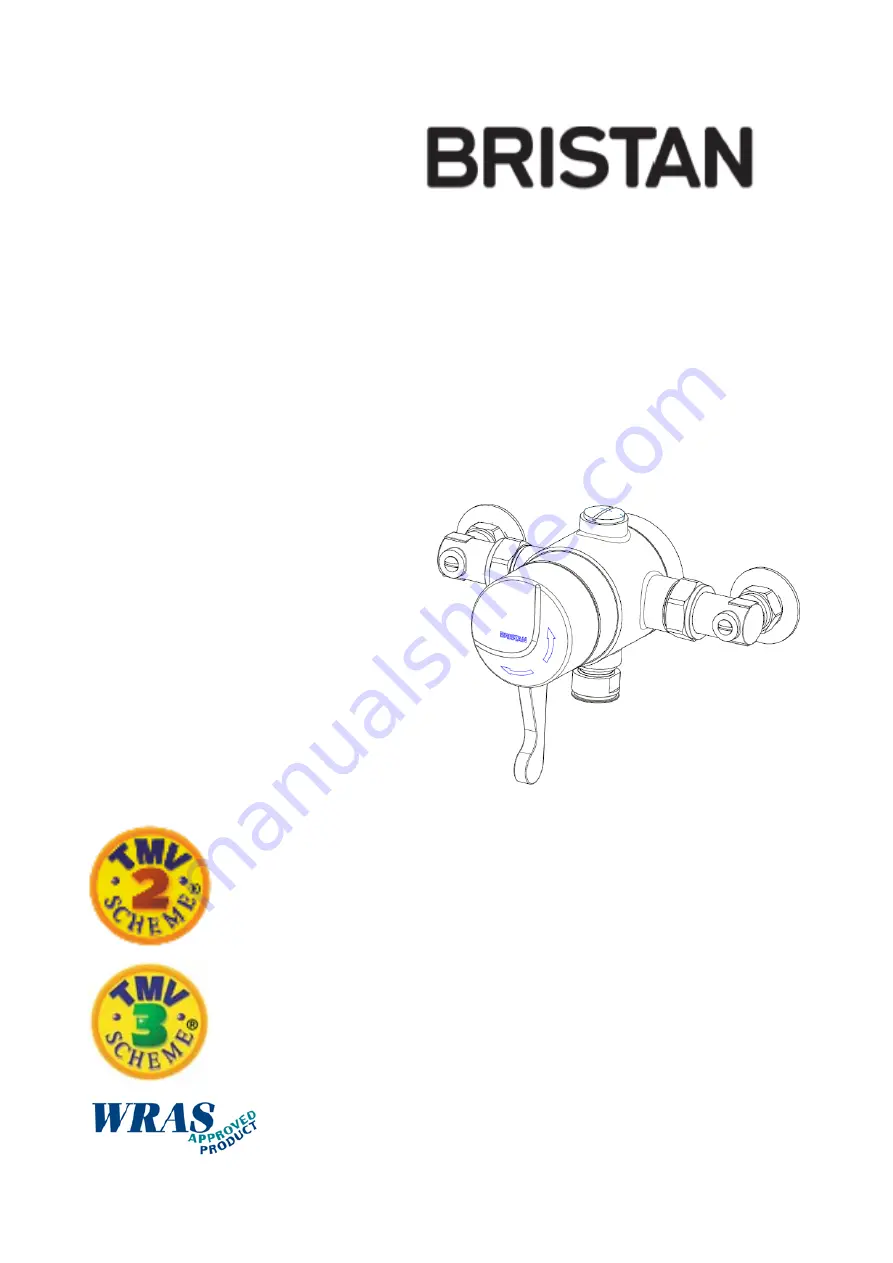
Opac Lever Thermostatic 
Shower Valve

Models covered: OP TS1503 EL C,    
OP TS1503 CL C, OP TS1503 ISOL C, 
OP TS1503 SCL C

Please keep this booklet for future

Reference.

Installer, when you have read these

instructions please ensure you leave them

with the user.

Summary of Contents for OP TS1503 CL C

Page 1: ...Lever Thermostatic Shower Valve Models covered OP TS1503 EL C OP TS1503 CL C OP TS1503 ISOL C OP TS1503 SCL C Please keep this booklet for future Reference Installer when you have read these instructi...

Page 2: ...d and if you need any further help please do not hesitate to give us a call on 0844 701 6273 Important Safety Information General Information Product Features Specifications Dimensions Installation Re...

Page 3: ...nstallation please consider the following Prior to drilling into walls check that there are no hidden electrical wires cables or water supply pipes This can be checked with the aid of an electronic de...

Page 4: ...inimum distance from the highest installed position of the showerhead to the underside of the cold tank should be at least 1 metre to ensure adequate performance Note Nominally equal balanced inlet su...

Page 5: ...om outlet 3 Isolation Elbows Designed for ease of maintenance and servicing when the valve in installed in a wall cavity Supplied with OP TS1503 ISOL C OP TS1503 CL C only 4 Concealing Shroud Conceals...

Page 6: ...ent site conditions the valve will work adequately however the TMV3 scheme will not apply Supply Requirements Minimum cold water supply temperature 5 C Maximum cold water supply temperature 25 C Maxim...

Page 7: ...Dimensions mm s OP TS1503 EL C Surface Mounted 33 5 135 7 Need help Give us a call on 0844 701 6273 and speak to one of our trained advisors 148 158 48...

Page 8: ...ions mm s OP TS1503 CL C Concealed Model 130 Centres 26 64 74 125 8 Suitable for wall cavity depths of between 64 74mm Need help Give us a call on 0844 701 6273 and speak to one of our trained advisor...

Page 9: ...Dimensions mm s 9 Need help Give us a call on 0844 701 6273 and speak to one of our trained advisors OP TS1503 ISOL C 33 5 135 175 48...

Page 10: ...Dimensions mm s 10 Need help Give us a call on 0844 701 6273 and speak to one of our trained advisors OP TS1503 SCL C 26 127 125 132 centres 172 102 60...

Page 11: ...ss effective backflow prevention device immediately upstream of the inlet b so that it draws water by gravity only from a cistern or cylinder having a permanently open vent pipe and the distributing p...

Page 12: ...ture can be 2 C above the recommended maximum set outlet temperatures Note 46 C is the maximum mixed water temperature from the bath tap The maximum temperature takes account of the allowable temperat...

Page 13: ...ow Pressure Hot Cold Bar 1 0 to 5 0 0 2 to 1 0 Hot Supply Temperature C 52 to 65 52 to 65 Cold Supply Temperature C 5 20 5 20 Minimum Temperature Differential C 10 C 10 C This valve has been approved...

Page 14: ...5 bar 2 5 MTR HEAD Green 7 Litre Regulator Nothing Gravity 0 5 bar 5 MTR HEAD Green 7 Litre Regulator Yellow 5 Litre Regulator Unvented hot water storage system shower coil Combi boiler Instantaneou...

Page 15: ...r when fitting a replacement cartridge assembly See maintenance section Remove mixing valve from backplate see Installation Peel of label to reveal bottom cap with a marker pen mark a point in line wi...

Page 16: ...ch backplate to wall Loosen the backplate grub screw on the backplate using a hexagonal key Use the backplate as a template and mark the centres of the fixing holes onto the wall Warning Please check...

Page 17: ...he nuts Ensure the olives and filter are in place Secure the shower valve to the backplate by tightening the backplate grub screw Re attach the shower valve to the backplate by tightening the grub scr...

Page 18: ...between centres to fit fully into the shower valve elbows 2 Attach shower valve to wall Position the shower valve backplate in the wall cavity and secure using the fixings supplied Push the shower val...

Page 19: ...d to leave a sufficient gap around the shower valve for future servicing maintenance 4 Fit concealing plate Slide the concealing plate fixing over the shower valve and secure to the wall Surface using...

Page 20: ...surface to fit fully into the shower valve elbows 2 Attach backplate cover to wall Remove the backplate cover from the shroud using a hexagonal key Use the backplate cover as a template and mark the c...

Page 21: ...nuts Ensure the olives and filter are in place 4 Fit the cover shroud Slide the cover shroud over the shower valve and push onto the backplate cover until it clips into place Note The lever handle may...

Page 22: ...necessary the following should be carried out Turn the control knob anti clockwise so the shower is running at full flow and is at the maximum temperature allow the flow temperature to stablise for af...

Page 23: ...water supply to the TMV Thermostatic Mixer Valve wait for five seconds if the water is still flowing check that the temperature is below 46 C If there is no significant change to the set temperature...

Page 24: ...anti back siphonage devises are in good working order c Any isolating valves are fully open With an acceptable mixed water temperature complete the following procedure a Record the temperature of the...

Page 25: ...next in service test can be deferred to 24 to 28 weeks after commissioning b If small changes e g 1 to 2 K in mixed water temperatures are recorded in only on of these periods necessitating adjustmen...

Page 26: ...lation section site requirements If the valve has operated correctly for some time but no longer performs acceptably you may find it useful to firstly refer to the fault diagnosis in the Troubleshooti...

Page 27: ...dge the water supplies must be isolated Follow the steps in Servicing filters to isolate the shower valve Note If servicing the concealed OP TS1503 CL C do not pull the isolators out once fully unscre...

Page 28: ...rature is less than 10 C above the required blend temperature Adjust hot water temperature or wait for water system to reheat if stored system is used Instantaneous water heater not igniting because w...

Page 29: ...Maintenance section pages 26 27 Pulsating flow and or varying temperature Air block in either both supplies Flush through supply pipework Incorrect use of flow regulators Check and remove replace if n...

Page 30: ...ment will be necessary in order to secure any visits by our engineers which will be charged if the problem is found not to be a manufacturing fault If the fault is found to be down to a manufacturing...

Page 31: ...eplacement part or a visit from a Bristan engineer If required a service call will be booked and either yourself or an appointed representative who should be a person of 18 years or over must be prese...

Page 32: ...Bristan Group Ltd Birch Coppice Business Park Dordon Tamworth Staffordshire B78 1SG Web www bristan com Email enquire bristan com A Masco Company Part Number 800446 Issue FI Opac Lever Range D3...

Reviews: