
8
Install Lens & Camera
9
Live View & Capture Photo
10
Auto Capture Photos
1
4
5
3
13
Specifications
2
6
Power Saving Mode:
LCD screen is automatically turned
off to save power when camera
detects no activity for 10 secs.
Playback by Date
11-3
Exit
11-4
Enable Knocking Sensor
12
1. Live View
Press
SHUTTER BUTTON
to
turn on LCD screen and
display images at your front
door.
11
Image Playback
Auto Playback
11-1
Manual Playback
11-2
When in
LIVE VIEW
state,
press
UP BUTTON
to select
Playback mode and auto
replay daily visitor photos.
During auto playback, press
SHUTTER BUTTON
to pause.
Press
UP
or
DOWN BUTTON
to manually view previous or
next photo.
1. When in
LIVE VIEW
state, press
DOWN BUTTON
to enter
"
MENU SETTINGS
".
1. At pause mode, the LCD goes back to DAILY FOLDER
screen when no activity for 15 secs.
2. Image folders stored in the SD card can be accessed,
edited or deleted on computer.
1
2
Exit
2017/12/01
2017/12/02
2017/12/03
2017/12/04
Press to Next
Browse Images
1. Triggered by
KNOCKING
detection:
It is a built-in function of which the sensitivity level is
adjustable (Section 12-
ENABLE KNOCKING SENSOR
).
2. Capture Photos
When in
LIVE VIEW
state, press
SHUTTER BUTTON
to capture
photos. (RED LED blinks when
camera is recording. One
recording takes 8 photos.)
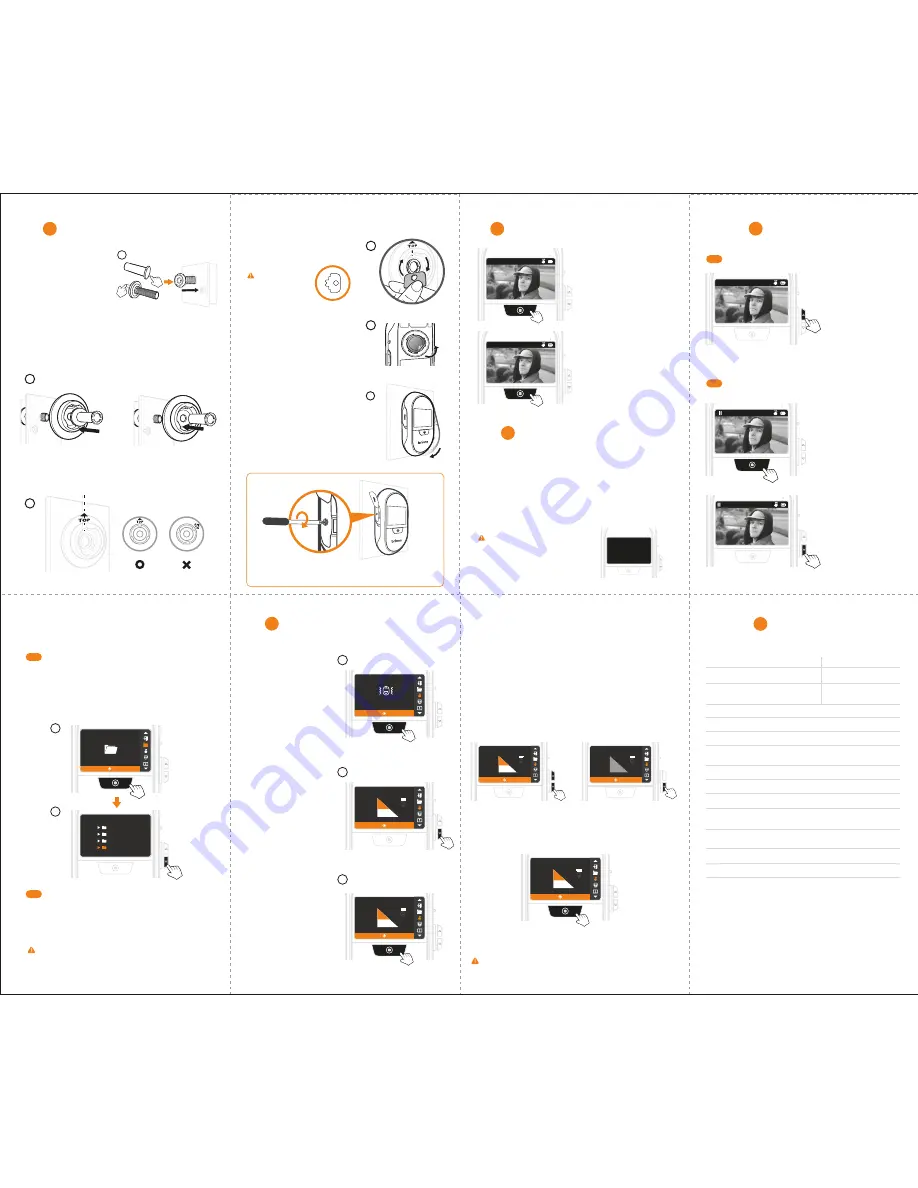
1. Remove the protective film
from the peephole lens. Insert
it into the drilled hole on the
door from outside.
2.
For the 12mm Peephole
(For most North American users.)
Position the Peephole barrel through the washer into the base
flange from inside of the door. Tighten it.
For the 14mm Peephole
Position the Peephole barrel into the base flange. Tighten it.
3. Make sure the TOP icon is facing up.
A
B
4. Use the tightening tool to
tighten the peephole barrel.
Both sides of the
tightening tool
can be used.
5. Remove the protective film from
the lens of the camera.
6. Attach the camera to the flange.
Rotate it clockwise and lock the
camera.
SHC1000 12
15/32”(12 mm)
1-1/8” to 2-1/4”
(28~58mm)
90°
Optical grade lens peephole
2.7” TFT
Micro SD card
(Support up to 32 GB. 8GB Class 10 is recommended.)
JPEG
4AA batteries (included)
Peephole, Base flange, Tightening tool,
4AA batteries, User manual, Quick start guide.
3.4”x6.2”x1.3” (87 x 158 x 34 mm)
6 oz (170 g) (without batteries)
Knocking sensor
Model
Peephole Barrel
Applicable
Door Thickness
View Angle
Peephole Type
LCD Screen
Storage
File Format
Power Source
Approx. 1,800 triggers
Battery Life
32 ˚F ~ 113 ˚F (0˚C ~ 45˚C)
Operating
Temperature
Contents
Size (WxHxD)
Weight
Built-in Sensor
SHC1000 14
5/9”(14 mm)
1-3/4” to 3-1/8”
( 43~80mm)
TWO ways to auto capture photos:
During auto playback, hold
SHUTTER BUTTON
to return
to
DAILY FOLDER
screen. Choose "
Exit
" and press
SHUTTER BUTTON
to exit and turn off LCD screen.
2. Select "
Browse Images
": Press
SHUTTER BUTTON
to go
to
DAILY FOLDER
screen. Select the desired daily folder
and press
SHUTTER BUTTON
to auto replay photos.
2. Triggered by
MOTION
detection:
It is a separate accessory you place outside on/near your door
(Details see MAS200 motion sensor manual).
2017/02/13 07:28:55 A
2017/02/13 07:28:55 A
Tighten the Locking Screw to secure the camera onto the door
and avoid being taken away (as shown in the image above).
1. On Knock Sensor screen,
press
SHUTTER BUTTON
to set up knock sensitivity.
Press to Confirm
Adjust Knock Sensor
TEST
TEST
0
Light
50
Heavy
Press to Confirm
Adjust Knock Sensor
TEST
TEST
0
Light
50
Heavy
Press to Confirm
Adjust Knock Sensor
TEST
TEST
0
Light
AUTO
Heavy
2. Press
DOWN BUTTON
to
enable knocking sensor,
the sensitivity default
setting at 50, the
mid-level.
3. Press
SHUTTER BUTTON
to confirm and return to
MENU SETTINGS
.
1
2
Press to Confirm
Adjust Knock Sensor
TEST
TEST
0
Light
50
Heavy
Press to Confirm
Adjust Knock Sensor
TEST
TEST
0
Light
50
Heavy
3
Press to Setup
Adjust Knock Sensor
Your setting is
OFF
Setting knocking sensor too sensitive will add frequency of
triggering. It will give you more alert messages and photos
of your front door area, however, shorten your battery life.
4. Adjust knock sensitivity:
If the knock sensitivity doesn’t fit your needs, go to Knock Sensor
setting screen to adjust knock sensitivity:
4-1. Press
UP
or
DOWN BUTTON
to increase or decrease knock
sensitivity level, or hold
DOWN BUTTON
to
AUTO
mode,
then knock on the door until the TEST icon flashes on.
4-2. Press
SHUTTER BUTTON
to confirm and return to
MENU
SETTINGS
.
or
For the 12mm Peephole
For the 14mm Peephole


