Brinkmann TRIPLE FUNCTION Owner'S Manual Download Page 37

Owner’s Manual for Model

Manual del Propietario para el Modelo

810-3830-S

140-3830-S
1/08

©2008 The Brinkmann Corporation

Dallas, Texas 75244 U.S.A

www.brinkmann.net

For one year from date of purchase, The Brinkmann Corporation warrants the Brinkmann Triple Function Grill against defects due to workmanship or
materials to the original purchaser. The Brinkmann Corporation’s obligations under this warranty are limited to the following guidelines:

This warranty does not cover grills that have been altered or damaged due to: normal wear, rust, abuse, improper maintenance, improper use,
disassembly of parts and/or attempted repair by anyone other than an authorized employee of The Brinkmann Corporation.

This warranty does not cover surface scratches or heat damage to the finish, which is considered normal wear.

The Brinkmann Corporation may elect to repair or replace damaged units covered by the terms of this warranty.

This warranty extends to the original purchaser only and is not transferable or assignable to subsequent purchasers.

The Brinkmann Corporation requires reasonable proof of purchase. Therefore, we strongly recommend that you retain your sales receipt or invoice. To
obtain replacement parts for your Brinkmann Triple Function Grill under the terms of this warranty, please call Customer Service Department at 
800-527-0717. A receipt will be required. The Brinkmann Corporation will not be responsible for any cookers forwarded to us without prior authorization.
Brinkmann Triple Function Grill must be returned to the original place of purchase for replacement of the unit.

EXCEPT AS ABOVE STATED, THE BRINKMANN CORPORATION MAKES NO OTHER EXPRESS WARRANTY.

THE IMPLIED WARRANTIES OF MERCHANTABILITY AND FITNESS FOR A PARTICULAR PURPOSE ARE LIMITED IN DURATION TO ONE YEAR
FROM THE DATE OF PURCHASE. SOME STATES DO NOT ALLOW LIMITATIONS ON HOW LONG AN IMPLIED WARRANTY LASTS, SO THE
ABOVE LIMITATION MAY NOT APPLY TO YOU.

ANY LIABILITY FOR INDIRECT, INCIDENTAL OR CONSEQUENTIAL DAMAGES ARISING FROM THE FAILURE OF THE BRINKMANN TRIPLE
FUNCTION GRILL TO COMPLY WITH THIS WARRANTY OR ANY IMPLIED WARRANTY IS EXCLUDED. CUSTOMER ACKNOWLEDGES THAT
THE PURCHASE PRICE CHARGED IS BASED UPON THE LIMITATIONS CONTAINED IN THE WARRANTY SET OUT ABOVE. SOME STATES DO
NOT ALLOW THE EXCLUSION OR LIMITATION OF INCIDENTAL OR CONSEQUENTIAL DAMAGES, SO THE ABOVE LIMITATION OR EXCLUSION
MAY NOT APPLY TO YOU. THIS WARRANTY GIVES YOU SPECIFIC LEGAL RIGHTS, AND YOU MAY ALSO HAVE OTHER RIGHTS WHICH VARY
FROM STATE TO STATE.

Por un año a partir de la fecha de compra, The Brinkmann Corporation garantiza la parilla Triple Function de Brinkmann contra defectos debidos a la
mano de obra o materiales, al comprador original. Las obligaciones de The Brinkmann Corporation bajo esta garantía están limitadas a los siguientes
lineamientos:

Esta garantía no cubre parrillas que han sido alteradas o dañadas debido al: desgaste ordinario, óxido, abuso, mantenimiento inapropiado, uso
inapropiado, desensamblaje de piezas y/o el intento de reparación por cualquier persona que no sea un empleado autorizado de The Brinkmann
Corporation.

Esta garantía no cubre rayones en la superficie ni daño al acabado provocado por el calor, el cual es considerado desgaste ordinario.

The Brinkmann Corporation puede elegir reparar o reemplazar unidades dañadas cubiertas bajo los términos de esta garantía.

Esta garantía se extiende al comprador original únicamente y no es cedible ni asignable a compradores subsecuentes.

The Brinkmann Corporation requiere una prueba de compra razonable. Por lo tanto le recomendamos fuertemente que 

conserve su recibo o

factura

. Para obtener piezas de reemplazo para su Parrilla Triple Function de Brinkmann conforme a los términos de esta garantía, por favor llame al

Departamento de Servicio al Cliente al 800-527-0717. Un recibo será necesario. The Brinkmann Corporation no se hará responsable por cualquier
parrilla que le sea remitida sin autorización previa. La Parrilla Triple Function de Brinkmann debe ser devuelta al lugar original de la compra para el
reemplazo de la unidad.

SALVO EN CUANTO A LO ANTERIORMENTE INDICADO, THE BRINKMANN CORPORATION NO HACE OTRA GARANTÍA EXPRESA.

LAS GARANTÍAS IMPLÍCITAS DE CALIDAD E IDONEIDAD PARA UN FIN CONCRETO ESTÁN LIMITADAS EN DURACIÓN A UN AÑO A PARTIR
DE LA FECHA DE COMPRA. ALGUNOS ESTADOS NO PERMITEN LIMITACIONES EN CUANTO AL TIEMPO DE DURACIÓN DE UNA GARANTÍA
IMPLÍCITA, POR LO QUE LA ANTERIOR LIMITACIÓN PODRÍA NO APLICARLE A USTED.

CUALQUIER RESPONSABILIDAD POR DAÑOS INDIRECTOS, INCIDENTALES O EMERGENTES RESULTANTE DE FALLAS DE LA PARRILLA
TRIPLE FUNCTION DE BRINKMANN PARA CUMPLIR CON ESTA GARANTÍA O CUALQUIER GARANTÍA IMPLÍCITA QUEDA EXCLUIDA. EL
CONSUMIDOR ACEPTA QUE EL PRECIO DE COMPRA ESTÁ BASADO EN LAS LIMITACIONES CONTENIDAS EN LA GARANTÍA ESTABLECIDA
ARRIBA. ALGUNOS ESTADOS NO PERMITEN LA EXCLUSIÓN NI LIMITACIÓN DE LOS DAÑOS INCIDENTALES O EMERGENTES, ASÍ QUE LA
LIMITACIÓN O EXCLUSIÓN QUE APARECE ARRIBA PODRÍA NO APLICARLE A USTED. ESTA GARANTÍA LE DA A USTED DERECHOS
LEGALES ESPECÍFICOS, Y USTED TAMBIÉN PODRÍA TENER OTROS DERECHOS QUE VARÍAN DE ESTADO A ESTADO.

ONE YEAR LIMITED WARRANTY

GARANTÍA LIMITADA DE UN AÑO

FOR COVERS, ACCESSORIES AND OTHER PRODUCTS, PLEASE VISIT US ONLINE AT:

www.brinkmann.net

FOR GRILL WARRANTY REPLACEMENT PARTS, PLEASE VISIT US AT:

www.grillpartsonline.com

PARA CUBIERTAS, ACCESORIOS Y OTROS PRODUCTOS, FAVOR DE VISITARNOS POR LA RED MUNDIAL EN:

www.brinkmann.net

PARA PARTES DE REEMPLAZO DE PARRILLA BAJO GARANTIA, FAVOR DE VISITARNOS POR LA RED MUNDIAL EN:

www.grillpartsonline.com

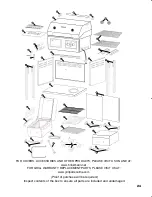
Summary of Contents for TRIPLE FUNCTION

Page 1: ...ROSA SI SE HACE CASO OMISO A ESTAS ADVERTENCIAS E INSTRUCCIONES LEAY SIGA TODAS LAS ADVERTENCIAS E INSTRUCCIONES EN ESTE MANUAL PARA EVITAR LESIONES PERSONALES INCLUSO LA MUERTE O LOS DAÑOS MATERIALES ASSEMBLY AND OPERATING INSTRUCTIONS INSTRUCCIONES DE ARMADO Y OPERACIÓN SAVE THIS MANUAL FOR FUTURE REFERENCE GUARDE ESTE MANUAL PARA REFERENCIA FUTURA OWNER S MANUAL MANUAL DEL PROPIETARIO NOTICE TO...

Page 2: ...LL GAS 1 Shut off gas to the appliance 2 Extinguish any open flame 3 Open Lid 4 If odor continues keep away from the appliance and immediately call your gas supplier or your fire department 1 DO NOT store or use gasoline or other flammable liquids or vapors in the vicinity of this or any other appliance 2 An LP cylinder not connected for use shall not be stored in the vicinity of this or any other...

Page 3: ...mbly Instructions 23 35 Warranty Back Cover TABLE OF CONTENTS DANGER Indicates an imminently hazardous situation which if not avoided will result in death or serious injury WARNING Be alert to the possibility of serious bodily injury if the instructions are not followed Be sure to read and carefully follow all of the messages CAUTION Indicates a potentially hazardous situation which if not avoided...

Page 4: ...ble DO NOT lean on the side table Keep children and pets away from hot grill DO NOT allow children to use or play near this grill DO NOT leave the grill unattended while in use DO NOT allow the gas hose to come in contact with hot surfaces DO NOT allow grease from drain hole to fall on hose or valve regulator assembly Keep any electrical supply cords away from water or heated surfaces Keep a fire ...

Page 5: ... Installation Code CAN CGA B149 1 Natural Gas Installation Code CAN CGA B149 1 Canada Propane Installation Code CAN CGA B149 2 Canada To check your local codes see your local LP gas dealer or natural gas company This grill was not intended to be connected to a natural gas supply line If an external electrical source is utilized it must be electrically grounded in accordance with local codes or in ...

Page 6: ...e on the cylinder and that accompany this product Never store a spare LP gas cylinder under or near your grill This could cause excess pressure to be expelled through the vapor relief valve resulting in fire explosion or severe personal injury including death Note PROPANE GAS IS HEAVIER THAN AIR AND WILL COLLECT IN LOW AREAS PROPER VENTILATION IS EXTREMELY IMPORTANT Keep the ventilation opening s ...

Page 7: ...s securely in tank holder 5 Attach or detach regulator to the LP gas cylinder only when cylinder is at rest in tank holder HOSE AND REGULATOR Your grill is equipped with a Type 1 connection device with the following features 1 The system will not allow gas flow from the cylinder until a positive connection to the valve has been made Note The cylinder valve must be turned off before any connection ...

Page 8: ...ve is CLOSED prior to connecting the LP gas cylinder to your grill Turn the valve knob clockwise to properly close the valve Read and follow all instructions and warnings on the supply hose safety tags Read and follow all warnings in this manual concerning the safe use of LP gas cylinders and the hose and regulator before connecting cylinder to grill Read and follow all warnings on the LP cylinder...

Page 9: ...been moved At least once per year or if your grill has not been used for more than 60 days CHECKING FOR LEAKS 1 Create a mixture of 50 water and 50 liquid dishwashing soap 2 Open the lid 3 Ensure all control knobs are set to the OFF position 4 Turn on the fuel supply at the cylinder valve Turn the cylinder valve knob one turn counter clockwise 5 Apply the soap water mixture to the following Supply...

Page 10: ...bled and prior to each use DO NOT operate this grill until you have read and understand ALL of the warnings and instructions in this manual PRE START CHECK LIST Ensure that the grill is properly assembled Inspect the gas supply hose for burns chaffing kinks and proper routing before each use If it is evident there is excessive abrasion or wear or the hose is cut it must be replaced prior the grill...

Page 11: ...gas supply Turn off the gas at the burner and cylinder DO NOT attempt to operate the grill until the problem is found and corrected See Trouble Shooting section of this manual 7 To turn off turn each control knob clockwise until it locks in the OFF position This does not turn off the gas flow from the cylinder MATCH LIGHTING THE MAIN BURNERS 1 Open lid before lighting 2 Turn the burner control kno...

Page 12: ...rill This ensures that the grilling surfaces are at the desired temperatures to sear the food sugars when cooking After lighting your grill set the main burner control knobs to the HIGH position for 10 to 15 minutes Close the cover during the preheat period CONTROLLING FLARE UPS Flare ups are a part of cooking meats on a grill This adds to the unique flavor of cooking on a gas grill Excessive flar...

Page 13: ...placing cooked foods back on the platter or use different platters for raw and cooked foods Never use the same utensils when handling raw meat uncooked poultry or seafood unless you wash the utensils thoroughly with soap and hot water Never re use marinade from raw meat or uncooked poultry on foods that have been cooked and are ready to be served GRILLING TO PROPER TEMPERATURE Use a meat thermomet...

Page 14: ...been pre treated with lighter fluid under the grill Do not use gasoline kerosene or alcohol for lighting charcoal Use of any of these or similar products could cause an explosion possibly leading to severe bodily injury Never add charcoal lighting fluid to hot or even warm coals as flashback may occur causing severe burns Place grill in an area where children and pets cannot come into contact with...

Page 15: ... remaining coals and ashes in a non combustible metal container and saturate completely with water Allow coals and water to remain in metal container 24 hours prior to disposing Extinguished coals and ashes should be placed a safe distance from all structures and combustible materials With a garden hose completely wet the surface beneath and around grill to extinguish any ashes coals or embers whi...

Page 16: ...coal section of the Triple Function Grill see Adding Charcoal Wood During Cooking section of this manual Note We recommend using charcoal that has been pre treated with lighter fluid or a charcoal chimney starter WARNING DO NOT use lighter fluid or other flammable liquids in or around your grill 3 With grill and firebox lids and charcoal doors open stand back and carefully light charcoal and allow...

Page 17: ...ns of this manual To obtain your favorite smoke flavor experiment by using chunks sticks or chips of flavor producing wood such as hickory pecan apple cherry or mesquite Most fruit or nut tree wood may be used for smoke flavoring Do not use resinous wood such as pine as it will produce an unpleasant taste Wood chunks or sticks 3 to 4 7 to 10 cm long and 1 to 2 2 to 4 cm thick work best Unless the ...

Page 18: ...ior to disposing Extinguished coals and ashes should be placed a safe distance from all structures and combustible materials With a garden hose completely wet surface beneath and around the grill to extinguish any ashes coals or embers which may have fallen during the cooking or cleaning process Cover and store grill in a protected area away from children and pets AFTER USE SAFETY WARNING Addition...

Page 19: ...d other insects building their nests or from grease build up Blocked burner tubes can prevent gas flow to the burners and could result in a burner tube fire or fire beneath the grill To clean the Burner Assembly follow these instructions to clean and or replace parts of burner assembly or if you have trouble igniting the grill 1 Turn gas off at control knobs and LP cylinder tank valve 2 Remove coo...

Page 20: ...elight burners to verify proper operation 11 Replace heat distribution plates and cooking grills COOKING GRILLS Clean with mild soap detergent and water A brass bristled brush or a nylon cleaning pad can be used to remove residue from the stainless steel surfaces Do not use steel wire bristles to clean the cooking grills Steel can cause the finish to chip or crack DO NOT use a commercial oven clea...

Page 21: ...r Connecting LP Cylinder and Hose Regulator to Grill 2 Burner holes may be obstructed 1 Excess grease build up causing grease fires 2 Damaged or faulty regulator Replace with factory authorized parts 3 Cook on a lower temperature setting Burner will not light Fire at control knob Yellow Flames at burner Flame blows out on LOW Burner does not get hot enough Grill is Too Hot 20 BEFORE STORING YOUR G...

Page 22: ...ne from your grill Open gas supply for one second to test for obstruction If no obstruction is present reconnect fuel line If the fuel line is blocked replace with a new hose regulator assembly If an obstruction is suspected in the hose regulator assembly orifice or gas valves call Brinkmann Customer Service at 800 527 0717 Question Why does my LP gas grill have a low flame or a flame with orange ...

Page 23: ...s of stainless steel as well as cooking oils and a dirty grill lid can also encourage discoloration if the lid is not cleaned prior to grill use After your grill is assembled remove the protective PVC film from your grill lid and use a stainless steel cleaner and soft cloth to remove residual adhesive and oils from the inside and outside of your grill lid Never use abrasive cleaners or scrubbers I...

Page 24: ...1 Center Divider 2 Cooking Grills 2 Air Shutters 1 Crank 1 Door Handle 1 Door Bracket 2 Heat Distribution Plates 4 Legs left front leg right front leg left back leg right back leg 2 Side Panels 1 Back Panel 1 Bottom Panel 23 15 PARTS LIST ASSEMBLY INSTRUCTIONS READ ALL SAFETY WARNINGS ASSEMBLY INSTRUCTIONS CAREFULLY BEFORE ASSEMBLING OR OPERATING YOUR GRILL WE RECOMMEND TWO PEOPLE WORK TOGETHER WH...

Page 25: ...14 24 25 24 FOR COVERS ACCESSORIES AND OTHER PRODUCTS PLEASE VISIT US ONLINE AT www brinkmann net FOR GRILL WARRANTY REPLACEMENT PARTS PLEASE VISIT US AT www grillpartsonline com Proof of purchase will be required Inspect contents of the box to ensure all parts are included and undamaged 34 33 ...

Page 26: ...12 M6 X 15 Shoulder Bolts 6 M5 X 10mm Bolts 2 M6 X 10mm Bolts 28 M6 X 15mm Bolts 4 M6 X 50mm Bolts 12 M6 Nuts 16 M4 Nuts 1 M5 Nut 6 M6 Washers 2 Vent Knobs 2 M10 Washers 2 M10 Spring Washers 1 Hex Nut Wrench 1 5 6 3 2 4 7 8 9 10 11 1 2 3 4 5 6 7 8 9 10 11 13 12 14 15 12 13 14 15 16 17 16 17 ...

Page 27: ...ighten caster bolts securely using hex nut wrench provided in parts pack Step 2 Attach left side panel to left front leg and left rear leg by using four M6 X 15mm bolts Repeat for the right side panel and right legs Step 3 Attach bottom panel to the left and right panel assemblies by using four M6 X 50mm bolts Step 4 Insert tank lock wire through two small holes in cart base as illustrated Locking...

Page 28: ... of the tank block bar to the cart base with one M5 X 10mm bolt Step 6 Attach door frame bracket to front of cart assembly by using four M6 X 15mm bolts Step 7 Install a door handle stand to the door using two M4 X 10mm bolts and M4 nuts Next insert door handle into handle stand Place the other handle stand over handle and attach by using two M4 X 10mm bolts and two M4 nuts Repeat for other door ...

Page 29: ...tach the air shutter to the inside of grill hood by aligning the air shutter with grill hood holes secure by using two M6 X 15mm shoulder bolts and M6 nuts Repeat for opposite side of grill hood Step 10 Attach hood handle stand to grill lid using two M6 X 15mm bolts M6 washers and M6 nuts Insert hood handle into the handle stand Then attach other hood handle stand to grill handle and secure to gri...

Page 30: ...inting up and secure with a M10 nut M10 washer and M10 spring washer Step 12 Place the control knobs on the control panel Step 13 Insert adjuster crank through front of grill body and into crank brackets Rotate clockwise until cranks engage charcoal grates Door Handle Door Locking Plate Nut Door Washer Spring Washer 29 ...

Page 31: ...l the center divider into the tracks between the two sections of the grill body Note When performing Step 17 lift grill body from front and rear panels to avoid injury to hands and fingers Step 17 With the help of a friend place grill body assembly on assembled cart frame Grill body will rest on angled vertical supports Align bolt holes located on the outside of the grill body assembly Secure usin...

Page 32: ...ts and M4 nuts Step 19 Install handle of left side firebox using two M6 X 10mm bolts and M6 washers Step 20 Install door vent onto the firebox using three M6 X 15mm shoulder bolts vent knob and two M6 nuts Step 21 Insert firebox door handle through hole in firebox door with handle pointing down Place door locking plate over door handle pointing up and secure with a M10 nut M10 washer and M10 sprin...

Page 33: ...Step 22 Install the firebox flue and the firebox to the left side of grill body using four M5 X 10mm bolts Tighten securely Step 23 Place the ash pan inside the firebox 32 ...

Page 34: ...e ash pan Place the charcoal grill in holes on firebox rim above the charcoal grate and secure it onto the firebox Step 25 To attach the right side table slide the right side table over the pre attached bolts Press down to lock in position and tighten securely 33 ...

Page 35: ...Step 26 Place the heat distribution plates on lower level of grill body assembly directly above burners Step 27 Place cooking grills on support ribs directly above heat distribution plates 34 ...

Page 36: ...Brinkmann 3830 Assembled 35 ...

Page 37: ...es al comprador original Las obligaciones de The Brinkmann Corporation bajo esta garantía están limitadas a los siguientes lineamientos Esta garantía no cubre parrillas que han sido alteradas o dañadas debido al desgaste ordinario óxido abuso mantenimiento inapropiado uso inapropiado desensamblaje de piezas y o el intento de reparación por cualquier persona que no sea un empleado autorizado de The...

Reviews: