5
123
MODELS 540000/610000 FUEL SYSTEM COMPONENTS
Access Cover/Blower Housing
Removal
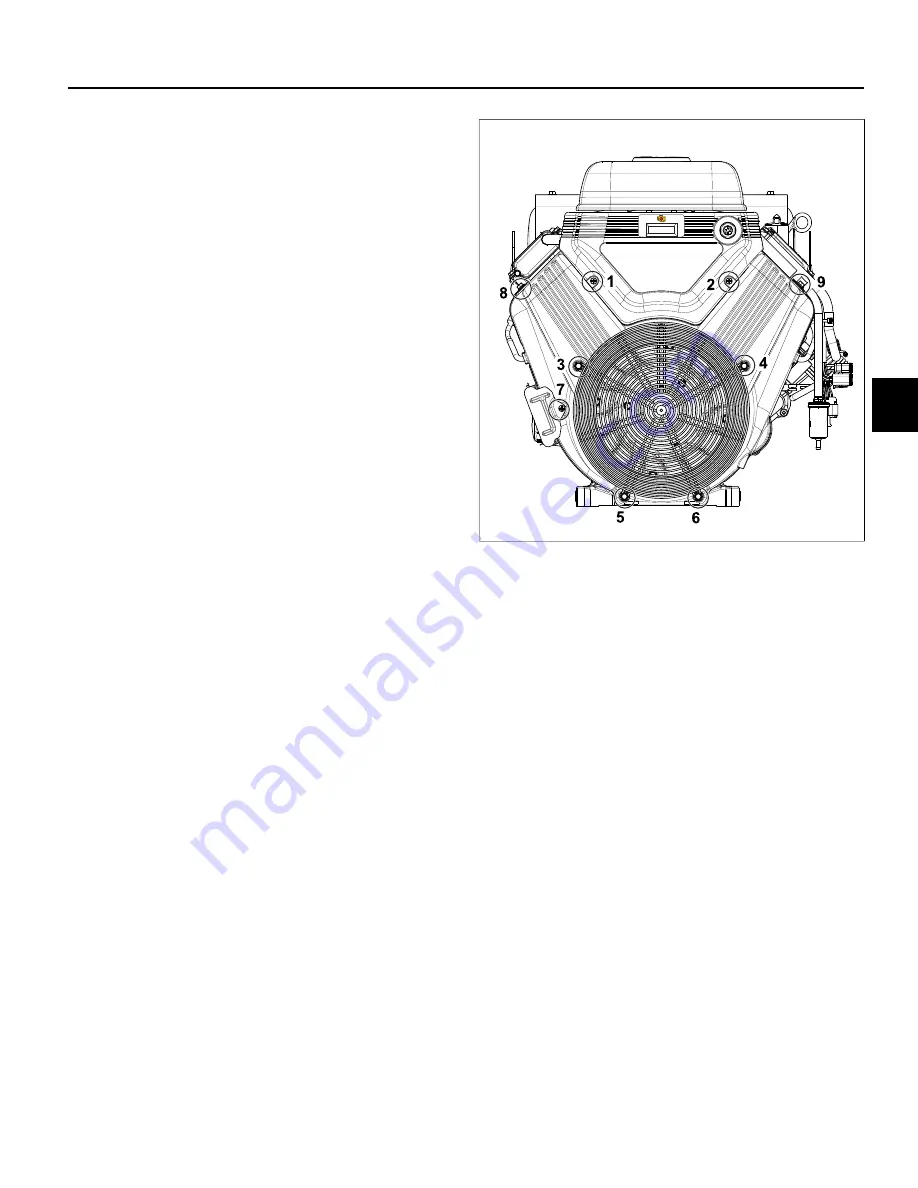
1. See Figure 21. Remove two Phillips screws (
1-2
) to
release access cover from blower housing.
2. Lift access cover straight up to release tongues from
grooves in blower housing.
3. If equipped, disconnect tachometer/hourmeter/MIL
connector at back of access cover.
4. Remove four hex flange screws (
3-6
) from coupling
nuts to release wire guard.
5. Remove hex flange screw (
7
) to release oil cooler
bracket from blower housing.
6. Remove hex flange screws (
8-9
) to release left and
right side air guides and blower housing from intake
manifold.
7. Remove four coupling nuts (
3-6
). Lift blower housing
straight up to disengage from posts.
Installation
1. Place blower housing into position engaging holes
with four posts.
2. Verify high tension leads are routed through slots on
each side or damage will occur when blower housing
is tightened.
3. Install coupling nuts on posts (
3-6
). Alternately
tighten coupling nuts to
78-96 lb-in
(9-11 Nm) using a
crosswise pattern.
4. Install two hex flange screws (
8-9
) to fasten left and
right side air guides and blower housing to intake
manifold. Tighten screws to
78-96 lb-in
(9-11 Nm).
5. Install hex flange screw (
7
) to fasten oil cooler bracket
to blower housing. Tighten screw to
35-43 lb-in
(4-5
Nm).
6. Install four hex flange screws (
3-6
) to fasten wire
guard to coupling nuts. Tighten screws to
78-96 lb-in
(9-11 Nm).
7. If equipped, connect tachometer/hourmeter/ MIL
connector at back of access cover.
8. Lower access cover straight down to engage tongues
in grooves of blower housing.
9. Verify IAC connector wire harness conduit is routed
through groove or damage will occur when access
cover is tightened.
10. Install two Phillips screws (
1-2
) to fasten access
cover to blower housing. Tighten screws to
35-43 lb-
in
(4-5 Nm).
21
ECM
NOTE:
A product improvement to dampen vibration to
the ECM/fuse block bracket was recently introduced in
production. A Briggs & Stratton Service Kit (Part No.
847337) to upgrade product in the field includes a new
fuse/relay block cover, ECM mounting bracket, rubber
isolation mounts, and mounting hardware. See Service
Bulletin DSB-1053 for details.
Removal
1. Remove access cover. See
Access Cover/Blower
Housing, Removal,
steps 1-3.
2. Remove two Phillips screws to release ECM from
ECM/fuse block bracket.
3. Disconnect J1 and J2 connectors from ECM.
Installation
1. Connect J1 and J2 connectors to
new
ECM.
NOTE:
The words BLACK and GREY are molded into
the ECM housing to ensure proper installation of J1
(Grey) and J2 (Black) connectors.
2. Slide Phillips screw through ECM flange (Grey ECM
J1 connector side) and ground wire ring terminal.
Start screw into ECM/ fuse block bracket.
Not for
Reproduction
Summary of Contents for VANGUARD M490000
Page 2: ...N o t f o r R e p r o d u c t i o n ...
Page 6: ...N o t f o r R e p r o d u c t i o n ...
Page 84: ...3 80 MODEL 490000 EFI ELECTRICAL SCHEMATIC PAGE 1 OF 2 N o t f o r R e p r o d u c t i o n ...
Page 85: ...3 81 MODEL 490000 EFI ELECTRICAL SCHEMATIC PAGE 2 OF 2 N o t f o r R e p r o d u c t i o n ...
Page 95: ...3 91 MODELS 490000 540000 610000 FUSE RELAY BLOCK N o t f o r R e p r o d u c t i o n ...
Page 96: ...3 92 N o t f o r R e p r o d u c t i o n ...
Page 110: ...4 106 N o t f o r R e p r o d u c t i o n ...
Page 115: ...5 111 This page is intentionally left blank N o t f o r R e p r o d u c t i o n ...
Page 134: ...5 130 30 N o t f o r R e p r o d u c t i o n ...
Page 137: ...5 133 This page is intentionally left blank N o t f o r R e p r o d u c t i o n ...
Page 138: ...5 134 32 N o t f o r R e p r o d u c t i o n ...
Page 140: ...5 136 33 N o t f o r R e p r o d u c t i o n ...
Page 142: ...5 138 This page is intentionally left blank N o t f o r R e p r o d u c t i o n ...


