background image

7

Bag Installation and Tube Assembly

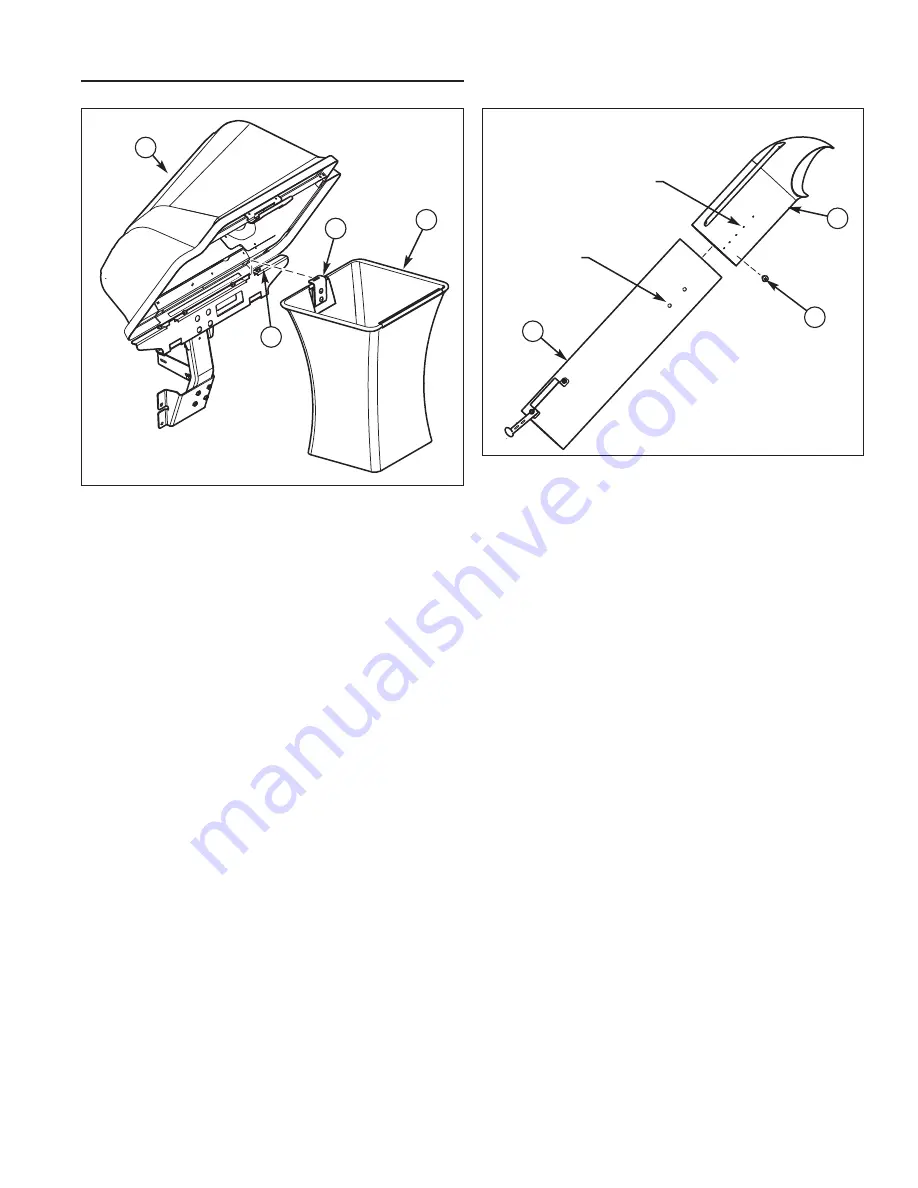
INSTALL COLLECTOR BAGS

1. Raise the cover (A, Figure 7).

2. Attach collector bags (B) using grass bag hanger (C)

to bag hanger post (D).

A

D

Figure 7.  Install Collector Bags
A. Cover 
B. Collector Bags
C. Grass Bag Hanger
D. Bag Hanger Post

B

C

B

A

50” Mowers

CONNECTING UPPER AND MIDDLE TUBE

1. Slide the upper tube (A, Figure 8) over middle tube

(B) and secure together using screw (C).

In upper tube:

- Fourth hole from end is for 50” mowers

See Figure 8 for hole locations.

C

Figure 8.  Middle and Upper Tube Assembly
A. Upper Tube
B. Middle Tube
C. Screw, 1/4 x 3/4

50” Mowers

Summary of Contents for 1695284

Page 1: ...ATTACHMENT OPERATOR S MANUAL 50 2 Bin Bagger Mfg No Description 1695284 50 2 Bin Bagger 1734240 Rev 00 Rev Date 01 2007 TP 100 4452 00 AT SN 2 BIN BAGGER ...

Page 2: ...THIS PAGE INTENTIONALLY BLANK ...

Page 3: ...tial Installation Counterweight Installation 4 Blowout Baffle Installation 4 Hitch Installation 5 Bag Support and Cover Installation 6 Bag Installation and Tube Assembly 7 Chute and Tube Installation 8 Normal Removal Installation Collector Installation 10 Collector Removal 11 NOTE In these instructions left and right are referred to as seen from the operating position Table of Contents ...

Page 4: ...e blades when not mowing DO NOT mow in reverse unless absolutely necessary Always look down and behind before and while travelling in reverse DO NOT turn sharply when travelling alongside a building or any object Slow down before turning DO NOT carry passengers When collection system is removed from the mower deck the deflector must be properly installed Collector bags are subject to deterioration...

Page 5: ...tor Disengage the PTO and allow all moving parts to stop BEFORE disconnecting or clearing tube or emptying catcher Before leaving the operator s position for any reason engage the parking brake disengage the PTO stop the engine and remove the key To reduce fire hazard keep the engine rider and mower free of grass leaves and excess grease Do not stop or park rider over dry leaves grass or combustib...

Page 6: ... 10 2 Front counter weight is required when ever using rear mounted grass collection system E B F D Figure 1 Install Counter Weight A Slide Pins B Counter Weight C Pin Slots D Front Footrest Support E Pin F Safety Clip A C INSTALL BLOWOUT BAFFLES 1 Remove and discard existing baffles A Figure 2 carriage bolts B and nuts C from mower deck housing D Figure 3 Blowout Baffle Installation A Baffle RH B...

Page 7: ... B to frame A sliding rear of hitch flush with frame 6 Finger tighten 3 8 16 nut F 5 16 16 nut G 1 2 13 nut H and 3 8 16 nut I 7 Tighten 3 8 16 nut F and 5 16 16 nut G first then 1 2 13 nut H and 3 8 16 nut I I F G E C B H B A A J Left View Back View Figure 4 Install Hitch Assembly A Frame B Hitch Assembly C Debris Guard D Capscrew Debris Guard 3 8 16 E Capscrew Seat Deck Support 5 16 18 F Nut Nyl...

Page 8: ...he upright support A until the shoulder rest F makes full contact with the shoulder bolts G 2 Insert mount pin D through the support mount C and upright support A as shown 3 Secure mount pin D with retainer spring E Figure 6 Cover Installation A Cover Assembly B Bag Support Bracket C Cover Hinge Pivots D Hinge Pins E Retainer Springs INSTALL COVER 1 Attach cover assembly A Figure 6 to bag support ...

Page 9: ...tor Bags A Cover B Collector Bags C Grass Bag Hanger D Bag Hanger Post B C B A 50 Mowers CONNECTING UPPER AND MIDDLE TUBE 1 Slide the upper tube A Figure 8 over middle tube B and secure together using screw C In upper tube Fourth hole from end is for 50 mowers See Figure 8 for hole locations C Figure 8 Middle and Upper Tube Assembly A Upper Tube B Middle Tube C Screw 1 4 x 3 4 50 Mowers ...

Page 10: ...wer chute E Secure tube assembly H to lower chute E using strap F and pin G G H Figure 9 Install Chute A Mounting Plate B Locknuts 5 16 18 C Carriage Bolt 5 16 18 x 5 8 D Chute Rod E Rubber Strap F Discharge Deflector G Locknut H Mounting Hole A B C D E F G H Chute Installation 1 Install mounting plate A Figure 9 to mower deck as shown Secure with 5 16 18 x 5 8 carriage bolts C and 5 16 18 locknut...

Page 11: ...9 THIS PAGE INTENTIONALLY BLANK ...

Page 12: ...kes full contact with the shoulder bolts C 2 Insert mount pin D through the support mount X and upright support A as shown 3 Secure mount pin D with retainer spring E 4 Attach cover assembly I to bag support bracket B using cover hinge pivots H Secure cover assembly to bag support bracket using hinge pins F and retainer springs E 5 Raise the cover I attach collector bags J using grass bag hanger K...

Page 13: ...h assembly A by removing retainer spring E then removing mount pin D Note To prevent loss of pins and retainer springs re attach them to the cover and bag and cover support assembly 5 Remove wing nut U from carriage bolt W 6 Remove knob S from carriage bolt T 7 Lift up discharge deflector V and remove chute R from carriage bolt T and W IMPORTANT See that discharge deflector R returns to the DOWN p...

Page 14: ...Stratton Corporation Milwaukee WI USA All Rights Reserved MANUFACTURING INC Simplicity Mfg Inc 500 N Spring Street PO Box 997 Port Washington WI 53074 0997 www SimplicityMfg com Simplicity Mfg Inc Snapper Products 535 Macon Street McDonough GA 30253 www Snapper com ...

Reviews: