51
11 Advanced Ethernet Configurations
This section is dedicated to an advanced feature for individuals with networking knowledge which
enables users to:
•
Live View of Cameras
•
Playback and download of recordings
•
View and download of logs
•
Configure MDR unit settings
This feature is not recommended for field operations, diagnosis and configuration.
Warning: The web interface menu below (left) does not match the OSD menu found on the
MDR. Terminology may differ but the same settings can be found.
Warning: To achieve full functionality (snapshots, downloads, live view etc.) open Internet
Explorer by running as Asdministrator for Windows 8 and Windows 10 operating systems.
Note:
The configuration requires a Cat5e cable, a Microsoft Windows™ Operating system; a PC
with an Ethernet RJ45 port and a wireless adapter with Internet Access (may be needed to
download the plugin).
Warning
:
Playback, Live view and Maintenance features are dependent on your Internet
Explorer version.
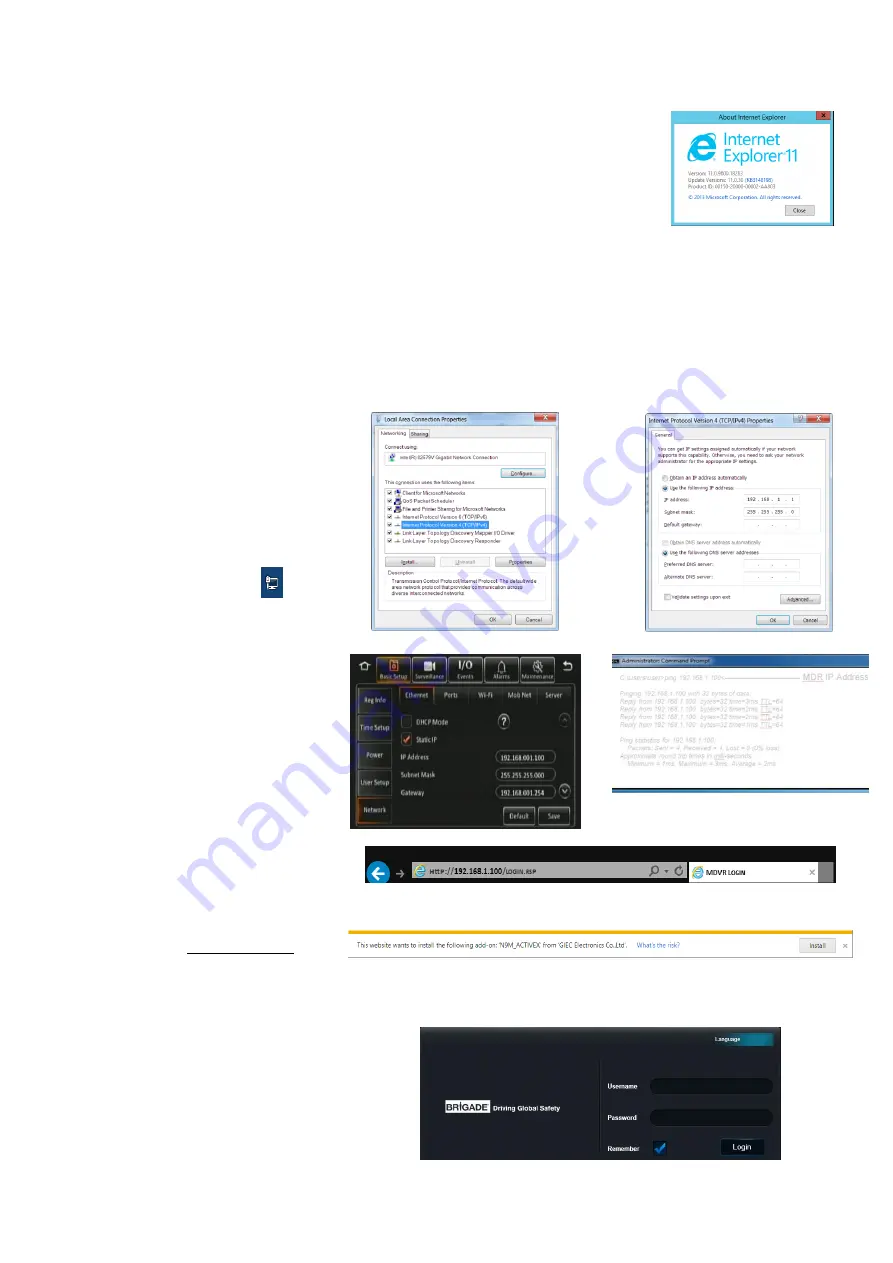
Internet Explorer Version Figure 211
11.1 Ethernet Setup
•
Connect an Ethernet cable to the PC and
Ethernet LAN port on the back of the
MDR.
•
The following steps apply to PCs running
Windows 7 upwards. Before making
changes to the PC’s network settings,
ensure all work is saved.
•
Local Area Connection Properties Figure
212
shows the network configuration
window. This dialog may be accessed by
right clicking on “Open Network and
Sharing Centre
” on the desktop
.
Select the appropriate network interface by
double clicking.
Local Area Connection Properties Figure 212
Internet Protocol Version 4 Figure 213
•
Select the “Internet Protocol Version 4
(TCP/IPv4)” item and click “Properties”.
Internet Protocol Version 4 Figure 213
displayed; an IP address should be
entered in this box;
192.168.1.1
is shown
in the example. (This address is on the
same subnet as the MDR, which has a
default IP address of
192.168.1.100
).
•
To locate the MDR IP, log into the MDR
menu, go to
Basic Setup
Ethernet
and
check the IP address.
•
To change type, the new IP and click save.
MDR Network Settings Figure 214
Results from Command Prompt Figure 215
•
To test the PC connection to the MDR,
open the Command prompt by typing cmd
within the start-up menu. Ping the MDR IP
address by typing
ping 192.168.1.100
.
These results are shown in
Internet Explorer Web Address Figure 216
•
Open an Internet Explorer web page and
type the following http://192.168.1.100. A
pop-up window will appear in Internet
Explorer requesting permission to allow
the installation/running of a plugin
“N9M_ACTIVEX”. See
Plugin Pop-up Figure 217
•
Allow the plugin and its installation.
•
After the plugin is successfully installed,
the login window (
) will appear.
•
Enter the appropriate password (same as
MDR unit login) to grant the correct
permissions, and then click
LOGIN
.
Note: If MDR unit password is disabled,
click
LOGIN
after entering a username only.
Web User Login Figure 218
Summary of Contents for MDR-504-500
Page 9: ...9 3 5 MDR 504xx 500 Connection Diagram MDR 504xx 500 Connection Diagram Figure 8...
Page 10: ...10 3 6 MDR 508xx 1000 Connection Diagram MDR 508xx 1000 Connection Diagram Figure 9...
Page 89: ...89...
Page 90: ...90...
Page 91: ...91...
Page 92: ...92 18 10 2017 10 52 00 MDR 500 Series Installation Operation Guide v2 0 ENG 5145A docx...


