background image

12 / 16

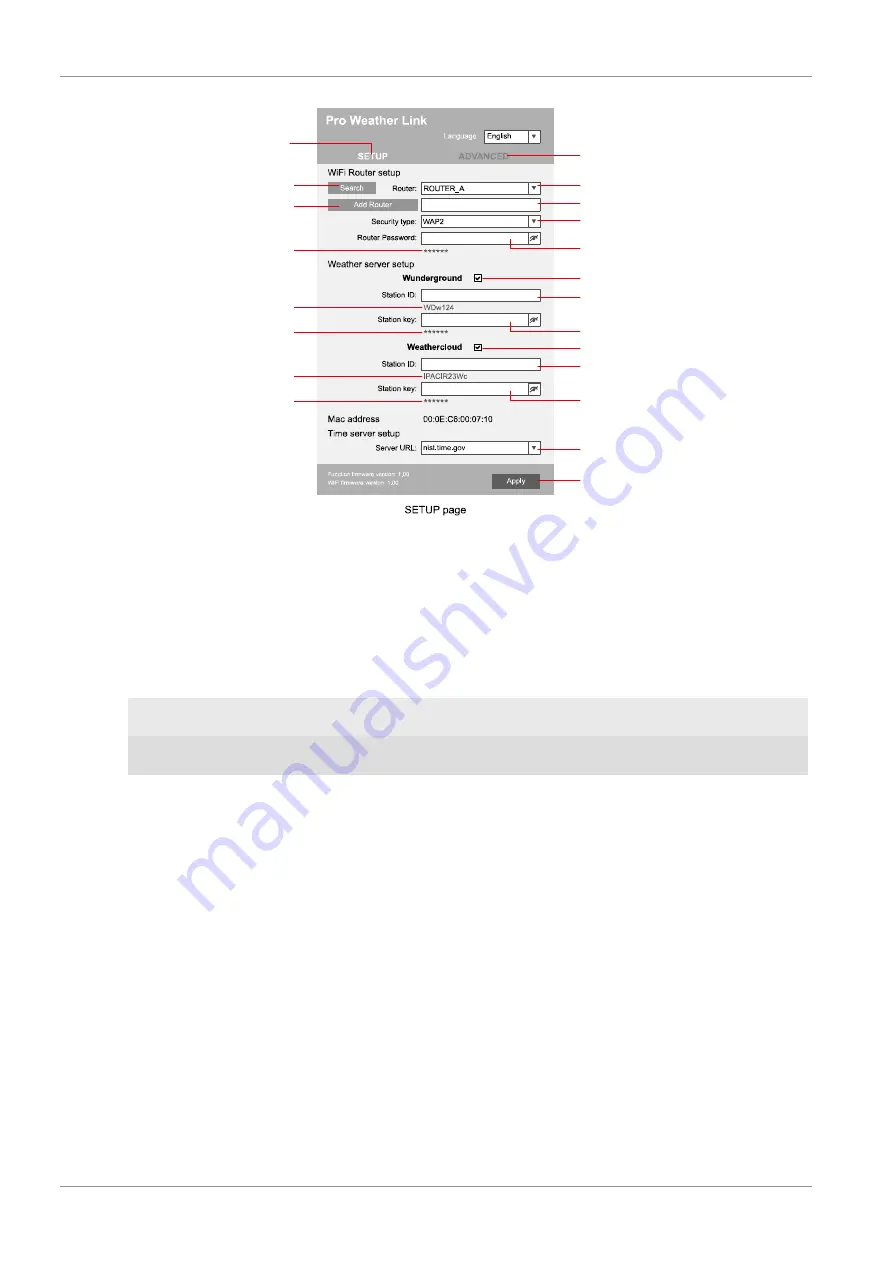
Select 'Add Router'

to add a router manually**

Select 'ADVANCED' 

to enter advanced settings menu

Select desired WI-FI router
If router is not listed, enter SSID manually
Select security type of the router (normally WAP2)

Enter password of the Router (leave field blank 

if no password has been assigned)

Check to comfirm upload to Weather underground*

Enter 'Station ID' registered at Wunderground*

Enter 'Station Key' registered at Wunderground*

Check to comfirm upload to Weathercloud*

Enter 'Station ID' registered at Weathercloud*

Enter 'Station Key' registered at Weathercloud*

Select time server

Click to confirm entries

Select 'SETUP'  

to enter settings menu

Select 'Search'

to search for a router

*Leave field blank if registration is not yet available and entries are to be made later.

**Manual setup requires additional router information (including e.g. IP address, SSID, etc)

Password record

(if a password was entered)

ID record

(if an ID was entered)

Key record

(if a key was entered)

ID record

(if an ID was entered)

Key record

(if a key was entered)

6. After completing the settings, the device will recognide the default WI-FI connection after each

restart.

7. In Access Point Mode, the WI-FI / SENSOR button can be pressed for 6 seconds to restore the

previous settings.

WI-FI-verbindingsstatus:

WI-FI symbol is shown in the

display

WI-FI symbol flashes in the dis-

play

AP symbol flashes in the display

Connection to the WI-FI router

successful

Connection to the WI-FI router

not stable or ongoing connection

Access Point Mode enabled

18 Automatische tijdinstelling

Once the power supply and internet connection is established, the time and date information (UTC

Coordinated Universal Time) is transmitted by the internet time server automatically.
If the reception is correct, date and time are set automatically and the reception icon 'SYNC' is display-

ed.
If the time / date information has not been received or is not received correctly, proceed as follows:
1. In countries / regions whose time done differs from the coordinated world time UTC, the time done

must be set manually (see chapter 'Set time done ') to show the correct time.

2. Press the REFRESH button on the base unit for about 2 seconds to re-initiate retrievement of the

Internet time information.

3. Check the W-LAN settings on the base unit for correctness and, if necessary, correct them so that

an Internet connection can be established (see chapter, Establishing a W-LAN connection).

19 Handmatige tijdinstelling

To set the time / date manually, first disable the reception of the time signal by pressing the RCC but-

ton for approx. 8 seconds.

Summary of Contents for WTW 5in1

Page 1: ...Weerstation Weather Center WTW 5in1 NL Gebruikershandleiding...

Page 2: ...e este producto en un idioma determinado Entonces visite nuestra p gina web utilizando el siguiente enlace c digo QR para ver las versioneAs disponibles IT Desidera ricevere informazioni esaustive su...

Page 3: ...n 9 13 Montage en installatie van de multifunctionele draadloee sensor 9 14 Signaaloverdracht 10 15 Een gebruikersaccount aanmaken voor Weather Underground oftioneel 10 16 Een gebruikersaccount voor w...

Page 4: ...an De in dede documentatie gebruikte termen en handelsnamen van de respectievelijke bedrijven dijn over het algemeen in Duitsland de Europese Unie en of andere landen goederen merken en of oc trooirec...

Page 5: ...0 9 24 23 18 21 Afb 1 All parts of the base station 1 ALARM SNOOZE button snoode function or interrupt alarm 2 Colour display 3 RAIN button display of various precipitati on values 4 BARO button displ...

Page 6: ...button change of atmosp heric pressure measurement unit 23 C F slider display change betw C and F 24 USB socket power supply 25 USB power adapter 6 Onderdelenoverdicht Multisensor 1 3 4 5 6 9 8 7 13...

Page 7: ...grepen 3 pcs of 1 5V AA type batteries outdoor sensor 1 pc of 3V CR2032 battery base station 8 Schermweergave 23 2 1 9 10 15 14 18 7 4 21 20 8 22 3 5 6 13 11 12 17 16 19 Afb 3 Screen display 1 Wind sp...

Page 8: ...device when exchanging the batteries If batteries are exchanged in only one of the devices i e the remote sensor the signal can t be received or can t be received correctly Note that the effective ra...

Page 9: ...partment Ensure that the battery polarity is correct 7 Replace the cover and retighten it with the screw 12 Rubber pads bevestigen Attach the supplied self adhesive rubber pads to the clamps as shown...

Page 10: ...racht The base station will automatically connect to the multi outdoor sensor and if available to other wire less sensors You can also press the Wi Fi SENSOR button to start a manual search for the re...

Page 11: ...de service niet worden gebruikt 17 Configuratie Instellen van een WI FI verbinding 1 If the base station has not yet been connected to a router it will switch to AP Access Point Mode mode after the fi...

Page 12: ...can be pressed for 6 seconds to restore the previous settings WI FI verbindingsstatus WI FI symbol is shown in the display WI FI symbol flashes in the dis play AP symbol flashes in the display Connec...

Page 13: ...rox 3 seconds to change to time setting mode The current value fore the time offset flashes 2 Press up or DOWN button to set the desired hour value 0 to 10 hours for the time offset 3 Finally press th...

Page 14: ...t het radioapparatuur met artikelnummer 7002585 voldoet aan de richtlijn 2014 53 EU De volledige tekst van de EU conformiteitsverklaring is beschikbaar op het vol gende internetadres www bresser de do...

Page 15: ......

Page 16: ...e mail e mail sav bresser fr T l phone 33 494 592 599 BRESSER France SARL P le d Activit s de Nicopolis 260 rue des Romarins 83170 Brignoles France Prix d un appel local depuis la France ou Belgique S...

Reviews: